


Introduction
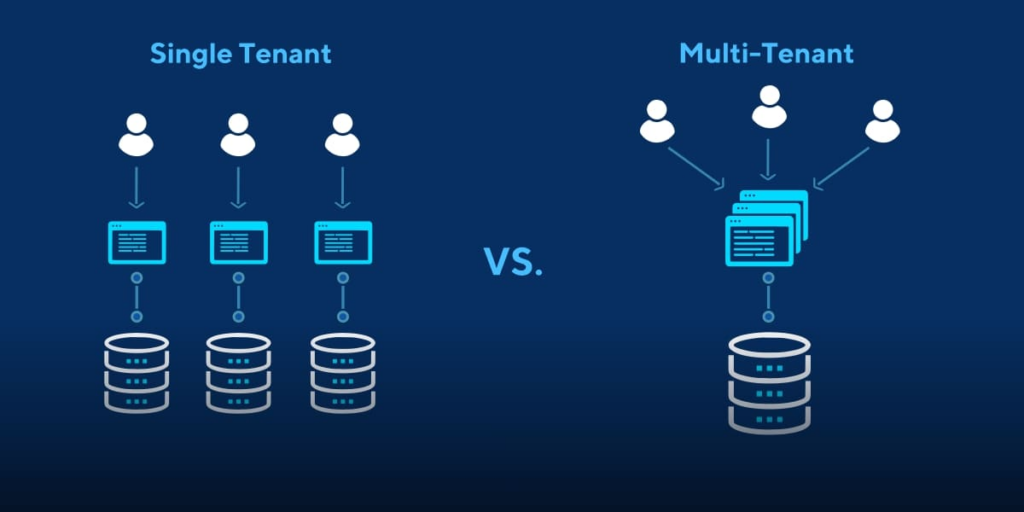
As organizations scale their Kubernetes infrastructure, managing multiple teams and workloads on a single cluster becomes complex. Multi-tenancy allows multiple tenants to share the same cluster resources while maintaining isolation, governance, and security. Capsule, an open-source Kubernetes operator, provides an effective solution for managing multi-tenancy in Kubernetes.
In this guide, we’ll walk through the process of setting up Capsule for multi-tenancy in Kubernetes, including real-world examples and best practices. By the end, you’ll have a working Capsule setup and a clear understanding of how to manage tenants and their associated namespaces.
Why Multi-Tenancy Matters in Kubernetes
Multi-tenancy enables:
- Resource Sharing – Optimizing infrastructure costs by allowing multiple teams to share a single Kubernetes cluster.
- Isolation and Governance – Ensuring that tenants are isolated from each other while enforcing security policies.
- Simplified Management – Centralized control over cluster resources, quotas, and security configurations.
However, multi-tenancy introduces challenges:
- Resource conflicts between tenants.
- Managing RBAC (Role-Based Access Control) at scale.
- Ensuring that tenants cannot interfere with each other’s resources.
Capsule addresses these challenges by grouping namespaces under a single tenant and enforcing isolation at the tenant level.
Step 1: Install Capsule Operator in Kubernetes
Prerequisites:
- A running Kubernetes cluster (v1.22 or higher)
kubectlandhelminstalled
Install Capsule using Helm:
helm repo add clastix https://clastix.github.io/charts
helm repo update
helm install capsule clastix/capsule --namespace capsule-system --create-namespace
Verify Installation:
kubectl get pods -n capsule-system
You should see something like:
NAME                         READY   STATUS    RESTARTS   AGE
capsule-controller-manager   1/1     Running   0          1m
Step 2: Create a Tenant Using Capsule
Capsule introduces the concept of a Tenant – a logical grouping of namespaces with defined resource policies.
Define a Tenant:
Create a tenant.yaml file:
apiVersion: capsule.clastix.io/v1beta1
kind: Tenant
metadata:
  name: example-tenant
spec:
  owners:
    - name: "team-a@example.com"
      kind: User
  namespaceQuota: 5
  networkPolicies:
    items:
      - name: "deny-all"
        spec:
          podSelector: {}
          policyTypes:
            - Ingress
            - Egress
Apply the Tenant:
kubectl apply -f tenant.yaml
Check the Tenant Status:
kubectl get tenants
Example output:
NAME            NAMESPACES   STATUS
example-tenant  0            Active
Step 3: Create Namespaces Under the Tenant
Capsule automatically associates namespaces with tenants based on labels.
Create a Namespace:
apiVersion: v1
kind: Namespace
metadata:
  name: team-a-dev
  labels:
    capsule.clastix.io/tenant: example-tenant
Apply the namespace:
kubectl apply -f namespace.yaml
Verify the Association:
kubectl get namespaces --show-labels
Output:
NAME           STATUS   AGE     LABELS
team-a-dev     Active   1m      capsule.clastix.io/tenant=example-tenant
Step 4: Set RBAC for the Tenant
Capsule allows you to define RBAC at the tenant level.
Create a Role and RoleBinding:
Start by creating a role.yaml file:
kind: Role
apiVersion: rbac.authorization.k8s.io/v1
metadata:
  namespace: team-a-dev
  name: tenant-admin
rules:
  - apiGroups: ["*"]
    resources: ["*"]
    verbs: ["*"]
Create a rolebinding.yaml file:
kind: RoleBinding
apiVersion: rbac.authorization.k8s.io/v1
metadata:
  namespace: team-a-dev
  name: tenant-admin-binding
subjects:
  - kind: User
    name: "team-a@example.com"
roleRef:
  kind: Role
  name: tenant-admin
  apiGroup: rbac.authorization.k8s.io
Apply the Role and RoleBinding:
kubectl apply -f role.yaml
kubectl apply -f rolebinding.yaml
Step 5: Configure Resource Quotas and Limits
You can restrict tenant resource usage with Capsule.
Example Quota:
Create a resourcequota.yaml file:
apiVersion: v1
kind: ResourceQuota
metadata:
  namespace: team-a-dev
  name: compute-resources
spec:
  hard:
    requests.cpu: "4"
    requests.memory: 8Gi
    limits.cpu: "8"
    limits.memory: 16Gi
Apply the quota:
kubectl apply -f resourcequota.yaml
Verify:
kubectl get resourcequotas -n team-a-dev
Output:
NAME              AGE   REQUESTS.CPU   REQUESTS.MEMORY   LIMITS.CPU   LIMITS.MEMORY
compute-resources  2m    4              8Gi               8           16Gi
Step 6: Enable Network Policies for Isolation
Capsule supports network isolation between tenants using NetworkPolicies.
Example Network Policy:
Create a networkpolicy.yaml file:
apiVersion: networking.k8s.io/v1
kind: NetworkPolicy
metadata:
  namespace: team-a-dev
  name: allow-http
spec:
  podSelector: {}
  ingress:
    - from:
        - namespaceSelector:
            matchLabels:
              capsule.clastix.io/tenant: example-tenant
      ports:
        - protocol: TCP
          port: 80
Apply the policy:
kubectl apply -f networkpolicy.yaml
Step 7: Monitor Capsule
You can monitor Capsule and tenant activity using kubectl logs:
kubectl logs -n capsule-system deployment/capsule-controller-manager
For detailed status of tenants:
kubectl describe tenant example-tenant
Real-World Application
Use Case: Multi-Tenant SaaS Platform
A SaaS company using Kubernetes to host customer environments can:
- Create a separate Capsule tenant for each customer.
- Assign namespaces to each tenant.
- Set CPU and memory quotas to prevent noisy neighbor problems.
- Apply network policies to prevent inter-tenant communication.
Use Case: Multi-Team Development
A large enterprise with multiple development teams can:
- Create a Capsule tenant for each team.
- Control resource consumption with quotas.
- Enforce access controls using RBAC.
Best Practices
- Use Capsule quotas to prevent overutilization.
- Apply NetworkPolicies for cross-tenant isolation.
- Automate tenant creation and quota assignment using GitOps.
- Monitor tenant activity using Prometheus and Grafana.
Conclusion
Capsule provides a robust solution for managing multi-tenancy in Kubernetes. By following this guide, you can isolate tenants, enforce resource quotas, and maintain secure communication between namespaces. Multi-tenancy with Capsule allows you to efficiently manage shared Kubernetes clusters, improving both security and performance.
That’s it for now. I hope this article gave you some useful insights on the topic. Please feel free to drop a comment, question or suggestion.