


APIs are the backbone of modern software. For years, REST has been the go-to approach to building APIs in Java with Spring Boot. However, as frontend needs evolve, especially in mobile and single-page app, its limitations become more visible. Consequently, this is where GraphQL steps in as a smarter alternative.
In this blog, we’ll walk through how GraphQL offers a smarter, more flexible way to build APIs. We will also see how Spring Boot makes adopting it straightforward.
Introduction
In simple terms, GraphQL is a query language for your API — not a library or a database. It acts as a middle layer between your frontend and backend. This setup allows the client to ask for exactly the data it needs.
With GraphQL, the frontend always talks to the GraphQL API, and the backend provides data through it. This decouples the two sides. The frontend doesn’t need to know how the backend works. The backend doesn’t need to worry about how the data will be used. Instead, the GraphQL API acts as a contract, defining what data can be requested and how it should be structured.
Rest VS GraphQL
Modern applications demand speed, flexibility, and efficiency. Traditional REST APIs often struggle to deliver on these needs. REST was designed around exposing resources through dedicated endpoints. This works well for simple use cases. But as applications grow more dynamic and data-hungry, the limitations of REST become clear.
The Problem with REST
In REST, each endpoint returns a fixed data structure. This means:
- Clients often get too much or too little data.
- To fetch related resources, multiple API calls are needed.
- The server decides what the client receives, not the other way around.
As a result, REST can lead to inefficient communication between the frontend and backend, especially in mobile or low-bandwidth environments.
How GraphQL Solves This
GraphQL flips the approach. Instead of relying on multiple endpoints, GraphQL provides a single endpoint where clients can specify exactly what data they need.
Key benefits include:
- Precise data fetching: No over-fetching or under-fetching.
- Single query, multiple resources: Fetch related data in one go.
- Client-driven responses: The client defines the shape of the response.
- Schema-based: The API is strongly typed and self-documented through a schema.
Key Steps to Use GraphQL with Spring Boot
Step 1: Project Set up
In this guide, we’ll build a comprehensive Inventory Management API. Our application will manage inventory items stored in a MySQL database and provide real-time updates through GraphQL subscriptions over WebSockets.
To begin building this real-time inventory API, we’ll need to add the following dependencies to our Spring Boot project:
- Lombok → reduces boilerplate code by generating getters, setters, and constructors.
- Spring Data JPA → simplifies database access and repository management.
- MySQL Driver → connects your application to a MySQL database.
- WebSocket → required for GraphQL subscriptions over a persistent connection.
- Spring Reactive Web (WebFlux) → enables reactive programming and real-time subscriptions with
FluxandMono. - Spring for GraphQL → provides GraphQL starter and annotations like
@QueryMapping,@MutationMapping, and@SubscriptionMapping.
After setting up dependencies, create your Entity, Repository, and Service classes. These will form the foundation for working with your data before wiring them into GraphQL resolvers.
Step 2: Define Schema
Once the dependency is in place, the next step is to define the schema., which acts as the blueprint of your API. It defines the types of data available, showing how these types relate to each other, and specifying what operations clients can execute. It’s important to note that a GraphQL schema is not the same as a database schema. It is completely independent of your database.
The schema consists of types and their fields, and acts as a strict contract between the frontend and backend. It ensures that all incoming requests are valid and that responses follow a well-defined structure. This helps keep consistency, catch errors early, and improve developer experience across the stack.
GraphQL schema: Inventory API Example
If you had selected the Spring for GraphQL dependency while generating your project, it would have automatically created a graphql folder. It would appear inside src/main/resources. If not, you’ll need to create the folder manually and then add a file with the .graphqls extension inside it. This is where you’ll define your GraphQL schema.
Custom Type
We can represent the structure of the inventory item in our GraphQL schema using a custom type.
- For each type, we can add fields with different types related to the
InventoryItem. - GraphQL provides built-in scalar types like
String,Int,Float,Boolean, andID. - But we can also define custom nested types. For example, in type:
InventoryItem, we can have a field SupplierInfo. This field is also a custom type having information about the supplier. It includes details like name, contact, email, phone, and the address.
type InventoryItem {
  id: String
  name: String
  category: String
  supplier: String
  costPrice: Float
  sellingPrice: Float
  quantity: Int
}
Query Type
This type is used to define read-only operations — i.e., how clients fetch data.
getInventoryItemsreturns a list of all inventory items.getInventoryItemByIdwhich fetches a single item by itsid, which is passed as an argument.
type Query {
  getInventoryItems: [InventoryItem]
  getInventoryItemById(id: String): InventoryItem
}
Mutation Type
This type defines write operations, such as creating, updating, or deleting data.
- Fields marked with
!are required. - The mutation expects data from the frontend. It passes the data to the backend to perform an action. This action could be storing the item in a database.
- You can also define custom
inputtypes to cleanly structure the data coming from the frontend.
type Mutation {
  addInventoryItem(
    id: String!,
    name: String!,
    category: String!,
    supplier: String!,
    costPrice: Float!,
    sellingPrice: Float!,
    quantity: Int!
  ): InventoryItem
}
Subscription Type
This type is used for real-time updates. It allows clients to listen for changes on specific data.
- Whenever a relevant change happens (like a new item added), subscribed clients receive the update automatically.
type Subscription{
  inventoryItem: InventoryItem
}
Step 3: Implement Resolvers
After defining the schema, the next task is to implement resolvers, which provide the actual logic behind the schema fields. When a client sends a query, the GraphQL server validates it against the schema and determines which resolvers to call. These functions are then executed to fetch, process, and return the requested data. In Java application, resolvers are typically written inside a @Controller-annotated class — similar to how we write REST endpoints.
Spring GraphQL provides specific annotations to mark resolver methods:
@QueryMapping→ for handling queries@MutationMapping→ for handling mutations@SchemaMapping→ for field-level or nested resolvers
Spring Boot Resolver: Inventory API Example
Query Resolver
For our defined query type: getInventoryItems , we can write the resolver using the @QueryMapping annotation.
 @QueryMapping
    public List<InventoryItem> getInventoryItems() {
        return service.getAllItems();
    }
Mutation Resolver
For our defined mutation type: addInventoryItem , we can write the resolver using the @MutationMapping annotation. To add a new inventory item and publish it to subscribers, so that they can get updates.
 @MutationMapping
    public InventoryItem addInventoryItem(@Argument String id,
                                          @Argument String name,
                                          @Argument String category,
                                          @Argument String supplier,
                                          @Argument double costPrice,
                                          @Argument double sellingPrice,
                                          @Argument int quantity) {
        InventoryItem item = new InventoryItem(id, name, category, supplier, costPrice, sellingPrice, quantity);
        service.saveItem(item);
        return item;
    }
Subscription Resolver
We have a defined subscription type on the field: inventoryItem. We can write the resolver using the @SubscriptionMapping annotation. This approach gets the real-time updates of inventory items. They allow clients to listen for changes on specific data and receive updates automatically whenever relevant changes occur.
 @SubscriptionMapping
    public Flux<InventoryItem> inventoryItem(){
        return inventoryPublisher.getInventoryItems();
    }
Inventory Publisher
In a Spring Boot application, you can implement subscriptions using reactive programming. A common approach is to create a component like InventoryPublisher.
@Component
public class InventoryPublisher {
    private static final Logger logger = LoggerFactory.getLogger(InventoryPublisher.class);
    private final Sinks.Many<InventoryItem> sink;

    // Constructor initializes the Sinks.Many processor for multicast emission
    public InventoryPublisher() {
        this.sink = Sinks.many().multicast().onBackpressureBuffer();
        logger.info("InventoryPublisher initialized with a multicast sink.");
    }

    // Adds an inventory item to the sink.
    public void addInventory(InventoryItem item) {
        logger.info("Adding inventory item: {}", item);
        Sinks.EmitResult result = sink.tryEmitNext(item);
        if (result.isSuccess()) {
            logger.info("Successfully emitted inventory item: {}", item);
        } else {
            logger.error("Failed to emit inventory item: {}. EmitResult: {}", item, result);
        }
    }

    // Returns a Flux that allows subscribers to receive inventory items.
    public Flux<InventoryItem> getInventoryItems() {
        logger.info("Returning Flux for inventory items.");
        return sink.asFlux();
    }
}
Reactive Flow Explained
- Sink as the Source
TheSinks.Many<InventoryItem>acts as the event source. It can continuously emit multiple inventory items over time. - Multicast with Backpressure
By usingSinks.many().multicast().onBackpressureBuffer(), we ensure that:- Every active subscriber receives the events.
- If a subscriber is slow, new events are buffered instead of dropped.
- Emitting Events
sink.tryEmitNext(item)pushes a new inventory item into the stream. If successful, all subscribers immediately receive the update. - Flux for Subscribers
sink.asFlux()exposes these events as a Flux — a reactive stream that any client can subscribe to for real-time inventory updates.
Step 4: Execute Query
With the schema and resolvers in place, the final step is to execute queries and interact with your GraphQL API. REST requires multiple endpoints. In contrast, GraphQL uses a single endpoint. The client can clearly describe the data it needs.
GraphQL Query: Inventory API Example
We will be executing the GraphQL queries using Postman:
- Click on create from my workspace section.
- Select the GraphQL option.
- Enter the GraphQL endpoint URL:
http://localhost:8080/graphql. - Under the
Schematab, you can import the GraphQL schema file located atsrc/main/resources/graphql/inventory.graphqlsin the project directory to get auto-completion and documentation support. - Under the
Querytab, you can see all the methods imported from the schema. These methods are listed under the related operation, such as query, mutation, or subscription.
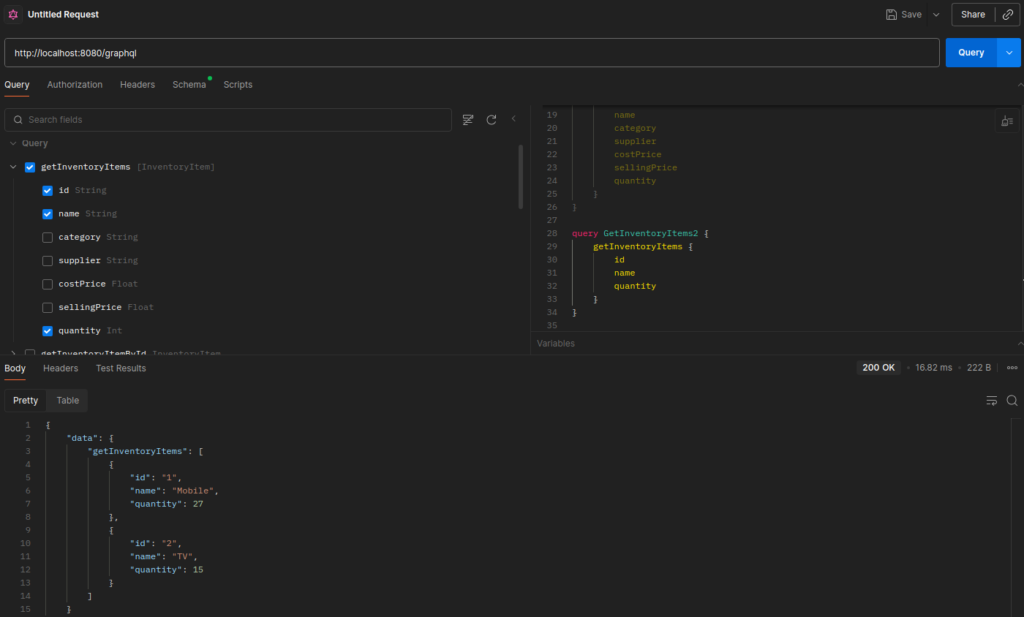
Query Operation
A query is the most common operation in GraphQL. It’s used to fetch data from the server—similar to a GET request in REST APIs. Select the schema method: getInventoryItems and the fields you want to return in the response, then execute.
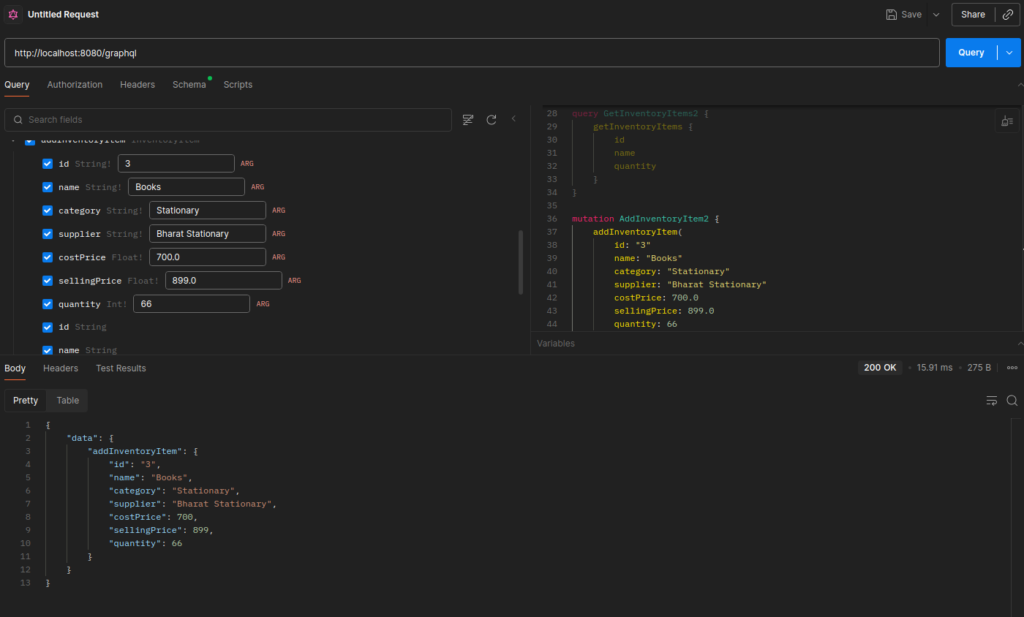
Mutation Operation
While queries are for reading, mutations are used when you want to change data—like adding, updating, or deleting records. Select the schema method: addInventoryItem. Provide the values of the required arguments. Then, select the fields you want to return in the response. Finally, execute the method.
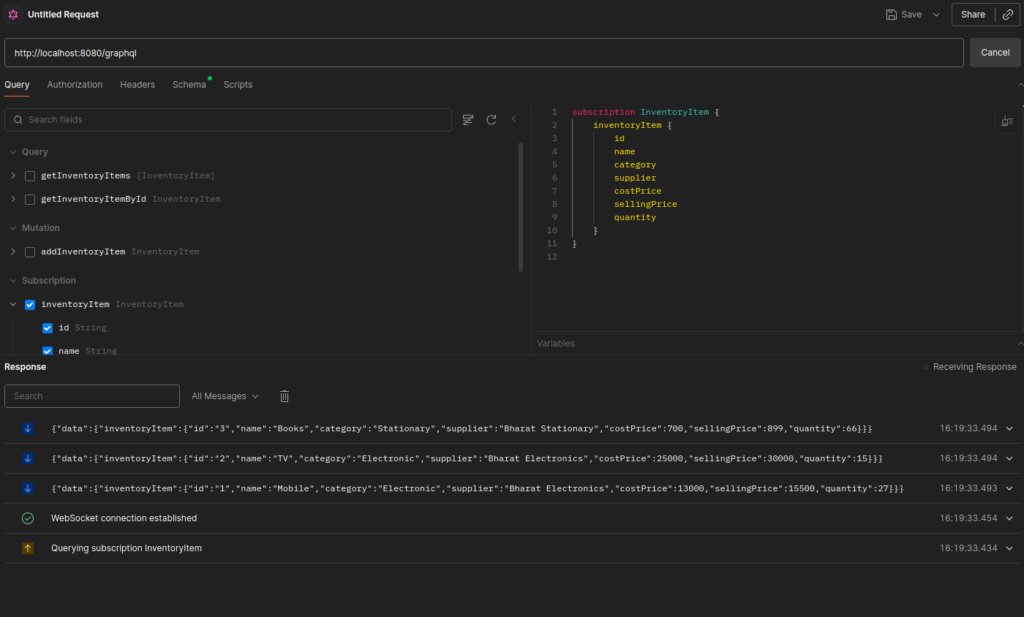
Subscription Operation
Subscriptions work over a WebSocket connection, allowing the server to push updates to the client automatically. For this, create a new request and just observe the changes on adding new inventory items.
Conclusion
We saw how to build a GraphQL API with Spring Boot—starting from project setup, schema, and resolvers, to running queries, mutations, and subscriptions. Using Spring for GraphQL with WebFlux and WebSocket, we added real-time updates with reactive programming.
Code is available here: 👉 GraphQL Inventory API Demo