


1. Introduction
The mobile app development landscape is evolving rapidly, with companies demanding cross-platform solutions that can run seamlessly on both iOS and Android. React Native has long been a favorite for building cross-platform apps using JavaScript, but setting it up and configuring native builds can be time-consuming and challenging for beginners.
This is where Expo Framework steps in. Expo is designed to make mobile development faster and more accessible by offering a streamlined toolchain and a set of prebuilt components and APIs. With Expo, developers can create fully functional apps without needing to touch native code in the early stages. From prototyping to production, Expo reduces friction and accelerates development cycles.
2. What is Expo Framework?
Expo is an open-source platform built on top of React Native, providing an ecosystem of tools, libraries, and cloud services. It is often referred to as a “wrapper” around React Native that eliminates the need for complex configurations.
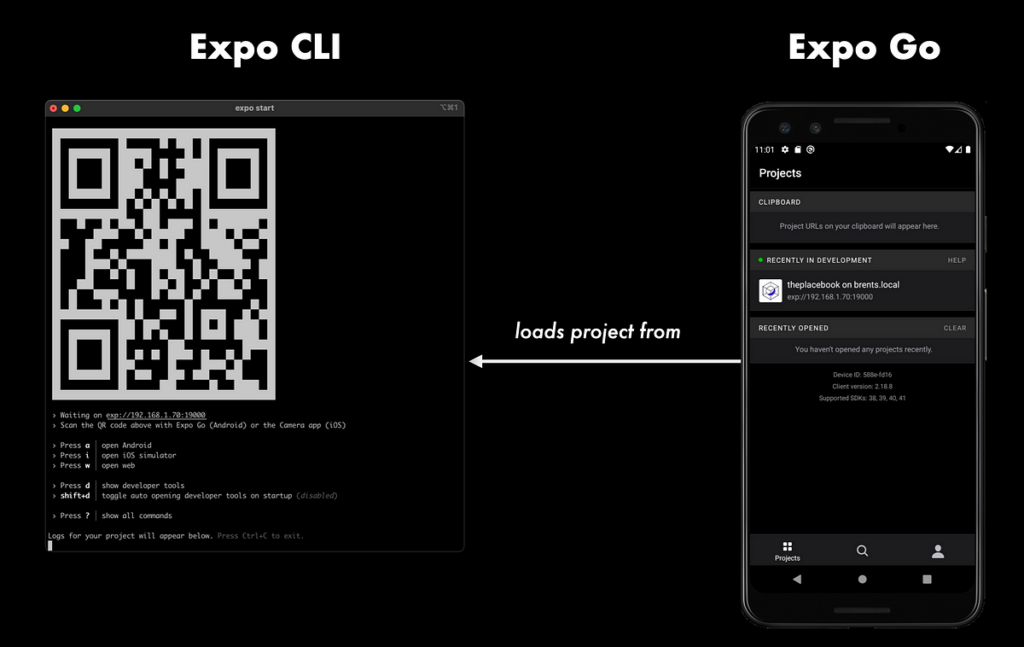
With Expo, you can create apps using JavaScript or TypeScript, and it takes care of the tedious parts of native configuration such as setting up Xcode for iOS or Gradle for Android. It also includes Expo Go, a mobile client that allows you to preview your app on real devices instantly, without building native binaries.
Unlike the traditional React Native workflow, which requires a lot of manual setup, Expo’s managed workflow allows developers to start coding immediately, making it particularly attractive for startups, indie developers, and teams that value rapid prototyping.
3. Why Use Expo?
Developers choose Expo for many reasons:
- Simplicity: No need to install Android Studio or Xcode just to run a test build.
- Cross-platform development: Write once, run on both iOS and Android.
- Prebuilt APIs: Expo provides ready-to-use APIs for common needs, such as handling cameras, push notifications, file storage, or device sensors.
- Faster prototyping: With Expo Go, you can see real-time updates on your device just by scanning a QR code.
- OTA (Over-the-Air) Updates: Deploy app updates instantly without going through the lengthy app store submission process.
- Strong Community Support: Expo is backed by a thriving community and maintained by a dedicated team.
4. Key Features of Expo

- Expo Go:
The Expo Go app allows you to run your project instantly without building a separate APK or IPA file. This is perfect for testing apps on real devices quickly. - Managed and Bare Workflows:
- Managed Workflow: Expo handles all native configurations automatically.
- Bare Workflow: Developers have full access to native code but can still use Expo’s libraries.
- OTA Updates:
Push small updates or bug fixes directly to users’ devices without app store delays. - Built-in APIs:
Expo includes APIs for camera access, image pickers, location tracking, haptics, and more—saving time that would otherwise be spent installing and linking third-party packages. - EAS (Expo Application Services):
A set of cloud services (Build, Update, and Submit) designed to handle production needs such as building and publishing apps. - Snack – Online Editor:
A browser-based React Native playground where developers can experiment with code and share projects instantly.
5. Expo vs. React Native CLI
Although Expo is built on React Native, the experience is quite different:
- Ease of Setup:
Expo requires almost zero setup. In contrast, React Native CLI needs manual configuration of native projects, which can be daunting for beginners. - Native Modules:
React Native CLI gives complete freedom to use native modules and custom native code. Expo’s managed workflow is limited in this aspect, but it can be ejected if you need custom native functionality. - Development Speed:
With features like Expo Go and Hot Reloading, Expo drastically reduces development time compared to traditional React Native projects. - Use Cases:
- Use Expo for fast prototyping, MVPs, or small-to-medium-sized apps.
- Use React Native CLI for complex, large-scale apps that require deep native integrations.
6. Getting Started with Expo
6.1 Installing Expo
Before you start, make sure you have Node.js (LTS version) installed on your system. Install the Expo CLI globally using npm or yarn:
npm install --global expo-cli
6.2 Creating Your First Project
Once installed, you can create a new project using the following command:
expo init MyFirstApp
cd MyFirstApp
npm start
You will be asked to select a template (e.g., blank or with TypeScript support). Choose the template that fits your needs.
6.3 Running on Devices and Simulators
- Install the Expo Go app from the App Store or Google Play.
- Run
npm start(orexpo start) in your project folder. - Scan the QR code that appears in the terminal or browser to open the app directly on your device.
- For emulators, use: bashCopyEdit
expo start --ios expo start --android
7. Popular Expo Tools and Services
- EAS Build: A cloud-based service for building production-ready binaries without setting up native environments.
- EAS Submit: Lets you upload your builds directly to the App Store and Google Play.
- EAS Update: Send instant updates to users via OTA, without waiting for store approvals.
- Expo Router: A new routing system inspired by Next.js for organizing navigation.
- Expo Prebuild: Helps convert managed projects into bare React Native projects with minimal effort.
8. Advantages and Limitations of Expo
Advantages:
- Ideal for beginners with minimal setup.
- Built-in support for a wide range of APIs.
- OTA updates simplify bug fixes and feature rollouts.
- Great documentation and large community.
- EAS cloud services streamline production builds.
Limitations:
- Larger app sizes compared to custom native apps.
- Limited support for third-party native modules in managed workflow.
- Advanced use cases might require ejecting, which can complicate the workflow.
9. Best Practices for Using Expo
- Keep SDK Versions Updated: Expo releases regular updates with new features and performance improvements.
- Use TypeScript: Improves maintainability and reduces runtime errors.
- Leverage EAS Services: Use EAS Build and OTA Updates for seamless deployment.
- Optimize Assets: Compress and properly scale images to avoid bloated app sizes.
- Plan for Ejection if Needed: For complex native features, be prepared to eject and configure native modules.
10. Conclusion
Expo Framework has changed how developers approach React Native development by removing many of the pain points associated with mobile app setup and deployment. Its combination of managed workflows, rich APIs, and powerful cloud services make it the perfect choice for developers looking to build high-quality cross-platform apps quickly.
If you’re new to mobile development or want to accelerate your workflow, Expo is an excellent starting point. As your project grows, you can transition from a managed to a bare workflow without losing the benefits of the Expo ecosystem.