


If you are using Postman for manual testing or scripting test flows with pre-request scripts and JavaScript, here’s some good news: there’s a low-code way to do it now. It’s called Postman Flows, and it lets you create visual API workflows without writing code.
What is Postman Flow?
Postman Flows is a newer tool built into Postman. In simple terms, it gives you a drag-and-drop canvas where you can connect different blocks to build out a flow of actions.
Before this, if you wanted to run a series of API requests, especially if one response needed to feed into the next, you have to write JavaScript. Not fun if you’re not into coding.
But now, with Flows, you can chain requests together visually, without writing a single line of code. That’s super helpful for folks like QAs, testers, or anyone who wants to build API workflows but isn’t comfortable with scripting. Compared to Collections, Flows give you more flexibility. You can run different paths at the same time, hook up multiple collections into one flow, and even build something like a mini ecosystem where all your requests and data play nicely together. It just saves time and honestly, it’s kind of fun to use.
When to Use Flows
Flows are used when:
- You’re dealing with multi-step workflows (e.g., login → fetch token → use token → create resource).
- You want quick visibility into how your API calls interact.
- You’re testing APIs that require dynamic chaining, conditional logic, or waiting between steps.
- You’re demoing workflows or onboarding team members because visuals > code walls.
In addition, not every test needs a flow, but when it does, it saves you time and makes the logic easier to explain to both developers and stakeholders.
Demo: Getting Started with Postman Flows
Now, it’s time to build a basic but practical scenario to show how easy and useful Flows can be.
1. Setting Up Your First Flow
To create your first flow:
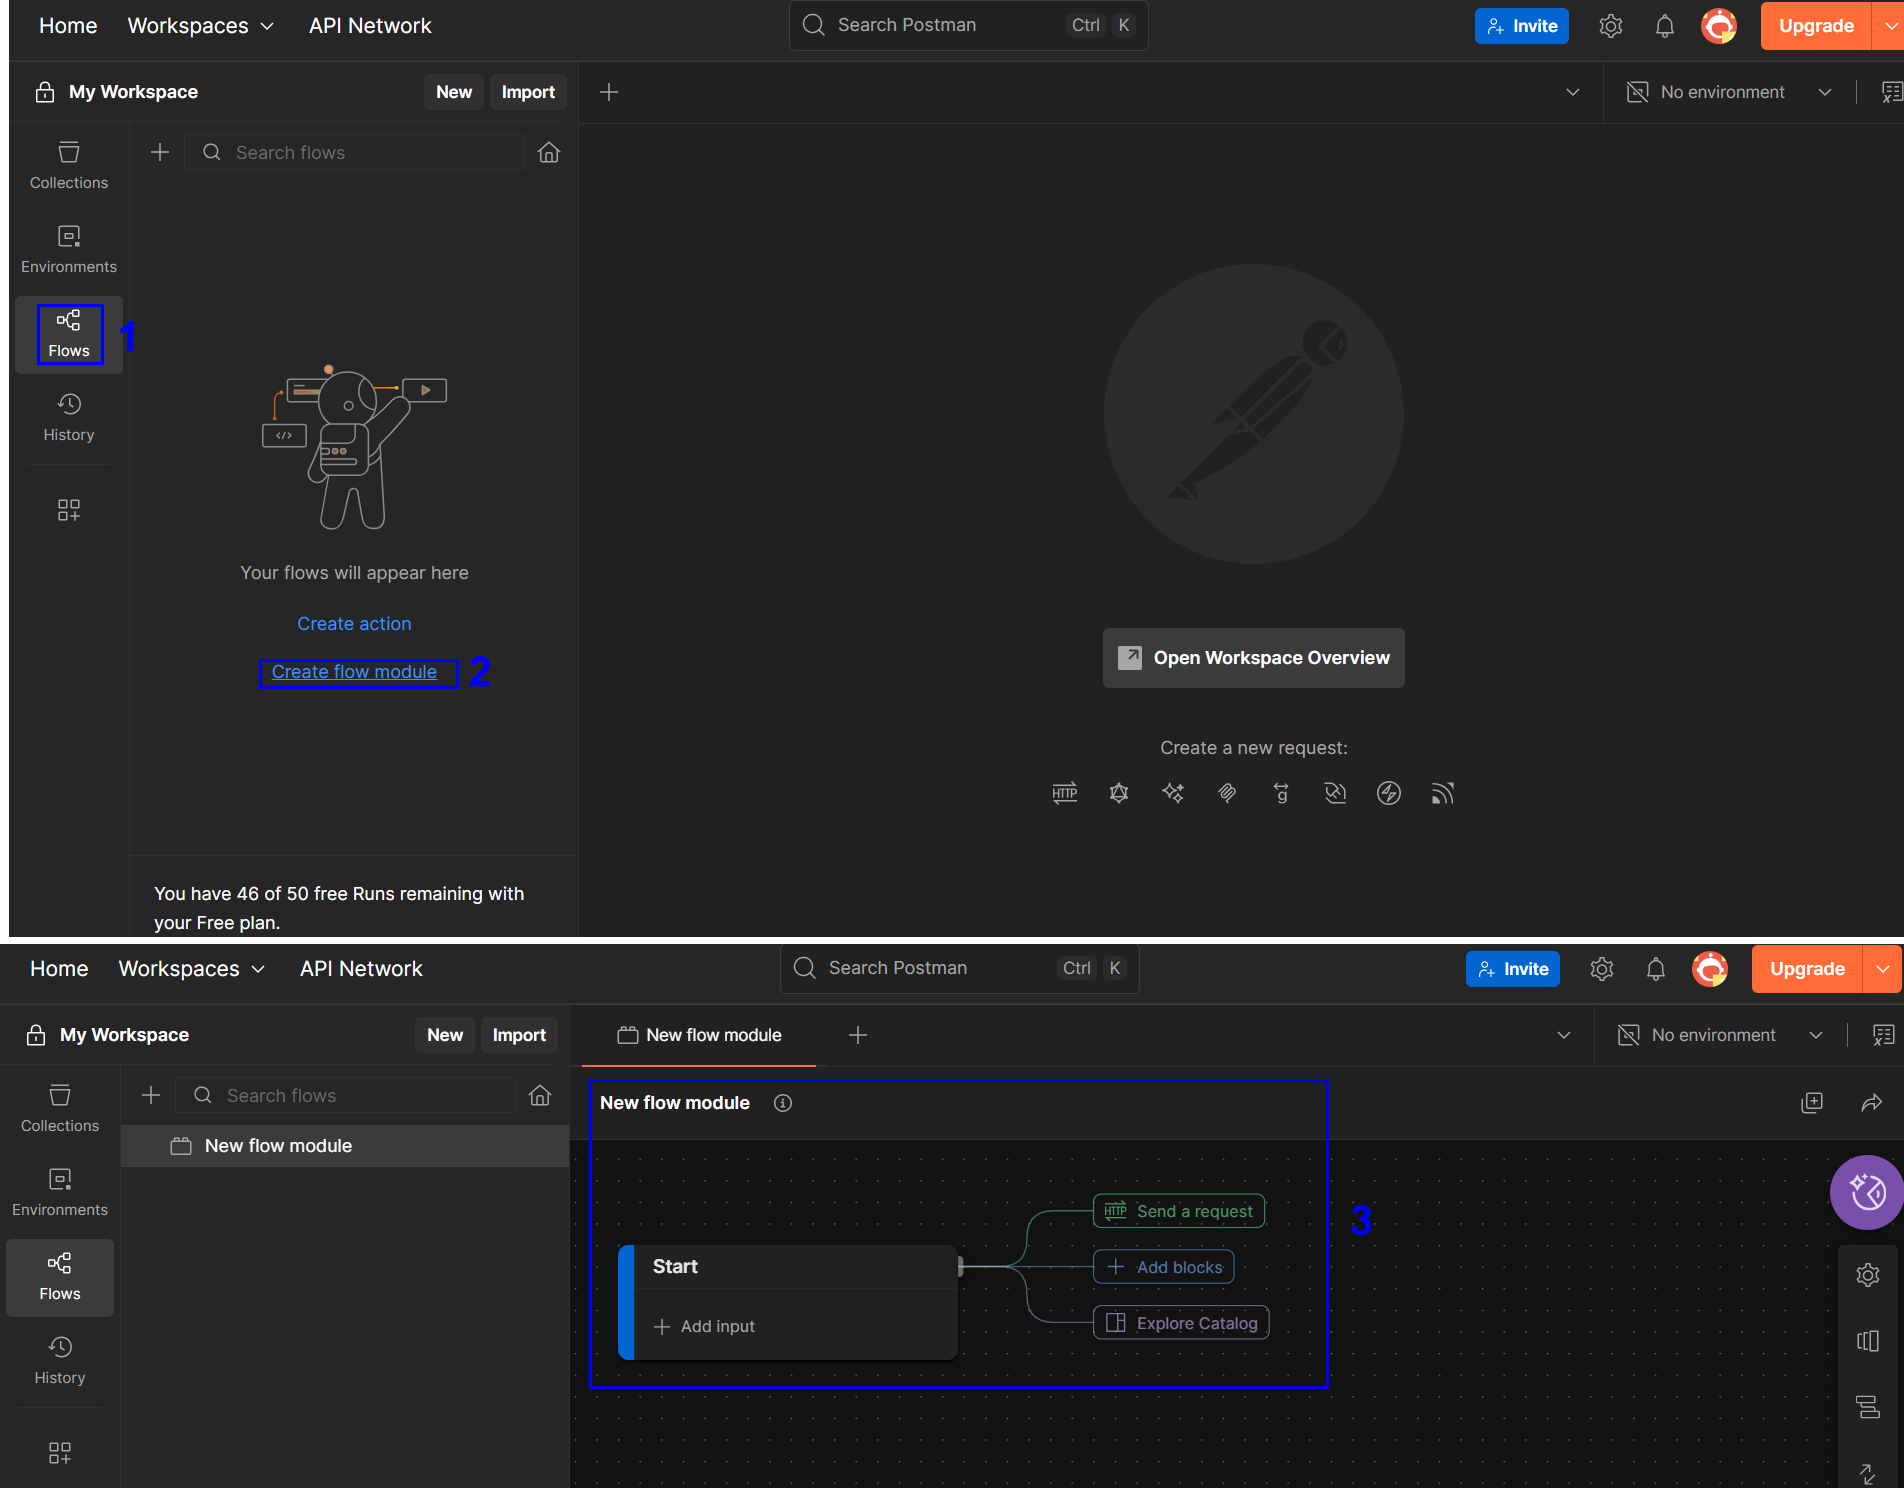
- Select Flows from the left hand horizontal menu.
- Click on “Create flow module” to view the canvas and give it a name. You’ll be greeted with a blank canvas with the Start block where you can start building your workflow.
Blocks:
To add an API request to your flow, drag in a “Request” block, either “Send a request” or “HTTP Request” from the block popup. Then configure it with your API details, like the method: GET, POST, PUT, DELETE, URL, headers, and body.
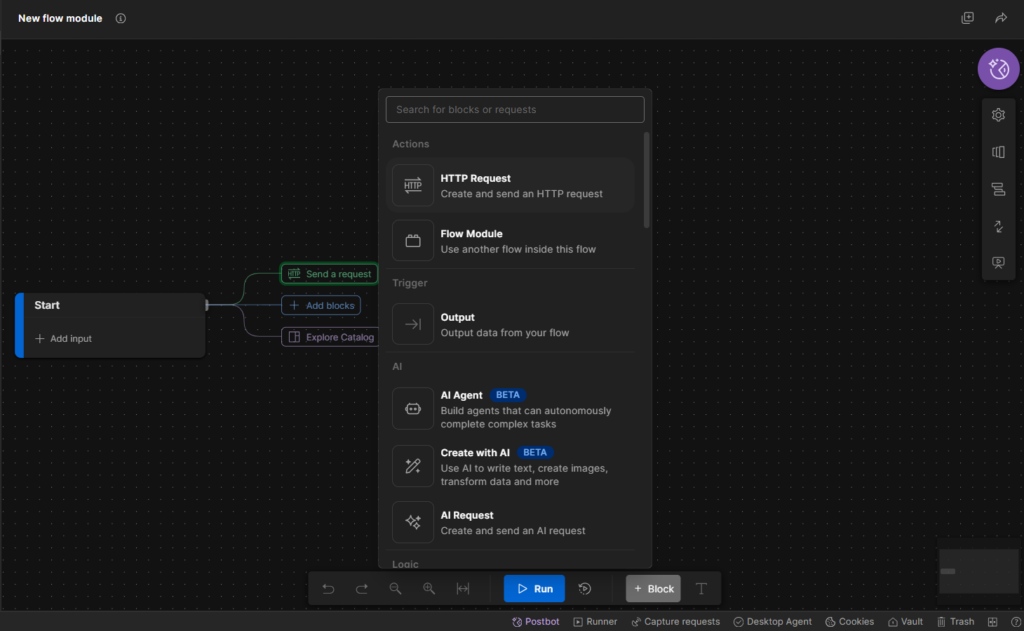
Besides, there are some other blocks:
- Add a Delay block if you want to simulate wait time between calls.
- Use a Set Variable block to store response data.
- Chain another Request block that uses the stored variable.
- Add a Test block to assert conditions on the response.
Chaining Requests:
One of the great things about Postman Flows is that you can connect multiple requests together. For example, let’s say you first call an API to get a list of users, then you want to pull more details for each user from another endpoint.
To do that, just drag another Request block onto the canvas and connect it to the first one. This way, the second request will only run after the first one finishes. Super useful when your requests depend on each other.
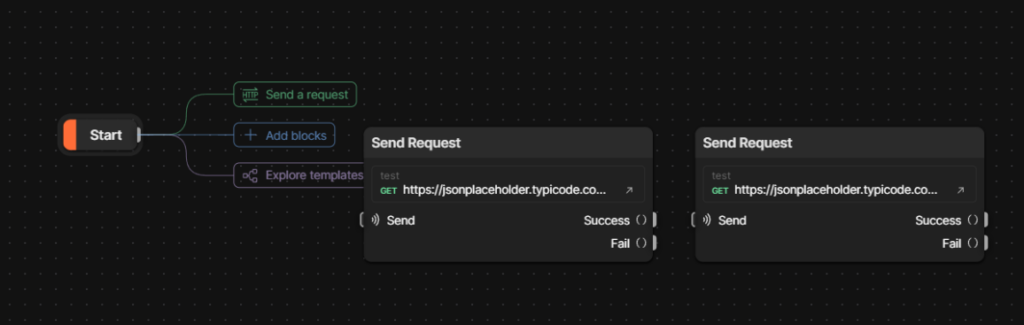
Wow! You’ve just built a mini automation suite without writing a single line of code.
2. Scenario: A User Validation Workflow
Let me show you how to build a practical Flow that validates user registrations different systems. This is something we use regularly in our testing work, but usually by sending one request at a time. Now we can connect them all in one go.
Scenario:
We need to verify that when a user registers:
- System created a user in our main database
- System sent a welcome email
- The user appears in our other systems
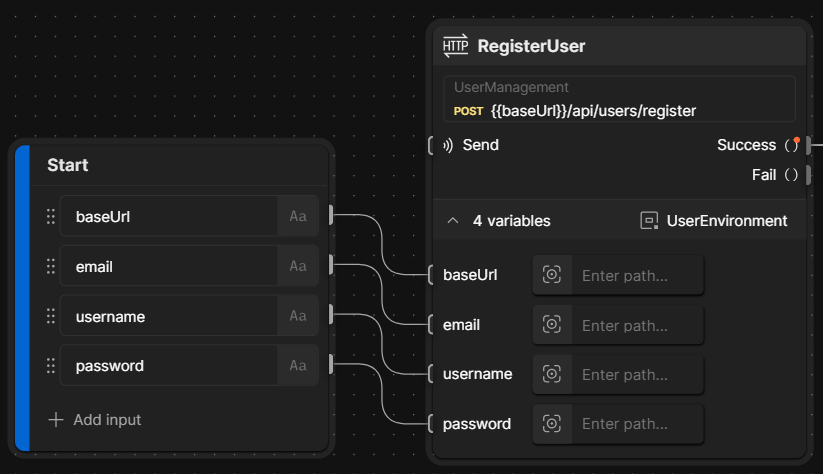
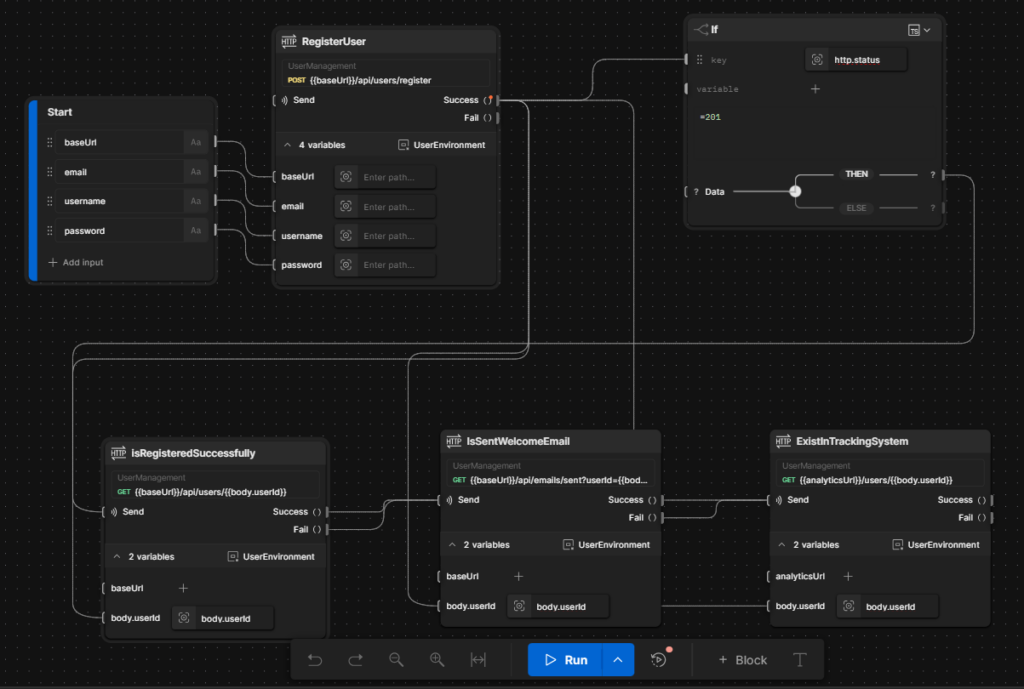
Step 1: Set up the Start Block
- Click “Create Flow”
- In the Start block, add these variables: baseUrl, email, username, password
- Enter data to these ones via Scenarios

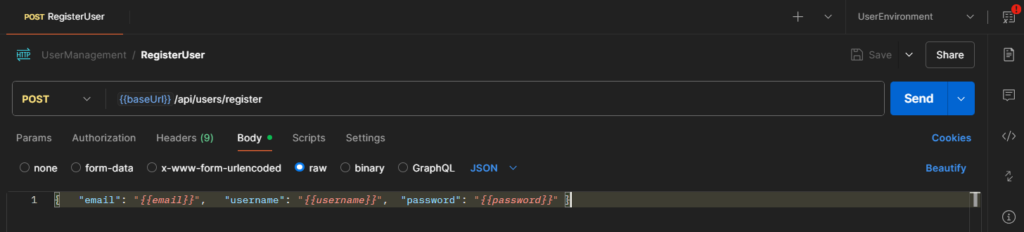
Step 2: Add User Registration Request
- Drag a “Send Request” block onto the canvas
- Connect it to the Start block
- Configure the request:
Method: POST
URL: {{baseUrl}}/api/users/register
Body (JSON):
{ “email”: “{{email}}”, “username”: “{{username}}”, “password”: “{{password}}” }
4. Configure the “Send Request” called ‘RegisterUser’ and drag lines from Start -> RegisterUser according to variables
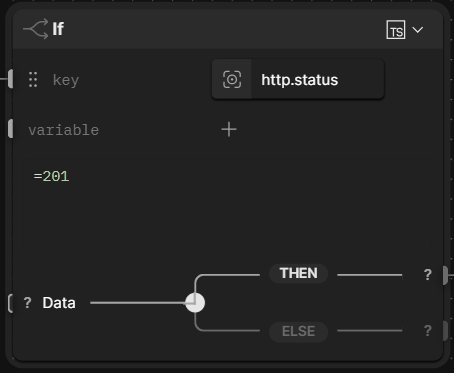
Step 3: Add Conditional Logic
- Add an “If” block after the “RegistrationUser” block
- Set condition: http.status=201
- This checks if registration was successful
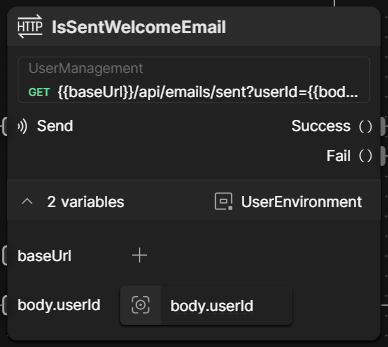
Step 4: Check if the user is stored successfully in database
- Add another “Send Request” block called ‘isRegisteredSuccessfully” and connect from the “True” branch
- Configure it to check if user exists:
Method: GET
URL: {{baseUrl}}/api/users/{{body.userId}}
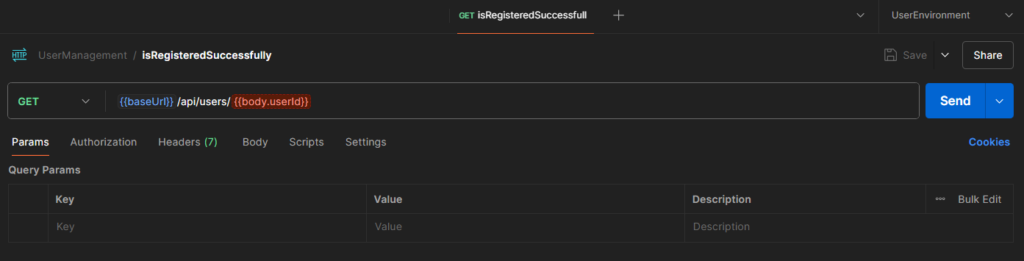
3. Configure for ‘isRegisteredSuccessfully” block:
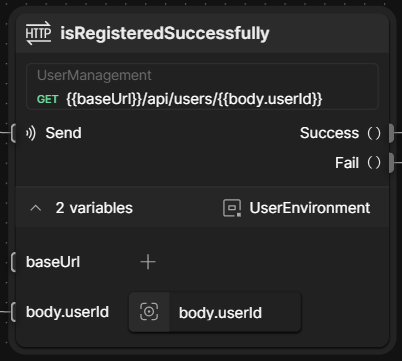
4. Click and drag from the success port of “RegistrationUser” block and drop on the input port of “body.userId” of ‘isRegisteredSuccessfully” block. It means that output of the previous request will be input of the next request.
Step 5: Check Welcome Email
- Add a third “Send Request” block called “IsSentWelcomeEmail” and connect from Success or Fail port of ‘isRegisteredSuccessfully” block (in Part 2, we will handle for each case in detail)
- Configure it to verify email was sent:
Method: GET
URL: {{baseUrl}}/api/emails/sent?userId={{body.userId}}
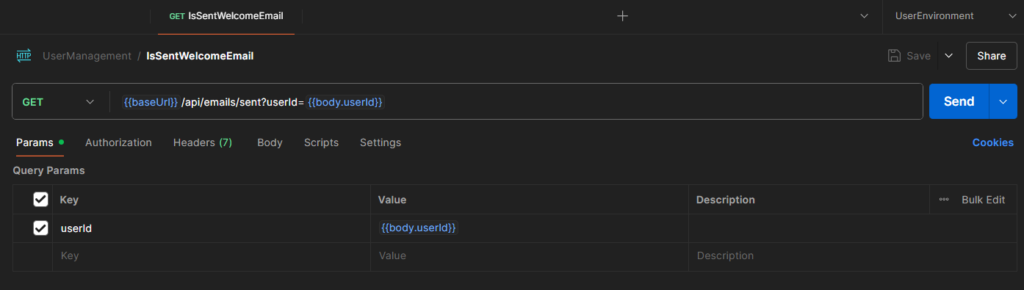
Configure for ‘IsSentWelcomeEmail” block:
4. Click and drag from the success port of “RegistrationUser” block and drop on the input port of “body.userId” of ‘IsSentWelcomeEmail” block. It means that output of the previous request will be input of the next request.
Step 6: Check if existing in other system
- Add a third “Send Request” block called “ExistInTrackingSystem” and connect from Success or Fail port of ‘IsSentWelcomeEmail” block (in Part 2, we will handle for each case in detail)
- Check other system:
Method: GET
URL: {{analyticsUrl}}/api/users/{{$response.body.userId}}
Configure for ‘ExistInTrackingSystem” block:
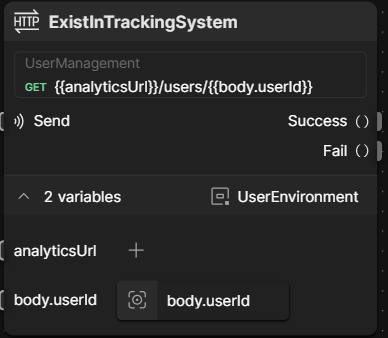
4. Click and drag from the success port of “RegistrationUser” block and drop on the input port of “body.userId” of ‘ExistInTrackingSystem” block. It means that output of the previous request will be input of the next request.
3. Running the Flow:
- Click the “Run” button in the top-right
- Watch as each block executes in sequence
- Check the output to see your validation results
The entire flow looks like:
Conclusion
Postman Flows isn’t here to replace your usual automation scripts. It’s more like a helpful sidekick that makes things quicker and easier.
Sometimes, you just want to test your logic without jumping into full-on coding mode. So, that’s where Flows comes in. It gives you a clear, visual way to work through your API logic, no context switching, no overthinking. Just drag, connect, and see it run. Simple as that.