


GitHub Copilot agents use AI to help developers by offering code suggestions and handling repetitive tasks inside their coding workspace. In addition to the built-in agent, it’s easy to create your own agent, letting you customize it to suit your needs. In this article, let’s explore how to create an agent effectively.
1.How to create Github Copilot agent.
1.1 Pre-requisite
- Install VS Code
- Install Github Copilot extension
- Login Github Copilot account
1.2 Steps to create Github Copilot agent
-Open your project
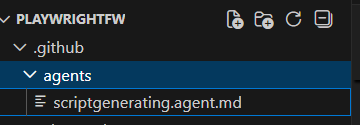
-In the root directory, create the .github folder
-In the new created folder, create agents folder
-Create a file with agent.md extension. Eg: scriptgenerating.agent.md
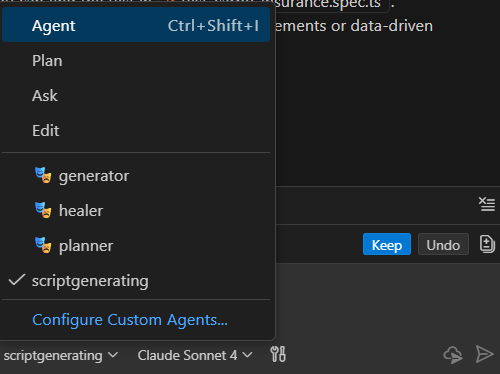
-Check the agent appear in the chat mode
1.3 Agent file structure
The agent file is where we outline the agent’s purpose, its workflow, and the tools it will utilize.
Here’s the sample of agent file.
# Script Generating Agent
description: This agent is designed to automate the generation of Playwright scripts for end-to-end testing, following the project conventions and structure described in `copilot-instructions.md`.
tools:[ 'search/fileSearch', 'search/textSearch', 'search/listDirectory', 'search/readFile', 'playwright-test/browser_click', 'playwright-test/browser_drag', 'playwright-test/browser_evaluate', 'playwright-test/browser_file_upload', 'playwright-test/browser_handle_dialog', 'playwright-test/browser_hover', 'playwright-test/browser_navigate', 'playwright-test/browser_press_key', 'playwright-test/browser_select_option', 'playwright-test/browser_snapshot', 'playwright-test/browser_type', 'playwright-test/browser_verify_element_visible', 'playwright-test/browser_verify_list_visible', 'playwright-test/browser_verify_text_visible', 'playwright-test/browser_verify_value', 'playwright-test/browser_wait_for', 'playwright-test/generator_read_log', 'playwright-test/generator_setup_page', 'playwright-test/generator_write_test'
]

## Workflow
1. **Automate the test step**
   - Use playwright mcp server to automate the test step in real-time.

2. **Leverage Existing Scripts**
   - Before generating new code, search for and reuse any relevant scripts, page objects, or fixtures already present in the workspace.

3. **Generate Page-Object Class**
   - Create new page-objects classes in the `page-object/` directory.
   - For each class, create a separate file.
   - The classes should be named and organized according to the page function or page name defined in the test case step.
   - Follow the page object pattern for maintainability and reusability.

4. **Add Page Object to Fixtures**
   - Integrate the newly created page-object class into the appropriate fixture in the `fixtures/demo-page-fixture.ts` file.
   - Ensure the fixture provides access to the page object for use in tests.

5. **Generate Test Case**
   - Create the test case in the `tests/` directory, under the relevant subfolder (e.g., `ui/`, `api/`).
   - Use the page-object and fixture for test steps, following the structure and naming conventions in the workspace.
6. **Ensure test case runnability**
   - Validate that the generated test case runs successfully in chrome heade mode with command: `npx playwright test ${filelocation} --project=chromium --headed`
## Example Usage

- When prompted to generate the automation script (e.g., "Generate automation script for following steps..."), automate step with Playwright mcp server and generate the corresponding Playwright script using the above workflow.
- Ensure all new code adheres to the workspace's organization and best practices.
- Validate selectors by running tests in headed mode to ensure robustness and uniqueness.

---

For more details, refer to `copilot-instructions.md` in the workspace root.
Let’s understand more about the above sections:
- Script Generating Agent: you can add the agent name here. In this section, we can define 2 parts:
- description: in this section, we’ll define the duty/objective of the agent.
- tools: we’ll define the tools the agent will use to handle their task. We should limit the tools here so that agent can optimize selecting the tools for implementing task.
- Workflow: in the workflow session, we can define the plan for agent when it receives new task. For each sub task, we can define more about the steps and the best practices for each step.
- Examples usage: it’s the place we can add the example of prompt which can tell the agent to follow above workflow.
- Other: we can add other suggestions for agent. However, keep it clear and simple.
2. How to create Github Copilot agent effectively.
- Just write down your idea and tell Github Copilot to generate the agent files for you.
- Try with simple prompt until you get the output as expected. Then, tell Github Copilot to summarize the conversation and generate the agents files for you.
- The samples for code generated should be stored in copilot-instructions.md file and mention this file in agent file.
- Litmit the tools agents should use for implementing tasks.
Conclusion
In summary, creating an effective Github Copilot agent requires a clear plan, thoughtful tool selection, and a focus on simplicity. By outlining workflows, providing concrete usage examples, and iteratively refining your prompts, you can harness the full potential of Copilot to streamline agent creation. With these best practices, you’ll be well-equipped to develop efficient and reliable agents using Github Copilot.