


Welcome back to this Keycloak series. This is the second blog, where we continue understanding Keycloak step by step.
In the previous blog, Keycloak Basics: Concepts, Protocols, and Configuration we covered the Keycloak fundamentals and set up everything needed to get authentication working:
- Realms
- Clients
- Users
- Roles
- Assigning roles to users using the Admin Console
So far, we logged in through the Keycloak UI and verified that it issued tokens successfully. However, we haven’t yet explored the information inside them or how they are used by services in real-world systems.
In this guide, we shift the focus to Keycloak tokens and authentication flow. Rather than introducing new configurations, we concentrate on understanding the tokens themselves. We will cover their types and how clients use them. We will also see how they are validated, refreshed, and invalidated. Finally, we will decode a token and inspect its claims in a real scenario.
Token Basics
A token is a short-lived credential issued by Keycloak after a user successfully logs in. Instead of sending usernames and passwords on every request, applications use this token to prove who the user is.
Keycloak handles authentication and then issues tokens that applications can trust. The application never sees or stores user passwords — it only works with tokens.
In OAuth 2.0 and OpenID Connect flows, tokens are the final result of the authentication process. After a successful login, Keycloak generates and returns tokens. These tokens serve different purposes. For example, they access secured APIs, maintain active sessions, or convey identity details depending on their type.
Types of Tokens in Keycloak
1. Access Token
The access token is used by applications to authorize requests. It is sent with every secured API call in the request header:
Authorization: Bearer <access_token>Access tokens are short-lived by default, which limits the impact if a token is leaked or compromised. They contain:
- User identity
- Roles
- Scopes
- Client information
This is the token that backend APIs validate to decide whether a request should be accepted.
2. ID Token
The ID token is used for authentication, meaning it proves who the user is. It is mostly consumed by frontend applications after login and is not intended for API access. ID tokens are also short-lived, reducing the risk if they are exposed.
It typically contains:
- User ID
- Username or email
- Session information
In most cases, backend services avoid using the ID token for authorization. The ID token is designed to verify who the user is. It is not meant to determine what the user is allowed to do.
3. Refresh Token
The refresh token is used to obtain a new access token when the current one expires. It has a longer lifespan than the access token. Keycloak issues it only to trusted clients, because anyone possessing a refresh token can generate new access tokens.
Its main purpose is to:
- Avoid frequent re-authentication
- Maintain user sessions seamlessly
The refresh token has a longer lifespan and higher privileges, so you must store and handle it securely. Exchange it only with Keycloak at the token endpoint — never send it to backend APIs.
Token Flow Walkthrough
This section demonstrates the token lifecycle using Postman and verifies the session using the Keycloak Admin Console. This process does not involve any application integration.
0. Enable the Direct Access Grants
This guide uses the Keycloak configuration from the previous blog, including realms, clients, users, and roles, with just one small modification required. We will be logging in using a username and password. Therefore, we need to enable Direct Access Grants in the demo-app client settings. This allows the client to request tokens directly using user credentials.

1. Login and Get Tokens
Use Postman to authenticate with Keycloak and obtain tokens using a username and password.
Method: POST
URL: http://localhost:8080/realms/demo-realm/protocol/openid-connect/token
Headers: Content-Type: application/x-www-form-urlencoded
Body (x-www-form-urlencoded)
grant_type=password
client_id=demo-app
client_secret=<your-client-secret>
username=john.doe
password=john
The examples in this blog use demo values based on the Keycloak setup from the previous blog — including host (
localhost), realm (demo-realm), client ID (demo-app), client secret, and user credentials (john.doe/john). If you are using your own Keycloak setup, replace these values accordingly.

Token Format
Keycloak issues tokens in JWT (JSON Web Token) format. A JWT is a compact, self-contained token that carries all required information within itself.
A JWT has three parts:
header.payload.signature- Header – contains metadata about the token, such as the signing algorithm
- Payload – contains claims like user details, roles, scopes, and expiry
- Signature – ensures the token has not been tampered with
JWTs are stateless, meaning the server does not need to store session data. All the information needed to validate and authorize a request is already inside the token.
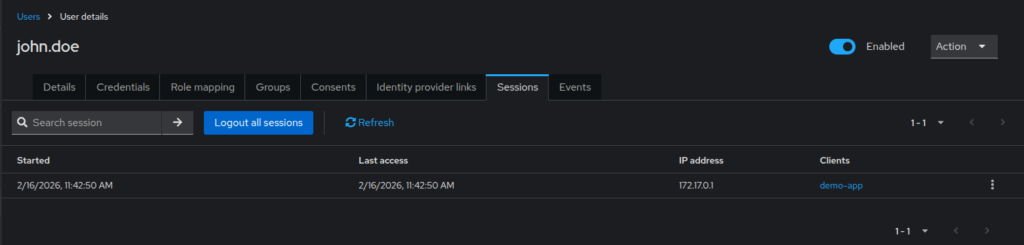
2. Verify Login Session
After obtaining the tokens, you can verify the login directly in the Keycloak Admin Console. First, navigate to Users → Sessions, and then select the logged-in user.
If the authentication was successful, you will see an active session listed for that user. This confirms that Keycloak authenticated the user successfully. It also shows that Keycloak created and is actively maintaining a session for them.
3. Decode the Token
Once you have obtained the access_token from Keycloak using the password grant, you can decode it. This allows you to inspect its contents and understand the information it carries. This is useful for seeing the user details, roles, and other claims included in the token.
- Copy the access token value from Postman’s response.
- Open https://jwt.io/ in your browser.
- Paste the token into the “Encoded” field on the left.
- The decoded payload will appear on the right, where you can see all the claims included in the token.
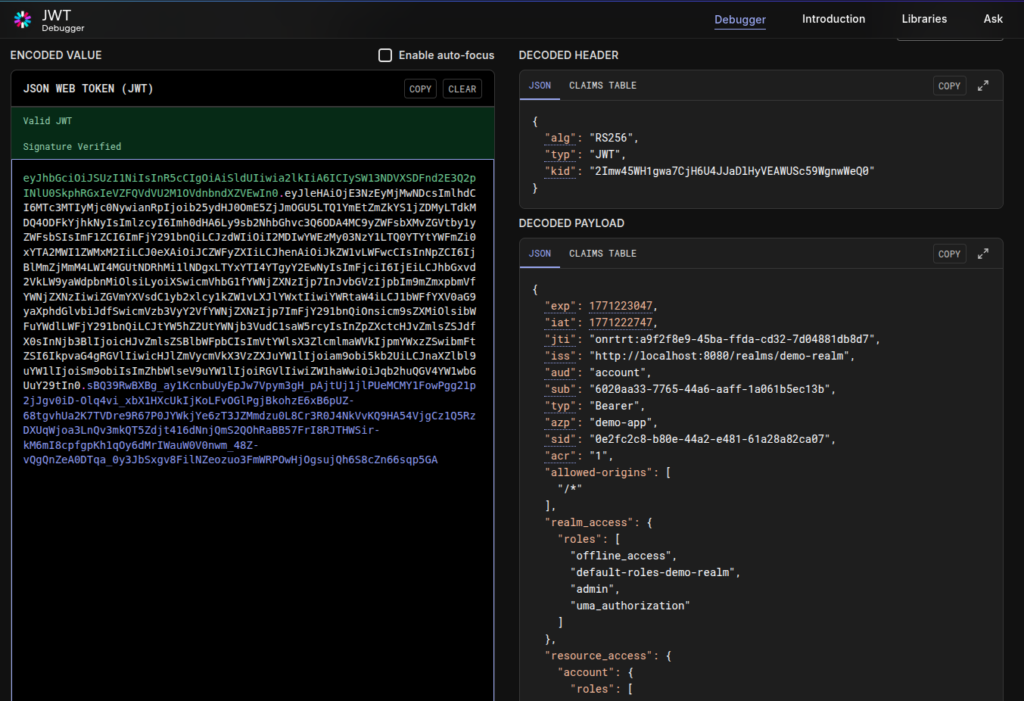
Key Claims in Keycloak Tokens
JWT tokens contain claims, which are key–value pairs holding information about the user, client, and the token itself. Keycloak-issued tokens are validated against these claims to verify things like issuer, audience, expiration, and user roles.
Some commonly used claims include:
- sub (Subject): Uniquely identifies the authenticated user.
- iss (Issuer): Identifies the issuer of the token — the Keycloak realm that issued it. This ensures the token came from a trusted realm.
- aud (Audience): Specifies who the token is intended for, usually a client. Ensures the token is being used by the correct consumer.
- exp (Expiration Time): Defines when the token expires. Tokens are rejected once this time is reached.
- iat (Issued At): Indicates when the token was issued.
- scope: Represents the scopes granted to the client for this token.
- realm_access / resource_access: Contain role information.
realm_accessholds realm-level rolesresource_accessholds client-specific roles
Roles and permissions are included directly in the token’s claims. That’s how, the receiving service can instantly decide the user’s identity and access rights. This eliminates the need for extra requests to Keycloak during authorization.
4. Refresh the Access Token
Before logging out, you can use the refresh token. It allows you to obtain a new access token without re-entering the username and password.
Method: POST
URL: http://localhost:8080/realms/demo-realm/protocol/openid-connect/token
Headers: Content-Type: application/x-www-form-urlencoded
Body (x-www-form-urlencoded)
client_id=demo-app
client_secret=<<your-client-secret>>
refresh_token=<your-refresh_token>
grant_type=refresh_token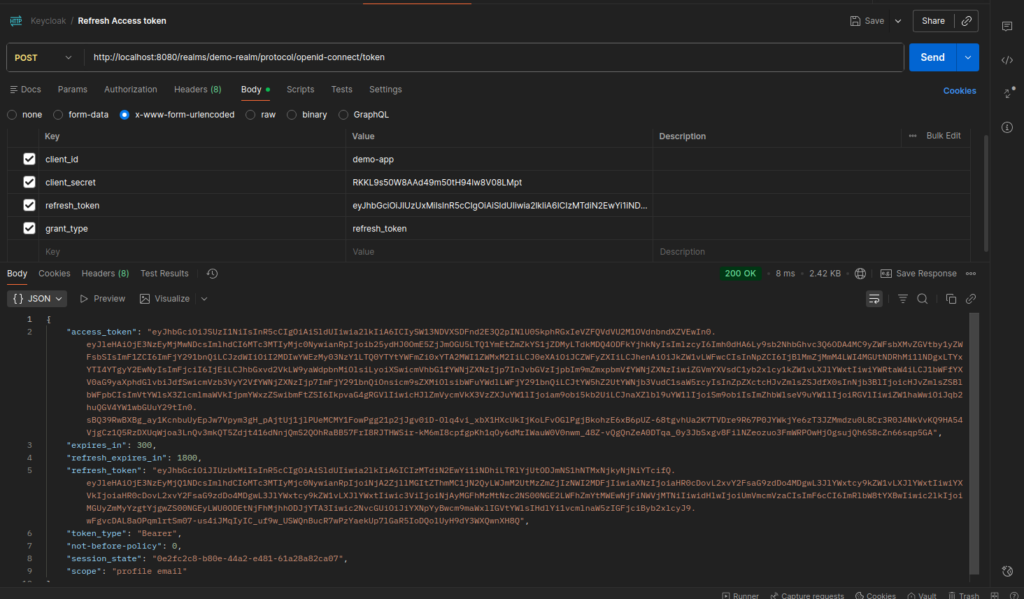
5. Inactive the Token
To terminate the user session, call the Keycloak logout endpoint using the refresh token. This invalidates the session and prevents any further token refresh.
Method: POST
URL: http://localhost:8080/realms/demo-realm/protocol/openid-connect/logout
Headers: Content-Type: application/x-www-form-urlencoded
Body (x-www-form-urlencoded)
client_id=demo-app
client_secret=<your-client-secret>
refresh_token=<your-refresh_token>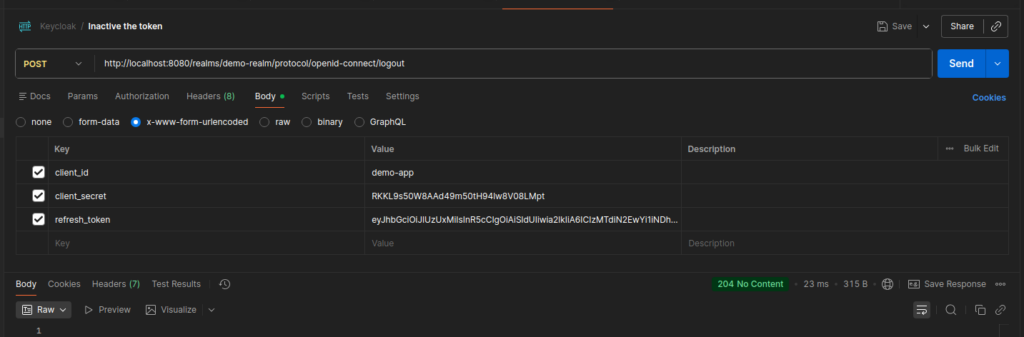
6. Introspect the Token
After logout, you can verify the token state by using Keycloak’s token introspection endpoint.
Method: POST
URL: http://localhost:8080/realms/demo-realm/protocol/openid-connect/token/introspect
Headers: Content-Type: application/x-www-form-urlencoded
Body (x-www-form-urlencoded)
client_id=demo-app
client_secret=<your-client-secret>
token=<your-access_token>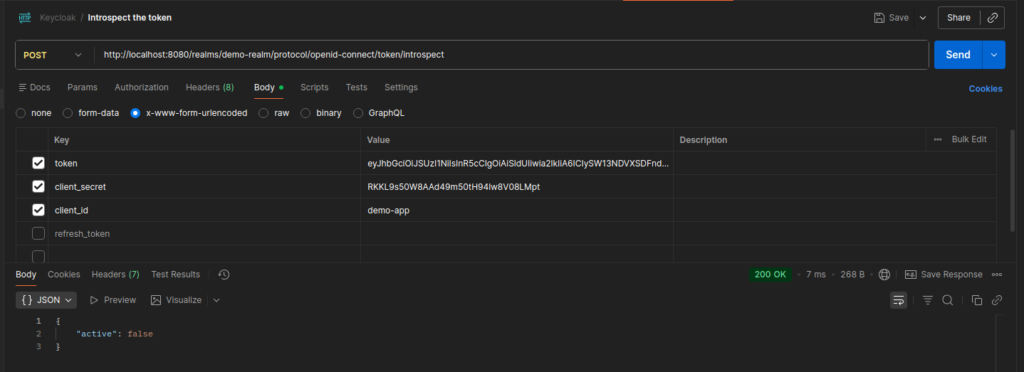
Conclusion
In this blog, we revisited Keycloak tokens and explored their lifecycle in detail using Postman. We walked through each step, from login and token issuance to refresh, logout, and introspection. This gives us a solid foundation for using them confidently in real-world systems.
In the next blog, Secure Spring Boot APIs Using Keycloak, we will move beyond Keycloak itself and focus on application integration. We will explore how applications consume these tokens to secure and authorize APIs, including validating access tokens, extracting roles and scopes, and enforcing authorization at the API level