


Containerizing a MERN stack application involves packing the MongoDB, Express.js, React, and Node.js (MERN) components of your application into a Docker container. This process enhances the portability of your application, making it easier to deploy across various environments. This blog post will guide you through the process of how to containerize a MERN stack application, step by step.
Understanding Containers and Docker
Before we dive into the process, it’s important to understand what containers are and how Docker fits into the picture. Containers are virtual environments where you can run an application and its dependencies in isolation, ensuring that the application runs consistently across different computing environments. Docker is an open-source platform that allows you to automate the deployment, scaling, and management of applications inside these containers.
Now, as we are clear with the concept of containers and docker, let’s start the process to containerize a MERN stack application. For the demonstration purpose, I will be using an open source MERN stack project that I recently contributed to by dockerizing the project as the users were facing difficulties while running that project locally.
Let’s have a look at the project structure that we have here:
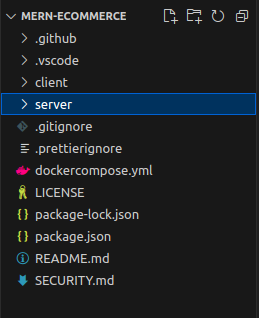
Here, we have a NodeJS server configured in the server directory and a ReactJS application in client directory. And in the root directory of the project, we have the global package.json and dockercompose.yml file that we will be using in the near future to run this project on docker compose. With that, let’s start with the main agenda of dockerizing this project.
Step-by-Step Guide to Containerize a MERN Stack Application
Step 1: Create the Dockerfile
The first step in containerizing your MERN stack application is to create a Dockerfile in both the client and server directory. This file will contain the necessary instructions for Docker to build an image of your application.
Here is a basic example of what your Dockerfiles might look like:

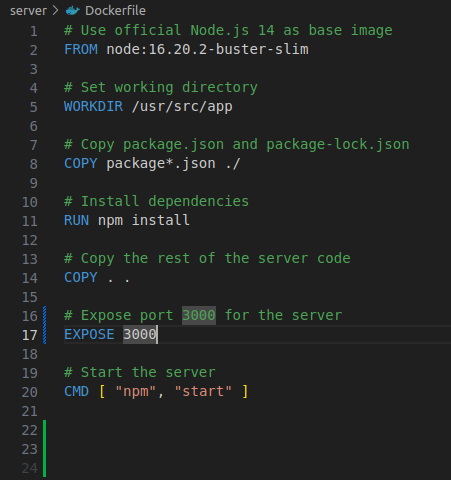
In the above Dockerfiles, we’re telling Docker to:
- Use the node:16.20.2-buster-slim image as the base image for the container.
- Set /usr/src/app as the working directory within the container.
- Copy the package.json and package-lock.json files into the container.
- Install the dependencies listed in the package.json file.
- Copy the rest of the files from your project into the container.
- Expose port 8080 and 3000, which your application will use to communicate with the outside world.
- Run the npm start command when the server’s container starts and npm run dev when client’s container starts.
Step 2: Create the Docker Compose File
Now that we have successfully dockerized our application, we need to start our containers and make sure that they can communicate with each other on a single network. To make this part easier and more robust, we have Docker Compose. Docker Compose allows you to define and run multi-container Docker applications, and it uses a YAML file (docker-compose.yml) to specify the services that make up your application.
Make sure to create your dockercompose.yml file in the root directory of the project and it should be like this:
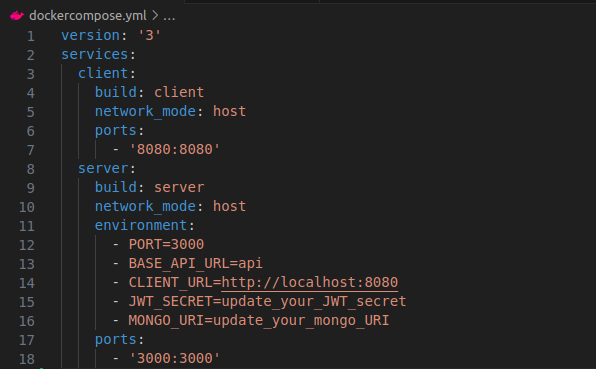
In the above dockercompose file, we’re telling Docker to:
- Run two containers, client and a server.
- To run those containers, use the Dockerfile present in client and the server directory and create the respective Docker images.
- Set the network mode to host so that both the containers should be on the same network.
- Bind the port of each container to our host.
- In the server container, we are also passing some environment variable that are required to build connection between the API server and the MongoDB instance.
And with that, our Dockercompose file is completed and we are ready bring up our MERN stack application live.
Step 3: Run the MERN stack application on Docker
Now that your docker compose file is completed, we need to build the docker images and start the docker container using docker compose. And for that, we need to run following command:
docker compose -f docker-compose.yml build
docker compose -f docker-compose.yml up
In the above commands, we are first building the docker images and then using the up command to start our conatiners.
And just with that, your MERN stack application will be up and running on their respective ports.
Conclusion
A key takeaway here is that your application configuration can be different. Based on that, you will need to change the Dockerfile and Dockcompose file. Rest of the stuff will probably be the same.
Containerizing your MERN stack application with Docker can streamline the deployment process and ensure consistency across different computing environments. By following this guide, you should now be able to containerize your own MERN stack applications and deploy them with ease.