


In the dynamic world of software development, the adoption of microservices has become a game-changer. Among the myriad tools that empower the microservices architecture, Docker stands out as a cornerstone for achieving deployment portability and scalability. In this blog post, we’ll embark on a journey to explore the fundamentals of Docker, its architecture, and practical applications in running a Spring Boot application.
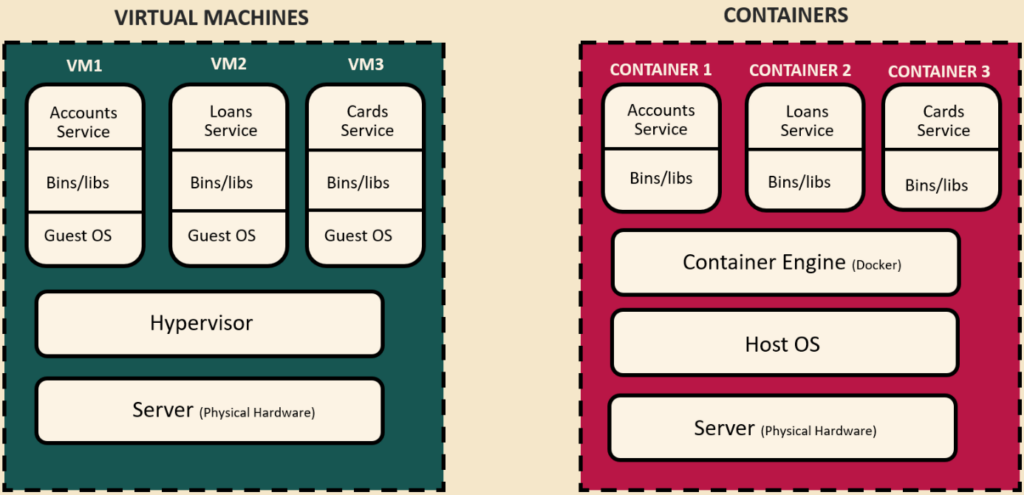
1. Containers vs. Virtual Machines (VM):
Before delving into Docker, it’s essential to grasp the concept of containers and how they differ from traditional virtual machines (VMs). Containers provide a lightweight, portable environment that encapsulates an application and its dependencies. Unlike VMs, containers share the host operating system’s kernel, leading to faster startup times and more efficient resource utilization.
2. Containers and Docker:
Docker, a leading containerization platform, simplifies the creation, deployment, and scaling of applications using containers. It introduces a standardized format for packaging applications and their dependencies, ensuring consistency across various environments. Docker containers can run on any system that supports the Docker engine, making them highly portable.
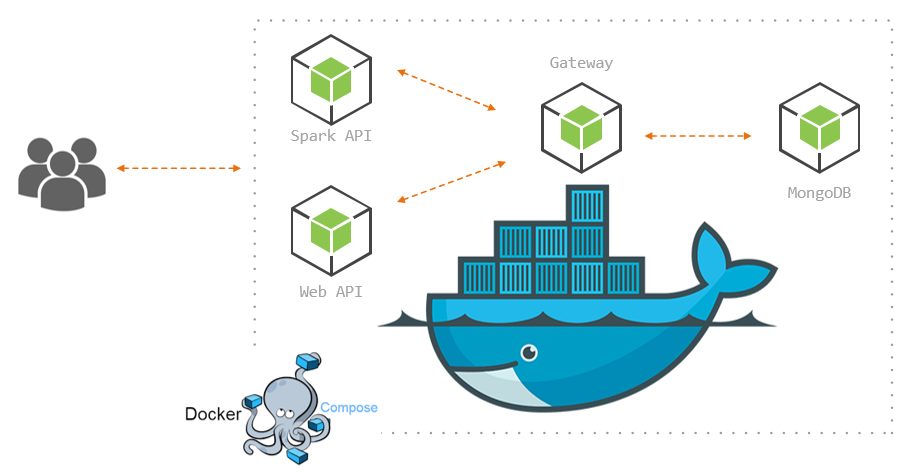
3. Docker Architecture:
To understand how Docker works, let’s explore its architecture. Docker follows a client-server architecture where the Docker client communicates with the Docker daemon, responsible for building, running, and managing containers.

As we Can see 4 main steps are given.
- Instruction from Docker Client to Server to run a container
The process begins with a command from the Docker client, typically initiated by a user or an automated system, instructing the Docker daemon to run a specific container.
- Docker Server finds the image in the registry if not found locally:
The Docker daemon first checks if the required container image is available locally. If the image is not present, the daemon proceeds to search for it in the configured Docker image registry.
- Docker Server pulls the image from the registry into local:
In the event that the required image is not available locally, the Docker daemon pulls the image from the specified registry, such as Docker Hub or a private registry. This step ensures that the required dependencies are obtained.
- Docker Server creates a running container from the image:
With the necessary image now available locally, the Docker daemon creates a running container based on the provided image. This involves setting up the container’s filesystem, network, and other runtime components, preparing it for execution.
4. Running a Spring Boot App Using Dockerfile:
Now, let’s dive into the practical aspect of containerizing a Spring Boot application with Docker. Below is a basic example of a Dockerfile for a Spring Boot app:
# Use an official OpenJDK runtime as a parent image
FROM openjdk:11-jre-slim

# Set the working directory to /app
WORKDIR /app

# Copy the current directory contents into the container at /app
COPY . /app

# Make port 8080 available to the world outside this container
EXPOSE 8080

# Define environment variable
ENV NAME World

# Run the Spring Boot application when the container launches
CMD ["java", "-jar", "your-spring-boot-app.jar"]
Let’s break down the key components of this Dockerfile:
- FROM: Specifies the base image (OpenJDK 11 in this case).
- WORKDIR: Sets the working directory inside the container.
- COPY: Copies the application files into the container.
- EXPOSE: Informs Docker that the application will use port 8080.
- ENV: Defines an environment variable.
- CMD: Specifies the command to run the Spring Boot application.
Building this Docker image involves executing the following command:
- 1. Run the maven command
mvn clean installFrom the location where pom.xml is present to generate a jar file inside target folder.
- 2. Execute the docker command
docker build -t <dockerhubId>/<projectName>:<TagName>from the location where docker Dockerfile is present. This will generate the docker image based on the tag name provided.
- 3 . Execute the docker to run the docker container
docker run -p 8080:8080  <dockerhubId>/<projectName>:<TagName>
example : docker run -p 8080:8080 testProject/accounts:s1
This command will start the docker container based on the docker image name and port mapping provided.
Part 1 Conclusion:
In this first part, we’ve laid the foundation by understanding the concepts of containers, delving into Docker’s architecture, and practically implementing Spring Boot containerization with a Dockerfile. Join us in Part 2 as we explore advanced Docker concepts, including port mapping, Buildpacks, Docker commands, error handling, and troubleshooting. Stay tuned as we unravel the intricacies of Docker to empower your microservices journey.
References:
https://docs.docker.com/get-started/overview/
https://middleware.io/blog/microservices-architecture-docker/
For further insights, please Check my profile.