


Introduction
In today’s fast-paced technological landscape, users increasingly demand applications that deliver real-time updates and interactive experiences. Whether it’s a live chat, dynamic dashboards, or collaborative editing, the need for real-time functionality has become paramount. Fortunately, SignalR, coupled with .NET Core, offers an elegant solution for seamlessly implementing real-time features. In this blog post, we’ll delve into the fundamentals of SignalR and I will guide you through the process of building a basic real-time chat application using .NET Core.
What is SignalR
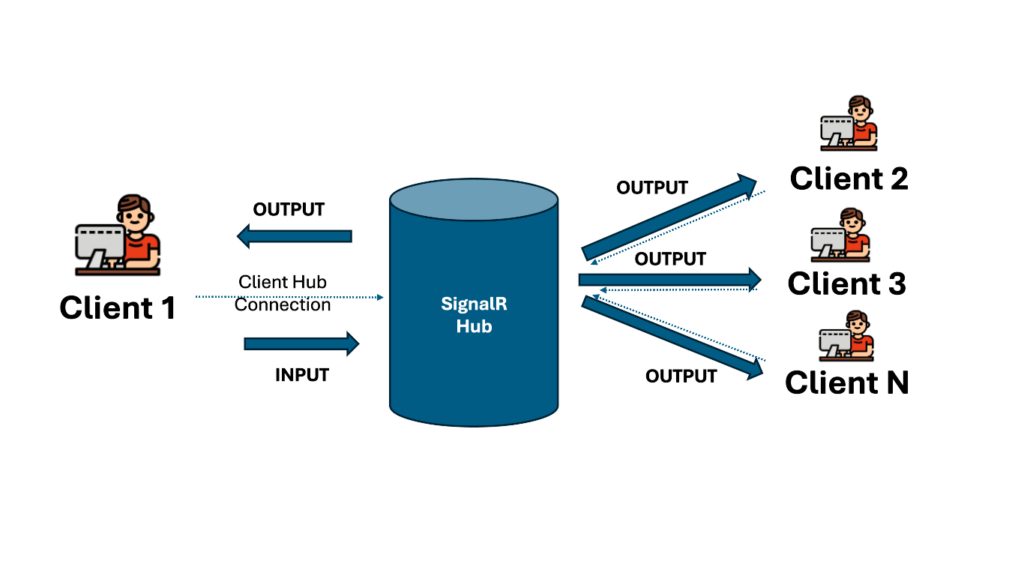
SignalR is a real-time communication library within the Microsoft .NET ecosystem that simplifies the integration of real-time web functionality into applications. It facilitates bidirectional communication between the server and connected clients over a persistent connection, enabling the server to push updates to clients instantly.
Prerequisites
- Basic knowledge of C# and ASP.NET Core
- Visual Studio 2019 or later
- .NET 6/7 SDK installed
Steps to start with SignalR
Step 1: Getting Started with Your Project:
- Open Visual Studio on your computer.
- Create a new project by selecting “ASP.NET Core Web Application”.
- Name your project, for this blog example, let’s call it “SignalRChatApp.”
Step 2: Installing SignalR:
To install the SignalR library:
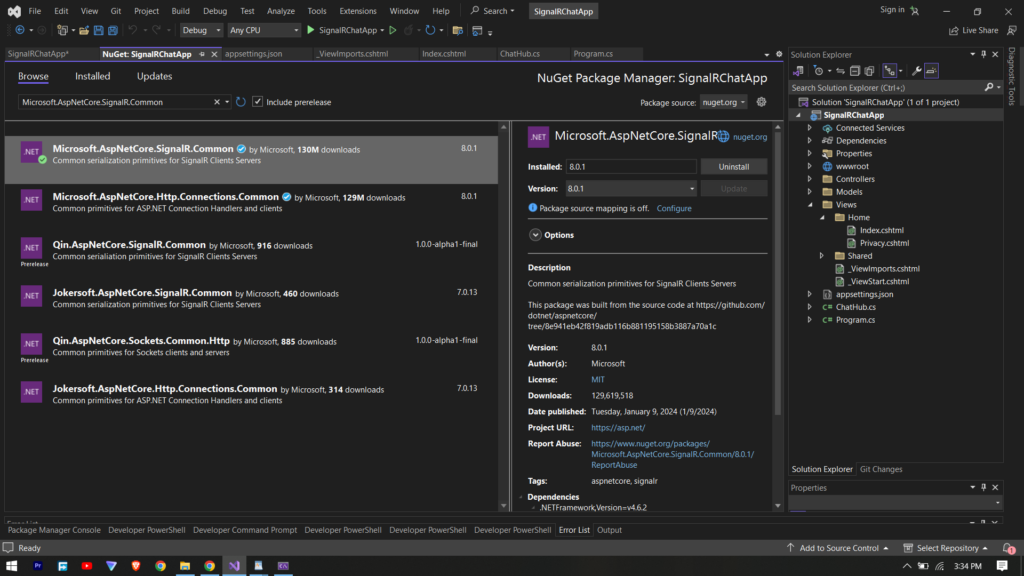
- Right-click on your project in Visual Studio Solution Explorer and select “Manage NuGet Packages.”
- In the NuGet Package Manager, search for “Microsoft.AspNetCore.SignalR.Common” in the browse tab.
- Select the “Microsoft.AspNetCore.SignalR.Common” package and click “Install.”
Note: We used to install “Microsoft.AspNetCore.SignalR” previously, but this package has been deprecated. It is recommended to use “Microsoft.AspNetCore.SignalR.Common“
Step 3: Creating the SignalR Hub:
Now, let’s set up the core of our real-time application – the SignalR Hub named as ChatHub, for that lets create a class named ChatHub.cs. This hub will manage communication between the server and connected clients, specifically handling chat-related functionalities.
using Microsoft.AspNetCore.SignalR;

namespace SignalRChatApp
{
    public class ChatHub : Hub
    {
        // Method to send messages to all clients
        public async Task SendMessage(string user, string message)
        {
            await Clients.All.SendAsync("ReceiveMessage", user, message);
        }
    }
}
Understanding the code:
- We define the ChatHub class, inheriting from Hub, a fundamental part of SignalR.
- The SendMessage method, marked as asynchronous which sends messages to all the connected clients.
Understanding the Flow:
- A client invokes the SendMessage method on the server.
- The server uses Clients.All.SendAsync to broadcast the message to all the connected clients.
- The client-side code listens for messages with the method name “ReceiveMessage” which will help in for displaying messages in real-time.
Step 4: Configuring SignalR in Startup.cs:
using SignalRChatApp;

var builder = WebApplication.CreateBuilder(args);

// Add services to the container.
builder.Services.AddControllersWithViews();
builder.Services.AddSignalR();

var app = builder.Build();

// Configure the HTTP request pipeline.
if (!app.Environment.IsDevelopment())
{
    app.UseExceptionHandler("/Home/Error");
    // The default HSTS value is 30 days. You may want to change this for production scenarios, see https://aka.ms/aspnetcore-hsts.
    app.UseHsts();
}

app.UseHttpsRedirection();
app.UseStaticFiles();

app.UseRouting();

app.UseAuthorization();

app.UseEndpoints(endpoints =>
{
    endpoints.MapHub<ChatHub>("/chat");
});

app.MapControllerRoute(
    name: "default",
    pattern: "{controller=Home}/{action=Index}/{id?}");

app.Run();
This code sets up SignalR in your application, mapping the ChatHub to the /chat endpoint.
Step 5: Building the Basic Frontend:
Create a simple frontend for the chat application by replacing the content of Views/Home/Index.cshtml.
@{
    ViewData["Title"] = "SignalR Chat App";
}


<div class="container">
    <div>
        <label>Your Name: </label>
        <input type="text" id="displayname"/>
    </div>

    <div class="mt-5">
        <label>Enter Message: </label>
        <input type="text" id="message" />
        <hr />
        <input type="button" id="sendmessage" value="Send" />
    </div>

    <div class="mt-3">
        <ul id="discussion"></ul>
    </div>

</div>

// SignalR cdn for client side
<script src="https://cdn.jsdelivr.net/npm/@@microsoft/signalr@3.1.0/dist/browser/signalr.min.js"></script>

<script>

    // initializes connection to SignalR Hub located at the /chat endpoint
    var connection = new signalR.HubConnectionBuilder().withUrl("/chat").build();


    connection.start().catch(function (err) {
        return console.error(err.toString());
    });


    document.getElementById("sendmessage").addEventListener("click", function (event) {

        var user = document.getElementById("displayname").value;
        var message = document.getElementById("message").value;

        //invoking SendMessage method from ChatHub.cs, this will send the message to all the connected clients
        connection.invoke("SendMessage", user, message).catch(function (err) {
            return console.error(err.toString());
        });
        event.preventDefault();
    });


    // client side handler for "ReceiveMessage" event which will receive the message
    connection.on("ReceiveMessage", function (user, message) {
        var encodedMessage = user + ": " + message;
        var li = document.createElement("li");
        li.textContent = encodedMessage;
        document.getElementById("discussion").appendChild(li);
    });


</script>
This JavaScript code sets up client-side functionality to interact with the SignalR Hub.
Step 6: Testing the Application:
Run your application in Visual Studio, open multiple browser tabs to simulate different users interacting with the chat.
Real-time updates will be observed on all connected clients.
Conclusion
Congratulations! You’ve successfully built a basic real-time chat application using SignalR and .NET Core. The SignalR Hub is instrumental in facilitating real-time communication between the server and clients. This blog serves as a starting point to understand the flow for SignalR, you can explore additional features and enhancements as you delve deeper into SignalR’s capabilities using official SignalR documentation.