
When you think of containerizing nowadays, docker is perhaps the first technology you would think about. Configuring your application to run in a docker container can significantly improve your application’s deployment capabilities. While docker configurations can decrease your shipping time, it can also enhance the security of your application. But using docker to ship our application also comes with a responsibility to make sure that docker configuration do not add any security risk themselves. To ensure that does not happen, it is important that you secure docker container for your application.
There are different ways to secure docker container. Manual steps can be taken to make sure that common security errors are not made while setting up your container. We can also integrate security testing tools to do automated scanning for your container to detect vulnerabilities. We will look at both of these ways to get the best out of docker container security testing.
Manual Steps To Secure Docker Container
There are various rules that you can follow to ensure that docker containers are secure. These manual steps are related to basic configuration settings and resource management. Let us look at some of these steps:
1. Capability And Resource Limitation
Docker provides several mechanisms for limiting the capabilities and resources available to containers, which helps improve security, efficiency, and resource utilization. Here are some of the key capabilities and resource limitations that Docker containers can apply
Docker allows you to restrict the capabilities available to containers, preventing them from performing certain privileged actions. You can use following options to drop or add specific Linux capabilities to containers
docker run --cap-drop all
You can also not use —privileged flag to ensure that not all of the capabilities are added to docker container.
You also need to limit resources like memory and CPU to prevent docker containers from undergoing a DoS attack. Here are some options that you can set:
					--cpu-shares or --cpu-quota: Limits CPU shares or usage.
--memory: Sets a maximum memory limit for the container.
--memory-swap: Sets a maximum memory plus swap limit.
--cpus: Specifies the number of CPUs that the container can use.
--blkio-weight: Sets the relative block I/O weight between containers.
--pids-limit: Limits the number of processes that can run inside the container.
2. Prevent In-Container Privilege Escalation
Preventing in-container privilege escalation is crucial for maintaining the security of Docker containers. Here are some strategies to mitigate the risk of privilege escalation within containers:
1. Run Containers with Non-Root Users
Avoid running containers as the root user whenever possible. Specify a non-root user in the Dockerfile or at runtime using the –user option. This limits the impact of any potential privilege escalation vulnerabilities within the container.
Example Dockerfile snippet:
USER nonrootuser
2. Ensure that your Docker images are executed with --security-opt=no-new-privileges flag
Making sure that your Docker images are consistently executed with the –security-opt=no-new-privileges flag to thwart any potential privilege escalation. Using this, it prevents containers from acquiring additional privileges through setuid or setgid binaries.
3. Read Only File Systems
To set the filesystem and volumes of a Docker container to read-only, you can use the –read-only flag when running the container. Here’s how you can do it:
docker run --read-only myimage
This command starts a Docker container using the myimage image with the filesystem set to read-only.
Therefore by setting the filesystem and volumes to read-only, you prevent any write operations within the container, which can enhance security and prevent accidental modifications to critical files or data.
Automated Scanning For Docker Images
Automated scanning of Docker images involves using specialized tools to analyze container images for vulnerabilities and security misconfigurations. These tools help ensure that containers are secure and compliant with best practices before deployment. In fact let us look at some of these tools:
1. Anchore Engine: Anchore Engine is an open-source container analysis and policy evaluation tool that scans Docker images for security vulnerabilities, software package versions, and policy violations. It integrates with CI/CD pipelines and container registries, allowing automated scanning and policy enforcement.
2. Clair: Clair is an open-source vulnerability scanning tool developed by CoreOS. It analyzes Docker images for known vulnerabilities in operating system packages and libraries. Clair integrates with container registries like Docker Hub and provides vulnerability reports to help developers identify and remediate security issues.
3. Trivy: Trivy is a simple and fast open-source vulnerability scanner for containers and other artifacts, such as packages and filesystems. It supports scanning Docker images for vulnerabilities in OS packages, application dependencies, and configuration files. Trivy is easy to integrate into CI/CD pipelines and provides detailed vulnerability reports.
4. Twistlock: Twistlock is a comprehensive container security platform that includes automated vulnerability scanning as one of its features. It scans Docker images for vulnerabilities, malware, and misconfigurations, and provides runtime protection and compliance enforcement for containerized environments. Twistlock offers advanced threat intelligence and policy-based security controls.
5. Aqua Security: Aqua Security provides a container security platform that includes automated vulnerability scanning for Docker containers. It scans images for vulnerabilities, enforces compliance with security policies, and monitors runtime behavior for suspicious activities. Aqua Security integrates with CI/CD pipelines and container registries to provide continuous security throughout the container lifecycle.
6. Sysdig Secure: Sysdig Secure is a container security platform that offers automated vulnerability scanning and runtime protection for Docker containers. It scans images for vulnerabilities, configuration issues, and compliance violations, and provides real-time threat detection and response capabilities. Sysdig Secure integrates with CI/CD pipelines, container registries, and orchestration platforms like Kubernetes.
Automated Scanning With Clair
Clair is developed by CoreOS. C allows you to scan container images for security vulnerabilities. Automating scanning with Clair can be achieved through various means, depending on your infrastructure and workflow.
Clair works by analyzing container images for known vulnerabilities in their software components. Here’s an overview of how Clair operates:
Indexing Vulnerabilities: Clair maintains a database of known vulnerabilities sourced from various vulnerability databases such as the National Vulnerability Database (NVD), Red Hat Security Data, Debian Security Bug Tracker, etc. These databases contain information about security vulnerabilities in different software packages.
Image Analysis: When you instruct Clair to scan a container image, it pulls the image layers and inspects them to identify the software packages and libraries contained within. This analysis is essential because vulnerabilities often reside in these packages and libraries.
Comparing with Vulnerability Database: Once Clair analyzes the image, it compares the software packages and versions found in the image layers against its vulnerability database. It looks for matches between the software components in the image and the known vulnerabilities in the database.
Generating Report: Based on the comparison results, Clair generates a report listing any vulnerabilities found in the container image. This report typically includes details such as the severity of the vulnerabilities, affected software components, and links to more information about each vulnerability.
Install And Run Clair For Your Docker Image
Now that we have looked at how clair automated scanning works, let us now look at the steps we need to take to scan our docker image for any vulnerabilities.
As a pre requisite, you only need docker installed in your system. Once that is done, you should be good to go ahead.
Step 1 : Install and run the clair docker images
First step ofcourse would be to run two separate docker commands to run the clair docker images. The two commands are as follows:
					docker run -d --name db arminc/clair-db
docker run -p 6060:6060 --link db:postgres -d --name clair arminc/clair-local-scan
1. The first command runs a Docker container named db using the arminc/clair-db image, which is a pre-configured PostgreSQL database for use with Clair. arminc/clair-db: is the name of the Docker image used to create the container. It is provided by the arminc organization on Docker Hub. If it is already not installed, the image will be installed automatically with this docker command.
2. The second command will start a detached Docker container named clair, running the Clair scanner configured to use the local PostgreSQL database container named db. The container will be accessible on port 6060 of the host machine.
Step 2 : Download clair scanner CLI and run the local docker image
Second step is to fetch the Docker bridge network gateway IP address, download the Clair-Scanner binary, and then runs the Clair-Scanner CLI to perform vulnerability scanning on a local Docker image.
					DOCKER_GATEWAY=$(docker network inspect bridge --format "{{range .IPAM.Config}}{{.Gateway}}{{end}}")
wget -qO clair-scanner https://github.com/arminc/clair-scanner/releases/download/v8/clair-scanner_linux_amd64 && chmod +x clair-scanner
./clair-scanner --ip="$DOCKER_GATEWAY" --report "/home/ClaireScan/claire_data.json" your_image
1. The first command will store the IP address of the Docker bridge network gateway in DOCKER_GATEWAY, which is used for communication between containers on the same Docker network. Later in the script, you can use this IP address to specify the IP address of services or components that need to communicate with each other within the Docker environment.
2. The second command downloads the Clair-Scanner binary from GitHub and saves it as clair-scanner, and then it makes the downloaded binary executable. This prepares the Clair-Scanner binary for use in subsequent commands or scripts.
3. The third command will connect Clair-Scanner to the specified Clair server and scan the specified Docker image for vulnerabilities. Any vulnerabilities found will be reported back to the user. We have also added –report configuration to create a json file with all the vulnerabilities at the location “/home/ClaireScan/claire_data.json”. We have used infoslack/dvwa image for this blog as it contains a lot of vulnerabilities.
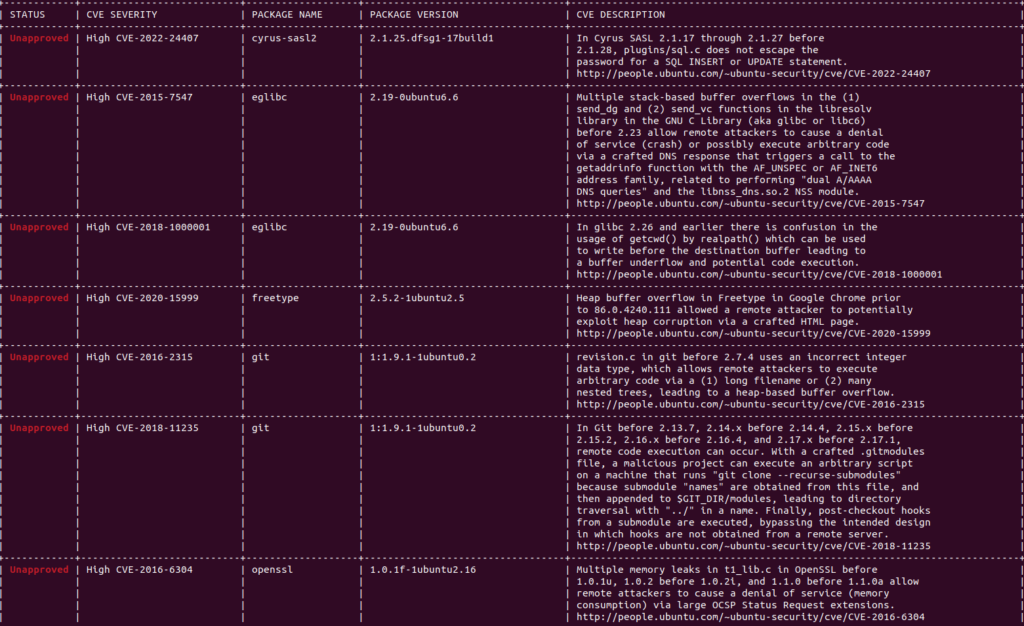
Step 3 : Check the generated report for the vulnerabilities
All that is left to do now is to check the report that has been generated. The report shows all the vulnerabilities that are present in infoslack/dvwa docker image.
Conclusion
In conclusion, both manual and automated testing can secure your Docker images from vulnerabilities. While manual testing requires constant intervention, a checklist helps identify security risks early. Therefore, once your image is up and running, automated tools like Clair can ensure scanning occurs with every new build. Ultimately, every Docker image should be secure from attacks, so utilizing these security testing methods is essential.