


In the world of technology, delivering software quickly is essential. However, speed should never compromise security. With the rise of containerized applications, ensuring the security of Docker images has become paramount. In this blog post, we’ll explore how to automate security testing for Docker images using Clair and Github Actions, two powerful tools that seamlessly integrate into your DevOps pipeline.
Introduction
Security vulnerabilities in Docker images can expose your applications to various risks, including data breaches and system compromises. Traditional manual security testing methods are time-consuming and error-prone, making them unsuitable for the rapid delivery cycles of DevOps. Automated security testing, on the other hand, enables teams to identify and mitigate vulnerabilities early in the development process.
Clair: An open-source vulnerability scanner for containers. Clair analyzes Docker images for known security vulnerabilities by comparing their software components against a database of known vulnerabilities.
GitHub Actions: A powerful automation platform integrated into GitHub, GitHub Actions enables teams to automate various aspects of their software development workflows, including continuous integration, continuous delivery, and now, security testing.
Setting Up Clair for Docker Image Scanning
Now, let’s delve into the necessary steps to scan our Docker image for potential vulnerabilities. As a prerequisite, all you need is Docker installed on your system. Once this requirement is fulfilled, you’re ready to proceed.
Step 1: Installing and Executing the Clair Docker Images
To initiate the process, we’ll begin with the installation and execution of the Clair Docker images. This initial step entails running two distinct Docker commands to deploy the Clair Docker images. These commands are outlined as follows:
docker run -d --name db arminc/clair-db
docker run -p 6060:6060 --link db:postgres -d --name clair arminc/clair-local-scan
- Initially, the command creates a Docker container labeled “db” utilizing the arminc/clair-db image. This image serves as a pre-configured PostgreSQL database tailored for integration with Clair. Provided by the arminc organization on Docker Hub, arminc/clair-db serves as the foundational Docker image utilized for container creation. In the event that it is not already present, this Docker command will automatically install the image.
- Subsequently, the following command launches a detached Docker container named “clair,” housing the Clair scanner. Configured to interact with the local PostgreSQL database container named “db,” this container operates independently, ensuring the seamless operation of the Clair scanner. Accessible via port 6060 on the host machine, the “clair” container facilitates vulnerability scanning effortlessly.
Step 2: Acquiring the Clair scanner CLI and Executing Vulnerability Scanning on a Local Docker Image
The subsequent stage involves procuring the Docker bridge network gateway IP address, obtaining the Clair-Scanner binary, and executing the Clair-Scanner CLI to conduct vulnerability scanning on a local Docker image.
DOCKER_GATEWAY=$(docker network inspect bridge --format "{{range .IPAM.Config}}{{.Gateway}}{{end}}")
wget -qO clair-scanner https://github.com/arminc/clair-scanner/releases/download/v8/clair-scanner_linux_amd64 && chmod +x clair-scanner
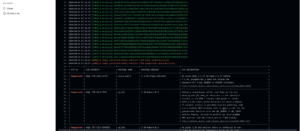
./clair-scanner --ip="$DOCKER_GATEWAY" --report "/home/ClaireScan/claire_data.json" your_image
Adding Docker-Compose and Shell Script To Streamline
The previously mentioned commands are fully functional when executed individually. Nevertheless, to integrate the clair scanner with a CI/CD tool, we need to optimize the process. This involves creating a docker-compose.yml file and invoking it from a shell script. Let us look at how this can be achieved with shell scripts and docker-compose.yml file.
docker-compose.yml file
version: '3'
services:
  db:
    image: arminc/clair-db
    container_name: clairdb
    restart: always

  clair:
    image: arminc/clair-local-scan
    container_name: clair
    depends_on:
      - db
    ports:
      - "6060:6060"
    links:
      - db:postgres
    restart: always
This is the Docker Compose configuration file (docker-compose.yml) that defines two services: db and clair.
- db Service:
- Image: Specifies the Docker image to use for this service, which is arminc/clair-db. This image contains the Clair database.
- Container Name: Defines the name of the container running this service as clairdb.
- Restart Policy: Specifies that the container should always restart if it stops for any reason.
- clair Service:
- Image: Specifies the Docker image for the Clair scanner, which is arminc/clair-local-scan.
- Container Name: Defines the name of the container running this service as clair.
- Depends On: Specifies that this service depends on the db service, ensuring that the Clair scanner container starts only after the Clair database container is running.
- Ports: Maps port 6060 on the host to port 6060 on the container, allowing access to Clair’s API.
- Links: Links this service to the db service, aliasing it as postgres.
- Restart Policy: Specifies that the container should always restart if it stops for any reason.
Bash Script
# Function to check if a command executed successfully
check_command() {
if [ $? -ne 0 ]; then
echo "Error executing the previous command!"
exit 1
fi
}

# Start the Clair and database containers
docker rm -f clairdb
docker rm -f clair
docker-compose up -d
check_command

# Note: It's better to have a health check to confirm when the db is ready, but for simplicity, we use sleep here.
sleep 20

# Get Docker's bridge network gateway
DOCKER_GATEWAY=$(docker network inspect bridge --format "{{range .IPAM.Config}}{{.Gateway}}{{end}}")
check_command
echo "$DOCKER_GATEWAY"

# Download and prepare the clair-scanner
if [ ! -f clair-scanner ]; then
echo "Downloading clair-scanner..."
wget -qO clair-scanner https://github.com/arminc/clair-scanner/releases/download/v8/clair-scanner_linux_amd64
check_command
echo "Setting execute permissions on clair-scanner..."
chmod +x clair-scanner
fi

# Scan the specified Docker image
./clair-scanner --ip="$DOCKER_GATEWAY" --report "PATH_TO_YOUR_JSON" infoslack/dvwa
check_command
- Defines a function check_command() to check if the previous command executed successfully. If the exit code of the previous command is not equal to 0 (indicating an error), it prints an error message and exits with a status code of 1.
- Removes any existing Docker containers named clairdb and clair using docker rm -f to ensure a clean environment.
- Starts the Clair and database containers using docker-compose up -d.
- Waits for 20 seconds to allow the database to initialize. This delay is added for simplicity; ideally, a health check should be implemented to confirm when the database is ready.
- Retrieves the Docker’s bridge network gateway IP address using docker network inspect bridge –format “{{range .IPAM.Config}}{{.Gateway}}{{end}}”. This IP address will be used as the target for the Clair scanner.
- Checks if the clair-scanner binary exists. If not, it downloads the clair-scanner binary from GitHub release (https://github.com/arminc/clair-scanner/releases/download/v8/clair-scanner_linux_amd64), sets the execute permissions, and places it in the current directory.
- Executes the clair-scanner binary with the specified parameters:
- –ip=”$DOCKER_GATEWAY”: Specifies the IP address of the Clair server.
- –report “/home/nashtech/ClaireScan/claire_data.json”: Specifies the path where the scan report will be saved.
- infoslack/dvwa: Specifies the Docker image to be scanned (in this case, infoslack/dvwa).
- Checks if the previous command executed successfully after each step using the check_command function defined earlier.
Github Actions Workflow
Now that we have created our bash script and docker-compose.yml file, all that we need to do is to create a github actions workflow file to call this bash script. Let us look at an example for it.
name: Run Bash Script

on:
  push:
    branches:
      - main

jobs:
  build:
    runs-on: ubuntu-latest

steps:
- name: Checkout code
  uses: actions/checkout@v2

- name: Pull Docker image
  run: docker pull infoslack/dvwa

- name: Run Bash script
  run: |
  bash path/to/your/script.sh
- name: Specifies the name of the workflow.
- on: Specifies the events that trigger the workflow. In this case, the workflow runs whenever there’s a push to the main branch. You can modify this to match the branch you want to trigger the workflow on.
- jobs: Defines one or more jobs that execute in parallel or sequentially.
build: Specifies the name of the job. - runs-on: Specifies the type of machine to run the job on. In this example, it runs on the latest version of Ubuntu.
steps: Contains a sequence of tasks that make up the job. - Checkout code: Uses the actions/checkout action to checkout the repository’s code into the runner’s workspace.
- Pull Docker image uses the docker pull command to download the infoslack/dvwa Docker image from Docker Hub.
- Run Bash script: Executes the Bash script using the run keyword. Replace path/to/your/script.sh with the actual path to your Bash script within the repository.
Conclusion
In conclusion, the fusion of Clair and GitHub Actions heralds a new era of automated security testing in DevOps. By automating the detection and remediation of vulnerabilities in Docker images, organizations can fortify their software against potential threats while maintaining the cadence of rapid delivery. As technology continues to evolve, embracing automated security testing becomes imperative for safeguarding the integrity and resilience of modern applications.