


 Introduction
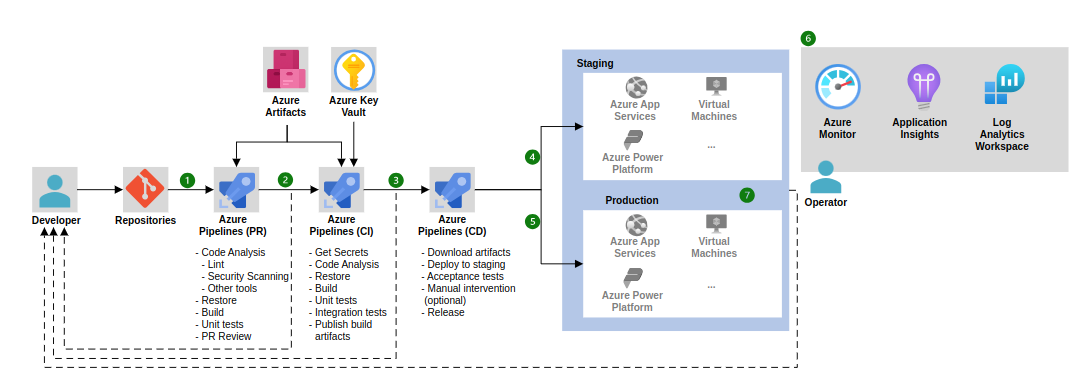
Azure Pipelines are a very integral part of Azure DevOps and are basically used to automatically build and tests the code projects. It supports all major programming languages and project types and combines continuous integration, continuous delivery, and continuous testing to build & test the code. The pipelines can automate and streamline the process of building, testing, and deploying applications, resulting in faster software releases.
Continuous Integration (CI)
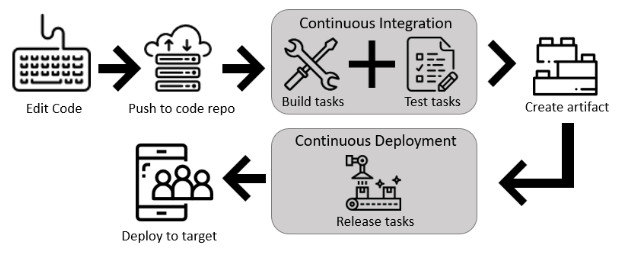
Continuous Integration is the practice used by development teams of automating, merging, and testing code. CI helps to catch bugs early in the development cycle, which makes them less expensive to fix. Automated tests execute as part of the CI process to ensure code quality.
Continuous Delivery (CD)
Continuous Delivery is a process by which code is built, tested, and deployed to one or more test or production environments. Deploying and testing in multiple environments increases quality. CD systems produce deployable artifacts, including apps. Automated release processes consume these artifacts to release new versions and fixes to existing systems.
Importance: Why use Azure Pipelines?
We should use the Azure Pipelines to support the following scenarios:
- Multi-language, Multi-platform compatibility: Supported by multiple programming languages and across multiple operating systems.
- Multi Target Deployment: Deploys to different types of targets at the same time.
- Interoperability: Integrates with GitHub & Works with open-source projects.
- Security: Provides security features like role-based access control (RBAC), audit logs, and compliance standards to help maintain security.
- Scalability and Performance: Azure DevOps is built on the Microsoft Azure cloud infrastructure, which offers scalability and reliability. This is especially important for handling large-scale CI/CD workloads.
Prerequisites for Building Pipelines
- Application’s source code should be in a version control system. It could be either Git or Azure Repos.
- Have an organization in Azure DevOps. If you don’t have one, create from the Azure DevOps portal.
Components & Features of Azure Pipeline
-
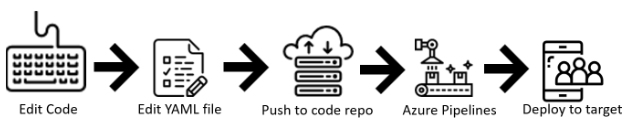
Defining Pipelines
- The pipelines can be defined using two ways:
- Using the YAML syntax –
- The Azure Pipelines (CI/CD) are defined in a YAML file named as azure-pipelines.yaml with the application.
- The pipeline follows the same branching structure as the code.
- The pipeline can be modified by editing the azure-pipelines.yaml for every branch.
- Using the YAML syntax –
- The pipelines can be defined using two ways:
-
-
- Using the Classic Interface –
- The pipelines can also be created by using the Classic user interface editor.
- A build pipeline can be created to build and test the code, and then to publish artifacts.
- A release pipeline can be created to consume and deploy those artifacts to deployment targets.
- Using the Classic Interface –
-
-
Agents
- Specifies a required resource on which the pipeline runs.
- Azure Pipelines supports both Microsoft-hosted agents and self-hosted agents. Microsoft-hosted agents are maintained by Azure DevOps and are available for common platforms, while self-hosted agents run on your infrastructure
-
Environment
- It represents a collection of resources targeted for deployment.
- Examples of environment includes, Development, Staging & Production.
- It also helps to manage and track the deployments of the application.
-
Tasks
- Tasks represent the individual steps that need to be executed within each stage.
- In order to add tasks, follow these steps:
- Open the pipeline editor.
- Click the stage where task is to be added.
- Click “Add task” to add a new task.
- Select the desired task, like “Build” or “Test”.
- Configure the settings for the task.
-
Jobs
- Defines the execution sequence of a set of steps.
- Jobs can include multiple steps, scripts, and tasks that need to be completed.
There are several other components and key features available for Azure Pipelines such as Triggers, Stages, Artefacts, etc, which are essential for the deployment of the application using the Azure Pipelines. You may refer to the official Microsoft Azure Documentation for more information.
Creating your First Azure Pipeline
To start with building your first Azure CI/CD Pipeline, do make sure you have an existing project added to your Azure DevOps account. Once the project is ready, follow these steps:
- Create New Pipeline: Open your project from your Azure DevOps portal. Navigate to the Pipeline section from the left sidebar. Then click on New Pipeline button.
- Repository Selection: Select the appropriate repository which houses your project code. It can be either Azure Repos or Git or other.
- Configuring Pipeline: Select the desired template from the given list as per your application tech stack, for ex. – ASP.NET Core MVC, Angular, Kotlin, Spring etc.
- Adding Stages (Build & Test): Configure the settings for each of the stage, such as agent pool, triggers, dependencies, build artefacts etc.
- Deployment Stages: Set up deployment stages for each target environment (for ex., development, test, production). Configure deployment tasks to deploy your application to the respective environments using Azure resources such as Azure App Service etc.
- Adding Variables: Define variables to store the pipeline’s configuration settings. Also store secret information, such as API keys or connection strings, in the pipeline’s secret store such as Azure Key Vault.
- Run Pipeline: Trigger the pipeline manually or let it be triggered automatically based on the defined triggers.
Azure Pipeline YAML File Sample
- trigger: Defines conditions that trigger the pipeline. In this case, the pipeline is triggered for commits to the
mainanddevelopmentbranches. - stages: Divides the pipeline into logical stages. In this example, there are two stages: Build and Deploy.
- stage: Build: Represents the build stage, responsible for building the project.
- job: Build: Defines a job within the Build stage.
- steps: Contains the sequence of tasks to be executed in the job.
- script: Executes a script to build the project.
- task: PublishBuildArtifacts@1: Publishes the built artifacts to Azure Pipelines for later use in deployment stages.
- steps: Contains the sequence of tasks to be executed in the job.
- job: Build: Defines a job within the Build stage.
- stage: Deploy: Represents the deployment stage, responsible for deploying the built artifact.
- job: Deploy: Defines a job within the Deploy stage.
- steps: Contains the sequence of tasks to be executed in the job.
- script: Executes a script to deploy the artifact to the target environment.
- steps: Contains the sequence of tasks to be executed in the job.
- job: Deploy: Defines a job within the Deploy stage.
Troubleshooting the Pipeline
If any issue/error is encountered while running the pipeline, we can use the diagnostics tools in Azure DevOps to identify and resolve those issues. Follow these steps to troubleshoot pipeline:
- Open pipeline editor.
- Click on the Runs tab to access the pipeline runs.
- Select the appropriate run that encountered the issue.
- Use the logs and diagnostics tools to identify the cause of the issue.
- Resolve the issues using the logs and tools.
Best Practices
- The Pipelines should be automated as much as possible, try to avoid manually running the pipelines, use appropriate triggers instead.
- Use versioning control system such as Git to manage and update the code changes and dependencies.
- Implement proper automated testing and validation to minimize build errors and improve the code quality.
- Define a clear branching strategy to effectively manage feature development, bug fixes, and releases.
Conclusion
In conclusion, Azure CI/CD Pipelines offer a complete solution for automating software delivery from code to production. By following the steps outlined in this guide, we can set up a CI/CD pipeline in Azure DevOps with ease. By paying attention to low-level details such as artifact management, environment configuration, monitoring, compliance, and continuous improvement, teams can unlock the full potential of their CI/CD pipelines.
References
- Microsoft Azure Pipelines Documentation – https://learn.microsoft.com/en-us/azure/devops/pipelines/?view=azure-devops
- BrowserStack CI/CD Guidelines – https://www.browserstack.com/guide/azure-cicd-pipeline
- Azure Pipeline with .NET Project – https://youtu.be/XTjV483nIuQ