


Introduction
In this post, I’ll guide you through quickly integrating PayPal into your website. PayPal is one of the most popular online payment gateways, widely used for global transactions. Integrating PayPal not only enhances the payment options for your customers but also brings convenience to both buyers and sellers.

Step 1: Register a PayPal Account
Before starting, you need a PayPal Developer account. If you don’t have one, you can register for free on the PayPal Developer homepage.
Step 2: Install PayPal SDK
PayPal provides an SDK to make the integration process easier.
In this article, I will guide you on how to integrate the PayPal JavaScript SDK.
Add the following script to your HTML page:
<!-- Include the PayPal JavaScript SDK.-->
<a href="https://www.paypal.com/sdk/js?client-id=YOUR_CLIENT_ID&currency=USD"></a>
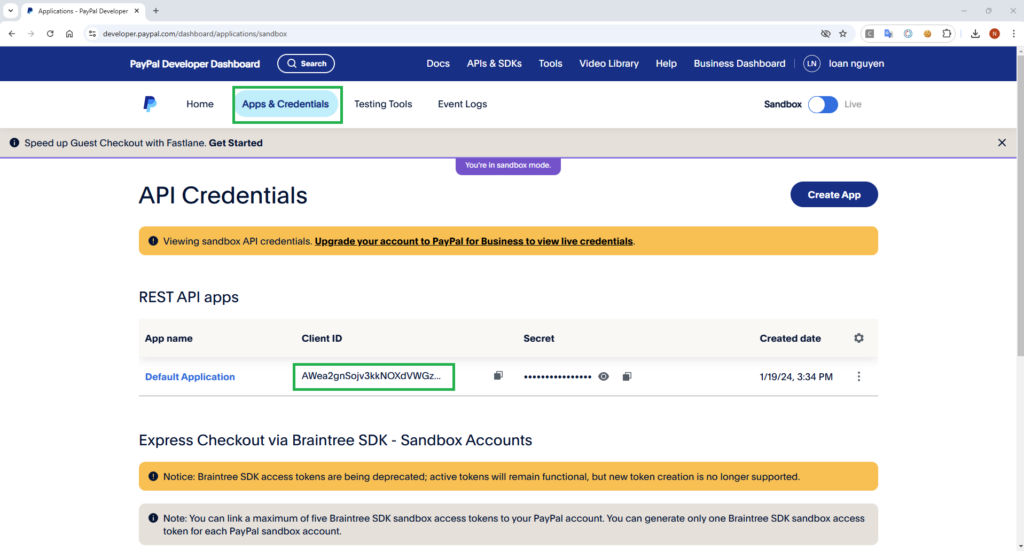
Replace YOUR_CLIENT_ID with the Client ID from your PayPal account. To get the Client ID, go to the Dashboard of your PayPal account, create an app, and retrieve the Client ID.
Step 3: Create a PayPal Payment Button
First, you create the index.html page to display the payment interface.
Next, you need to create a PayPal payment button. The following code will add a button to your website:
Step 3.1: Create the index.html page
<title>PayPal Checkout</title>
<!-- Include the PayPal JavaScript SDK. The SDK mentioned in Step 2.-->
<a href="https://www.paypal.com/sdk/js?client-id=YOUR_CLIENT_ID&currency=USD"></a>
<label for="amount" style="font-weight: bold">Enter the amount to be paid:</label>
<input class="form-control" type="number" placeholder="Enter amount">
<label for="amount" style="font-weight: bold"> $</label>
<!-- The PayPal payment button will be rendered here -->
<div id="paypal-button-container"></div>
paypal.Buttons({
createOrder: function(data, actions) {
var amount = document.getElementById('amount').value;
return actions.order.create({
purchase_units: [{
amount: {
value: amount,
currency_code: 'USD'
}
}]
});
},
onApprove: function(data, actions) {
return actions.order.capture().then(function(details) {
var fullResponse = {
orderID: data.orderID,
payerID: data.payerID,
details: details
};
window.location.href = "success.html?response=" + encodeURIComponent(JSON.stringify(fullResponse));
});
},
onError: function(err) {
// If there is an error, redirect to error.html
window.location.href = "error.html";
}
}).render('#paypal-button-container');
- createOrder: This function creates a new order with the specified payment amount. In this example, the amount default is
1.0 USD. - onApprove: Once the user approves the payment, this function displays the result after PayPal payment.
- onError: this function displays the result payment errors.
Step 3.2: Create the success.html page
					    <title>Success Page</title>
    <h1>Payment Successful</h1>
    <table>
        // Code the table display here.
    </table>

        // Get the response information from the URL
        var responseParam = new URLSearchParams(window.location.search).get('response');
        var response = JSON.parse(decodeURIComponent(responseParam));
        // Display the information in the table
        document.getElementById('order-id').innerText = response.orderID;
        document.getElementById('payer-id').innerText = response.payerID;
        document.getElementById('payer-name').innerText = response.details.payer.name.given_name;
        document.getElementById('payer-address').innerText = response.details.payer.address.country_code; // Modify to get the desired address information
        document.getElementById('payer-email').innerText = response.details.payer.email_address;
        document.getElementById('payment-amount').innerText = response.details.purchase_units[0].amount.value + " " + response.details.purchase_units[0].amount.currency_code;
        document.getElementById('payment-status').innerText = response.details.status;
Step 3.3: Create the error.html page
<h1>Payment error!</h1>
Card testing
After completing the above steps, you can use Card testing to check if the application runs successfully.
Video Demo
Conclusion
This is just a simple example; it does not integrate with a Backend. In practice, you will need to connect it with a backend, such as Spring Boot, to create a complete application. Properly handling order data, managing user sessions, and securing transactions are crucial for a robust implementation. By integrating the frontend with the backend, you can ensure that payment processing is smooth and reliable, providing a better experience for your users. I hope you found this article helpful and enjoyable!
References
Source code demo: