


In this blog, we’ll walk step-by-step through implementing Test-Driven Development (TDD) in .NET Core using Visual Studio Code (VS Code). By the end of this guide, you’ll understand TDD principles, tools, and techniques, and how to apply them in real-world applications.
This tutorial uses a simple ShoppingCart example to make the concepts accessible for beginners. Let’s get started!
What is TDD?
Test-Driven Development (TDD) is a software development methodology where you write tests before writing the actual implementation code. This ensures that every part of your application behaves as expected. TDD revolves around three steps, often referred to as the Red-Green-Refactor cycle:
- Red: Write a test that describes the behavior you want. The test will fail initially because the functionality isn’t implemented yet.
- Green: Write the minimum code required to make the test pass.
- Refactor: Clean up the code, improve its quality, and remove duplication without altering its behavior.
Why Use TDD?
TDD has several benefits, especially for developers aiming to write robust, maintainable, and bug-free code:
- Ensures code correctness by validating behavior upfront.
- Reduces bugs during later stages of development.
- Encourages writing modular and testable code.
- Improves confidence when making changes to the codebase.
Setting Up Your Environment
To start coding with TDD in .NET Core, you’ll need to set up your development environment:
- Install .NET Core SDK installed.
- Visual Studio Code installed
- XUnit and Moq, we will see how to install it.
XUnit: A popular testing framework for .NET Core.
Moq: A library for creating mock objects.
Step 1: Create the Project Structure
We will create two projects:
- ShoppingCartApp: A .NET Core library project containing the application logic.
- ShoppingCartApp.Tests: A .NET Core XUnit test project to write and run tests.
Follow these steps to set up the projects:
- Open VS Code and open the integrated terminal (
Ctrl+orCmd+on macOS). - Create a solution and the two projects:
dotnet new sln -n ShoppingCartSolution
dotnet new classlib -n ShoppingCartApp
dotnet new xunit -n ShoppingCartApp.Tests
dotnet sln ShoppingCartSolution.sln add ShoppingCartApp ShoppingCartApp.Tests
cd ShoppingCartApp.Tests
dotnet add reference ../ShoppingCartApp
cd ..ShoppingCartApp: Contains application logic.
ShoppingCartApp.Tests: Contains the test logic and referencesShoppingCartApp.
3. Add dependencies to the test project:
dotnet add ShoppingCartApp.Tests package xunit
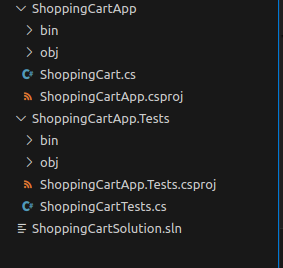
dotnet add ShoppingCartApp.Tests package moqfolder structure to follow for this blog:
Step 2: Writing the First Test
TDD starts with writing a test. Here, we’ll create a ShoppingCartTests class that ensures the shopping cart calculates the total price of items correctly.
File: ShoppingCartApp.Tests/ShoppingCartTests.cs
using Xunit;
using Moq;
using ShoppingCartApp;

namespace ShoppingCartApp.Tests
{
    public class ShoppingCartTests
    {
        [Fact]
        public void CalculateTotalPrice_ShouldReturnSumOfItemPrices()
        {
            // Arrange
            var mockLogger = new Mock<IShoppingCartLogger>();
            var shoppingCart = new ShoppingCart(mockLogger.Object);
            shoppingCart.AddItem("Apple", 2, 50);
            shoppingCart.AddItem("Banana", 3, 20);

            // Act
            var totalPrice = shoppingCart.CalculateTotalPrice();

            // Assert
            Assert.Equal(160, totalPrice);
        }
    }
}Explanation:
- Arrange: Set up mock objects (
Mock<IShoppingCartLogger>) and create aShoppingCartinstance. Add test items. - Act: Call the method under test,
CalculateTotalPrice. - Assert: Verify that the result matches the expected total.
Step 3: Implementing the ShoppingCart
we need to implement the ShoppingCart class in the ShoppingCartApp project.
File: ShoppingCartApp/ShoppingCart.cs
using System.Collections.Generic;

namespace ShoppingCartApp
{
    public class ShoppingCart
    {
        private readonly IShoppingCartLogger _logger;
        private readonly List<(string Name, int Quantity, int Price)> _items;

        public ShoppingCart(IShoppingCartLogger logger)
        {
            _logger = logger;
            _items = new List<(string Name, int Quantity, int Price)>();
        }

        public void AddItem(string name, int quantity, int price)
        {
            if (quantity <= 0 || price < 0)
                throw new ArgumentException("Quantity and price must be positive.");
            _items.Add((name, quantity, price));
            _logger.Log($"Item added: {name} x{quantity} @ ₹{price}");
        }

        public int CalculateTotalPrice()
        {
            int total = 0;
            foreach (var item in _items)
            {
                total += item.Quantity * item.Price;
            }
            _logger.Log($"Total price calculated: ₹{total}");
            return total;
        }
    }

    public interface IShoppingCartLogger
    {
        void Log(string message);
    }
}Explanation:
AddItem: Adds an item to the cart and logs the action.CalculateTotalPrice: Loops through the list of items and calculates the total price.IShoppingCartLogger: An interface to mock logging behavior for testing.
Step 4: Running the Test
To run the test:
- Open the integrated terminal.
- Navigate to the test project folder:bashCopy code
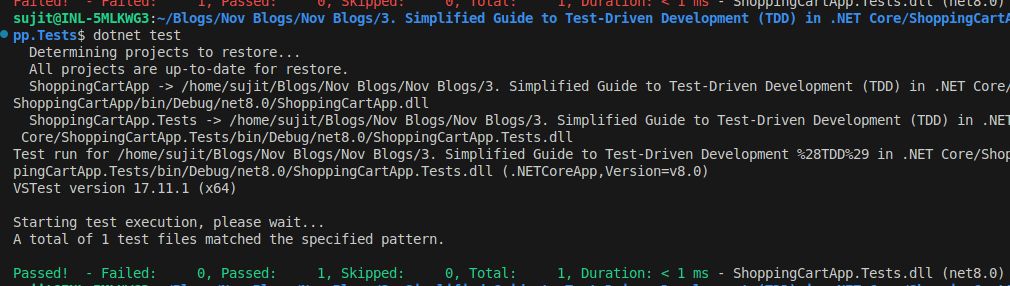
cd ShoppingCartApp.Tests3. Run the tests
dotnet testInitially, the test will pass if the implementation is correct. If it fails, refine the code until the test succeeds.
Step 5: Refactoring
After ensuring the test passes, refactor the code for clarity and efficiency:
- Remove duplication.
- Add error handling (e.g., invalid prices).
- Ensure that the code adheres to best practices.
Benefits of TDD
With TDD, you can:
- Catch bugs early in development.
- Write modular and well-structured code.
- Confidently make changes to your codebase without fear of breaking functionality.
Conclusion
In this tutorial, we’ve covered:
- Setting up a .NET Core solution in VS Code.
- Writing and running tests using XUnit.
- Implementing functionality using TDD principles.
- Debugging and refactoring code in VS Code.
By following these steps, you’ll not only build reliable applications but also develop better programming habits.