


Ensuring the greatest quality of applications through rigorous testing is crucial in the field of modern software development. Integrating Playwright with Docker enables developers to test web applications effectively, dependably, and scalable. Using Playwright in CI/CD (Continuous Integration/Continuous Deployment) pipelines can greatly improve the testing process’s speed and dependability.
Playwright
Playwright is an open-source automation library developed by Microsoft that allows developers to write robust E2E tests across multiple browsers, including Chromium, Firefox, and WebKit. Its capabilities extend to simulating user interactions, capturing performance metrics, and interacting with modern web applications that utilize complex frameworks.
Components of Playwright
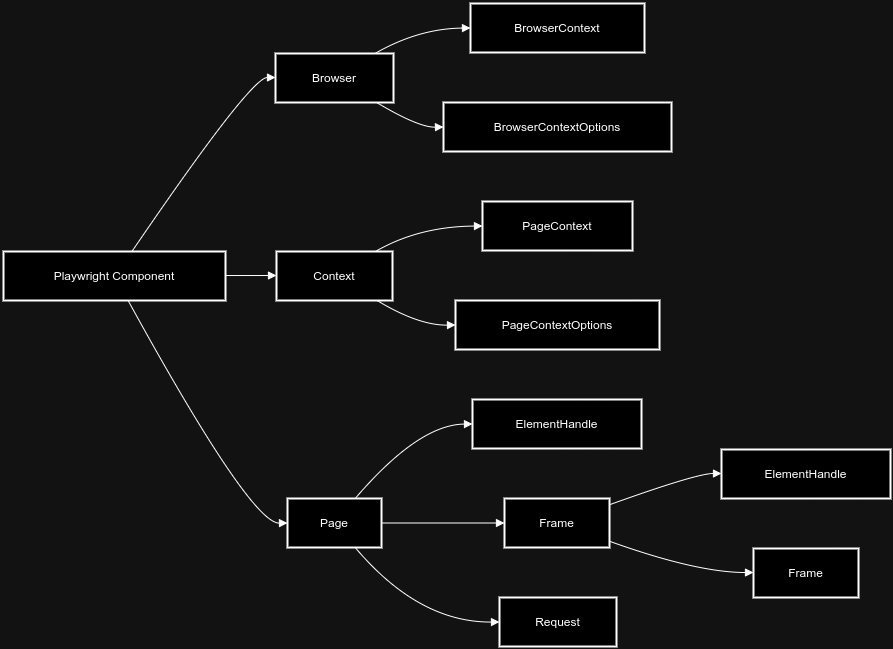
- Browser Contexts – One of the key features of Playwright is the concept of browser contexts. Each context represents an isolated cookie jar and storage, allowing multiple sessions to run simultaneously without interference. This is particularly useful for testing scenarios that require different user profiles, ensuring comprehensive coverage of user interactions.
- Pages – In Playwright, a page is an instance of a browser tab or frame. Pages encapsulate all the content loaded within them, including HTML elements, JavaScript, and media.
- Selectors – Playwright utilizes a powerful selector engine that allows developers to target elements on a page with precision. It supports various selector types, including CSS selectors, XPath, and text-based selectors.
- Assertions – Ensuring the correctness of web applications is vital, and Playwright facilitates this through built-in assertion capabilities. Testers can verify the presence, state, and values of elements, enabling the automated validation of expected outcomes.
- Test Runner Integration – While Playwright provides its own test runner, it also supports integration with popular frameworks such as Jest and Mocha. This flexibility allows teams to adopt Playwright within their existing testing ecosystems seamlessly, maximizing productivity and reducing the learning curve.
Setting Up Playwright in Docker

To get started, you need to create a Docker file that installs Playwright along with its browser dependencies. Incorporating Playwright into a Docker involves several key steps.
Step 1: Install Docker
Make sure Docker is installed on your computer before continuing. Docker Desktop is available for download on the official Docker website. Observe your operating system’s installation guidelines.
Step 2: Create a New Project Directory
Start by creating a new directory for your Playwright project. Launch your terminal and run the commands shown below:
mkdir playwright-with-docker
cd playwright-with-docker
Step 3: Initialize a Node.js Project
Begin by ensuring that your project is configured with Node.js. Initialize a package.json file if one does not exist.
npm init -yThe above command generates a package.json file that will manage your project dependencies.
Step 4: Install Playwright
Next, install Playwright and its necessary browser binaries using npm.
npm init playwright@latestTo begin, run the install command and make the following selections:
- Choose between TypeScript or JavaScript (default is TypeScript)
- The name of your tests folder (either tests by default, or e2e if your project already has a tests folder)
- Include a GitHub Actions workflow to make CI testing simple.
- Install the Playwright browsers (yes by default).
Playwright will generate the following files and download the required browsers.
playwright.config.ts
package.json
package-lock.json
tests/
  example.spec.ts
tests-examples/
  demo-todo-app.spec.ts
Step 5: Create Test Scripts
Develop your test scripts by creating a new directory under directory tests and writing Playwright tests in that directory. An example test could look like this:
Below Login Script using POM is created for dummy test login platform – Sauce Demo
// Login Script for Locked User

import {test} from '@playwright/test';
import {LoginPage} from "../../pages/login.page";

test('appears message about locked user', async function ({page}) {
    const loginPage = new LoginPage(page);
    await loginPage.openUrl();

    await loginPage.loginAsBlockedUser();
})

// Page class for Login Script of Locked User

import {BrowserContext, ElementHandle, Page} from "@playwright/test";
import {BasePage} from "./base.page";
import * as manipulations from "../helpers/elements.manipulation";

   export class LoginPage extends BasePage {
    readonly page: Page;
    private contexT: BrowserContext;
    readonly inputUserNameField: string;
    readonly inputPasswordField: string;
    readonly lockedOutUser: string;
    readonly loginBtn: string;

    constructor(page: Page) {
        super(page);
        this.page = page;
        this.inputUserNameField = '[data-test="username"]';
        this.inputPasswordField = '[data-test="password"]';
        this.lockedOutUser = 'locked_out_user';
        this.loginBtn = '[type="submit"]';
    }

   async openUrl() {
        await super.openUrls('/');
    }

     async loginAsBlockedUser(): Promise<void> {
        await manipulations.typeInput(this.page, this.inputUserNameField, this.lockedOutUser);
        await manipulations.typeInput(this.page, this.inputPasswordField, process.env.SECRET_PASSWORD);
        await manipulations.elementClick(this.page, this.loginBtn);
    }
Step 6: Create a Docker file
Make a Dockerfile file in the project directory and add the following information to it:
# Start with the Node.js base image to provide the runtime for JavaScript applications
FROM node
# Use the Playwright image as the base for running Playwright tests
FROM mcr.microsoft.com/playwright:focal
# Configure /app as the container's working directory
WORKDIR /app
# Copy the package-lock.json file into the container's /app directory
COPY package-lock.json /app
# Copy the package.json file into the container's /app directory
COPY package.json /app
# Install the package's dependencies.json using npm
RUN npm ci
# Install Playwright dependencies and browsers
RUN npx playwright install
# Copy the remaining application files into the container
COPY . .
# Set the command to run when the container starts (in this case, run "npm test")
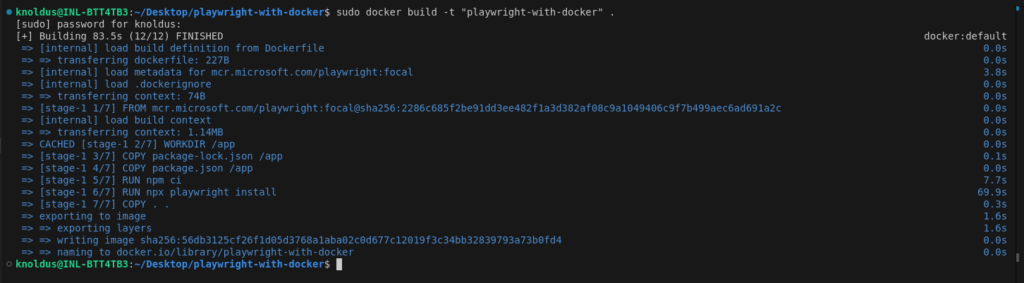
CMD ["npm", "test"]Step 7: Build Docker Image
With the Docker file created, the next step is to build the Docker image using the following command:
sudo docker build -t "playwright-with-docker" .This command instructs Docker to build an image named playwright-with-docker from the current directory (denoted by the dot).
Step 8: Running the Docker Container
After successfully building the image, you can run a container based on it. Execute the command:
sudo docker run playwright-with-docker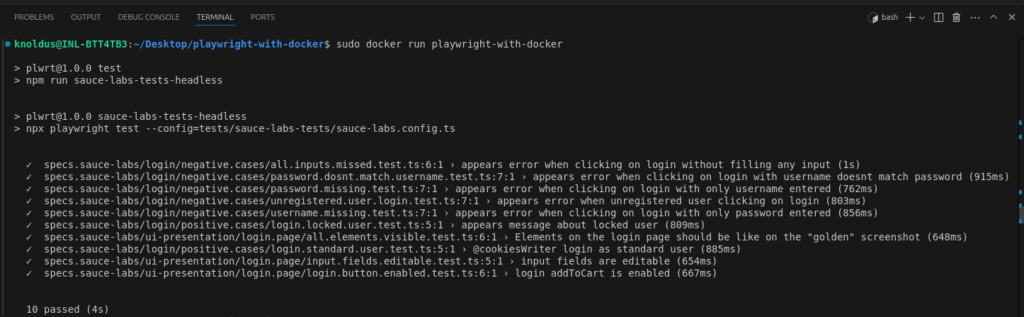
Conclusion
The integration of Playwright with Docker presents a powerful combination for modern software development and testing environments. By harnessing the capabilities of Playwright’s automated browser testing framework alongside Docker’s containerization, developers can achieve a streamlined, consistent testing process that enhances both efficiency and reliability.