


- 1. Before Aspire: the pain nobody talks about
- 2. Why Microsoft built Aspire — the short version
- 3. What is Aspire, actually?
- 4. Aspire vs Docker Compose — the question everyone asks first
- 5. Core concepts before you write any code
- 6. Why use Aspire — and where it falls short
- 7. When should you actually use Aspire?
- 8. Prerequisites
- 9. The architecture we're building
- 10. Scaffold the solution
- 11. Add PostgreSQL and Redis (running in Docker, orchestrated by Aspire)
- 12. Wire up the API project to Postgres and Redis (with EF Core)
- 13. Add the Next.js frontend as an Aspire-managed resource
- 14. Run everything — and take the full Dashboard tour
- 15. Debugging inside VS Code
- 16. Production Dockerfiles
- 17. Production architecture: the AppHost does not run in production
- 18. Deploying: Azure Container Apps (and cost-conscious alternatives)
- 19. Configuration and secrets: how Aspire merges everything
- 20. Testing your Aspire application
- 21. Beyond Postgres and Redis: the integration catalog
- 22. Aspire + AI: a quick look
- 23. Organizing large AppHosts
- 24. Practical tips for real projects
- 25. Troubleshooting checklist
- 26. Where to go from here
- 27. Source code & further reading
A hands-on guide for developers who want to go from “why does this exist?” to a running, multi-service, observable app on their own machine — and understand what changes when it ships.
Stack used in this guide
- OS: Windows 11
- IDE: Visual Studio Code
- .NET SDK: .NET 10
- Frontend: Next.js (running on Node.js v26.2.0)
- Backend: ASP.NET Core Minimal API
- Infrastructure: PostgreSQL + Redis, both running as Docker containers via Docker Desktop
- Orchestration: Aspire — formerly branded “.NET Aspire,” renamed simply Aspire starting with the Aspire 13 release, reflecting its growth into a multi-language platform (C#, TypeScript, Python, JavaScript, Java, Go, and more)
A note on versions: Aspire ships fast — this article was verified against Aspire 13.4+, the current stable line as of mid-2026. Commands like
aspire new,aspire add,aspire publish, andaspire deployreflect the current CLI-first workflow. If a command below doesn’t match what you see, runaspire --versionand check the official release notes — this is one of the fastest-moving parts of the .NET ecosystem.
1. Before Aspire: the pain nobody talks about
Picture a normal week for “Developer A,” joining a team with a fairly ordinary distributed app:
apiservice   (ASP.NET Core)
worker       (background jobs)
web          (React/Next.js)
postgres
redis
rabbitmq
To run this locally, Developer A needs to, in roughly this order:
docker compose up -dfor Postgres, Redis, RabbitMQ- Copy a
.env.exampleto.envand fill in secrets someone pasted in Slack dotnet runthe API in one terminal,dotnet runthe worker in anothernpm install && npm run devfor the frontend, in a third terminal- Manually check four different terminal windows to see if anything crashed
- Repeat steps 1-5 the next time they pull
mainand something changed
Multiply this by every teammate, and by every environment (local, CI, staging), and you get a README that looks like:
Step 1 ...
Step 2 ...
...
Step 17: if it still doesn't work, ask in #dev-help
This is the actual problem Aspire was built to solve — not “how do I run a container,” but how do I describe an entire distributed application, once, in a way that’s runnable, debuggable, and observable without a 17-step README.
2. Why Microsoft built Aspire — the short version
Aspire didn’t appear in a vacuum. It’s the next step in a fairly recognizable evolution of how teams have tried to tame local development for distributed systems:
Single app on localhost
        ↓
Docker Compose (containers, but no app-level awareness)
        ↓
Kubernetes (production-grade, but heavy for local dev)
        ↓
Service mesh (solves service-to-service concerns, adds complexity)
        ↓
OpenTelemetry (standardizes observability, but is just a data format)
        ↓
Aspire (a code-first model that ties orchestration + service discovery + observability together, for local dev first)
Each earlier tool solved one layer of the problem — Compose gave you containers, Kubernetes gave you production orchestration, OpenTelemetry gave you a common language for telemetry. None of them were designed specifically to make the inner dev loop — the thing you do fifty times a day — fast and observable. That gap is what Aspire targets.
3. What is Aspire, actually?
Aspire is an opinionated, code-first orchestration layer that solves local dev-time orchestration (and gives you a running start on cloud deployment). Instead of YAML or shell scripts, you describe your whole application graph in a project called the AppHost:
var postgres = builder.AddPostgres("postgres").AddDatabase("appdb");
var cache = builder.AddRedis("cache");
var api = builder.AddProject<Projects.ApiService>("apiservice")
    .WithReference(postgres)
    .WithReference(cache);
var web = builder.AddNpmApp("web", "../web", "dev")
    .WithReference(api)
    .WithExternalHttpEndpoints();
Run that one file, and Aspire will:
- Spin up Postgres and Redis as Docker containers
- Start your ASP.NET Core API with the right connection strings injected automatically
- Start your Next.js dev server with the API’s URL injected as an environment variable
- Open the Aspire Dashboard — a live view of logs, traces, metrics, and environment variables for every single resource
That’s the whole pitch: one command, one dashboard, zero manually-copied connection strings.
Official resources worth bookmarking before you start:
- Aspire — Your stack, streamlined (aspire.dev) — official product site and docs
- Aspire documentation on Microsoft Learn
- Build your first Aspire app (official quickstart)
- Aspire community videos & AspiriFridays livestreams — curated, kept up to date by the Aspire team
- dotnet/docs-aspire on GitHub — open to PRs if you find a mistake
- Aspire roadmap discussion (2026 → 2027) — where the project is headed
4. Aspire vs Docker Compose — the question everyone asks first
If you already use docker-compose.yml, the obvious question is: why would I need Aspire on top of that? Here’s the honest comparison:
| Docker Compose | Aspire | |
| Definition format | YAML | C# (or TypeScript) — a real programming language |
| What it can run | Containers only | Containers and plain executables/processes (dotnet run, npm run dev, Python, etc.) |
| Service discovery | Manual — you hardcode hostnames/ports | Built-in —WithReference() injects connection info automatically |
| Dashboard / observability | None built-in | Full dashboard: logs, traces, metrics, resource health |
| OpenTelemetry | Not included — you wire it yourself | Built-in by default via ServiceDefaults |
| Debugging in IDE | Attach manually per container | Native IDE debugging (F5) across the whole graph |
| Environment variables | Hardcoded per service in YAML | Computed and injected per resource reference |
| Deployment story | You write separate deploy configs | Same graph can publish to Azure Container Apps, Kubernetes, or generate a Docker Compose file for you |
| Multi-language orchestration | Yes, natively (any image) | Yes, as of Aspire 13 — first-class Python/JS/TS support alongside .NET |
The honest takeaway: Compose is a container runner; Aspire is an application model. Aspire can even emit a Compose file as one of its publish targets — so you’re not choosing one over the other forever, you’re choosing what authors your local dev-time graph.
5. Core concepts before you write any code
These four ideas are the actual foundation of Aspire. Understanding them up front will save you from a lot of confusion later.
5.1 The Resource Graph
Every builder.AddX(...) call in AppHost.cs adds a node. Every .WithReference(...) or .WaitFor(...) call adds an edge. Together they form a dependency graph that Aspire uses to compute start order automatically.
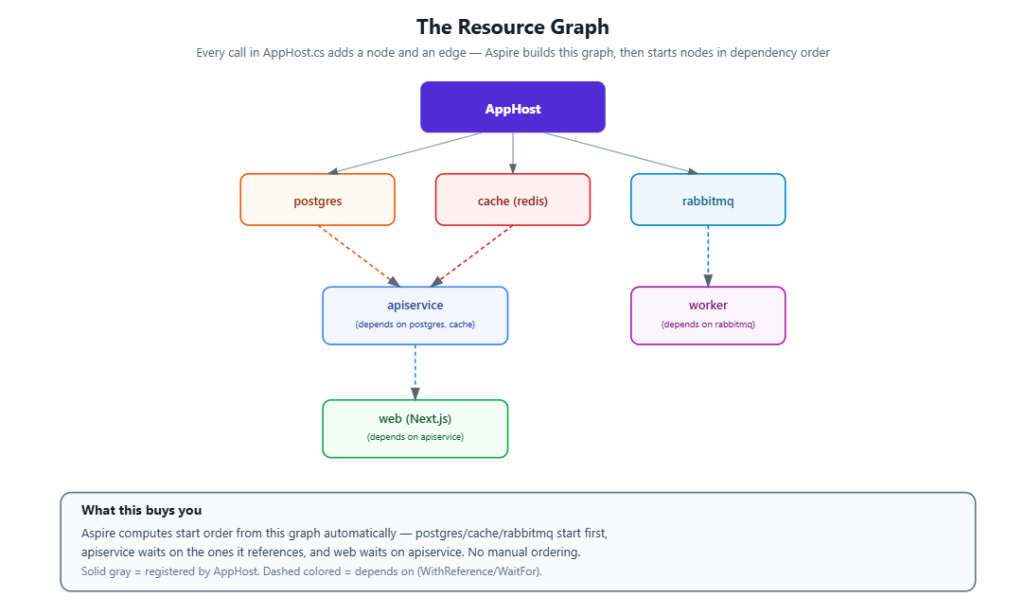
You never write “start postgres, then redis, then the API, then the frontend” — you just declare the relationships, and Aspire figures out the order.
5.2 Service Discovery — and why WithReference() is not WaitFor()
This is the single most misunderstood part of Aspire. They solve two different problems:
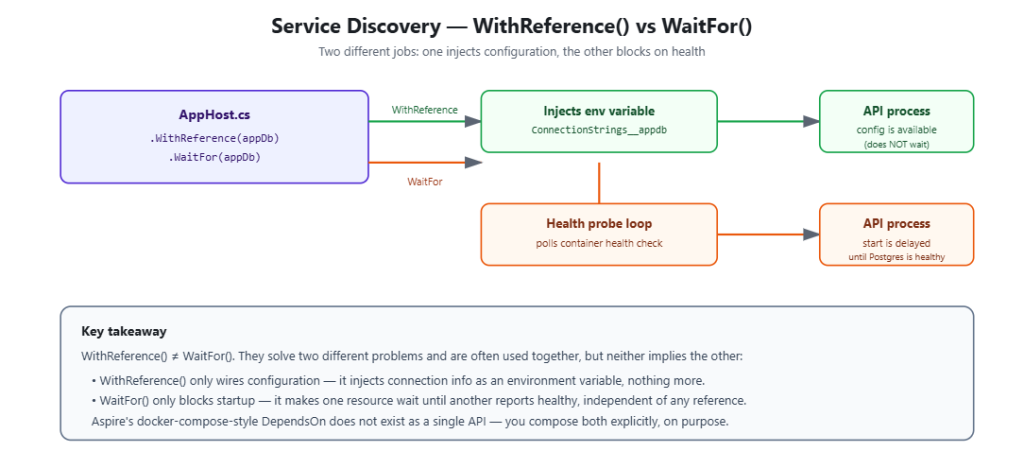
WithReference(resource)— only wires configuration. It injects an environment variable (typically a connection string, or aservices__<name>__http__0-style URL) into the dependent resource. It does not wait for anything.WaitFor(resource)— only blocks startup. It delays a resource’s start until the referenced resource reports healthy. It does not inject any configuration.
You almost always want both together for a hard dependency like a database:
var apiService = builder.AddProject<Projects.AspireDemo_ApiService>("apiservice")
    .WithReference(appDb)   // inject the connection string
    .WaitFor(appDb);        // don't start until Postgres is healthy
Crucially: Aspire never copies a literal connection string into a config file. It injects it as an environment variable at process-start time, every run, computed fresh — so there’s nothing stale to go out of sync.
5.3 ServiceDefaults — the project people accidentally delete
Every Aspire starter template includes a ServiceDefaults project, referenced by every other .NET project in the solution. It’s easy to assume it’s boilerplate and remove it — don’t. builder.AddServiceDefaults() wires up, in one call:
- OpenTelemetry — logs, metrics, and traces, exported to the dashboard
- Health checks —
/healthand/aliveendpoints - Resilience — standard retry/circuit-breaker policies for outgoing
HttpClientcalls - Service discovery — resolving
services__*style URLs into usableHttpClientbase addresses
5.4 Aspire is built on OpenTelemetry — the Dashboard is just the viewer
A common misconception: “Aspire is the dashboard.” In reality:
Aspire
  ↓
OpenTelemetry (the actual data: logs, metrics, traces — an open, vendor-neutral standard)
  ↓
Aspire Dashboard (one viewer for that data, built for local dev)
Because the underlying data is standard OTLP, you can point the same telemetry at Application Insights, Grafana, Jaeger, or any other OpenTelemetry-compatible backend in production — the dashboard is a convenience for local dev, not a proprietary lock-in.
6. Why use Aspire — and where it falls short
Benefits
- One file describes your whole architecture. The AppHost becomes the single source of truth — a new teammate can understand your entire system by reading one file instead of piecing together Compose files, READMEs, and tribal knowledge.
- Zero manually-copied connection strings, as explained above.
- Observability by default, via OpenTelemetry and the dashboard, with no extra setup.
- Not .NET-only. As of Aspire 13, Python and JavaScript/TypeScript are first-class citizens alongside .NET — not just “supported as a container.”
- The same model targets local dev and deployment. The graph can describe a Docker container locally and an Azure Postgres Flexible Server in the cloud, without a rewrite.
- Free and open source, maintained by Microsoft with an active public GitHub repo (6,000+ stars, hundreds of contributors) and community integrations.
Limitations
- It’s a dev-time orchestrator first. The dashboard is designed for local development; you’ll still want real production-grade monitoring (Application Insights, Grafana, Datadog) for a live system — see Section 17.
- You still need to understand real infrastructure. Aspire helps you describe and publish to Kubernetes, Azure Container Apps, or Docker Compose — it doesn’t replace understanding those platforms.
- Requires Docker Desktop (or Podman) locally. Check Docker Desktop’s commercial licensing terms with IT before rolling this out broadly at a larger company.
- The tooling moves fast. The CLI and publish/deploy commands have changed shape more than once as Aspire matured — pin your package/CLI versions in a real project and read release notes before upgrading.
- Learning curve. Understanding resource references,
WaitForvsWithReference, service discovery variable naming, and the publish/deploy pipeline is a real onboarding investment for a team new to the model.
7. When should you actually use Aspire?
Being direct about this makes the rest of the article more credible.
Probably skip it if:
- You’re building a small CRUD app with one database
- You’re shipping a monolith with no separate services
- It’s an internal tool used by a handful of people
- It’s a console app or a single script
- It’s a console app or a single script
Reach for it if:
- You’re building microservices or a distributed system
- You have multiple APIs/services that depend on each other
- You’re doing event-driven architecture (queues, workers, pub/sub)
- You’re building an AI system with multiple moving parts (API + vector DB + model provider + cache)
- Onboarding new developers to your local setup currently takes more than an hour
Bottom line: if your team already juggles multiple services and dependencies locally, Aspire’s time-to-value is high. If you’re shipping a single monolith with one database, you probably don’t need it yet — and that’s a perfectly fine answer.
8. Prerequisites
Install these before you touch any code. Everything below targets Windows 11.
| Tool | Version | Notes |
| .NET SDK | .NET 10 (10.0.100+) | Required by the Aspire CLI as of Aspire 13. Run dotnet --version to confirm |
| Visual Studio Code | latest | Our IDE for this guide |
| C# Dev Kit extension | latest | Marketplace ID ms-dotnettools.csdevkit; the Aspire VS Code extension builds on this |
| Docker Desktop for Windows or Rancher Desktop – Open-source (WSL…) | latest,WSL 2 backend enabled | Aspire uses this to run Postgres/Redis containers |
| Node.js | v26.2.0 | For the Next.js frontend — run node -v to confirm |
| Aspire CLI | latest (13.4+) | Installed below |
Open PowerShell and run:
# Confirm .NET 10 is installed
dotnet --version

# Install the Aspire CLI (choose ONE method)

# Option 1: WinGet (community package, simplest on Windows)
winget install Aspire.AspireCli

# Option 2: official install script
irm https://aspire.dev/install.ps1 | iex

# Option 3: as a .NET global tool
dotnet tool install -g Aspire.Cli

# Verify it worked (restart the terminal first if the command isn't found)
aspire --version

# Confirm Docker Desktop is running and using the WSL2 engine
docker version

# Confirm Node.js version
node -v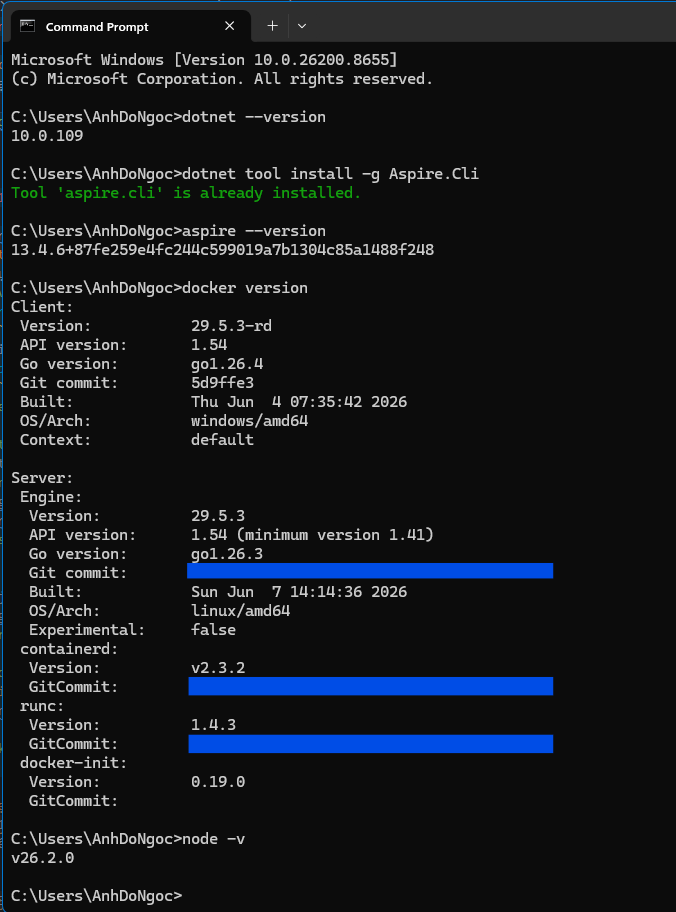
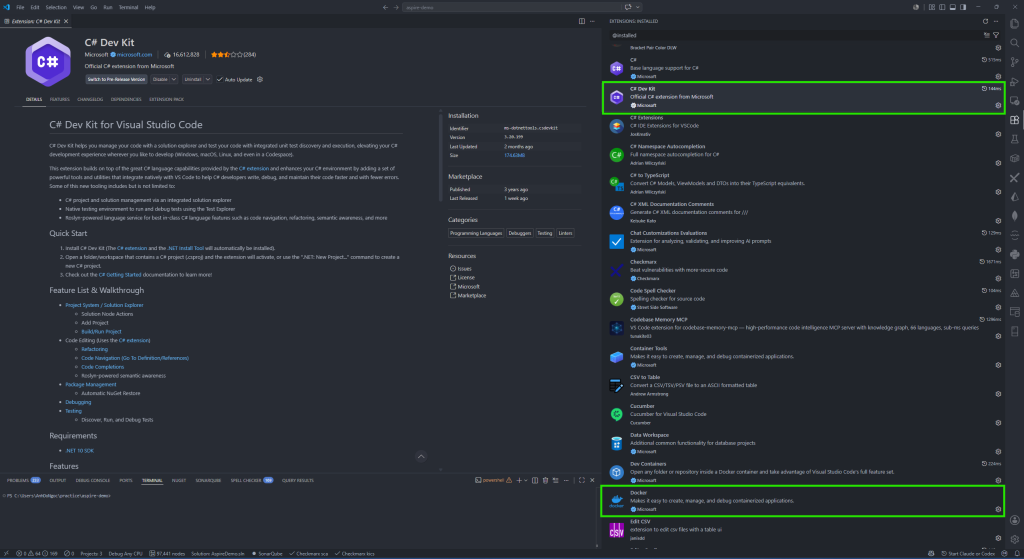
In VS Code, install these two extensions from the Extensions panel (Ctrl+Shift+X):
- C# Dev Kit — also installs the Aspire extension, which adds a dedicated Aspire panel to the Activity Bar
- Docker (
ms-azuretools.vscode-docker) — lets you inspect the containers Aspire spins up
9. The architecture we’re building
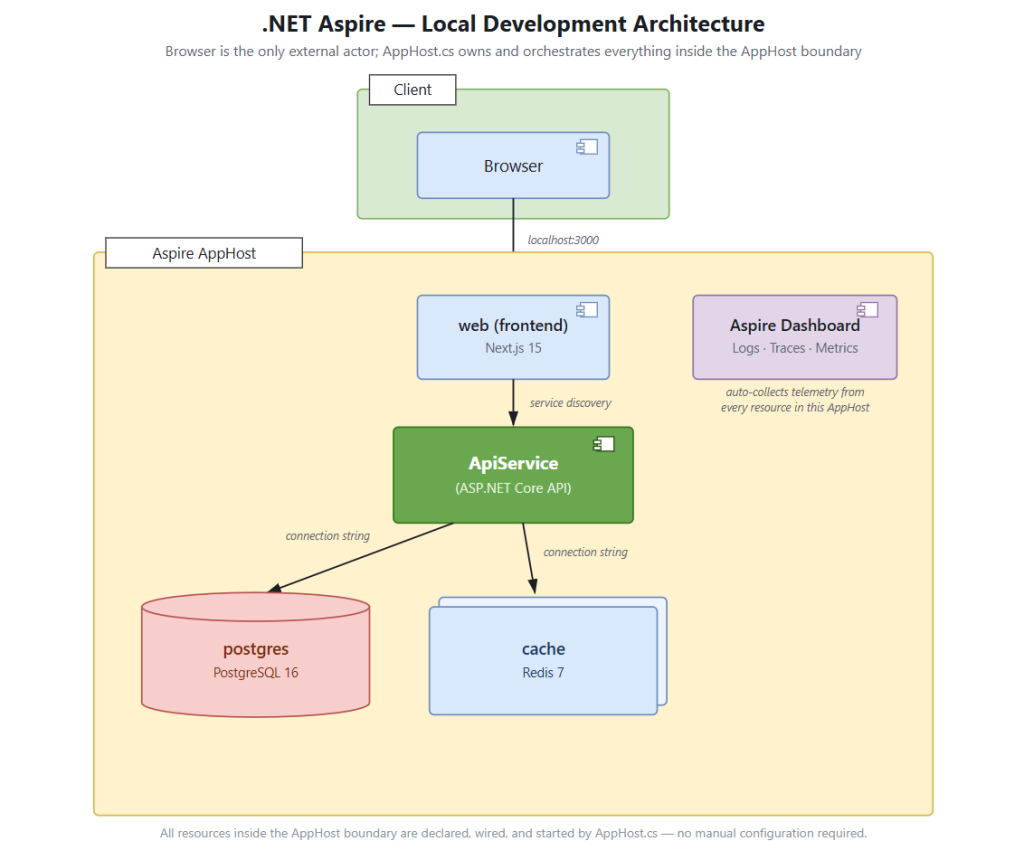
- AppHost — the orchestrator project; you run this, nothing else, in development
- apiservice — an ASP.NET Core Minimal API (.NET 10)
- web — a Next.js app, started via
npm run dev, wired to the API through Aspire’s service discovery - postgres / cache — real Postgres and Redis, running in Docker, with zero manual setup
- Aspire Dashboard — auto-launched in your browser, showing logs/traces/metrics for every resource above
10. Scaffold the solution
Aspire 13’s CLI-first workflow uses aspire new (interactive, recommended) instead of the older dotnet new aspire-starter template invocation directly — though the underlying templates are the same:
mkdir aspire-demo
cd aspire-demo

# Interactive — prompts you for template, name, and language
aspire new

# Or non-interactive, if you already know what you want:
aspire new aspire-starter -n AspireDemo -o .
This generates:
aspire-demo/
├── AspireDemo.AppHost/          ← the orchestrator (run this one)
├── AspireDemo.ApiService/       ← ASP.NET Core Minimal API
├── AspireDemo.ServiceDefaults/  ← shared telemetry/health-check config (Section 5.3)
└── AspireDemo.sln
Open the folder in VS Code:
code .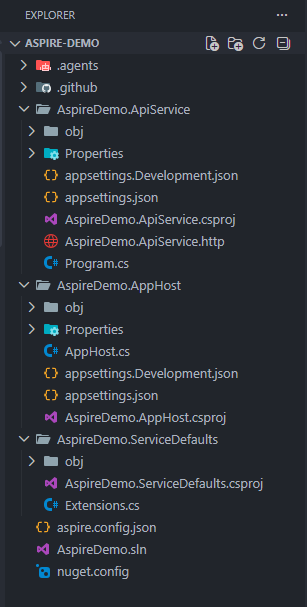
11. Add PostgreSQL and Redis (running in Docker, orchestrated by Aspire)
You can add hosting integrations either with the Aspire CLI or plain dotnet add package — both do the same thing:
cd AspireDemo.AppHost

# Aspire CLI way (interactive picker if you omit the name)
aspire add postgresql
aspire add redis

# ...or the classic NuGet way
dotnet add package Aspire.Hosting.PostgreSQL
dotnet add package Aspire.Hosting.Redis
Open AppHost.cs and update it. The full final version is available as a standalone file — AppHost.cs in the code samples — but here’s the core:
var builder = DistributedApplication.CreateBuilder(args);

// Postgres, running as a Docker container, with a persisted data volume
var postgres = builder.AddPostgres("postgres")
    .WithDataVolume()
    .WithPgAdmin(); // optional: adds a pgAdmin UI resource too

var appDb = postgres.AddDatabase("appdb");

// Redis, running as a Docker container
var cache = builder.AddRedis("cache")
    .WithDataVolume();

var apiService = builder.AddProject<Projects.AspireDemo_ApiService>("apiservice")
    .WithReference(appDb)
    .WithReference(cache)
    .WaitFor(appDb)
    .WaitFor(cache);

builder.Build().Run();
A few things worth calling out for beginners (see Section 5.2 for the full explanation of WithReference vs WaitFor):
.WithDataVolume()persists container data across restarts, so you don’t lose your dev data every time you stop the AppHost..WithReference(appDb)injects the correct connection string into the API project’s configuration automatically..WaitFor(...)tells Aspire not to start the API until Postgres/Redis report healthy — no more “connection refused” races on first boot.
12. Wire up the API project to Postgres and Redis (with EF Core)
In AspireDemo.ApiService, add the client integration packages:
cd ../AspireDemo.ApiService
dotnet add package Aspire.Npgsql.EntityFrameworkCore.PostgreSQL
dotnet add package Aspire.StackExchange.Redis
dotnet add package Microsoft.EntityFrameworkCore.Design
Create the DbContext and entity. The full file — including detailed migration instructions — is provided separately as AppDbContext.cs; the shape looks like this:
using Microsoft.EntityFrameworkCore;

namespace AspireDemo.ApiService.Data;

public class AppDbContext(DbContextOptions<AppDbContext> options) : DbContext(options)
{
    public DbSet<TodoItem> Todos => Set<TodoItem>();

    protected override void OnModelCreating(ModelBuilder modelBuilder)
    {
        modelBuilder.Entity<TodoItem>(entity =>
        {
            entity.HasKey(t => t.Id);
            entity.Property(t => t.Title).IsRequired().HasMaxLength(200);
            entity.Property(t => t.CreatedAtUtc).HasDefaultValueSql("now()");
        });

        base.OnModelCreating(modelBuilder);
    }
}

public class TodoItem
{
    public int Id { get; set; }
    public required string Title { get; set; }
    public bool Done { get; set; }
    public DateTime CreatedAtUtc { get; set; }
}
Creating your first EF Core migration
Install the EF Core CLI tool once, globally:
dotnet tool install --global dotnet-ef⚠️ Important — don’t point
dotnet efat the AppHost. You might expect--startup-projectshould beAspireDemo.AppHost, since that’s the project
you actually run. It isn’t, and doing so will fail with an error likeFile '...\AppHost\bin\Debug\net10.0\AspireDemo.ApiService.dll' not found.The reason: when the AppHost references the API via
builder.AddProject<Projects.AspireDemo_ApiService>(...), that’s a special
Aspire-only reference used purely for orchestration metadata — it does
not copyAspireDemo.ApiService.dllinto the AppHost’sbinfolder the
way a normalProjectReferencewould.dotnet efexpects that copy to
exist, so it can’t find it. This is a known, currently-unsupported scenario
in Aspire’s tooling (tracked as dotnet/aspire#2090).The supported approach — and the one Microsoft’s own Aspire EF Core samples
use — is to rundotnet efdirectly against the API project itself,
with no AppHost involved at all.
Because AppDbContext normally gets its connection string from Aspire at runtime (via AddNpgsqlDbContext<AppDbContext>("appdb")), and no AppHost is running during this command, add a design-time-only fallback connection string to appsettings.Development.json. EF only needs this string to be syntactically valid to build the model for a migration — it does not need to actually connect to a running database:
{
  "ConnectionStrings": {
    "appdb": "Host=localhost;Port=5432;Database=appdb;Username=postgres;Password=postgres"
  }
}
This value is only ever used by design-time tooling. At runtime, Aspire always overrides it with the real connection string of the Postgres container it started — so it’s safe to commit a non-secret placeholder like this one.
Now update Program.cs. The complete, working version — all five CRUD endpoints — is provided as a separate file, Program.cs; here’s the essential wiring:
using AspireDemo.ApiService;
using AspireDemo.ApiService.Data;
using Microsoft.EntityFrameworkCore;

var builder = WebApplication.CreateBuilder(args);

// Logging, health checks (/health, /alive), OpenTelemetry, resilient HttpClient defaults.
// This one call is what makes the project show up correctly in the Aspire Dashboard.
builder.AddServiceDefaults();

// Reads the connection string Aspire injected via WithReference(appDb) in AppHost.cs.
// The name "appdb" here MUST match the name used when the AppHost referenced the resource.
builder.AddNpgsqlDbContext<AppDbContext>("appdb");

// Reads the connection string Aspire injected via WithReference(cache) in AppHost.cs.
builder.AddRedisClient("cache");

// Add services to the container.
builder.Services.AddProblemDetails();

builder.Services.AddEndpointsApiExplorer();

// Allow the Next.js dev server (and its dynamic Aspire-assigned port) to call this API locally.
builder.Services.AddCors(options =>
{
    options.AddDefaultPolicy(policy =>
    {
        policy.SetIsOriginAllowed(_ => true) // relaxed for local dev only — tighten before shipping
              .AllowAnyHeader()
              .AllowAnyMethod();
    });
});

var app = builder.Build();

app.MapDefaultEndpoints(); // health checks, from ServiceDefaults

app.UseCors();

// Simple, beginner-friendly migration-at-startup for local development.
// For production, prefer a dedicated migration worker — see Data/AppDbContext.cs for why.
if (app.Environment.IsDevelopment())
{
    using var scope = app.Services.CreateScope();
    var db = scope.ServiceProvider.GetRequiredService<AppDbContext>();
    await db.Database.MigrateAsync();
}

app.MapGet("/api/todos", async (AppDbContext db) =>
    await db.Todos.OrderByDescending(t => t.CreatedAtUtc).ToListAsync());

app.MapGet("/api/todos/{id:int}", async (int id, AppDbContext db) =>
    await db.Todos.FindAsync(id) is { } todo
        ? Results.Ok(todo)
        : Results.NotFound());

app.MapPost("/api/todos", async (CreateTodoRequest request, AppDbContext db) =>
{
    var todo = new TodoItem { Title = request.Title, Done = false };
    db.Todos.Add(todo);
    await db.SaveChangesAsync();
    return Results.Created($"/api/todos/{todo.Id}", todo);
});

app.MapPut("/api/todos/{id:int}/toggle", async (int id, AppDbContext db) =>
{
    var todo = await db.Todos.FindAsync(id);
    if (todo is null) return Results.NotFound();

    todo.Done = !todo.Done;
    await db.SaveChangesAsync();
    return Results.Ok(todo);
});

app.MapDelete("/api/todos/{id:int}", async (int id, AppDbContext db) =>
{
    var todo = await db.Todos.FindAsync(id);
    if (todo is null) return Results.NotFound();

    db.Todos.Remove(todo);
    await db.SaveChangesAsync();
    return Results.NoContent();
});

app.Run();

public record CreateTodoRequest(string Title);
Notice there’s no connection string in appsettings.json — "appdb" and "cache" are just the resource names you gave them in the AppHost. Aspire resolves the rest at run time.
Now generate the migration, running the command from inside the AspireDemo.ApiService folder (no --project / --startup-project flags
needed, since the current directory already is both):
cd AspireDemo.ApiService
dotnet ef migrations add InitialCreate
This creates a Migrations/ folder with two files
(<timestamp>_InitialCreate.cs and AppDbContextModelSnapshot.cs) — commit
both to source control, they’re part of your schema history.
There are two supported ways to actually apply migrations to the database:
- Option A — apply at API startup (simplest, fine for demos): call
await db.Database.MigrateAsync()once, guarded byif (app.Environment.IsDevelopment()). This is what ourProgram.csalready does — the moment you runaspire runagain, Aspire injects the real connection string and the migration is applied automatically to the real Postgres container. - Option B — a dedicated migration worker (recommended for real projects): a small worker-service project that runs the migration once and exits, registered in
AppHost.cswith.WaitForCompletion(migrator)so the API never races another replica to apply the same migration. Full explanation and code are inAppDbContext.cs.
13. Add the Next.js frontend as an Aspire-managed resource
This is the part most tutorials skip: Aspire isn’t .NET-only. It can orchestrate any process, including a Node.js dev server, right alongside your .NET services.
First, scaffold the Next.js app next to your other projects (make sure you’re using Node.js v26.2.0 — check with node -v):
cd ..
npx create-next-app@latest web --typescript --app --eslint --tailwind --src-dir --import-alias "@/*"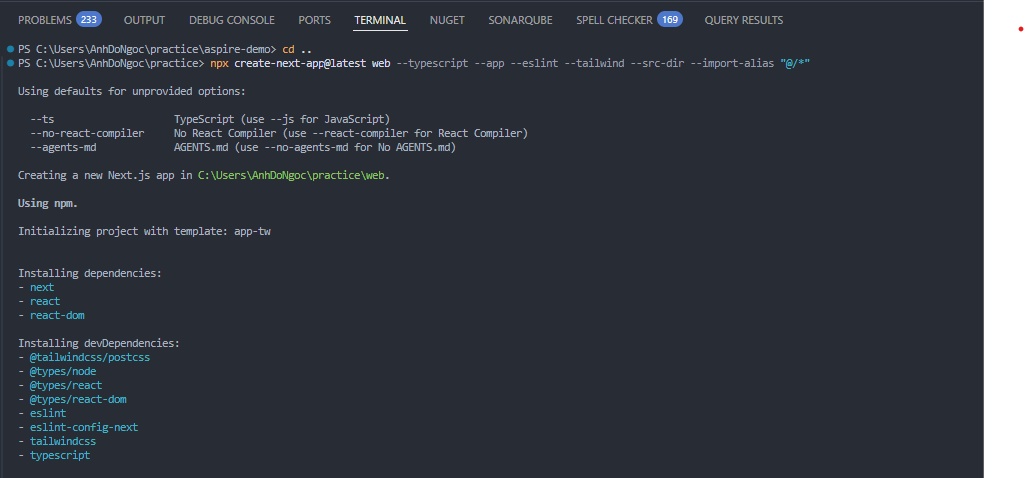
The structure now is:
aspire-demo/
├── AspireDemo.AppHost/
├── AspireDemo.ApiService/
├── AspireDemo.ServiceDefaults/
└── web/
Now tell the AppHost about it. Add the Node hosting package:
cd .\aspire-demo\AspireDemo.AppHost\
aspire add nodejs
# or: dotnet add package Aspire.Hosting.NodeJs
Update AppHost.cs:
var web = builder.AddNpmApp("web", "../web", "dev")
    .WithReference(apiService)
    .WaitFor(apiService)
    .WithEnvironment("BROWSER", "none")     // stop it from trying to auto-open a browser tab
    .WithHttpEndpoint(env: "PORT", port: 3000)
    .WithExternalHttpEndpoints();

builder.Build().Run();
WithReference(apiService) injects an environment variable into the Next.js process (something like services__apiservice__http__0) that resolves to the API’s actual local URL — which changes every run, since Aspire assigns dynamic ports.
In your Next.js code, read it through a small helper instead of hardcoding localhost:5000:
// web/src/lib/api.ts
export interface Todo {
  id: number;
  title: string;
  done: boolean;
  createdAtUtc: string;
}

export function getApiBaseUrl(): string {
  // Aspire injects this env var at process-start time — the value (and the
  // port) changes every run. Falls back to a sane default for `next build`.
  return process.env.services__apiservice__http__0 ?? "http://localhost:5150";
}

export async function getTodos(): Promise<Todo[]> {
  const res = await fetch(`${getApiBaseUrl()}/api/todos`, { cache: "no-store" });
  if (!res.ok) {
    throw new Error(`Failed to load todos (status ${res.status})`);
  }
  return res.json();
}

export async function createTodo(title: string): Promise<Todo> {
  const res = await fetch(`${getApiBaseUrl()}/api/todos`, {
    method: "POST",
    headers: { "Content-Type": "application/json" },
    body: JSON.stringify({ title }),
  });
  if (!res.ok) {
    throw new Error(`Failed to create todo (status ${res.status})`);
  }
  return res.json();
}

export async function toggleTodo(id: number): Promise<Todo> {
  const res = await fetch(`${getApiBaseUrl()}/api/todos/${id}/toggle`, {
    method: "PUT",
  });
  if (!res.ok) {
    throw new Error(`Failed to toggle todo (status ${res.status})`);
  }
  return res.json();
}

export async function deleteTodo(id: number): Promise<void> {
  const res = await fetch(`${getApiBaseUrl()}/api/todos/${id}`, {
    method: "DELETE",
  });
  if (!res.ok && res.status !== 204) {
    throw new Error(`Failed to delete todo (status ${res.status})`);
  }
}
Server actions call to API
// src/app/actions.ts
"use server";

import { revalidatePath } from "next/cache";
import { createTodo, toggleTodo, deleteTodo } from "@/lib/api";

export async function addTodoAction(formData: FormData) {
  const title = (formData.get("title") ?? "").toString().trim();
  if (!title) return;

  await createTodo(title);
  revalidatePath("/");
}

export async function toggleTodoAction(id: number) {
  await toggleTodo(id);
  revalidatePath("/");
}

export async function deleteTodoAction(id: number) {
  await deleteTodo(id);
  revalidatePath("/");
}
A simple Home page below:
// web/src/app/page.tsx
import { getTodos } from "@/lib/api";
import { addTodoAction, toggleTodoAction, deleteTodoAction } from "./actions";

export default async function Home() {
  let todos: Awaited<ReturnType<typeof getTodos>> = [];
  let error: string | null = null;

  try {
    todos = await getTodos();
  } catch (err) {
    error = err instanceof Error ? err.message : "Unknown error";
  }

  return (
    <main className="p-8 max-w-xl mx-auto">
      <h1 className="text-2xl font-bold mb-6">Todos</h1>

      {/* Add form — a native <form> posting to a Server Action */}
      <form action={addTodoAction} className="flex gap-2 mb-6">
        <input
          type="text"
          name="title"
          placeholder="What needs to be done?"
          required
          className="flex-1 border rounded-lg px-3 py-2 focus:outline-none focus:ring-2 focus:ring-blue-500"
        />
        <button
          type="submit"
          className="bg-blue-600 text-white px-4 py-2 rounded-lg hover:bg-blue-700 transition"
        >
          Add
        </button>
      </form>

      {error && (
        <p className="text-red-600 mb-4">Could not reach the API: {error}</p>
      )}

      {!error && todos.length === 0 && (
        <p className="text-gray-500">No todos yet — add your first one above.</p>
      )}

      <ul className="space-y-2">
        {todos.map((todo) => (
          <li
            key={todo.id}
            className="flex items-center justify-between border rounded-lg px-4 py-2"
          >
            <div className="flex items-center gap-3">
              {/* Toggle done/undone */}
              <form action={toggleTodoAction.bind(null, todo.id)}>
                <button
                  type="submit"
                  aria-label={todo.done ? "Mark as not done" : "Mark as done"}
                  className={`w-5 h-5 rounded border flex items-center justify-center text-xs ${
                    todo.done
                      ? "bg-green-600 border-green-600 text-white"
                      : "border-gray-400"
                  }`}
                >
                  {todo.done ? "✓" : ""}
                </button>
              </form>

              <span className={todo.done ? "line-through text-gray-400" : ""}>
                {todo.title}
              </span>
            </div>

            <div className="flex items-center gap-3">
              <span className="text-xs text-gray-400">
                {new Date(todo.createdAtUtc).toLocaleDateString()}
              </span>
              <form action={deleteTodoAction.bind(null, todo.id)}>
                <button
                  type="submit"
                  aria-label="Delete todo"
                  className="text-red-500 hover:text-red-700 text-sm"
                >
                  Delete
                </button>
              </form>
            </div>
          </li>
        ))}
      </ul>
    </main>
  );
}
14. Run everything — and take the full Dashboard tour
From the solution root:
cd AspireDemo.AppHost
aspire run
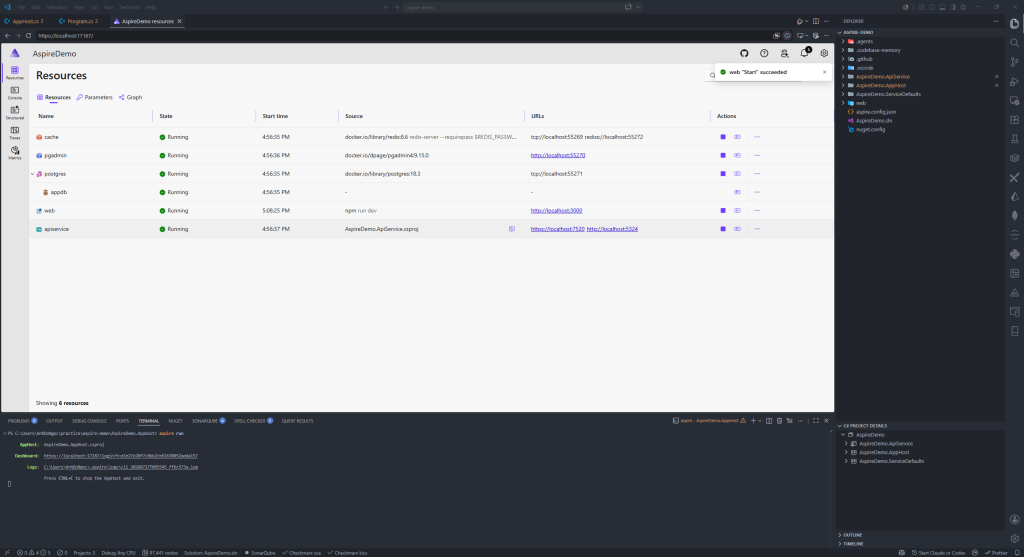
Watch the terminal — Aspire will pull/start the Postgres and Redis Docker images, start the ASP.NET Core API, run npm install + npm run dev for Next.js, and print a dashboard URL it opens automatically.
The dashboard is more than “logs and traces” — here’s the full tour most tutorials skip:
| Tab | What it shows | Why it matters |
| Resources | Every resource, its state (Running/Starting/Failed), and its endpoint URLs | Your single at-a-glance health check for the whole app |
| Console logs | Raw stdout/stderr per resource — including non-.NET processes like the Next.js dev server | Proves a resource is a real running process, not a mock |
| Structured logs | Queryable, filterable ILogger output with severity levels and scopes | Search “show me only Warning+ from apiservice” instead of grepping a terminal |
| Traces | Full distributed traces spanning process boundaries | See a single request cross Next.js → API → EF Core → Postgres → Redis, with timing for every hop |
| Metrics | OpenTelemetry metrics (request rates, durations, custom counters) | Spot a slow endpoint before it’s a production incident |
| Resource details → Configuration | Every environment variable and config value a resource actually received | The fastest way to debug “why isn’t my connection string showing up” |
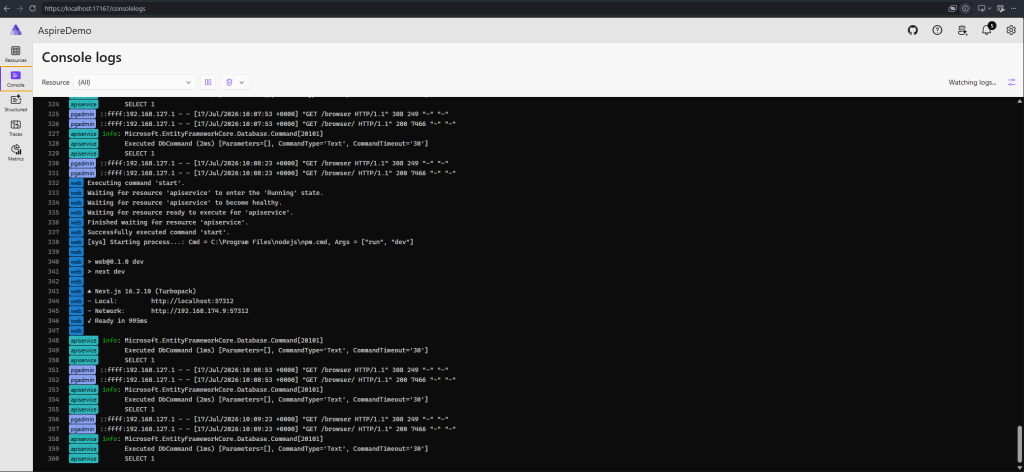
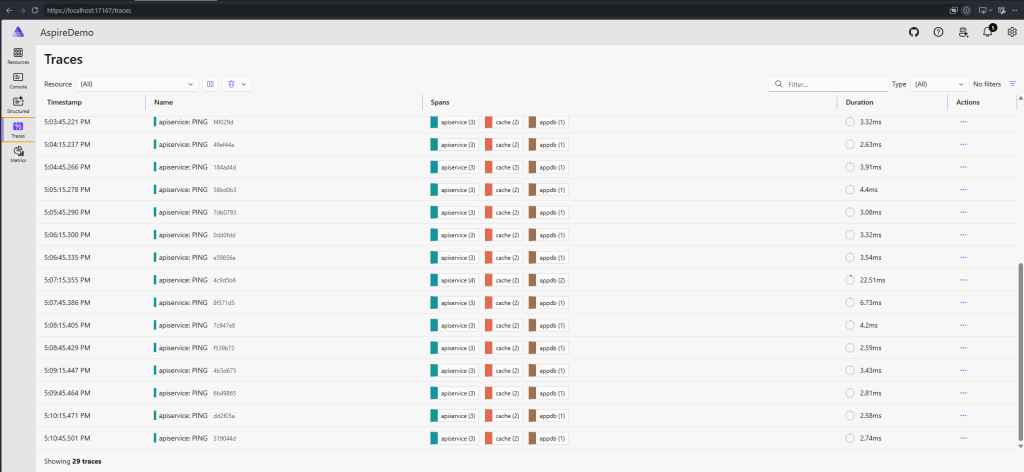
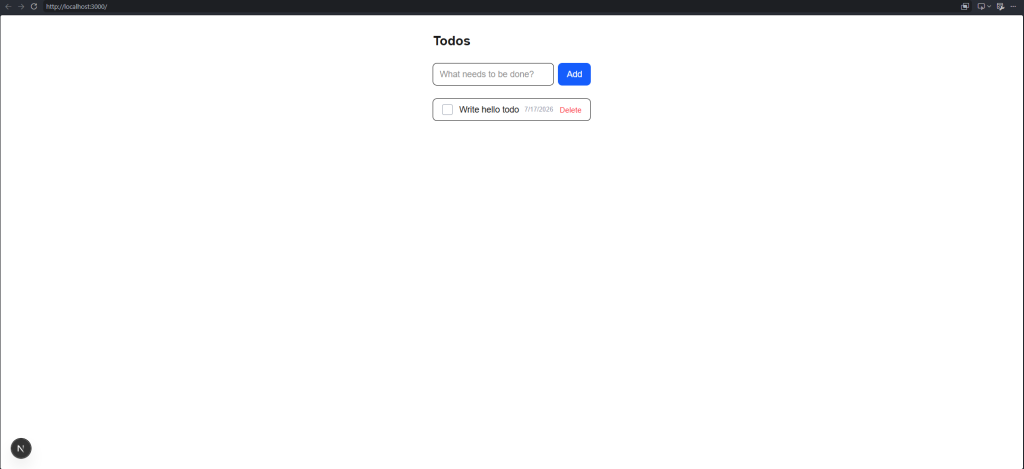
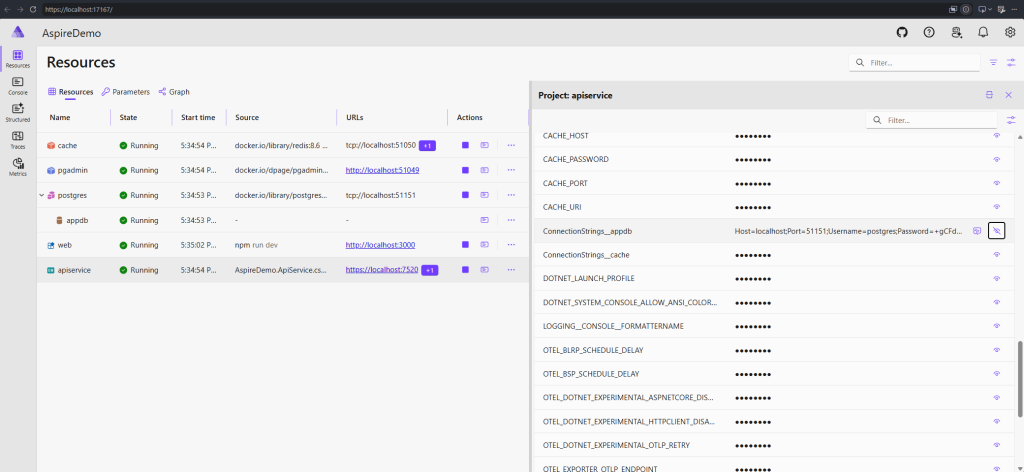
15. Debugging inside VS Code
Because the AppHost is just a normal .NET project, VS Code’s built-in debugger works on it directly:
- Open the Run and Debug panel (
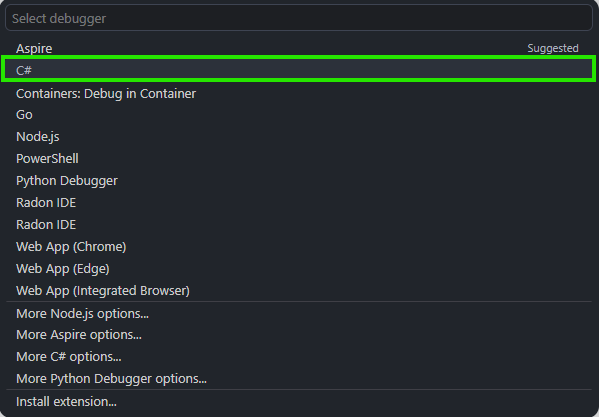
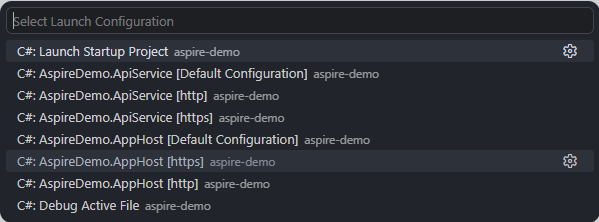
Ctrl+Shift+D) - Select C#: AspireDemo.AppHost (C# Dev Kit generates this automatically)
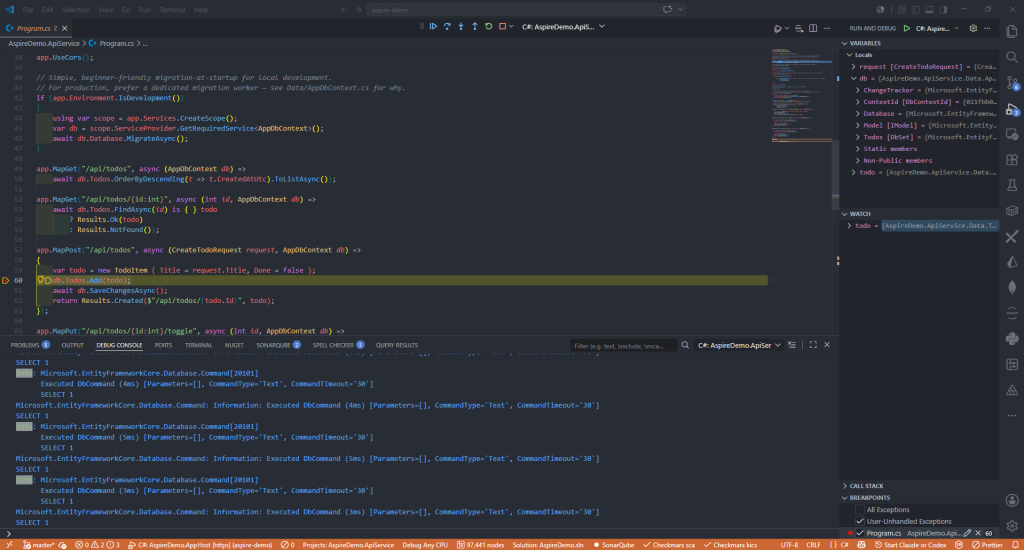
- Set a breakpoint inside
apiservice‘s/api/todosendpoint - Press
F5
Aspire launches the whole graph, and when the Next.js page calls the API, VS Code stops right on your breakpoint — even though the request originated from a Node.js process Aspire started for you.
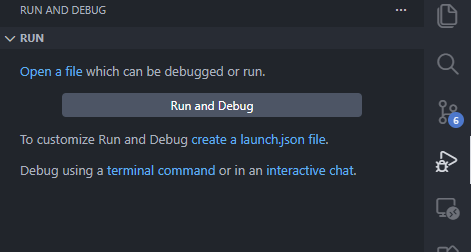
Choose Aspire or C#
Choose AppHost
Add breakpoint, run and debug
New: You can install the new ‘Aspire’ extension to make running and debugging more convenient
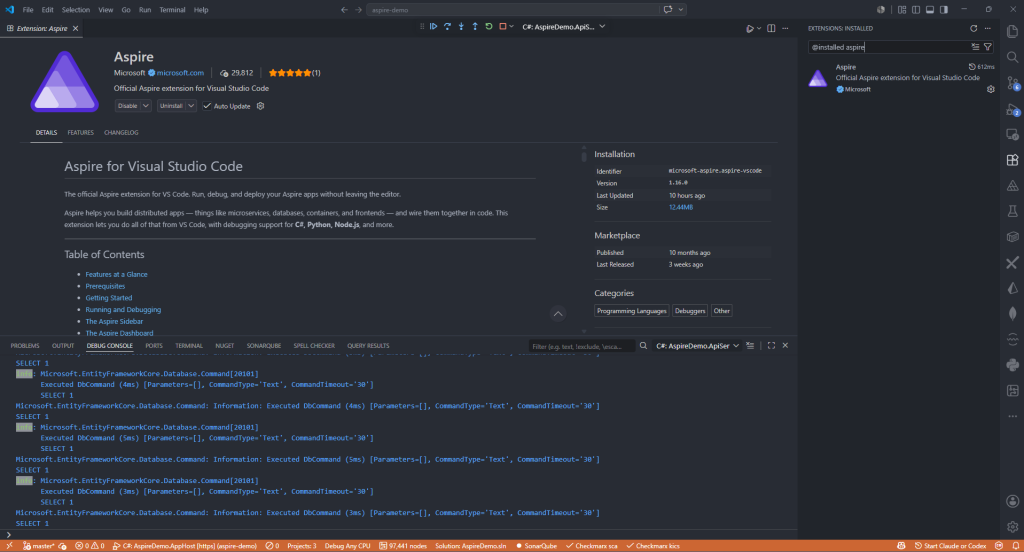
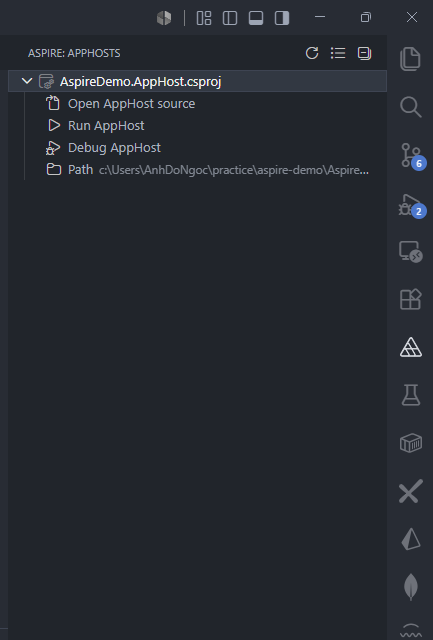
Note: If you got issue “Aspire CLI is not available on PATH. Please install it and restart VS Code.“
Follow the page Install Aspire CLI | Aspire to install Aspire CLI via WinGet, or simply by run command in powershell / command line:
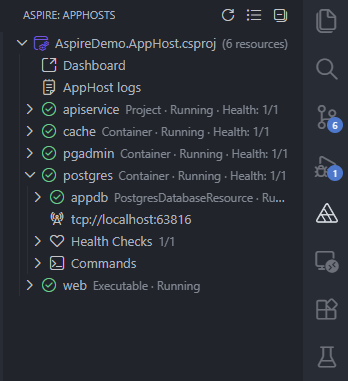
winget install Microsoft.AspireThen restart Visual studio Code, the extension will work:
16. Production Dockerfiles
Aspire’s publish pipeline can generate Dockerfiles for you automatically for plain .NET and Node/Python projects, but for full control (custom build steps, non-default flags, private feeds), it helps to know what a hand-written production Dockerfile looks like. Three complete, ready-to-use files are provided separately:
Root .dockerignore– Create this file in the root directory ofaspire-demo(at the same level asAspireDemo.AppHost,AspireDemo.ApiService, etc. — the exact location where you are when running thedocker buildcommand) to ensure you avoid the following error: “Theobj/andbin/directories generated on Windows have been included in the Docker image, overwriting the correct Linux restore results.”web/.dockerignore– Create this file as the web/dockerfile is built with its own context—the web/ directory—and does not use the .dockerignore file in the root directory), to avoid the exact same error when building the Next.js image (where the node_modules folder installed on Windows is mistakenly copied, overwriting the Linux version just installed in the container.ApiService/dockerfile— multi-stage build for the ASP.NET Core API: SDK image restores/publishes, runtime-onlyaspnetimage runs as a non-root user, with aHEALTHCHECKwired to the/healthendpoint fromServiceDefaults.web/dockerfile— multi-stage build for the Next.js frontend usingoutput: "standalone", producing a minimal runtime image onnode:26.2.0-alpine. Because Section 13’s frontend code reads the API’s address server-side, at request time (process.env.services__apiservice__http__0inside a Server Action), this image needs no build-time API URL — unlike a client-fetching setup, which would need aNEXT_PUBLIC_*build arg baked in beforenpm run build. One built image can be pointed at a different API URL in every environment just by changing a runtime environment variable, with no rebuild.docker-compose.prod.yml— wires the two images above together with real Postgres and Redis containers, injectingConnectionStrings__appdbandservices__apiservice__http__0at container-start time the same way Aspire does locally. This is what Section 18’s Option A actually runs — see that section for the full explanation and the command to run it.
Build the two Dockerfiles from the right context:
# From the solution root
docker build -f AspireDemo.ApiService/Dockerfile -t aspiredemo-api:latest .

# From inside the web/ folder
docker build -t aspiredemo-web:latest .
Sample:
1. Root aspire-demo/.dockerignore
# File: aspire-demo/.dockerignore
#
# Place this at the SOLUTION ROOT — the same folder you run
# `docker build -f AspireDemo.ApiService/Dockerfile -t aspiredemo-api:latest .`
# from. Without this file, `COPY . .` in the Dockerfile copies your local,
# host-built bin/ and obj/ folders into the container — which on Windows
# contain Windows-only NuGet paths (e.g. a fallback package folder under
# "C:\Program Files (x86)\..."). That overwrites the clean, Linux-restored
# obj/project.assets.json the container just created, causing
# `dotnet publish` to fail with:
#   "Unable to find fallback package folder 'C:\Program Files (x86)\...'"

# Build outputs — always regenerated inside the container, never copy these
**/bin/
**/obj/

# IDE / editor folders
**/.vs/
**/.vscode/
**/.idea/

# Node (the web/ project has its own separate .dockerignore too)
**/node_modules/
**/.next/

# Version control
**/.git/
**/.gitignore

# Misc
**/*.user
**/*.suo
2. web/.dockerignore
# File: web/.dockerignore
#
# Place this INSIDE the web/ folder — that's the build context for
# `docker build -t aspiredemo-web:latest .` (run from inside web/).
# Without this, `COPY . .` would copy your host's Windows-installed
# node_modules over the Linux ones the container just installed with
# `npm ci`, which can break native dependencies.

node_modules
.next
.git
.vscode

npm-debug.log*
*.local
3. AspireDemo.ApiService/Dockerfile
# File: AspireDemo.ApiService/Dockerfile
#
# Production, multi-stage Dockerfile for the ASP.NET Core API service.
# Aspire's `aspire publish` / `azd` pipelines can generate a Dockerfile for you
# automatically for plain .NET projects — but when you need custom build steps
# (native deps, private NuGet feeds, non-default publish flags), hand-writing
# one like this gives you full control.
#
# Build from the SOLUTION ROOT so the build context can see every project
# referenced by AspireDemo.ApiService.csproj:
#   docker build -f AspireDemo.ApiService/Dockerfile -t aspiredemo-api:latest .

# ---- Stage 1: restore + build ----------------------------------------------
FROM mcr.microsoft.com/dotnet/sdk:10.0 AS build
WORKDIR /src

# Copy csproj files first and restore, so Docker can cache this layer
# as long as your dependencies don't change.
COPY ["AspireDemo.ApiService/AspireDemo.ApiService.csproj", "AspireDemo.ApiService/"]
COPY ["AspireDemo.ServiceDefaults/AspireDemo.ServiceDefaults.csproj", "AspireDemo.ServiceDefaults/"]
RUN dotnet restore "AspireDemo.ApiService/AspireDemo.ApiService.csproj"

# Now copy the rest of the source and publish.
COPY . .
WORKDIR /src/AspireDemo.ApiService
RUN dotnet publish "AspireDemo.ApiService.csproj" \
      -c Release \
      -o /app/publish \
      --no-restore \
      /p:UseAppHost=false

# ---- Stage 2: runtime only (small final image) -----------------------------
FROM mcr.microsoft.com/dotnet/aspnet:10.0 AS final
WORKDIR /app

# curl is needed for the HEALTHCHECK below — the slim runtime image doesn't
# ship it (or wget) by default, to keep the image small. Installed while
# still root, before switching to the non-root user.
RUN apt-get update \
    && apt-get install -y --no-install-recommends curl \
    && rm -rf /var/lib/apt/lists/*

COPY --from=build /app/publish .

ENV ASPNETCORE_URLS=http://+:8080
EXPOSE 8080

# .NET's official runtime images (8.0+) already ship a built-in non-root
# user named "app" (UID 64198) — no need to create one with adduser/useradd.
# Those commands aren't guaranteed to exist across every base OS Microsoft
# publishes these images on (Debian, Azure Linux, chiseled Ubuntu), which is
# exactly what causes "adduser: not found" on some tags. USER app works
# identically on all of them.
USER app

# Aspire's ServiceDefaults wires up /health and /alive automatically —
# this HEALTHCHECK lets any orchestrator (Docker, Kubernetes, ACA) probe it.
HEALTHCHECK --interval=30s --timeout=3s --start-period=10s \
  CMD curl -f http://localhost:8080/health || exit 1

ENTRYPOINT ["dotnet", "AspireDemo.ApiService.dll"]
Notice when build: It must be run from the root directory of the solution (aspire-demo/), not from within AspireDemo.ApiService/, as the Dockerfile requires COPY . . to include AspireDemo.ServiceDefaults
cd aspire-demo
docker build -f AspireDemo.ApiService/Dockerfile -t aspiredemo-api:latest .
4. web/dockerfile
# File: web/Dockerfile
#
# Production, multi-stage Dockerfile for the Next.js frontend.
# Requires next.config.ts to have `output: "standalone"` (see below) so the
# build produces a minimal, self-contained server bundle.
#
# Build from inside the `web/` folder:
#   docker build -t aspiredemo-web:latest .

# ---- Stage 1: install dependencies -----------------------------------------
FROM node:26.2.0-alpine AS deps
WORKDIR /app
COPY package.json package-lock.json ./
RUN npm ci

# ---- Stage 2: build ----------------------------------------------------------
FROM node:26.2.0-alpine AS builder
WORKDIR /app
COPY --from=deps /app/node_modules ./node_modules
COPY . .
RUN npm run build

# ---- Stage 3: runtime only (small final image) -----------------------------
FROM node:26.2.0-alpine AS runner
WORKDIR /app
ENV NODE_ENV=production

RUN addgroup --system --gid 1001 nodejs && \
    adduser --system --uid 1001 nextjs

# `output: "standalone"` produces a trimmed server + only the files it needs.
COPY --from=builder /app/public ./public
COPY --from=builder --chown=nextjs:nodejs /app/.next/standalone ./
COPY --from=builder --chown=nextjs:nodejs /app/.next/static ./.next/static

USER nextjs
EXPOSE 3000
ENV PORT=3000
ENV HOSTNAME=0.0.0.0

CMD ["node", "server.js"]

# ─────────────────────────────────────────────────────────────────────────────
# Add this to next.config.ts for the standalone build:
#
#   import type { NextConfig } from "next";
#   const nextConfig: NextConfig = { output: "standalone" };
#   export default nextConfig;
#
# IMPORTANT — no build-time API URL is needed here. src/lib/api.ts reads
# `process.env.services__apiservice__http__0` at REQUEST time, inside a
# Server Component / Server Action, which runs on the Node server started by
# `node server.js` above — not in the browser. So the API's address only
# needs to exist as a runtime environment variable on the running container
# (see docker-compose.prod.yml), never baked into the image at build time.
# This also means the exact same image can be pointed at different API URLs
# in different environments (staging vs. production) without rebuilding it.
# ─────────────────────────────────────────────────────────────────────────────
5. docker-compose.prod.yml (not a separate Dockerfile, but included so that both images can be run)
# File: docker-compose.prod.yml
#
# A no-cost alternative to cloud deployment: run the whole stack with plain
# Docker Compose on any machine (a spare PC, a $5/mo VPS, your own server) —
# no Azure account, no credit card, no cloud billing required.
#
# Aspire can generate a file like this for you automatically:
#   cd AspireDemo.AppHost
#   dotnet add package Aspire.Hosting.Docker
#   aspire publish --publisher docker-compose -o ../publish-artifacts
#
# (Check `aspire publish --help` for the exact flag names on your installed
# CLI version — the publisher pipeline has changed shape a few times as
# Aspire has matured, most recently with the `aspire do` pipeline commands.)
#
# The file below is a hand-written illustration of what that output looks
# like conceptually, trimmed down for readability. Treat it as a reference,
# not a drop-in replacement for the generated file.

services:
  postgres:
    image: postgres:16
    environment:
      POSTGRES_DB: appdb
      POSTGRES_USER: appuser
      POSTGRES_PASSWORD: ${POSTGRES_PASSWORD:?set a real password in .env}
    volumes:
      - postgres-data:/var/lib/postgresql/data
    healthcheck:
      test: ["CMD-SHELL", "pg_isready -U appuser -d appdb"]
      interval: 5s
      timeout: 5s
      retries: 10

  cache:
    image: redis:7
    volumes:
      - redis-data:/data
    healthcheck:
      test: ["CMD", "redis-cli", "ping"]
      interval: 5s
      timeout: 5s
      retries: 10

  apiservice:
    build:
      context: .
      dockerfile: AspireDemo.ApiService/Dockerfile
    environment:
      ConnectionStrings__appdb: "Host=postgres;Database=appdb;Username=appuser;Password=${POSTGRES_PASSWORD}"
      ConnectionStrings__cache: "cache:6379"
      ASPNETCORE_ENVIRONMENT: Production
    depends_on:
      postgres:
        condition: service_healthy
      cache:
        condition: service_healthy
    ports:
      - "8080:8080"

  web:
    build:
      context: ./web
      dockerfile: Dockerfile
    environment:
      NODE_ENV: production
      # src/lib/api.ts reads this exact variable name server-side, at request
      # time — it's the same naming convention Aspire itself injects locally,
      # kept consistent here so no frontend code needs to change between
      # `aspire run` and a plain Docker Compose deployment.
      services__apiservice__http__0: "http://apiservice:8080"
    depends_on:
      apiservice:
        # apiservice's Dockerfile ships a HEALTHCHECK hitting /health — this
        # waits for that to pass, not just for the container process to start,
        # so the first request from web doesn't race a still-migrating API.
        condition: service_healthy
    ports:
      - "3000:3000"

volumes:
  postgres-data:
  redis-data:

# Run it with:
#   docker compose -f docker-compose.prod.yml --env-file .env up --build -d
#
# This gives you a real, working deployment of the exact same containers
# Aspire built for local dev — just without the Aspire dashboard/orchestrator,
# since that piece is a dev-time tool, not meant to ship to production.
Why is this file important alongside the two Dockerfiles above: Each dockerfile on its own only builds a single, independent image; docker-compose.prod.yml is what links them to the actual Postgres/Redis instances and injects the correct environment variables (ConnectionStrings__appdb, services__apiservice__http__0) — in line with ‘Option A’ (free, no Azure required) in section 18 of the article.
Note: If you got error when run docker build for web like below:
PS C:\Users\AnhDoNgoc\practice\aspire-demo> cd .\web\
PS C:\Users\AnhDoNgoc\practice\aspire-demo\web> docker build -t aspiredemo-web:latest .
[+] Building 52.8s (14/15) docker:default
=> [internal] load build definition from dockerfile 0.1s
=> => transferring dockerfile: 2.63kB 0.0s
=> [internal] load metadata for docker.io/library/node:26.2.0-alpine 3.0s
=> [internal] load .dockerignore 0.0s
=> => transferring context: 463B 0.0s
=> [deps 1/4] FROM docker.io/library/node:26.2.0-alpine@sha256:7c6af15abe4e3de859690e7db171d0d711bf37d27528eddfe625b2fe89e097f8 8.1s
=> => resolve docker.io/library/node:26.2.0-alpine@sha256:7c6af15abe4e3de859690e7db171d0d711bf37d27528eddfe625b2fe89e097f8 0.0s
=> => sha256:f8f3dfba4a9d386c9a8b04039708b6b8c641bd1bec9294d519bd027b36f8fb88 453B / 453B 0.3s
=> => sha256:99fcdb14935484e47368c0ccb984abae25c5d920c94071555a93da54c1e44835 58.50MB / 58.50MB 6.6s
=> => extracting sha256:99fcdb14935484e47368c0ccb984abae25c5d920c94071555a93da54c1e44835 1.4s
=> => extracting sha256:f8f3dfba4a9d386c9a8b04039708b6b8c641bd1bec9294d519bd027b36f8fb88 0.0s
=> [internal] load build context 0.1s
=> => transferring context: 279.61kB 0.1s
=> [deps 2/4] WORKDIR /app 1.7s
=> [deps 3/4] COPY package.json package-lock.json ./ 0.1s
=> [runner 3/6] RUN addgroup --system --gid 1001 nodejs && adduser --system --uid 1001 nextjs 0.4s
=> [deps 4/4] RUN npm ci 24.6s
=> [builder 3/5] COPY --from=deps /app/node_modules ./node_modules 3.9s
=> [builder 4/5] COPY . . 0.1s
=> [builder 5/5] RUN npm run build 9.3s
=> CACHED [runner 4/6] COPY --from=builder /app/public ./public 0.0s
=> ERROR [runner 5/6] COPY --from=builder --chown=nextjs:nodejs /app/.next/standalone ./ 0.0s
------
> [runner 5/6] COPY --from=builder --chown=nextjs:nodejs /app/.next/standalone ./:
------
dockerfile:33
--------------------
31 | # `output: "standalone"` produces a trimmed server + only the files it needs.
32 | COPY --from=builder /app/public ./public
33 | >>> COPY --from=builder --chown=nextjs:nodejs /app/.next/standalone ./
34 | COPY --from=builder --chown=nextjs:nodejs /app/.next/static ./.next/static
35 |
--------------------
ERROR: failed to build: failed to solve: failed to compute cache key: failed to calculate checksum of ref vehgxgy65szohit03x77fmtco::yxumm5336mltjgw5eanz47i1s: "/app/.next/standalone": not found
Root cause: The log shows that npm run build ran successfully (9.3s, no errors), but did not generate a .next/standalone folder — meaning the next.config.ts file in your project currently does not have an output line: “standalone”. This is a required setting for Next.js to build a compact, self-contained server for Docker.
Solution: Open web/next.config.ts and make sure content should like below:
import type { NextConfig } from "next";

const nextConfig: NextConfig = {
  // Enable when building Docker image production — not affected when running `npm run dev`.
  output: "standalone",
};

export default nextConfig;
Then run build the image again, this issue already be resolved.
docker build -t aspiredemo-web:latest .17. Production architecture: the AppHost does not run in production
This trips up almost everyone coming from Docker Compose, so it deserves its own section: the AppHost project is a local dev-time and build-time tool — it does not exist as a running process in your production environment.
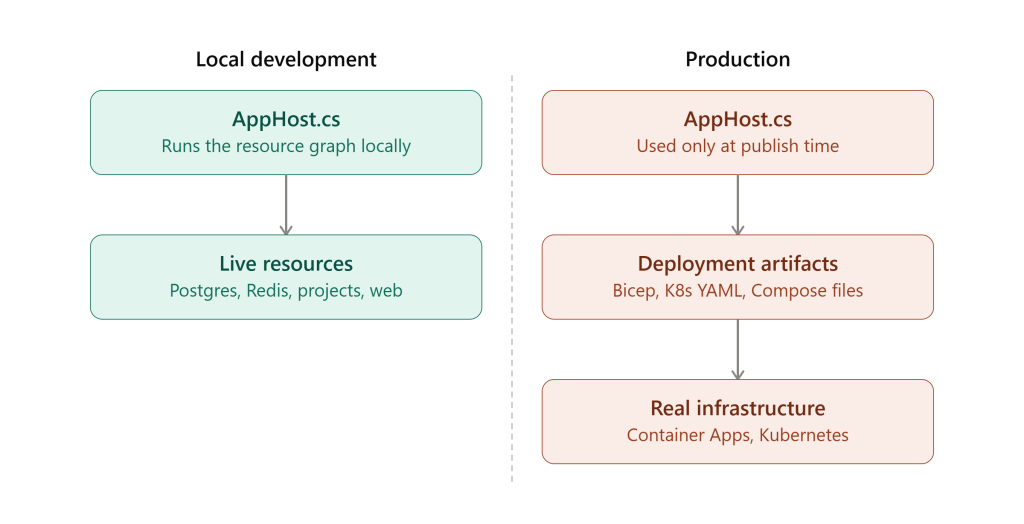
What aspire publish / aspire deploy actually do is read your AppHost.cs graph and translate it into real infrastructure definitions (Bicep for Azure, manifests for Kubernetes, or a plain docker-compose.yml) — then those artifacts are what actually runs in production. The Aspire Dashboard itself can optionally be deployed as one more resource in some targets, but the orchestrator process that ran on your dev machine never ships.
18. Deploying: Azure Container Apps (and cost-conscious alternatives)
This is usually where beginner tutorials either hand-wave or assume you have a company Azure subscription. Since not everyone has a paid Azure account, here’s an honest, cost-aware walkthrough — pick the option that matches your situation.
Option A (recommended if you just want to prove the concept, $0, no account needed): export to Docker Compose
cd AspireDemo.AppHost
aspire add docker-compose-publisher   # or: dotnet add package Aspire.Hosting.Docker
aspire publish --publisher docker-compose -o ../publish-artifacts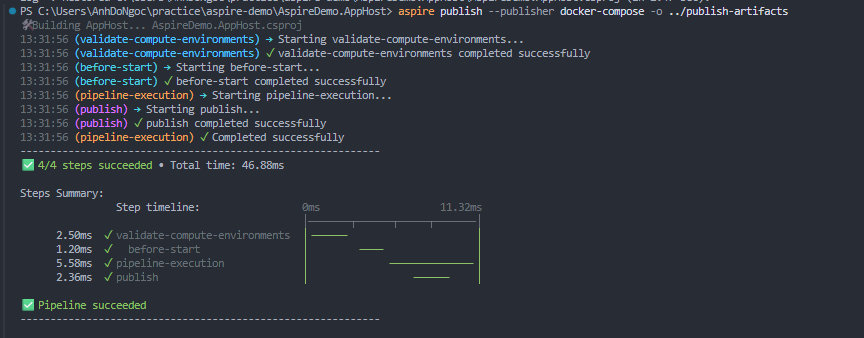
(As of Aspire 13, both aspire publish and aspire deploy are GA — check aspire publish --help for the exact current flag names on your installed version.)
A reference example of what that output conceptually looks like is provided separately as docker-compose.prod.yml, using the two Dockerfiles from Section 16.
Before running it, create a .env file next to docker-compose.prod.yml (same folder as AspireDemo.AppHost) — the compose file deliberately refuses to start without it, via POSTGRES_PASSWORD:?set a real password in .env:
"POSTGRES_PASSWORD=YourStrongPassword123!" | Out-File -Encoding utf8 -NoNewline .envThen run it:
docker compose -f docker-compose.prod.yml --env-file .env up --build -dTwo things need adjusting before this container will report healthy, both caused by the same root cause: ASPNETCORE_ENVIRONMENT: Production in the compose file means app.Environment.IsDevelopment() is now false everywhere it’s checked — and two places in our code use it as a guard:
AspireDemo.ServiceDefaults/Extensions.cswrapsMapDefaultEndpoints()‘s health check registration inif (app.Environment.IsDevelopment()). In Production,/healthis never mapped — so theHEALTHCHECKinApiService.Dockerfile(which callscurl -f http://localhost:8080/health) always fails,apiservicenever reports healthy, andweb— which waits on it — times out and never starts.Program.cswraps thedb.Database.MigrateAsync()call the same way. In Production, migrations never run, so theTodostable is never created — the samerelation "Todos" does not existerror from Section 15 resurfaces here.
For this $0, single-instance, not-public-facing demo, the simplest fix is to drop both guards:
// AspireDemo.ServiceDefaults/Extensions.cs
public static WebApplication MapDefaultEndpoints(this WebApplication app)
{
    app.MapHealthChecks("/health");
    app.MapHealthChecks("/alive", new HealthCheckOptions
    {
        Predicate = r => r.Tags.Contains("live")
    });
    return app;
}
// AspireDemo.ApiService/Program.cs — run unconditionally instead of only in Development
using var scope = app.Services.CreateScope();
var db = scope.ServiceProvider.GetRequiredService<AppDbContext>();
await db.Database.MigrateAsync();
This shortcut is fine for this tutorial, but not for a real production deployment — see the callout box below for what to do instead once real users are involved.
Rebuild and start again:
docker compose -f docker-compose.prod.yml --env-file .env up --build -d
docker compose -f docker-compose.prod.yml ps
You should see apiservice reach healthy and web reach Running. This proves the “same shape locally and in production” story without touching any cloud billing at all.
If you’re shipping this for real, don’t leave it like this. The two shortcuts above trade correctness for tutorial simplicity, and both have real fixes:
/healthshould stay guarded from the public internet, not from itself. An unauthenticated health endpoint that reports dependency status (database down? cache down?) is useful reconnaissance for an attacker and shouldn’t sit on the same public port as your app. Bind it to a separate, internal-only port (.RequireHost("*:8081")) that your orchestrator’s probe can reach but your public load balancer/ingress never exposes — Kubernetes liveness/readiness probes and Azure Container Apps both support probing on a dedicated port this way.- Migrating at API startup doesn’t scale past one instance. The moment you run more than one replica for availability, every replica races to run the same migration at once on startup — best case wasted work, worst case a lock conflict or a rolling deploy that migrates the schema mid-traffic. Move
MigrateAsync()into a small, separate worker that runs once, applies migrations, and exits before any API replica starts — exactly the “Option B” pattern already described inAppDbContext.cs(Section 12), wired up in Compose viadepends_on: migrator: condition: service_completed_successfullyor, in Kubernetes, as a Job/init container ahead of the Deployment.
Option B: a real Azure Container Apps deployment
If you do want to try a real cloud deployment, Azure Container Apps (ACA) is Aspire’s most mature, first-class deployment target, orchestrated through the Azure Developer CLI (azd).
winget install microsoft.azd

cd AspireDemo.AppHost
azd init
# -> "Use code in the current directory" -> confirm -> give it an environment name

azd auth login
azd up
azd up will ask for your Subscription and Location, then create a resource group, an Azure Container Registry, a Log Analytics workspace, a Container Apps Environment, and deploy each Aspire resource as a Container App — typically in one to two minutes for a small app.
Clean up when you’re done testing — cloud resources bill while they exist, not just while you’re using them:
azd downDo you actually need a paid Azure account?
- Azure Free Account: 200creditfor30days,plusan“alwaysfree“monthlygranton55+services(ContainerAppsincluded).Acreditcardisrequiredforidentityverification—asmalltemporaryauthorization( 1) may appear and is refunded; you’re not charged further unless you explicitly upgrade.
- Azure for Students: $100 credit, no credit card required — just an academic email. The easiest zero-friction path if you’re a student.
- No card at all: use Option A above, or a no-card-required PaaS free tier like Render (deploying your built container images individually, outside Aspire’s ACA publisher).
Further reading on deployment
- Deploy an Aspire project to Azure Container Apps (official docs, in-depth)
- Deploy Aspire apps to Azure Container Apps with azd (aspire.dev)
- Quickstart: Deploy an Aspire app to Azure App Service — an alternative target; historically more limited than ACA (fewer public endpoints per project, no deployed dashboard) — check current docs for the latest status before picking it
- Azure free account FAQ
- Azure for Students
19. Configuration and secrets: how Aspire merges everything
A common question: “if I have appsettings.json, environment variables, and Aspire-injected values, which one wins?” .NET’s standard configuration precedence still applies — Aspire just adds another provider into the stack:
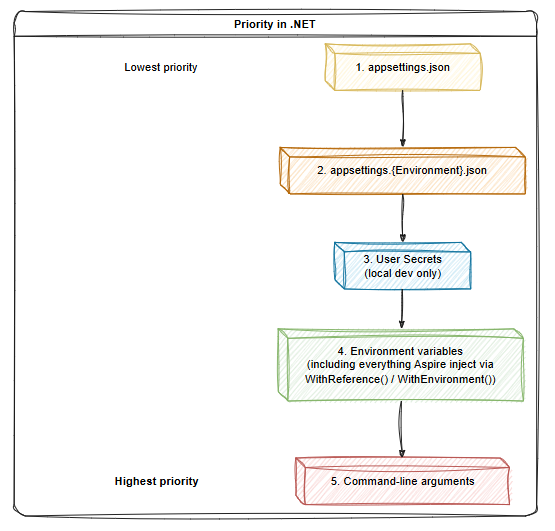
Practical guidance:
- Never put real secrets in
AppHost.cs. It’s a normal C# file that ends up in source control. - Local dev secrets →
dotnet user-secrets set "SomeKey" "value"in the consuming project. - Production secrets → your target platform’s secret store (Azure Key Vault, Kubernetes Secrets, etc.); Aspire’s Azure integrations can wire a Key Vault resource into the graph with
builder.AddAzureKeyVault(...), so the reference pattern stays the same even though the backing store changes between environments. - Because environment variables sit above
appsettings.jsonin precedence, anything Aspire injects viaWithReference()will correctly override a stale localappsettings.jsonvalue — this is by design, not a bug.
20. Testing your Aspire application
Aspire ships first-class testing support via Aspire.Hosting.Testing, which lets you spin up the real resource graph — real Postgres container and all — inside an integration test, then tear it down automatically:
cd ..
dotnet new aspire-nunit -n AspireDemo.Tests   # xunit/mstest templates also available
[Test]
public async Task GetTodos_ReturnsSuccessAndCorrectContentType()
{
    var appHost = await DistributedApplicationTestingBuilder
        .CreateAsync<Projects.AspireDemo_AppHost>();

    await using var app = await appHost.BuildAsync();
    await app.StartAsync();

    var httpClient = app.CreateHttpClient("apiservice");
    await app.ResourceNotifications.WaitForResourceHealthyAsync("apiservice");

    var response = await httpClient.GetAsync("/api/todos");

    Assert.That(response.IsSuccessStatusCode, Is.True);
}
This is fundamentally different from mocking your database — it’s a real integration test against a real, ephemeral Postgres container, orchestrated the same way your local dev environment is. It’s slower than a unit test, but it catches an entire category of “works on my machine, fails in CI” bugs that mocks can’t.
21. Beyond Postgres and Redis: the integration catalog
Postgres and Redis are the “hello world” of Aspire resources, but the hosting integration catalog is much wider. A sample of what’s available via aspire add or dotnet add package Aspire.Hosting.*:
| Integration | Package (abbreviated) | Use case |
|---|---|---|
| RabbitMQ | Aspire.Hosting.RabbitMQ | Message queues, event-driven architecture |
| Apache Kafka | Aspire.Hosting.Kafka | Event streaming at scale |
| Azure Storage (Blob/Queue/Table) | Aspire.Hosting.Azure.Storage | File storage, queues, NoSQL tables |
| Azure SQL / SQL Server | Aspire.Hosting.SqlServer / Aspire.Hosting.Azure.Sql | Relational data on the Microsoft stack |
| Azure OpenAI | Aspire.Hosting.Azure.CognitiveServices | LLM-backed features |
| Ollama | Aspire.Hosting.Ollama (Community Toolkit) | Local, offline LLM inference |
| Qdrant | Aspire.Hosting.Qdrant (Community Toolkit) | Vector search / RAG |
| Milvus | Aspire.Hosting.Milvus (Community Toolkit) | Vector search at larger scale |
| MongoDB | Aspire.Hosting.MongoDB | Document database |
The point isn’t to memorize this table — it’s to internalize that Aspire is not “the Postgres and Redis tool.” The same WithReference() / WaitFor() pattern you already know applies identically to every resource in this list. See the Aspire Community Toolkit for integrations beyond the officially maintained set.
22. Aspire + AI: a quick look
Because so many teams are now shipping an LLM-backed feature alongside a normal web app, a common Aspire shape looks like:
var vectorDb = builder.AddQdrant("vectordb");
var openAi = builder.AddAzureOpenAI("openai")
    .AddDeployment("chat", "gpt-4o-mini", "2024-07-18");

var apiService = builder.AddProject<Projects.ApiService>("apiservice")
    .WithReference(vectorDb)
    .WithReference(openAi)
    .WaitFor(vectorDb);
The same benefits apply: the API gets its Qdrant connection and Azure OpenAI endpoint/key injected automatically, and both resources show up in the dashboard with their own logs and traces — which matters a lot when you’re debugging why a RAG pipeline returned a weird answer, since you can see the exact vector search call and the exact prompt sent to the model in the same trace. Community integrations also cover local-first setups (Ollama for offline models, Foundry Local) so you can develop against a free local model and swap to Azure OpenAI only in staging/production via configuration, not code changes.
23. Organizing large AppHosts
A single-file AppHost.cs is fine for a demo. It stops being fine once you have 15+ resources. The common pattern for real projects is to split resource wiring into extension methods, grouped by concern:
AspireDemo.AppHost/
├── AppHost.cs                  <- thin: just calls the extensions below
└── Extensions/
    ├── DatabaseExtensions.cs   <- AddPostgres, AddSqlServer, migrations wiring
    ├── MessagingExtensions.cs  <- AddRabbitMQ, AddKafka
    ├── ObservabilityExtensions.cs
    └── ProjectExtensions.cs    <- AddProject calls + their WithReference/WaitFor chains
// Extensions/DatabaseExtensions.cs
public static class DatabaseExtensions
{
    public static IResourceBuilder<PostgresDatabaseResource> AddAppDatabase(
        this IDistributedApplicationBuilder builder)
    {
        return builder.AddPostgres("postgres")
            .WithDataVolume()
            .AddDatabase("appdb");
    }
}

// AppHost.cs stays readable:
var appDb = builder.AddAppDatabase();
var cache = builder.AddCache();
var apiService = builder.AddApiService(appDb, cache);
var web = builder.AddWebFrontend(apiService);
builder.Build().Run();
This keeps AppHost.cs as a readable table of contents for your whole system, instead of a 1,000-line wall of chained method calls.
24. Practical tips for real projects
- Don’t fight the ports: let Aspire assign dynamic ports for internal service-to-service calls; only pin a port (like we did for Next.js on 3000) when something external — your browser, a mobile app — needs a stable address.
- Docker Desktop must be running before
aspire run, or the Postgres/Redis resources will fail to start. This trips up almost everyone the first time. - Pin your Aspire package versions in any real project —
aspire updatewill tell you what’s available, but review release notes before jumping minor versions. - Use
aspire doctorif something feels wrong with your local environment — it diagnoses common setup issues (missing SDK, cert trust, Docker connectivity) in one command.
25. Troubleshooting checklist
| Symptom | Likely cause | Fix |
|---|---|---|
| AppHost fails immediately with a Docker-related error | Docker Desktop isn’t running, or WSL2 backend is off | Start Docker Desktop, confirm docker version works in PowerShell |
| Next.js resource shows “Failed to start” in the dashboard | Wrong Node version, or node_modules missing | Confirm node -v is v26.2.0; delete node_modules and let Aspire re-run npm install |
| API can’t reach Postgres | Missing .WaitFor(appDb) | Add .WaitFor() so the API waits for the DB health check before starting |
| Next.js can’t find the API URL | Reading the wrong environment variable name | Check the resource’s Configuration tab in the dashboard (Section 14) and confirm the exact services__* key Aspire injected |
| Dashboard doesn’t open automatically | Browser launch is disabled in some environments (e.g., remote/SSH VS Code) | Copy the dashboard URL printed in the terminal and open it manually |
azd up fails on registry push | Admin user not enabled on the Container Registry | Azure Portal -> your ACR -> Settings -> Access keys -> enable Admin user |
| General “something’s wrong with my setup” | Any local environment issue | Run aspire doctor for automated diagnostics |
26. Where to go from here
- Add authentication to the API and pass the Next.js session token through server-side
fetchcalls - Add a background worker project (
builder.AddProject<Projects.Worker>(...)) and watch it show up in the same dashboard - Try the testing pattern from Section 20 against your own resource graph
- Explore the Aspire Community Toolkit for integrations beyond the official set
- Browse the official Aspire docs and aspire.dev for anything this article didn’t cover
Aspire’s real value isn’t any single feature — it’s that your local dev environment, your debugging story, your tests, and your first deployment target all come from the same resource graph. Once you’ve run one command that starts a database, a cache, an API, and a Next.js app with zero manual wiring, full distributed tracing, and a real integration test against real containers, going back to a stack of terminal windows and a hand-maintained README feels like a downgrade.
27. Source code & further reading
Full source code
The complete, working project from this article — every file shown across all 27 sections, already wired together — is available on GitHub:
ASPIRE_DEMO Repository
clone it, run aspire run from AppHost/, and you’ll have the exact Postgres + Redis + ASP.NET Core API + Next.js stack described in this guide running locally within a few minutes. Includes the fixedApiService.Dockerfile, both .dockerignore files, and docker-compose.prod.yml from Section 16–18.
If you spot something in the repo that’s drifted from this article (Aspire moves fast — see the version note in Section 8), please open an issue or a PR; both are welcome.
Official Aspire resources
- aspire.dev — official product site, docs, and the community videos & AspiriFridays archive
- .NET Aspire documentation on Microsoft Learn
- Build your first Aspire app (official quickstart)
- dotnet/aspire on GitHub — source code, issues, release notes
- dotnet/docs-aspire on GitHub — the docs source, open to PRs
- Aspire Community Toolkit — community-maintained integrations beyond the official set (Section 21)
Deployment references (Section 18)
- Deploy an Aspire project to Azure Container Apps (official docs, in-depth)
- Deploy Aspire apps to Azure Container Apps with azd (aspire.dev)
- Azure free account FAQ
- Azure for Students