


Authenticating Terraform with Google Cloud Platform (GCP) in GitLab CI/CD can be streamlined by leveraging Workload Identity Federation (WIDF) and Service Account Impersonation. This approach eliminates the need for storing long-lived service account keys, improving security and compliance.
In this blog, we will guide you through the steps to set up Terraform authentication with GCP using WIDF and service account impersonation in GitLab CI/CD.
Prerequisites
Before we begin, ensure the following:
- A Google Cloud Platform (GCP) project with billing enabled.
- The Google Cloud SDK installed on your local machine for setting up initial configurations.
- Admin access to both GCP and GitLab.
Overview of Steps
- Enable Workload Identity Federation in GCP.
- Create a Service Account in GCP with required roles.
- Set up a Workload Identity Pool and Provider.
- Configure the Terraform provider.
- Implement the GitLab CI/CD pipeline.
Step 1: Enable Workload Identity Federation in GCP
- In the GCP Console, navigate to IAM & Admin > Workload Identity Federation.
- Create a new Workload Identity Pool.
- Name:
gitlab-widf-pool - Pool ID:
gitlab-pool - Description: “Workload Identity Pool for GitLab CI/CD.”
- Name:
Step 2: Create a Service Account in GCP
- In the GCP Console, go to IAM & Admin > Service Accounts.
- Create a Service Account:
- Name:
terraform-sa - Email:
terraform-sa@<project-id>.iam.gserviceaccount.com
- Name:
- Grant necessary roles to the service account, e.g.,:
roles/owner(for testing only).roles/WorkloadIdentityUser.
- Allow impersonation of this service account by the Workload Identity Pool:
Goto – Service Accounts > Grant Permission
In Principal add – principalSet://iam.googleapis.com/projects/PROJECT_ID/locations/global/workloadIdentityPools/POOL_ID/*
In roles add – WorkloadIdentityUser andServiceAccountTokenCreator.
Click save.
Step 3: Set Up Workload Identity Provider for GitLab
- In the GCP Console, go to IAM & Admin > Workload Identity Federation.
- Select the Workload Identity Pool created earlier (
gitlab-widf-pool). - Click on Add Provider and fill in the details:
- Provider Type:
OIDC. - Provider Name:
gitlab-provider. - Issuer URL:
https://gitlab.com.
- Provider Type:
- Under Attribute Mapping, configure:
google.subjectmapped toassertion.sub.- attribute.namespace_id mapped to assertion.namespace_id
- Under Access Control, specify conditions to restrict access, e.g.,
- Condition: assertion.namespace_id==’GITLAB_GROUP_ID’.
- Click Add Provider to finalize.
Step4: Configure Terraform Provider
Update your main.tf file to use the GCP provider and configure it for impersonation:
provider “google” {
project = var.project_id # Replace with your GCP project ID
impersonate_service_account = “service_account_email”
}
Step 5: Implement GitLab CI/CD Pipeline
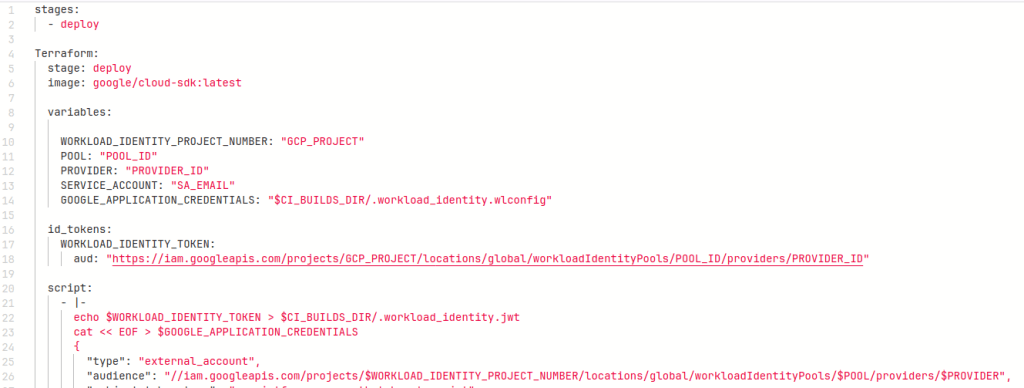
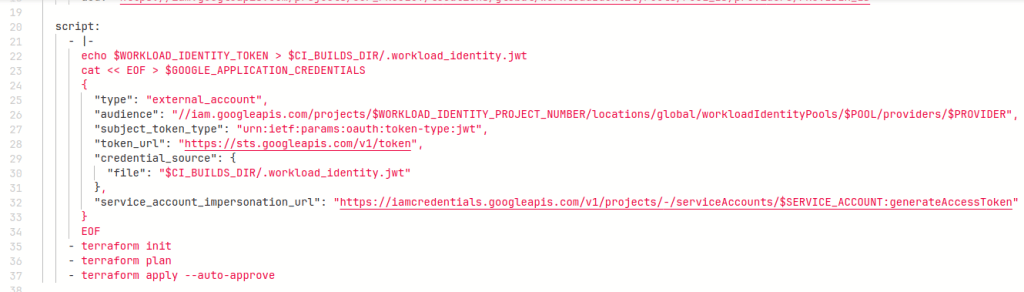
Thats it !! Run this pipeline to create GCP resources using terraform with no use of long lived keys.
For more information on GCP WIDF visit GCP official documentation.