


Introduction:
Version control systems like Git are very important tools for modern software development. Automation of code pushes to Git repositories is a common requirement for various scenarios. To automate pushing code to a Git repository using Java, you can use the JGit library. In this blog, we will explore how to push code to Git using Java, focusing on the popular Git library JGit.
Prerequisites:
Before we begin, make sure you have the following prerequisites in place:
- Git installed on your local machine.
- A Git repository where you want to push your code.
- Java Development Kit (JDK) installed on your system.
- A Java Integrated Development Environment (IDE) or a text editor.
Step 1: Set Up Your Java Project: Start by creating a new Java project in your preferred IDE or text editor. You can use popular IDEs like Eclipse, IntelliJ IDEA, or Visual Studio Code.
Step 2: Include Git Libraries: To interact with Git repositories using Java, you’ll need to include Git-related libraries in your project. JGit, an open-source library, provides Git functionality for Java applications. You can add it to your project using Maven or download the JAR files directly from the Eclipse website.
Using Maven (Recommended): Add the JGit dependency to your project’s pom.xml file:
<dependency>
			<groupId>org.eclipse.jgit</groupId>
			<artifactId>org.eclipse.jgit</artifactId>
			<version>5.12.0.202106070339-r</version>
		</dependency>
Step 3: Write Java Code to Push to Git: Now, you can write Java code to automate the process of pushing code to your Git repository. Below is a simple example using JGit:
package com.git.demo;
import org.eclipse.jgit.api.Git;
import org.eclipse.jgit.api.ListBranchCommand;
import org.eclipse.jgit.api.errors.GitAPIException;
import org.eclipse.jgit.api.errors.NoHeadException;
import org.eclipse.jgit.lib.Repository;
import org.eclipse.jgit.lib.RepositoryBuilder;
import org.eclipse.jgit.transport.CredentialsProvider;
import org.eclipse.jgit.transport.UsernamePasswordCredentialsProvider;
import org.eclipse.jgit.lib.Ref;
import java.io.File;
import java.io.IOException;
public class GitPushFolder {
public static void main(String[] args) {
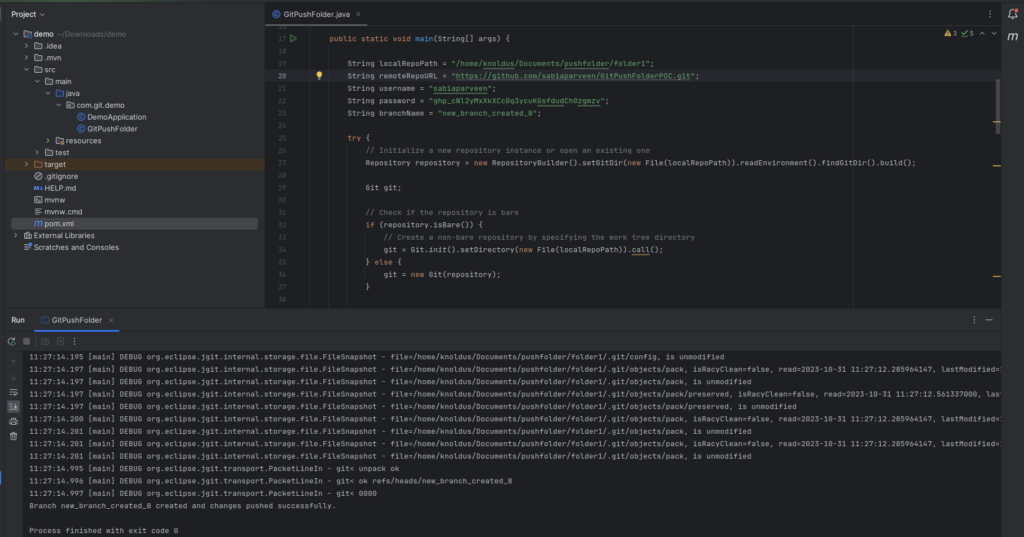
String localRepoPath = "/home/knol/Documents/pushfolder/folder1";
String remoteRepoURL = "[remoteRepoURL]";
String username = "[username]";
String password = "[password]".
String branchName = "new_branch_created_8";
try {
// Initialize a new repository instance or open an existing one
Repository repository = new RepositoryBuilder().setGitDir(new File(localRepoPath)).readEnvironment().findGitDir().build();
Git git;
// Check if the repository is bare
if (repository.isBare()) {
// Create a non-bare repository by specifying the work tree directory
git = Git.init().setDirectory(new File(localRepoPath)).call();
} else {
git = new Git(repository);
}
// Check if the repository has at least one commit
boolean isRepositoryEmpty = true;
try {
git.log().setMaxCount(1).call();
isRepositoryEmpty = false;
} catch (NoHeadException e) {
// The repository is empty, and no HEAD exists.
}
// If the repository is empty, create an initial commit with an empty file
if (isRepositoryEmpty) {
File emptyFile = new File(localRepoPath, "EMPTY");
emptyFile.createNewFile();
git.add().addFilepattern("EMPTY").call();
git.commit().setMessage("Initial commit").call();
}
// Check if the branch already exists
ListBranchCommand listBranchCommand = git.branchList();
for (Ref branch : listBranchCommand.call()) {
if (branch.getName().equals("refs/heads/" + branchName)) {
System.out.println("Branch " + branchName + " already exists.");
return;
}
}
// Create a new branch from the current branch (HEAD)
git.checkout()
.setCreateBranch(true)
.setName(branchName)
.call();
// Add the entire folder and its contents to the repository recursively
git.add()
.addFilepattern(".")
.call();
// Commit changes to the new branch
git.commit()
.setMessage("Added folder/files to new branch")
.call();
// Set up credentials for pushing to the remote repository
CredentialsProvider credentialsProvider = new UsernamePasswordCredentialsProvider(username, password);
// Push the newly created branch to the remote repository
git.push()
.setRemote(remoteRepoURL)
.setCredentialsProvider(credentialsProvider)
.call();
System.out.println("Branch " + branchName + " created and changes pushed successfully.");
} catch (IOException | GitAPIException e) {
e.printStackTrace();
}
}
}
In the code above, replace the placeholders with your specific information. Set the localRepoPath to the path of your local Git repository, remoteRepoURL to the URL of your remote repository, and provide your Git credentials (username and password or personal access token) for authentication.
Step 4: Run Your Java Code: Compile and run your Java code. If everything is set up correctly, the code will push to your Git repository. Ensure you’ve saved your credentials securely, possibly using environment variables or a credential manager for enhanced security.
Conclusion
With the JGit library, you can easily integrate Git operations into your Java applications. This blog covered the basic steps to push code to a Git repository by creating a new branch if it doesn’t exits, but there are many more possibilities and customizations you can explore to meet your specific needs. Stay connected to more blogs https://blog.nashtechglobal.com/.