


If you are looking for tools to meet the following factors when selecting automation tools: code readability, adaptability, and writing test speed, CodeceptJS could be a good option for you. It’s a tool which support us to do automation test efficiently since it understands how crucial this is for Agile projects.
I. Introduce
1. What is CodeceptJS
- CodeceptJS is a well-liked open-source JavaScript testing framework. Its straightforward and simple syntax is intended to make writing and maintaining end-to-end tests for web applications simple.
- Since its initial release in 2015, CodeceptJS has grown in popularity among JavaScript developers as a testing framework. Organizations of all sizes, from startups to major corporations,can use it extensively.
- CodeceptJS bypasses execution commands to helpers. Depending on helper enabled in configure, your test cases will be executed differently. It’s built on top of Playwright, WebDriver (uses WebdriverIO), Puppeteer, TestCafe as below architecture.

Architecture. Source: Codecept.io
- Each automation tool has its own strengths and weaknesses. Based on each kind of application under test, we need to choose an appropriate tool to work with them. With CodeCeptJs, your team won’t need to learn all kinds of tools and their syntax, we only use the Codecept exposed functions. When we call any functions, the request will be diverted to the helper we set in the configuration file.
2. Features
A few cutting-edge capabilities are available in CodeceptJS that are intended to enhance your web application testing. Beyond simple test automation, these features provide you with the power to manage intricate testing scenarios, improve teamwork, and expedite your testing process. Investigate these features to enhance your testing procedures and guarantee the caliber of your web apps.
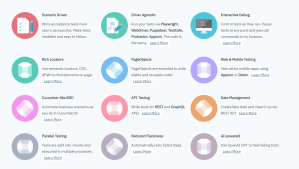
- CodeceptJS keywords are defined in human language so that not only the automation tester but also the non-technical guys can understand the test case easily.

- Users can easily switch the automation helpers such as Playwright, Puppeteer, WebDriver, TestCafe without re-implementing the automation test script. We can do it by updating configuration file as below.

- CI/CD integration is a must-have feature with all automation testing tools now. CodeCeptJS allows users to set up automation test pipeline with many kinds of CI/CD tools like Jenkins, TeamCity, GitLab, Codefresh.
- Support to generate various kinds of reports like ReportPortal, HTML. This allows us to see the details of the result and analyze the test result quickly. Besides that, it’s also able to generate test results in xml format so that we can integrate with test management or CI/CD tools like Testrail, Jenkins, Azure DevOps Test plan.

HTML report was produced with mochawesome reporter. Source: Codecept.io
- You can see in the below picture, CodeceptJS can leverage openAI to generate test script from human language. It helps us to reduce the effort for test case implementation.
- Support both web applications and native mobile applications.
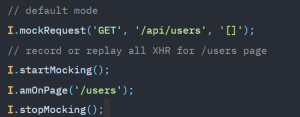
- Be able to implement API Testing with REST or GraphQL. We can leverage API for preparing or cleaning test data for UI test case. This will make the test case more stable and faster. CodeceptJS also support mock request that are used to emulate requests from server by passing prepared data. It also allows users to record all XHR for the endpoint. For example:
- Codecept JS support built-in functions for visual testing. They’re built on top of Resemblejs and allow us to identify the differences between 2 images. For example, we have 2 images (expected image and actual image) as below.

CodepCeptJs will highlight the difference so that user can see it easily.

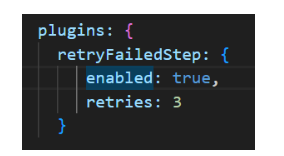
- Flaky test is a big challenge with automation test. Your test script maybe failed because of the unstable testing environment. We can re-run the failed test cases with CodeceptJs automatically with the following configuration.
- Asynchronous concerns are handled by the framework for you. This improves the readability and maintainability of tests so that you don’t have to worry about “Promise chains” or “callback hell”.
II. Step to create new an automation project with CodeceptJS
- Prerequisites
Software requirements: NodeJS
1. Step 1: Install CodeceptJS with the following command
npm i codeceptjs
2. Step 2: Initialize the the project with the command “npx codeceptjs init”.
npx codeceptjs init
3. Step 3: We need to answer the following questions to complete this step.
| Question | Default Answer | Alternative |
| Do you plan to write tests in TypeScript? | n (No) | or learn how to use TypeScript |
| Where are your tests located? | **./*_test.js | or any glob pattern like **.spec.js |
| What helpers do you want to use? | Playwright | Which helper to use for: web testing, mobile testing , API testing |
| Where should logs, screenshots, and reports to be stored? | ./output | path to store artifacts and temporary files |
| Do you want to enable localization for tests? | English (no localization) | or write localized tests in your language |

4. Step 4: After answering questions, CodeceptJS will generate the configuration files

5. Step 5: Install Gherkin
5.1 To install gherkin in CodeceptJs, you need to run the command
npx codeceptjs gherkin:init
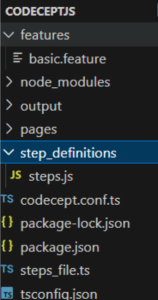
5.2 After running above command, you see features and step definitions folders are created.
6. Step 6: Add feature files
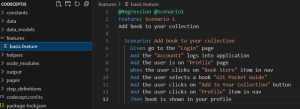
To add feature files, you can create new files and name feature_name.feature format in the Feature folder.
7. Step 7: Add step definition file
- In step_definitions folder, you create new files and name the file with .ts format.
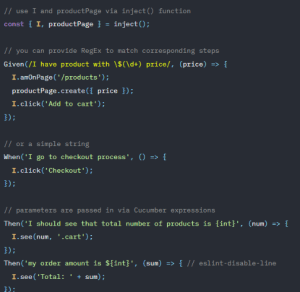
- Step definitions are placed in Typescript file with Given/When/Then functions that map strings from feature files to functions
- Steps can be either strings or regular expressions. Parameters from string are passed as function arguments. To define parameters in a string we use Cucumber expressions.
- To list all defined steps run gherkin:steps command:
npx codeceptjs gherkin:steps
- Use grep to find steps in a list (grep works on Linux & MacOS):
npx codeceptjs gherkin:steps | grep user
8. Step 8: Run test
- To run tests and see step-by step output use –steps option:
npx codeceptjs run –steps
- To see not only business steps but an actual performed steps use –debug flag:
npx codeceptjs run –debug
9. Step 9: Generate report
- In this tutorial, using mochawesome report. Need to run following command to install:
npm i mochawesome
- You also must configure in codecept.conf.ts file

- After that, execute and generate the report:
npx codeceptjs run –reporter mochawesome
10. Step 10: Observe the result

III. Conclusion
CodeceptJS is an excellent tool for crew seeking quick and adaptable project completion. With just one framework, you may obtain a lot of functionality for complete web, mobile, and hybrid product assurance.
If you are proficient in JavaScript and Typescript, CodeceptJS allows you to concentrate on the functional aspects of your test rather than having to write browser-side code. This way you can keep your tests stable and maintainable easily.
IV. References
1. CodeceptJS