


1. Introduction
In modern web applications, authentication and authorization play a critical role, especially when building systems that consist of multiple clients such as web applications, single-page applications, and APIs. Designing a secure and scalable identity solution for these systems can be challenging.
Duende IdentityServer, built on top of OpenID Connect and OAuth 2.0, provides a powerful framework for implementing centralized authentication and authorization. It allows applications to issue tokens, integrate external identity providers, and protect APIs using industry-standard security protocols.
In this blog post, we will build an end-to-end authentication and authorization system using Duende IdentityServer. We will integrate Google authentication, secure APIs, and connect both an ASP.NET MVC client and a React client to the system.
This article is aimed at .NET developers who want a practical, hands-on understanding of IdentityServer in a real-world architecture. By the end of this post, you will understand how IdentityServer, clients, and APIs work together through OpenID Connect.
2. Solution Architecture Overview
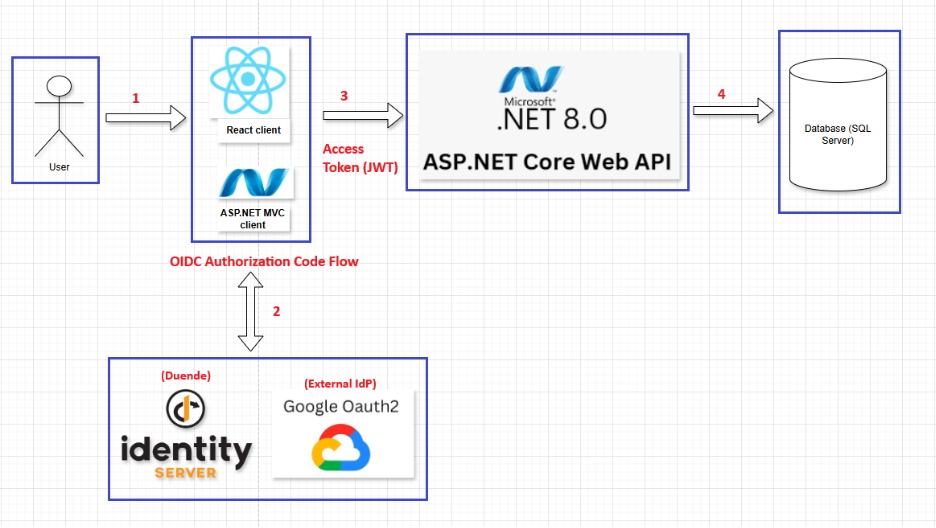
Explaintion:
(1) User → Clients:
The user accesses the system through a web browser and interacts with either React Client (SPA) or ASP.NET MVC Client.
At this stage:
- The user is not yet authenticated.
- The client applications are responsible only for rendering the UI and handling user interactions.
- Any request to protected resources will require the user to authenticate.
(2) Clients ⇄ IdentityServer (OpenID Connect Authorization Code Flow):
When authentication is required:
- The client redirects the user’s browser to Duende IdentityServer.
- IdentityServer authenticates the user: by displaying a login page or by delegating authentication to Google OAuth 2.0 as an external Identity Provider.
- After successful authentication, IdentityServer redirects the user back to the client with an Authorization Code.
- The client exchanges the Authorization Code for tokens:
- React Client uses Authorization Code Flow with PKCE.
- ASP.NET MVC Client uses Authorization Code Flow (server-side).
- IdentityServer issues: an Access Token (JWT) for calling the Web API and optionally an ID Token containing user identity information.
Result: The client is authenticated and holds a valid Access Token.
(3) Clients → ASP.NET Core Web API (Access Token – JWT)
After authentication:
- The client sends HTTP requests to the ASP.NET Core Web API.
- Each request includes the Access Token in the HTTP header: Authorization: Bearer <Access Token (JWT)>
- The Web API validates the token by:
- Verifying the JWT signature using the IdentityServer public keys
- Checking token expiration, audience, scopes, and roles
- Enforcing policy-based authorization.
- If the token is valid and authorized, the request is processed; otherwise, the API returns 401 Unauthorized or 403 Forbidden.
(4) Web API → SQL Server Database
Once authorization succeeds:
- The Web API executes the required business logic.
- It accesses the SQL Server Database to read or persist application data.
- The result is returned to the client through the Web API.
3. Authentication with IdentityServer
This section describes the step-by-step process for building the authentication flow and configuring Duende IdentityServer with Google OAuth 2.0 as an external Identity Provider.
Technology Stack & Dependencies:
All packages listed below are installed and managed via NuGet Package Manager.
- Duende.IdentityServer (v7.2.4)
- Duende.IdentityServer.AspNetIdentity (v7.2.4)
- Duende.IdentityServer.EntityFramework (v7.2.4)
- Microsoft.AspNetCore.Authentication.Google (v8.0.18)
- Microsoft.AspNetCore.Identity.EntityFrameworkCore (v8.0.18)
- Microsoft.EntityFrameworkCore.SqlServer (v8.0.18)
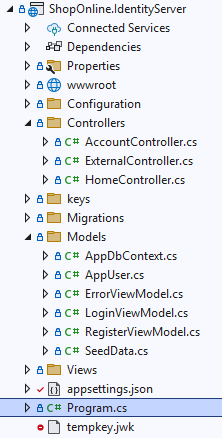
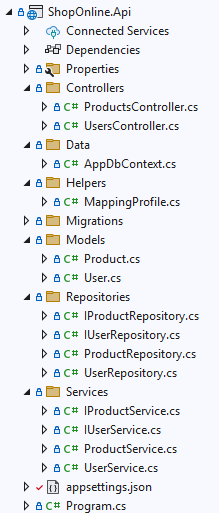
Project Structure:
appsetings.json

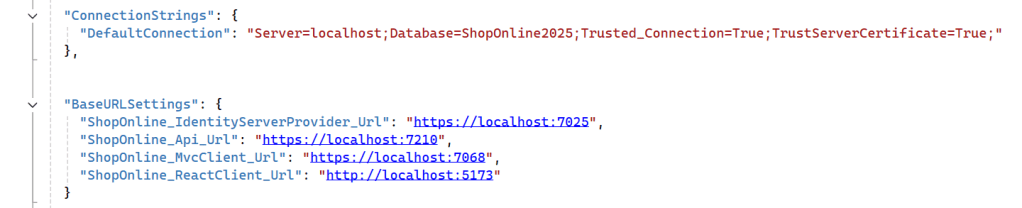
Explaination: This file contains runtime configuration settings for the IdentityServer application, including database connections, service base URLs, and external authentication providers.
- ConnectionStrings: Defines the database connection string used by IdentityServer and ASP.NET Core Identity.
- BaseURLSettings: Specifies the base URLs of system components, including IdentityServer, Web API, MVC client, and React client.
- Authentication.Google: Contains the Google OAuth 2.0 client credentials used to enable external authentication through Google.
To create the Google Client ID and Client Secret, please follow the official Google OAuth 2.0 documentation: https://developers.google.com/identity/protocols/oauth2
Config.cs
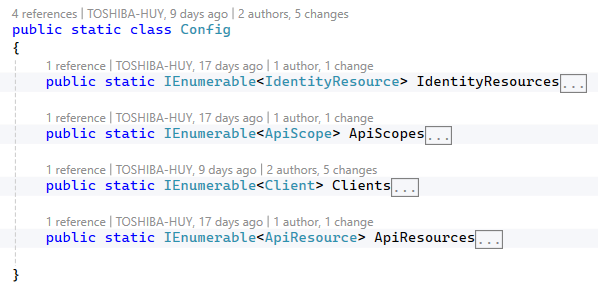
Explaination: This section defines the OAuth 2.0 and OpenID Connect configuration for Duende IdentityServer.
- Identity Resources: Defines the identity-related scopes and claims that can be included in ID tokens, including OpenID, profile, and role information.
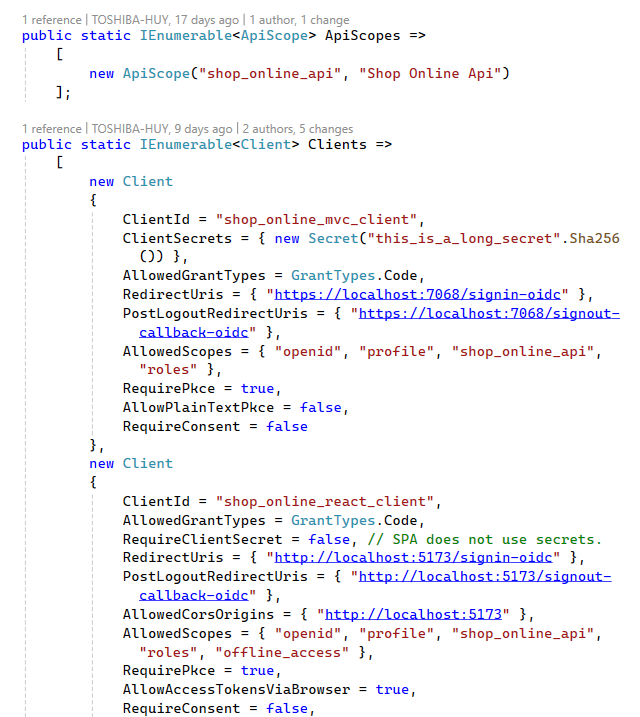
- API Scopes: Defines the scopes that clients can request to access protected APIs.
- API Resources: Defines protected API resources and the claims that are included in access tokens issued for API access.
- Clients: Defines the registered OAuth 2.0 clients (MVC and React SPA), their grant types, redirect URIs, allowed scopes, and security settings such as PKCE and client secrets.
CustomProfileService.cs
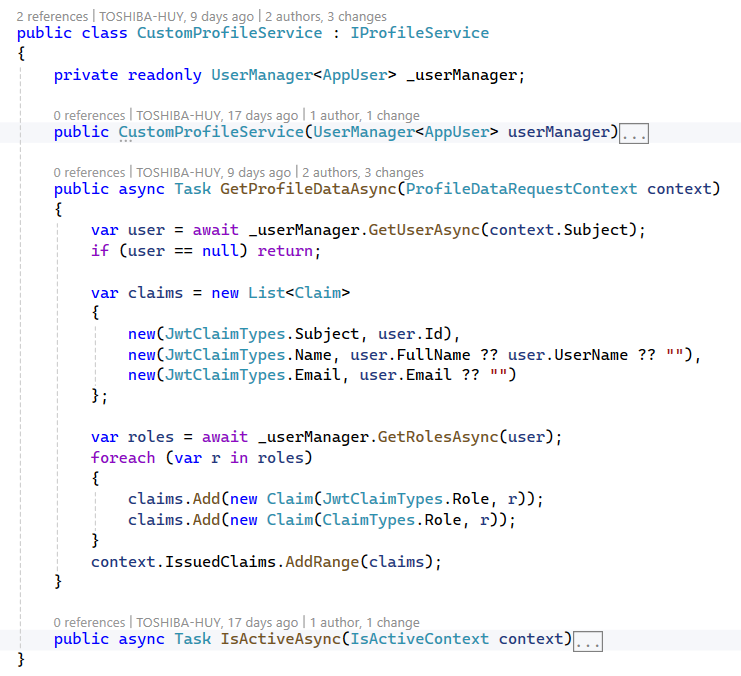
Explaination:
This component implements a custom profile service for Duende IdentityServer. It is responsible for enriching issued tokens with additional user claims retrieved from ASP.NET Core Identity.
- GetProfileDataAsync: Retrieves user information and roles from the ASP.NET Identity store and adds them as claims to the issued ID token and access token.
- IsActiveAsync: Determines whether the user account is active and eligible to receive tokens.
AppDbContext.cs

Explaination: This DbContext extends IdentityDbContext and provides persistence for ASP.NET Core Identity entities using SQL Server.
AppUser.cs
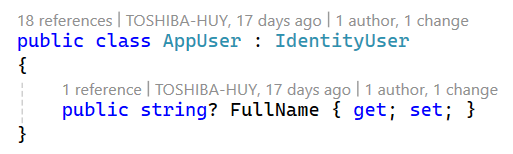
Explaination: This class extends IdentityUser by adding a FullName property used for user profile and token claims.
AccountController.cs
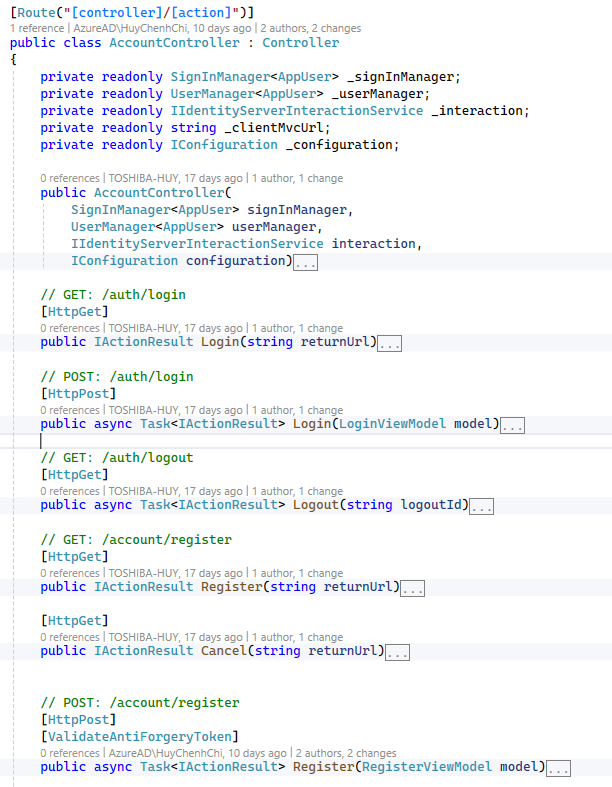
Explaination: This controller provides the user-facing authentication endpoints required by Duende IdentityServer, including login, logout, and registration, and supports OpenID Connect return URL handling.
ExternalController.cs
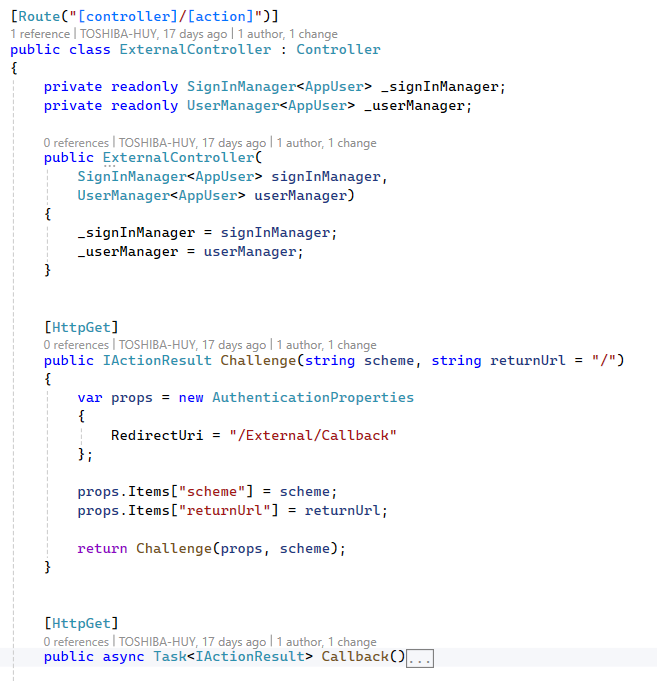
Explaination: This controller handles authentication via external identity providers, including challenge initiation, callback handling, and user provisioning in ASP.NET Core Identity.
- Google OAuth 2.0 is used as an external identity provider to authenticate users using their Google accounts. After successful authentication, user identity information is federated to Duende IdentityServer, which issues tokens for accessing protected application APIs.
Why use Google OAuth 2.0?
- Eliminates the need to manage user passwords internally.
- Improves user experience by enabling fast and familiar login.
- Provides a high level of security through Google’s built-in protections, such as MFA and risk-based authentication.
- Reduces the security and compliance responsibilities of the application.
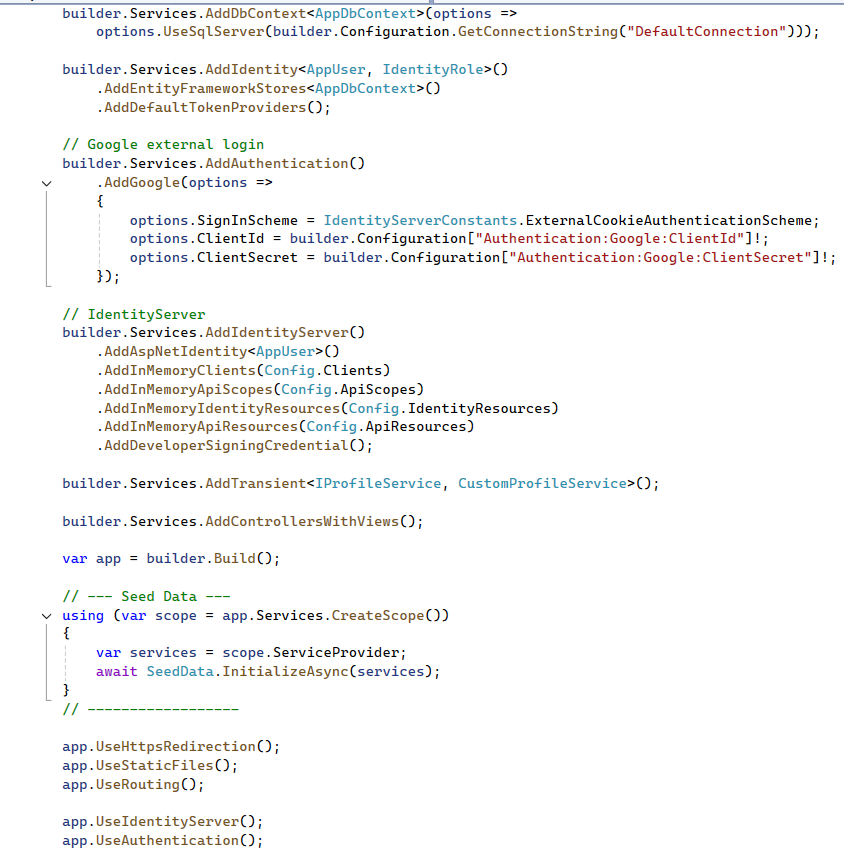
Program.cs
This file configures and initializes the IdentityServer application. It registers required services such as Entity Framework Core, ASP.NET Core Identity, Duende IdentityServer, and Google external authentication, and defines the HTTP request pipeline.
Views
The remaining files, such as Login.cshtml, Register.cshtml, … are responsible for defining the user interface and layout of the authentication views.
4. Building APIs and Integrating with IdentityServer
This project focuses on building RESTful APIs that expose core application functionalities, such as product management and user-related operations. The APIs are secured using access tokens issued by Duende IdentityServer
and enforce authorization through token validation and role-based policies.
Technology Stack & Dependencies:
All packages listed below are installed and managed via NuGet Package Manager.
- AutoMapper.Extensions.Microsoft.DependencyInjection (v12.0.1)
- Microsoft.AspNetCore.Authentication.JwtBearer (v8.0.17)
- Microsoft.EntityFrameworkCore (v8.0.18)
- Microsoft.EntityFrameworkCore.SqlServer (v8.0.18)
- Microsoft.EntityFrameworkCore.Tools (v8.0.18)
- Swashbuckle.AspNetCore (v6.6.2)
Project structure:
appsetings.json
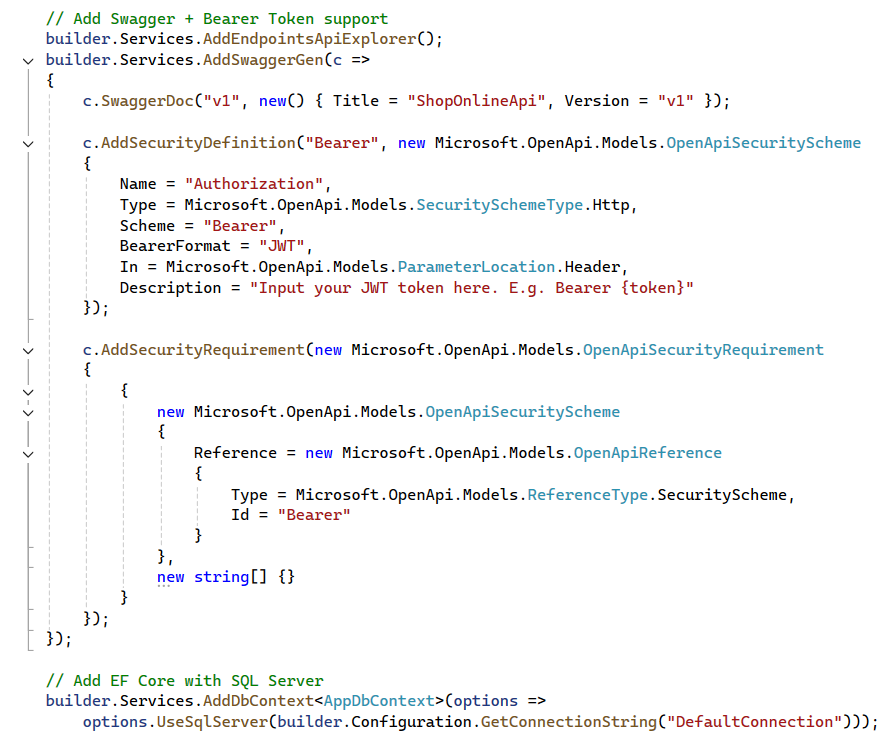
Program.cs
This file defines the startup configuration for the ShopOnline API. It configures core API services, database access, authentication using JWT bearer tokens, and policy-based authorization integrated with Duende IdentityServer.
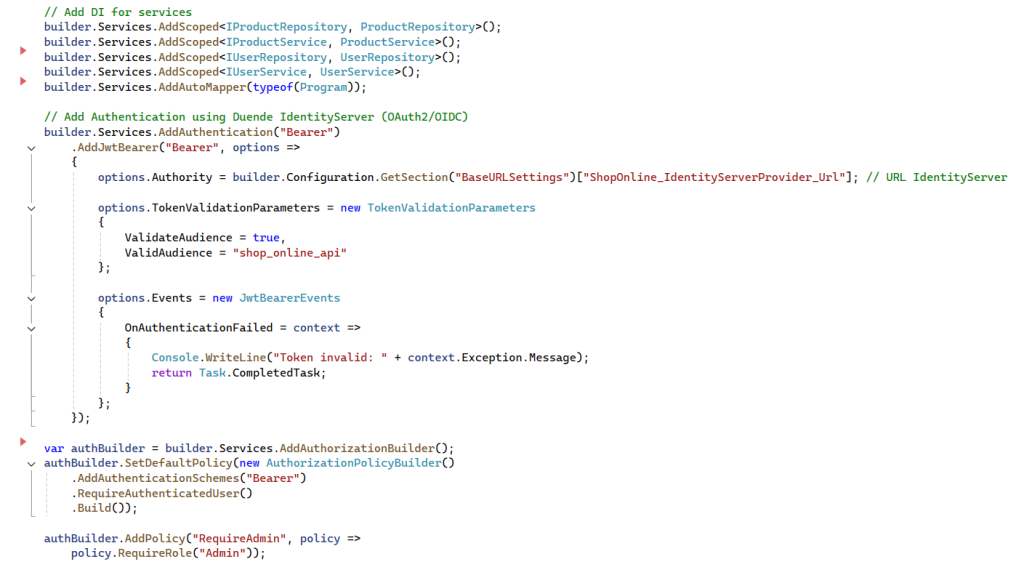
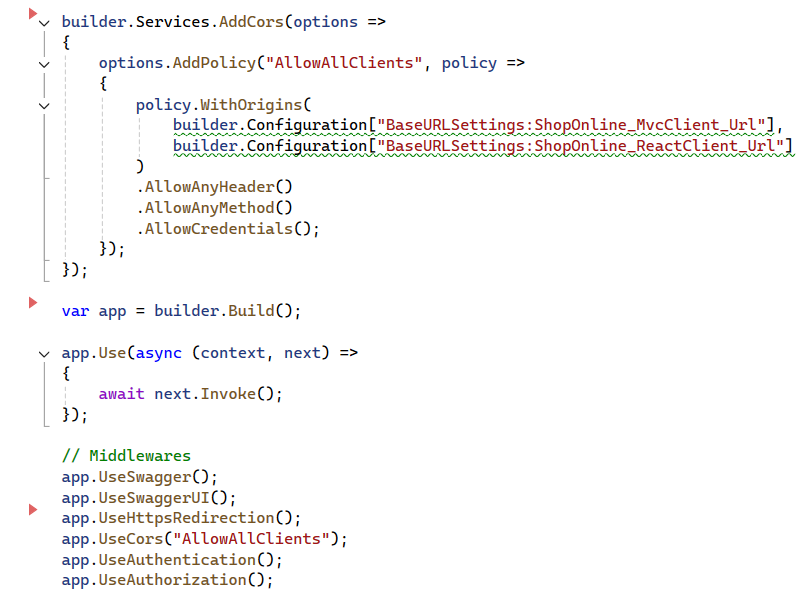
Explaination:
This configuration enables a secure API architecture where:
- Authentication is centralized in IdentityServer
- APIs validate JWT access tokens using OAuth 2.0 and OpenID Connect standards
- Authorization is enforced using policy-based access control
- Role information is propagated through token claims
- APIs remain stateless and scalable
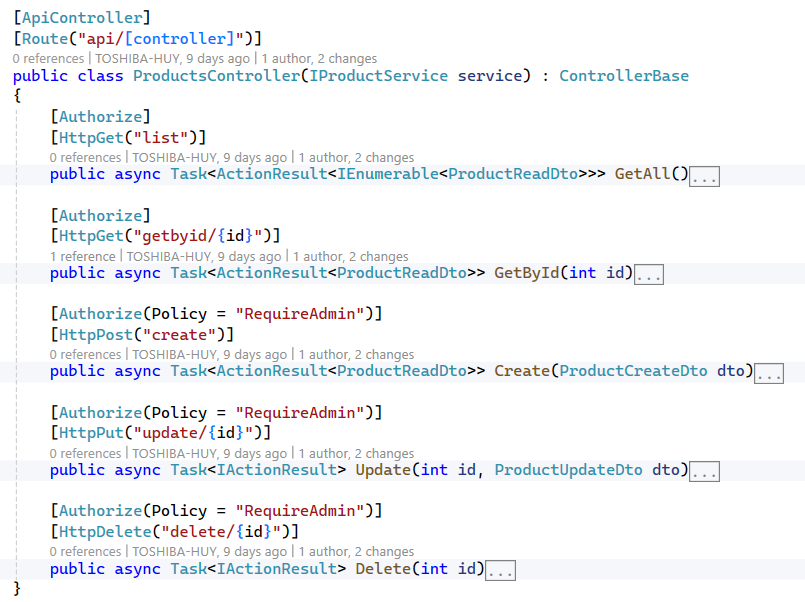
Explaination: The ProductsController is responsible for handling product-related operations, including creating, retrieving, updating, and deleting products.
[Authorize(Policy = “RequireAdmin”)]: this attribute restricts access to a controller or action using an authorization policy named RequireAdmin.
When a request is made:
- ASP.NET Core first checks whether the user is authenticated (usually via a JWT token).
- It then evaluates the RequireAdmin policy.
- The request is allowed only if the user meets the policy requirements (e.g., has the Admin role).
- If the user is not authenticated → 401 Unauthorized
- If authenticated but does not meet the policy → 403 Forbidden
- The policy itself is configured in the application startup (e.g., Program.cs) and can include role checks, claims, or custom authorization logic.
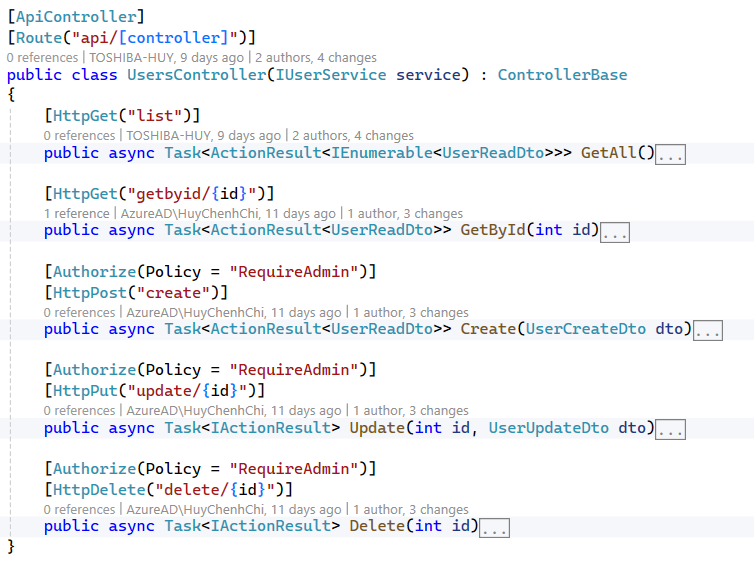
Explaination: The UsersController is responsible for handling user-related operations, including creating, retrieving, updating, and deleting.
IProductRepository.cs
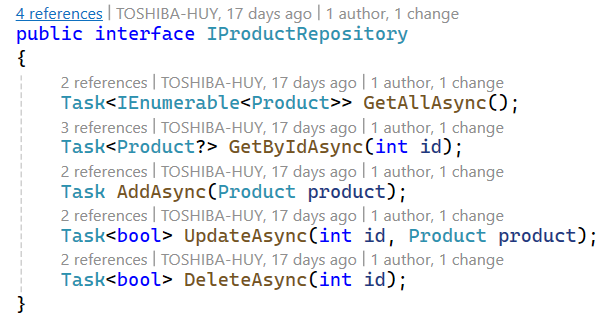
Explaination:
This interface defines a user repository contract using the Repository Pattern. It abstracts data access logic for the User entity and provides asynchronous CRUD operations, including retrieving all users, getting a user by ID, adding a new user, updating an existing user, and deleting a user by ID. Using an interface helps decouple business logic from data access, improves testability, and allows different implementations without changing the consuming code.
ProductRepository.cs
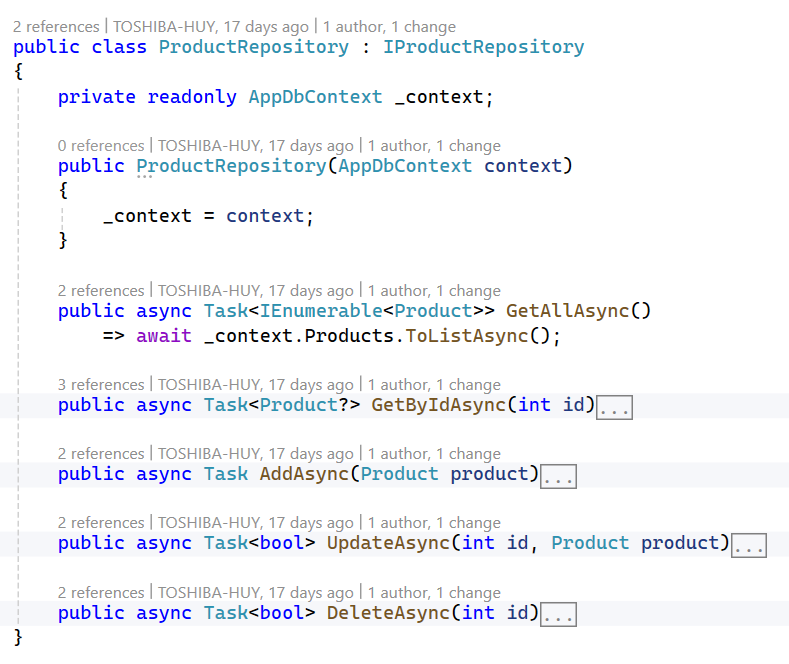
Explaination:
This class implements the Product repository using Entity Framework Core. It interacts with the database through AppDbContext to perform asynchronous CRUD operations for the Product entity, including retrieving all products, getting a product by ID, creating a new product, updating an existing product with validation, and deleting a product. The repository encapsulates data access logic, keeping it separate from business logic and making the application easier to maintain and test.
IProductService.cs
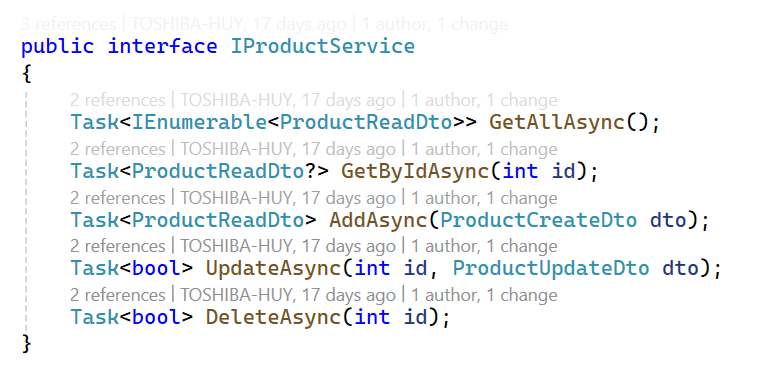
Explaination:
This interface defines the product service contract in the application’s service layer.
It exposes asynchronous methods for handling product-related business operations using DTOs, including retrieving all products, getting a product by ID, creating a new product, updating an existing product, and deleting a product.
ProductService.cs
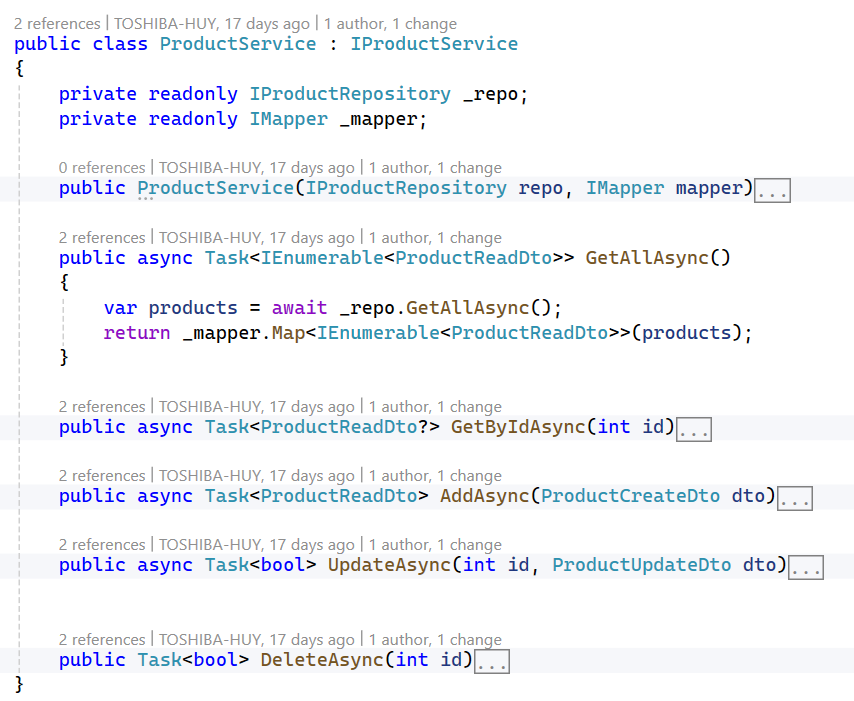
Explaination:
This class implements the product service layer, acting as a bridge between controllers and the data access layer. It uses a repository to interact with the database and AutoMapper to convert between domain entities and DTOs.
5. ASP.NET MVC Client Integration with API & IdentityServer
Project structure:
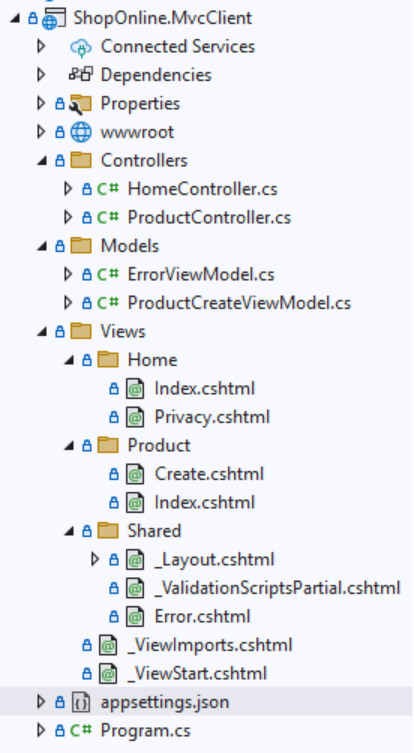
appsettings.json

Program.cs
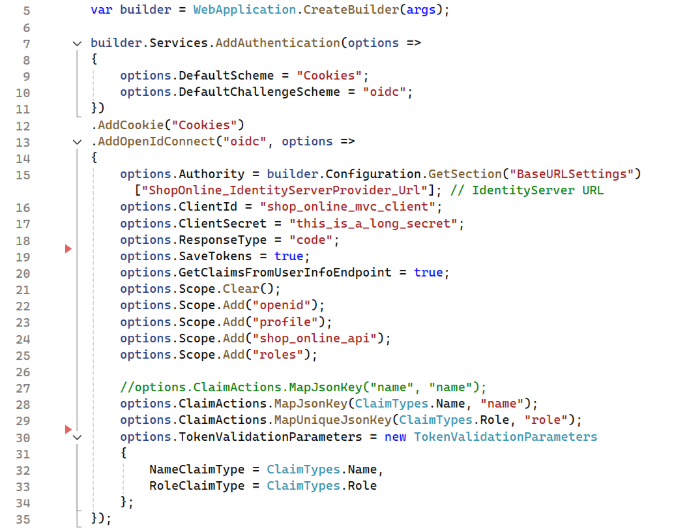
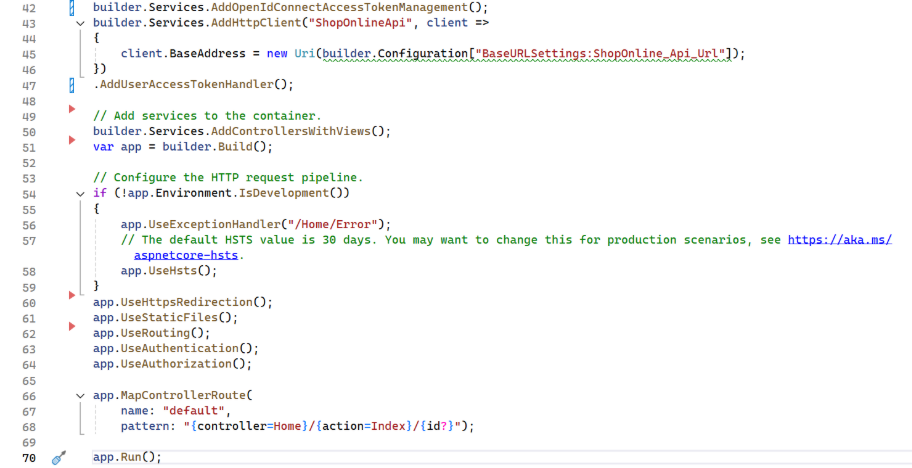
Explaination:
This code configures authentication for an ASP.NET Core MVC application using Cookie Authentication and OpenID Connect (OIDC) with an external IdentityServer.
- Uses cookies to maintain the user’s login session.
- Uses OpenID Connect to authenticate users via IdentityServer.
- Redirects unauthenticated users to IdentityServer when accessing protected pages.
- Uses the Authorization Code Flow for secure server-side authentication.
- Requests user information such as profile, roles, and API access.
- Maps user claims (name, role) so ASP.NET Core can handle:
- User.Identity.Name
- Role-based authorization ([Authorize(Roles = “…”)])
- Saves tokens (ID token, access token) for calling protected APIs.
ProductController.cs
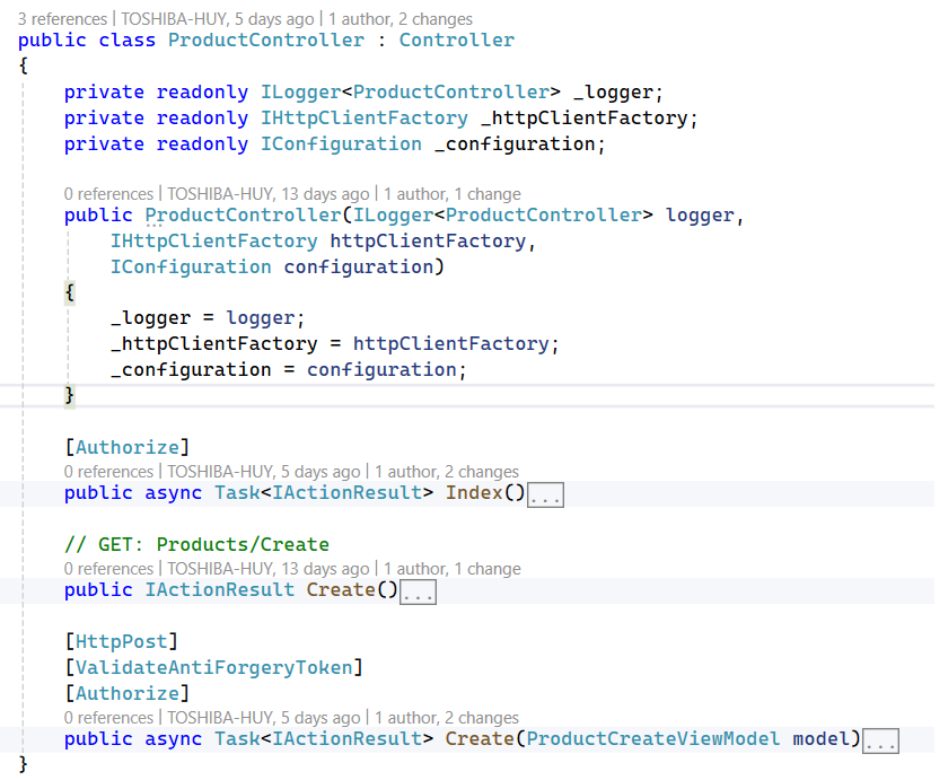
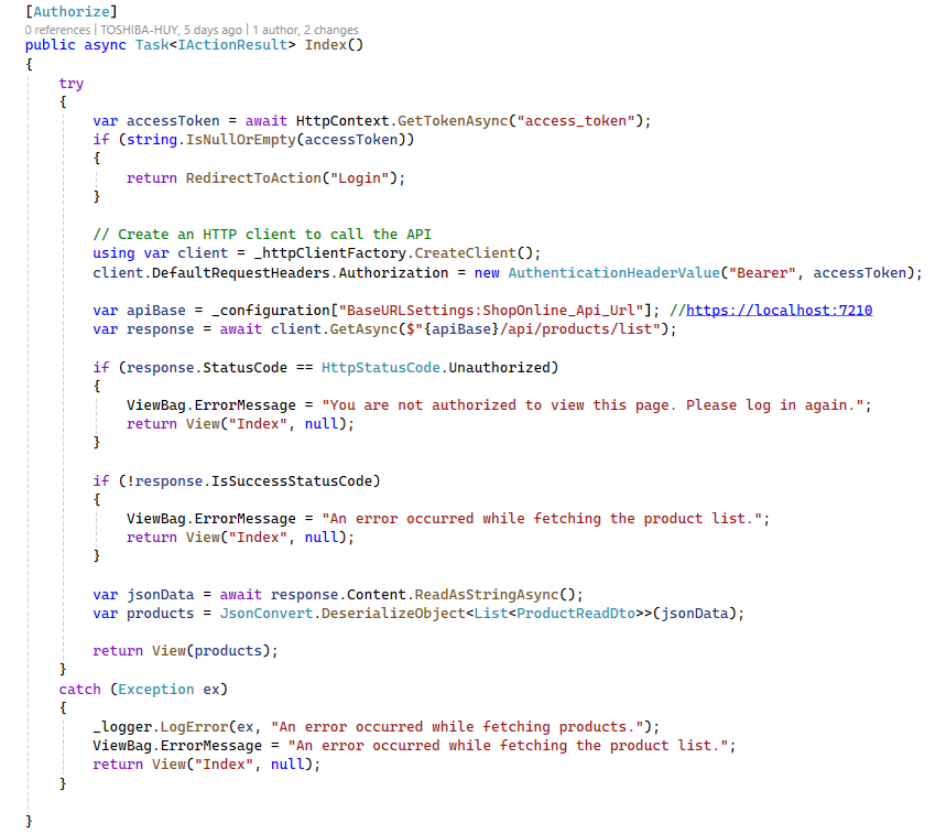
Explaination:
Product List (Index)
Securely load and display products from a protected backend API using the user’s access token.
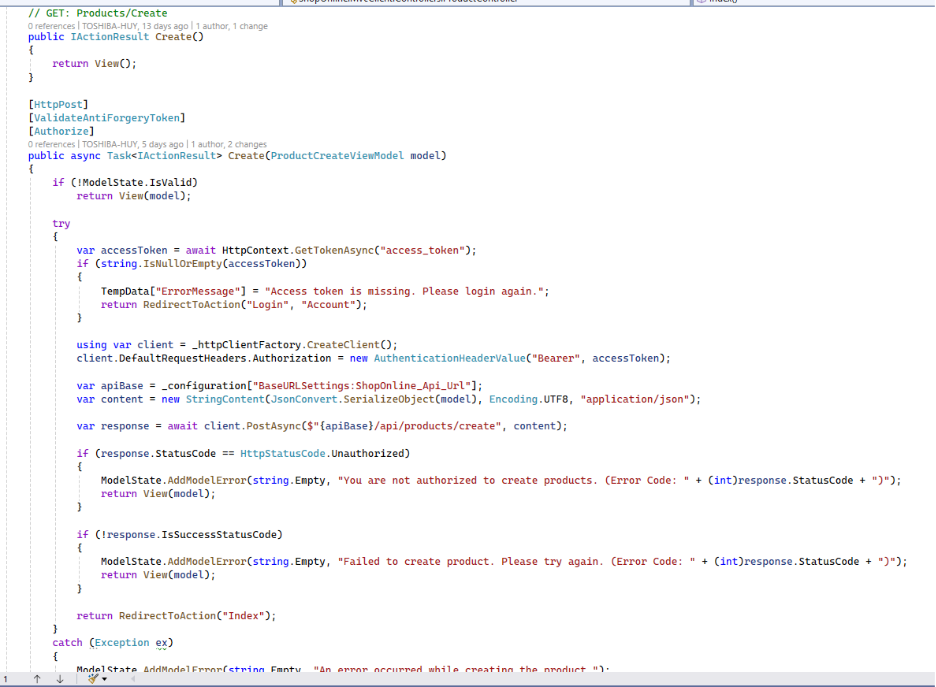
Create Product (Create – POST)
Create a new product by calling a secured API endpoint on behalf of the authenticated user.
ProductCreateViewModel

Explaination:
This class represents the data model used when creating a new product from the MVC application.
Defines the fields required to create a product.
Uses Data Annotations to validate user input on the server side.
Product List View
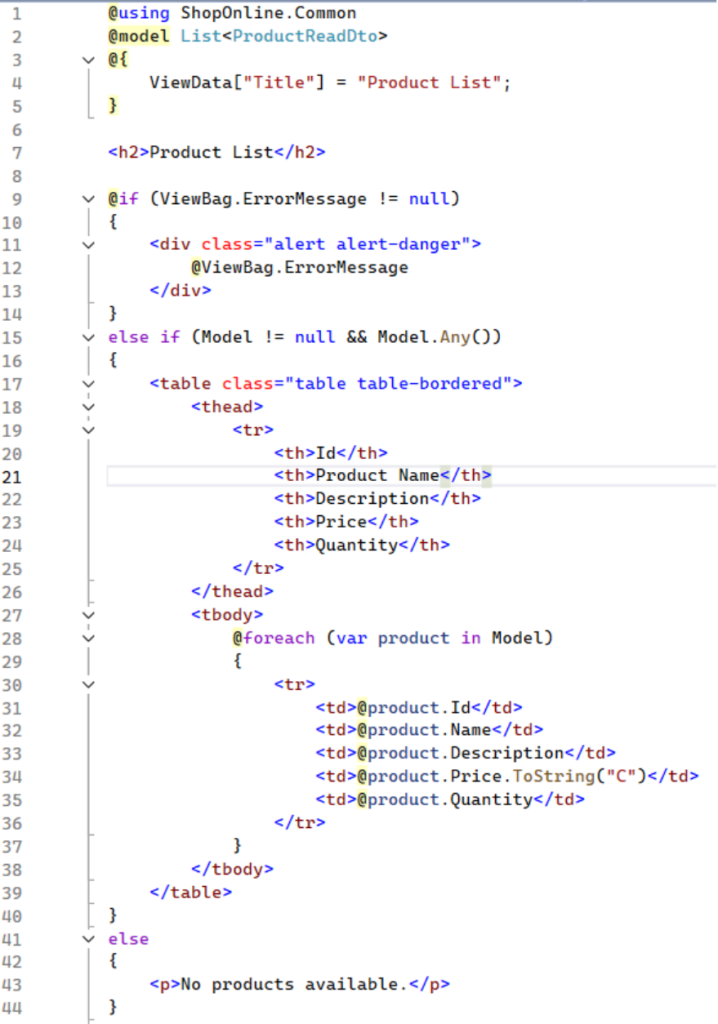
Explaination:
This Razor view (.cshtml) is used in an ASP.NET MVC application to display a list of products (List<ProductReadDto>).
Create Product View
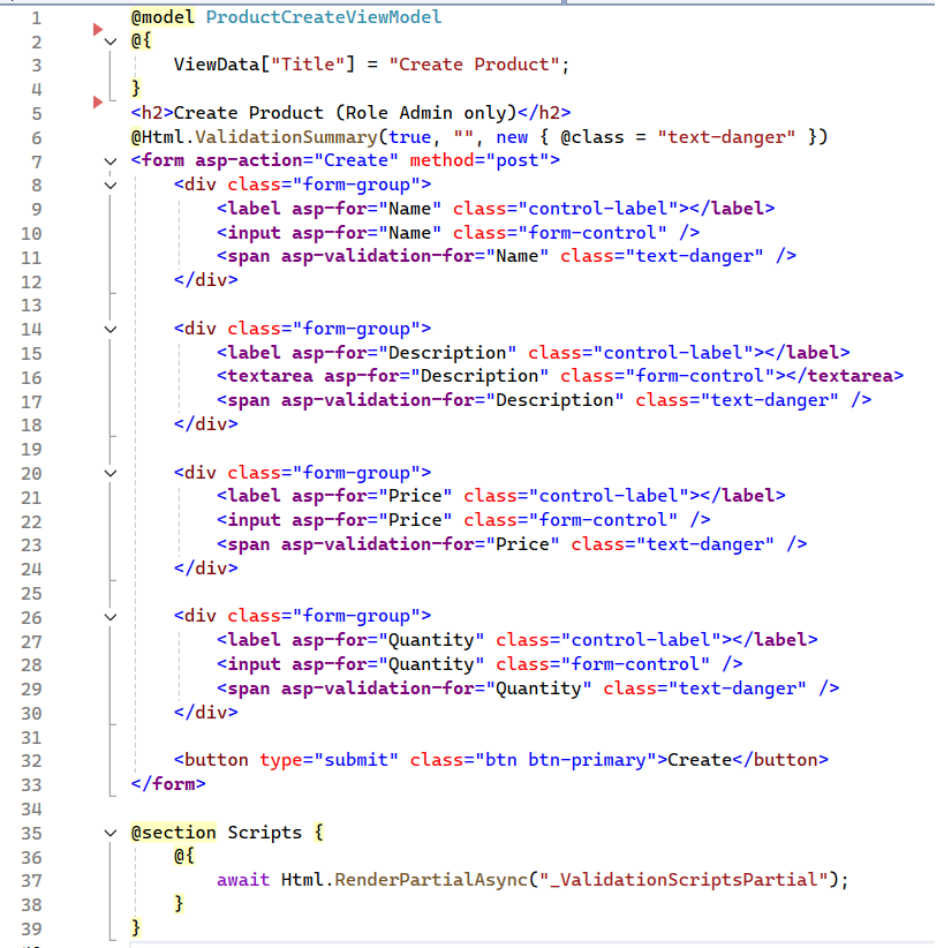
Explaination:
This Razor view is used to create a new product and is intended for Admin users only.
It binds to ProductCreateViewModel and uses Tag Helpers to generate a form with fields for Name, Description, Price, and Quantity, along with validation messages.
Client-side validation scripts are included to ensure user input is validated before the form is submitted.
_Layout.cshtml
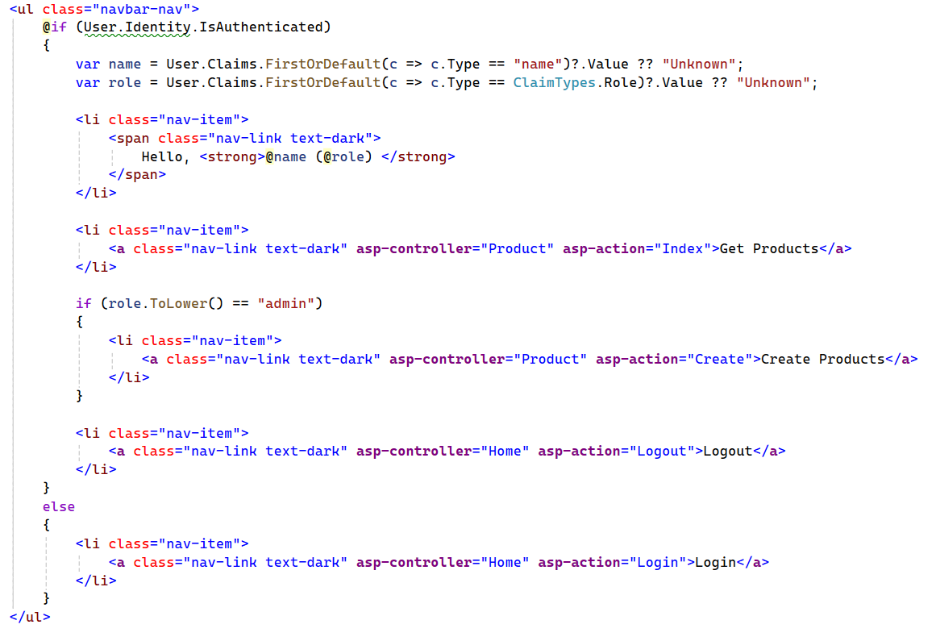
Explaination:
This Razor snippet renders a navigation menu that adapts based on the user’s authentication status.
If the user is authenticated, it displays a greeting with their name and role, links to view products, and—if the role is Admin—a link to create products, plus a logout option.
If the user is not authenticated, only a Login link is shown.
6. Frontend React Client
Technology Stack & Dependencies:
All packages listed below are installed and managed via NuGet Package Manager.
- react v19.2.0
- react-dom v19.2.0
- react-router-dom v7.10.1
- oidc-client-ts v3.4.1
Project structure:
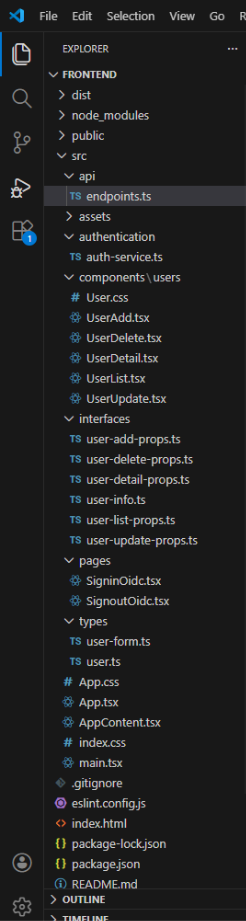
endpoints.ts:
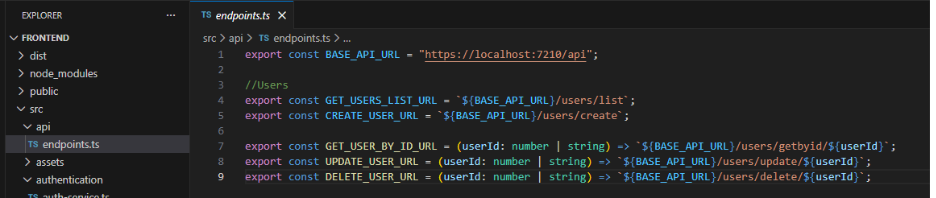
Explaination: This file centralizes all backend API endpoint URLs, including the base API URL and user-related endpoints for listing, creating, retrieving, updating, and deleting users. It helps keep API URLs consistent, reusable, and easy to maintain.
auth-service.ts:

Explaination: The auth-service.ts file configures and initializes authentication using oidc-client-ts. It defines the OpenID Connect (OIDC) settings such as the authority, client ID, redirect URLs, response type, and scopes. The file creates and exports a UserManager instance to handle user login, logout, token management, and silent token renewal using browser local storage.
UserAdd.tsx:
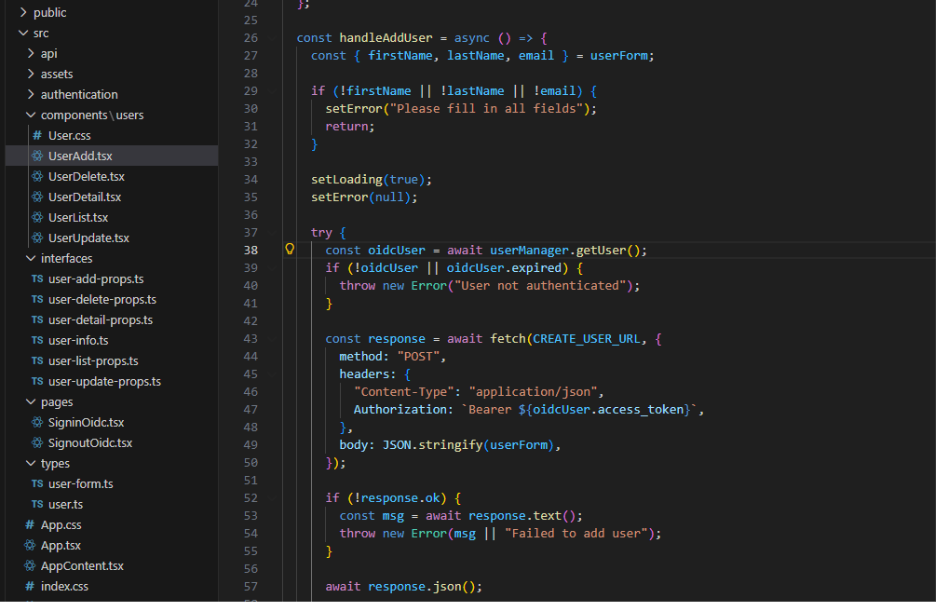
Explaination: The UserAdd component provides a modal form for creating a new user. It manages form state and validation using React state hooks. When submitting, it retrieves the access token from the OIDC UserManager and sends an authenticated POST request to the create-user API endpoint. The component also handles loading, error states, and triggers success and close callbacks after a successful operation.
UserDelete.tsx:
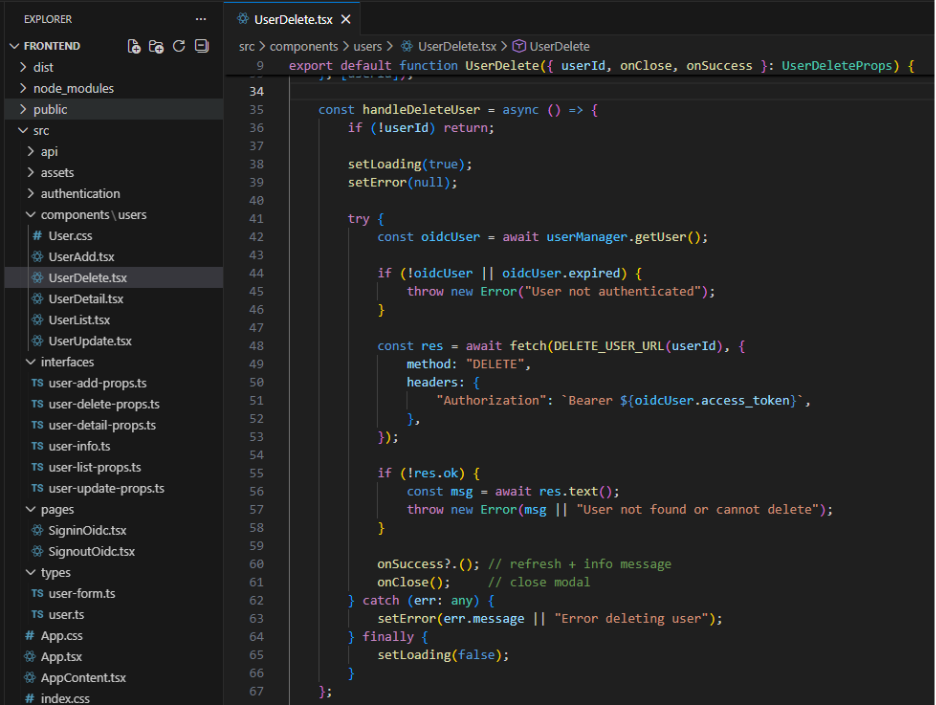
Explaination: The UserDelete component displays a confirmation modal for deleting a user. It fetches and shows user details by ID when the modal is opened. Upon deletion, it retrieves the access token from the OIDC UserManager and sends an authenticated DELETE request to the backend API. The component manages loading and error states, and triggers success and close callbacks after a successful deletion.
UserDetail.tsx:
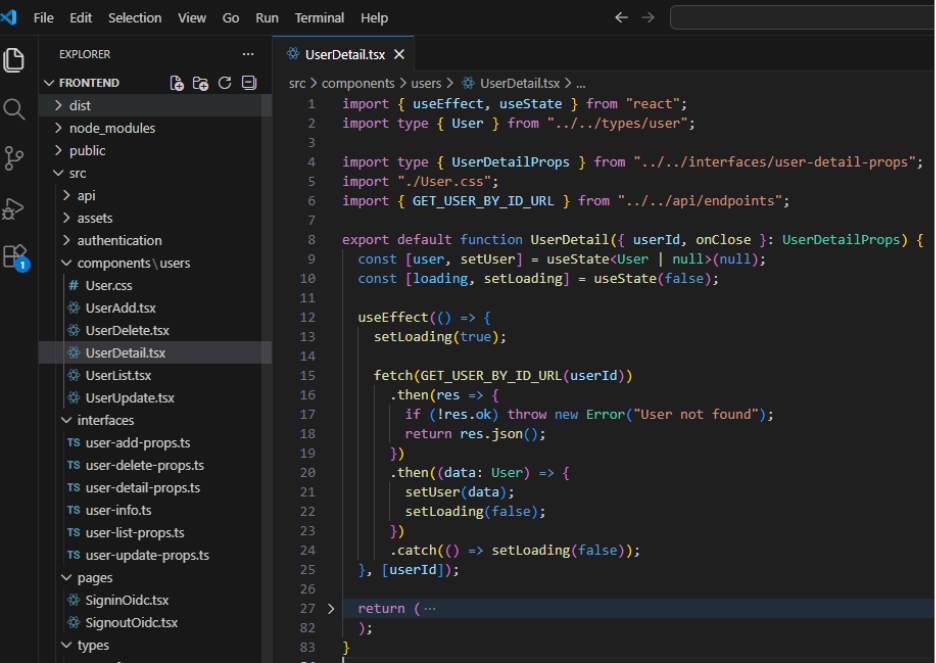
Explaination: The UserDetail component displays detailed information about a user in a modal view. It fetches user data by ID from the backend API when the component is mounted or when the user ID changes. The component manages loading state while data is being retrieved. It presents user details and allows the modal to be closed via a callback.
UserList.tsx:
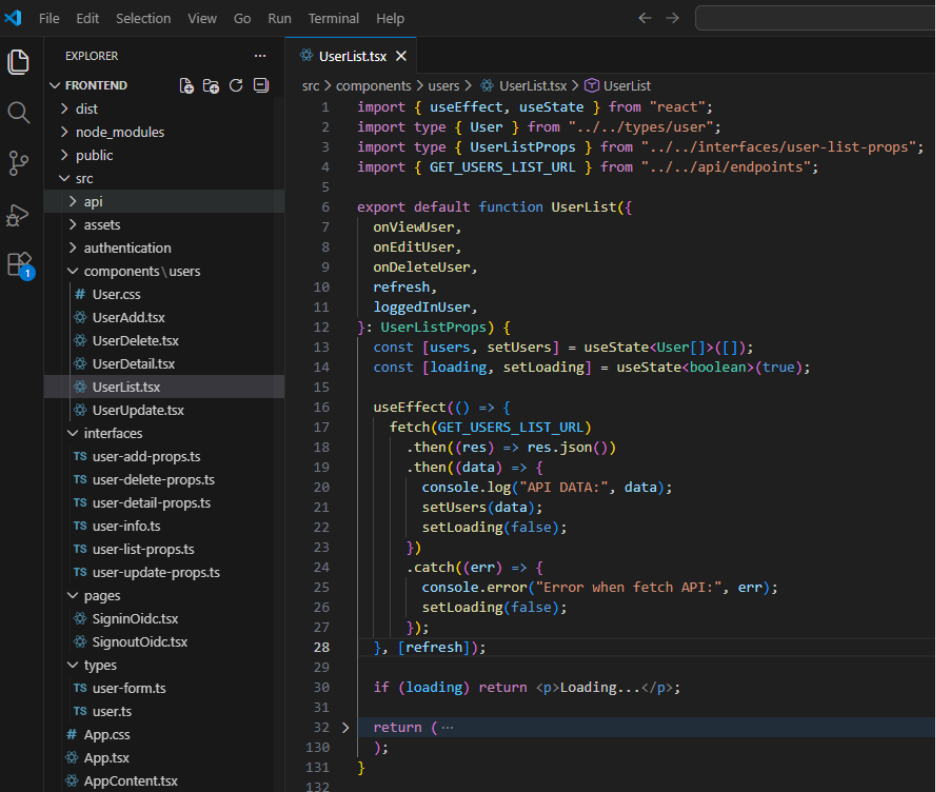
Explaination: The UserList component fetches and displays a list of users from the backend API in a table format. It reloads data when the refresh flag changes. The component provides actions to view, edit, and delete users via callback props. It also applies basic role-based checks to restrict edit and delete actions to admin users only.
UserUpdate.tsx:
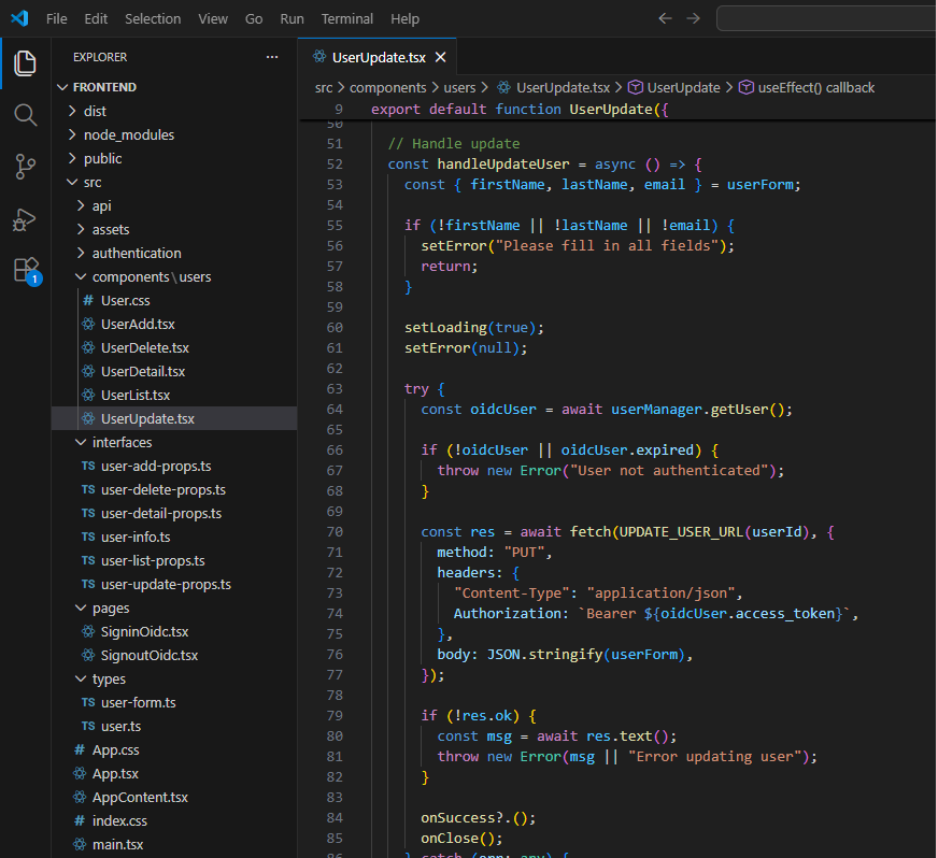
Explaination: The UserUpdate component provides a modal form for editing an existing user. It loads user data by ID and pre-fills the form fields for editing. When submitting, it retrieves an access token from the OIDC UserManager and sends an authenticated PUT request to update the user. The component handles form validation, loading, error states, and triggers success and close callbacks after a successful update.
user-add-props.ts:
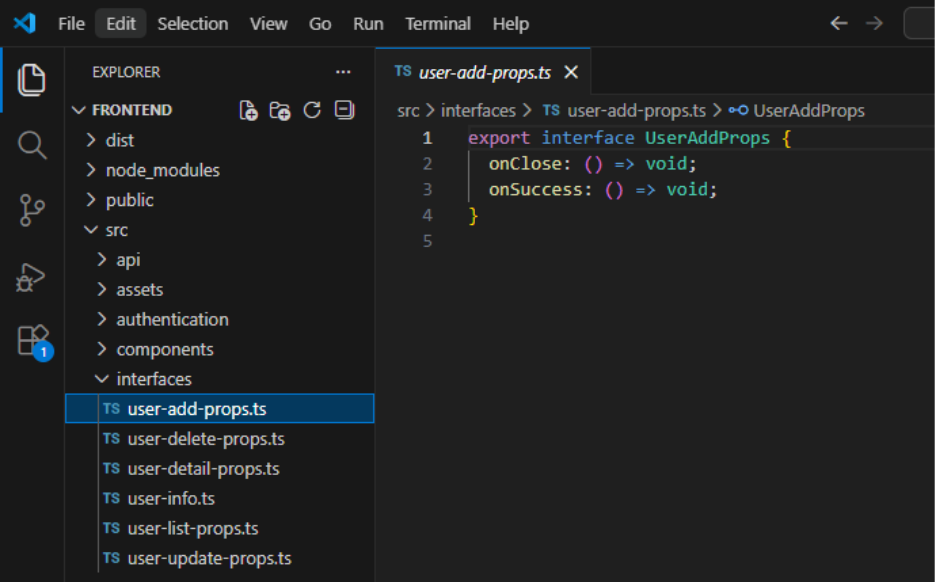
Explaination: The UserAddProps interface defines the props required by the UserAdd component, including callback functions for closing the modal and handling successful user creation.
SigninOidc.tsx:
Explaination: The SigninOidc component handles the OpenID Connect sign-in callback after a successful login. It processes the authentication response using the OIDC UserManager and redirects the user to the home page once login is completed.
SignoutOidc.tsx:
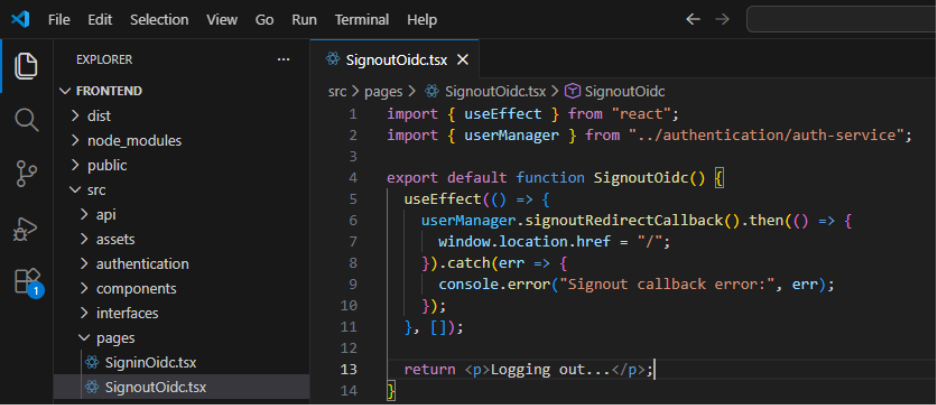
Explaination: The SignoutOidc component handles the OpenID Connect sign-out callback. It processes the logout response using the OIDC UserManager and redirects the user back to the home page after logout is completed.
user-form.ts:
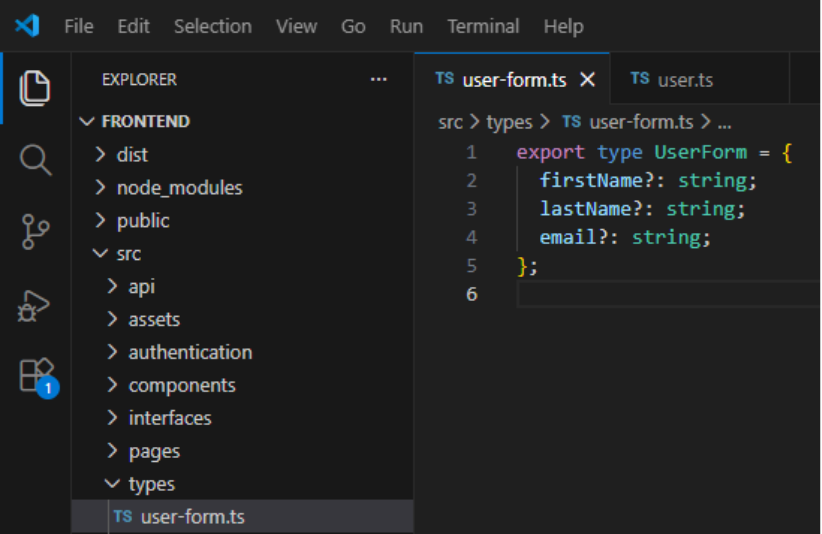
Explaination: The UserForm type defines the shape of user form data used for creating and updating users, including optional fields for first name, last name, and email.
App.tsx:

Explaination: This file configures client-side routing for the application using React Router. It defines routes for OIDC sign-in and sign-out callbacks and routes all other paths to the main AppContent component.
AppContent.tsx:
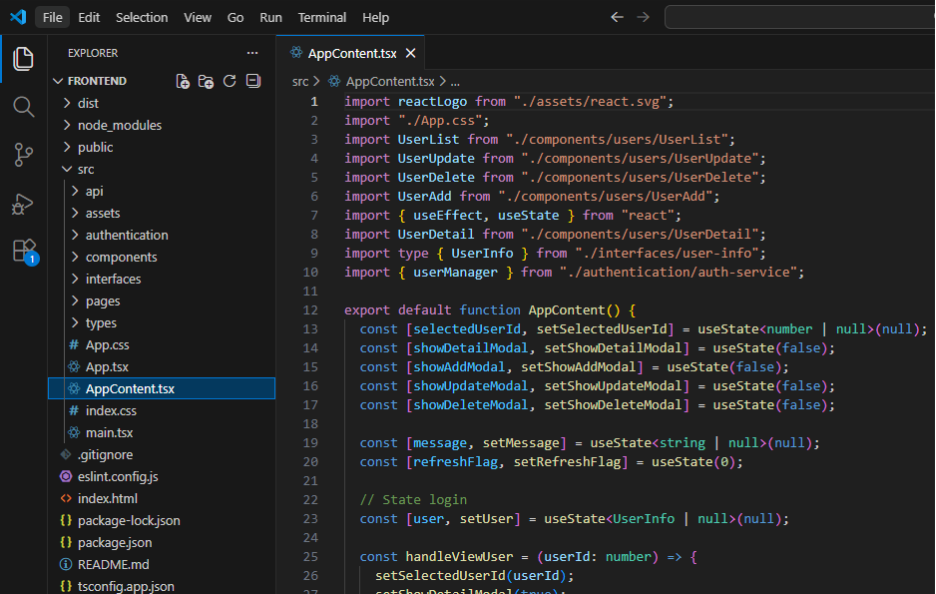
Explaination: The AppContent component serves as the main container of the application. It manages authentication state using OIDC, including login and logout actions. The component coordinates user CRUD operations by controlling modal visibility and selected user state, and it refreshes the user list after successful actions. It also applies basic role-based access control for user management features.
7. Conclusion
API Swagger: This is API swagger UI when started.

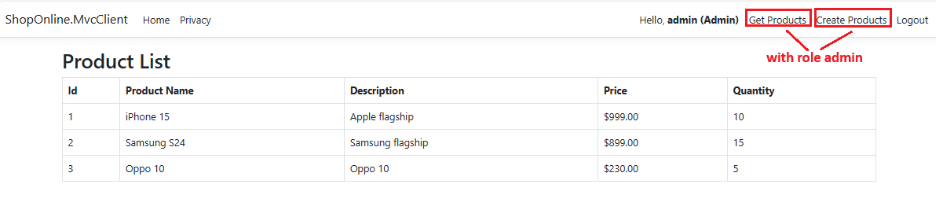
Mvc Client: This is Mvc Client page.

When users click the Login button, the system navigates to the IdentityServer login page.

After a successful login, the system redirects the user back to the MVC Client. The MVC Client then displays the logged-in user’s information along with the associated role. If the role is “Admin”, two links—“Get Products” and “Create Products”—are displayed. If the role is “User”, only the “Get Products” link is shown.
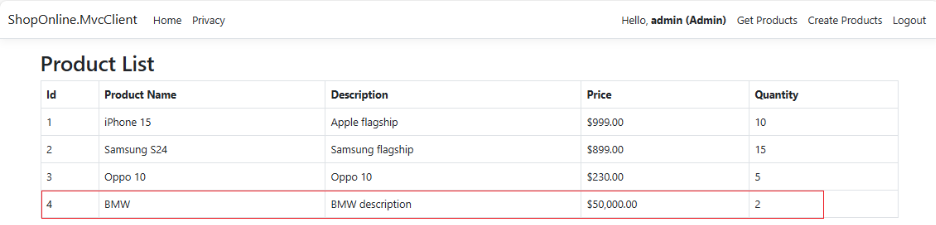
The “Create New Product” page:
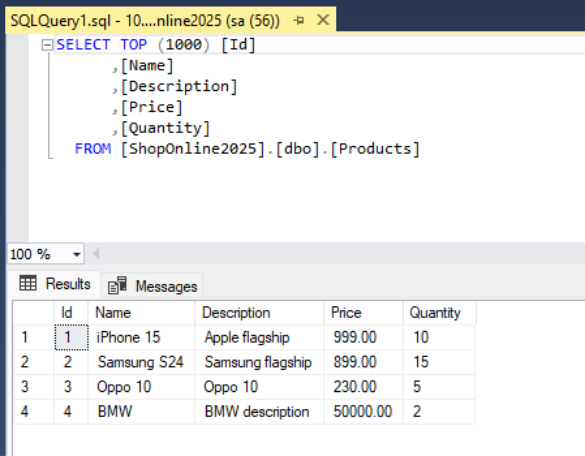
We can check data in SQL as below.
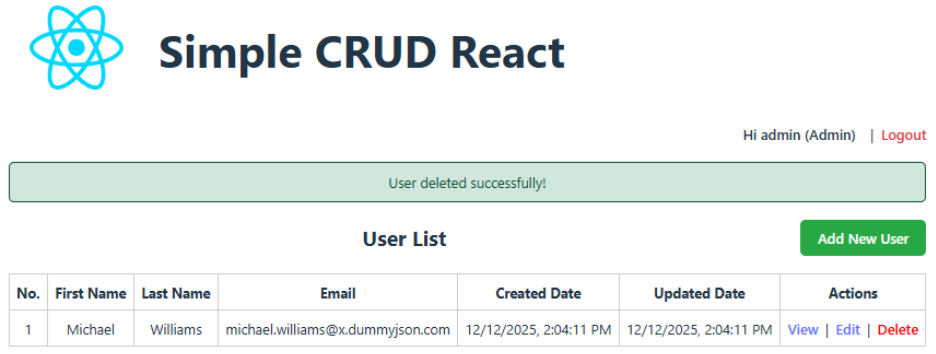
React Client:
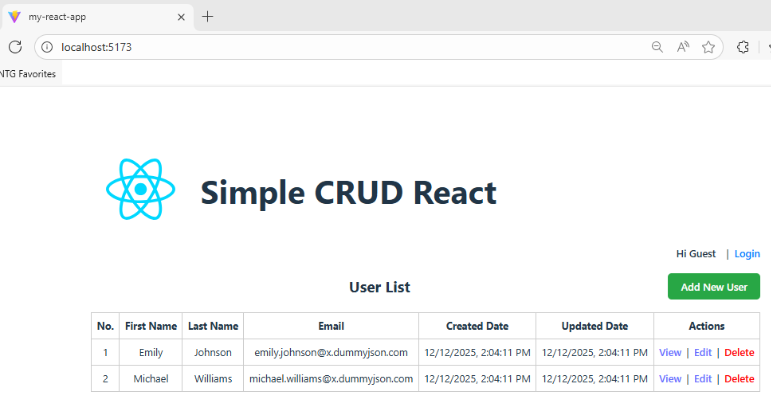
Users click Login to navigate to the same login page as the MVC Client.

After a successful login, the system redirects the user back to the React homepage.
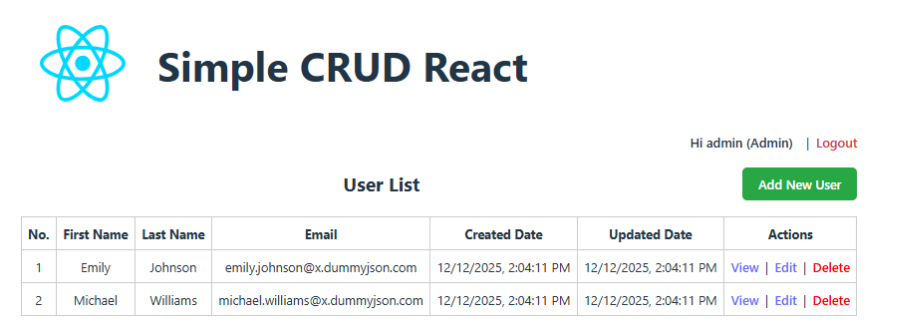
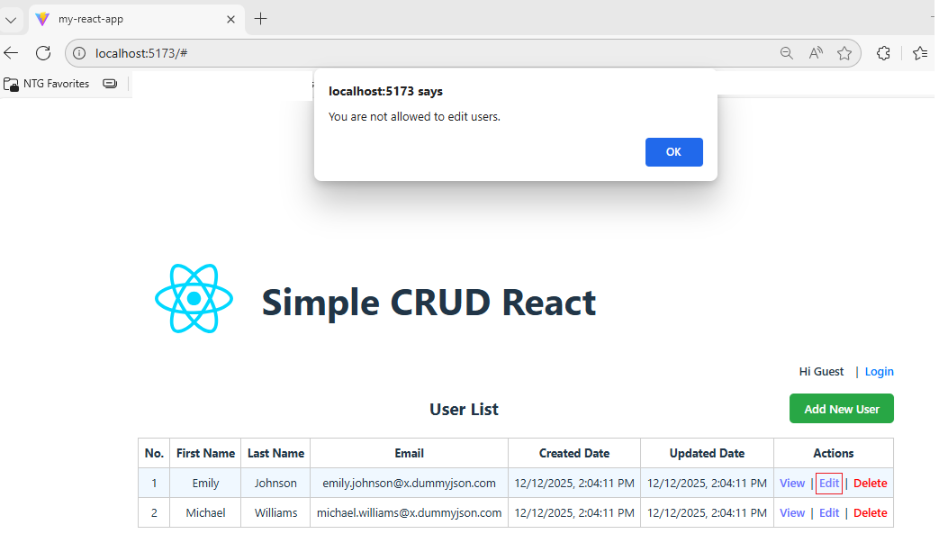
With the “Admin” role, users have full permissions to view details, edit, and delete users. With the “User” role, users can only view details.
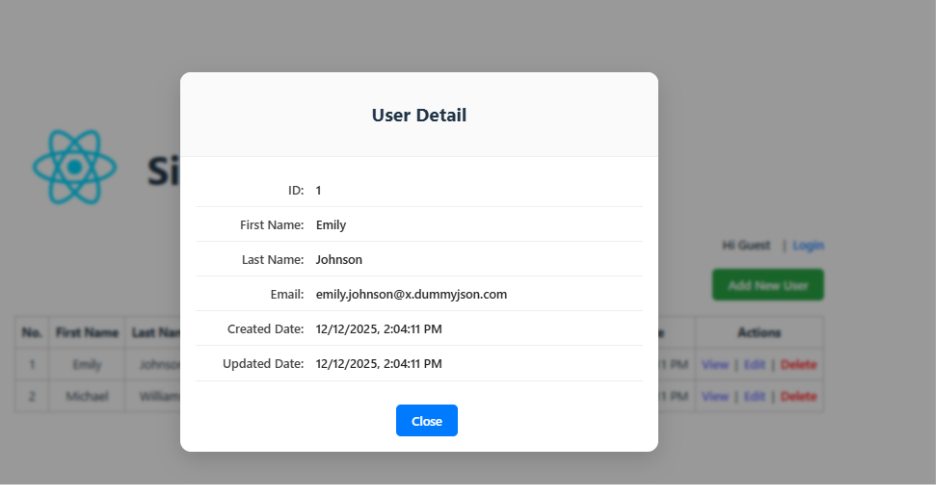
View Detail:
Users cannot edit or delete unless they are logged in as an admin.
Add New User page:

Update User page:

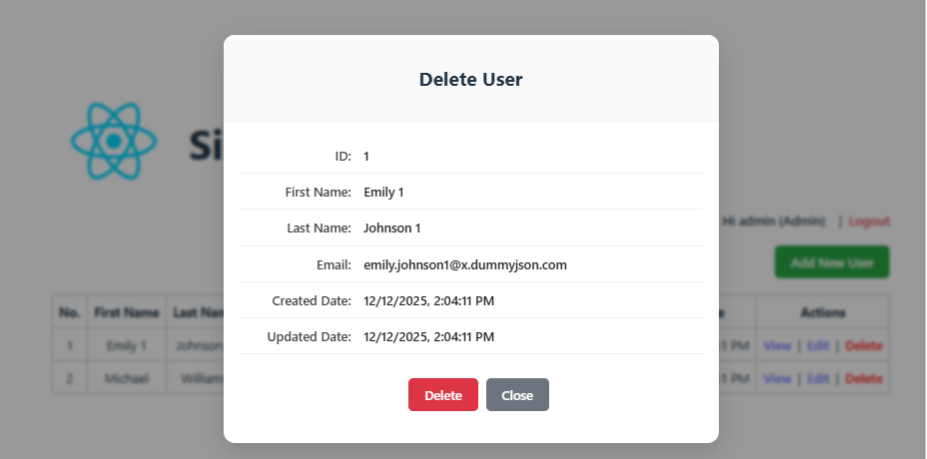
Delete User page:
In this blog, I successfully built a secure API using IdentityServer, leveraging OAuth2 and OpenID Connect to handle authentication and authorization in a centralized manner. The API is consumed by two different clients—a MVC client and a React client—demonstrating the flexibility and scalability of this approach.
In addition, I implemented policy-based authorization to clearly separate access permissions between Admin and User roles. This approach provides better control and maintainability compared to traditional hard-coded role checks.
This architecture closely reflects real-world scenarios in modern systems, especially in microservices-based architectures or applications where multiple frontends need to access a shared backend.
Source code: https://github.com/huychenh/huyc_react_crud_2025
Reference documents:
https://react.dev/
https://learn.microsoft.com/en-us/dotnet/core/whats-new/dotnet-8/overview
https://identity-server.readthedocs.io/en/latest/
https://mojoauth.com/oauth2-oidc/implement-oauth2-oidc-with-react/
— End —