


1. Introduction
Today, technology is evolving faster than ever — and Generative AI (GenAI) is leading the way. When GenAI is added to apps, it can power smart tools that help users get things done automatically. The problem? Most of these tools are locked inside a single app. That’s where MCP (Model Context Protocol) comes in. It allows different AI apps to share and reuse tools, so we don’t have to build the same thing over and over again.
In this post, we’ll walk through building a simple MCP Server and Client using Java Spring Boot and Spring AI with your OpenAI API key. Along the way, you’ll see how to wire both components to local MongoDB and PostgreSQL databases, allowing AI-driven services to call external tools and data sources
2. What is Model Context Protocol?
The Model Context Protocol (MCP) is a standardized protocol that enables AI models to interact with external tools and resources in a structured way. It supports multiple transport mechanisms to provide flexibility across different environments.
- Without MCP: Each AI tool is stuck on its own “island,” unable to share data or capabilities.
- With MCP: They team up—sharing info, tools, and context seamlessly.
MCP like a USB-C port for AI applications. Just as USB-C provides a standardized way to connect your devices to various peripherals and accessories, MCP provides a standardized way to connect AI models to different data sources and tools.
3. How It Works
The MCP workflow in the example follows these steps:

3.1. Initial Setup and Discovery
- Connection Initialization
- When the host application starts, its Chat Client sends an initialization request to the MCP Client.
- The MCP Client establishes a connection to the configured MCP Server.
- Capability Discovery
- The MCP Client asks the MCP Server: “What capabilities (tools) do you offer?”
- The MCP Server responds with metadata describing all available tools, such as names, parameters, and descriptions.
- Registration
- The MCP Client forwards this tool list to the Chat Client.
- The Chat Client registers these tools with the AI model (LLM) so it knows what tools are available at runtime.
- The AI model confirms: “These tools are now available for me to use.”
3.2. Processing a User Request
Let’s say a user asks: “Get all products”
- Need Recognition
- The Chat Client receives the user’s message and forwards it to the AI model.
- The AI model analyzes the prompt and determines it requires external data (e.g., a product list from a database).
- Tool Selection
- The AI model selects a registered tool that can handle the request, e.g., getProductsTool.
- Tool Invocation
- The Chat Client requests the MCP Client to execute the selected tool.
- The MCP Client sends a standardized request to the MCP Server.
- The MCP Server executes the corresponding tool logic.
- Data Retrieval
- The tool queries the necessary data source (e.g., MongoDB or PostgreSQL).
- The database responds with the requested product data.
- The tool sends the data back up to the MCP Server, which relays it to the MCP Client.
- Response Generation
- The MCP Client returns the external data to the AI model.
- The AI model generates a final natural language response that incorporates the data.
- Result Delivery
- The Chat Client sends the completed response back to the user interface.
- The user sees the answer: e.g., “Here are 10 products currently available.”
All of this happens in just a few seconds, giving users the impression that the AI “knows” more than what it was originally trained on. By using a common protocol, components built by different teams can plug in and work together securely and efficiently—letting you extend your AI’s power with new tools and data sources.
4. Building MCP Server with Spring Boot AI
4.1. Key Concepts
Before jumping into code examples, it’s important to understand two core building blocks of MCP tool integration: @Tool and ToolCallbackProvider.
@Tool Annotation
- What it does: Marks a method as a callable tool in your MCP server
- Why it matters: When you annotate a method with
@Tool, you’re telling the MCP framework: “This method can be invoked by the AI model when needed.” - You also provide a description, which is used by clients (like AI-powered UIs or apps) to understand and display what the tool does.
ToolCallbackProvider
- What it does: Registers all tool methods with the MCP framework.
- Why it matters: ToolCallbackProvider scans your application for methods annotated with @Tool, then registers them so they can be executed when an AI model triggers a tool call.
- Without this, your MCP server wouldn’t know which methods are available or how to invoke them in response to incoming requests.
4.2 MCP Server
Step 1: Setting Up Project Dependencies
Add these dependencies in your pom.xml:
<dependencies>

<!--		Full MCP Server features support with SSE (Server-Sent Events) server transport based on Spring MVC and an optional STDIO transport.-->
	<dependency>
		<groupId>org.springframework.ai</groupId>
		<artifactId>spring-ai-starter-mcp-server-webmvc</artifactId>
	</dependency>

	<dependency>
		<groupId>org.springframework.boot</groupId>
		<artifactId>spring-boot-starter-data-mongodb</artifactId>
	</dependency>

	<dependency>
		<groupId>org.springframework.boot</groupId>
		<artifactId>spring-boot-starter-jdbc</artifactId>
	</dependency>

	<dependency>
		<groupId>org.postgresql</groupId>
		<artifactId>postgresql</artifactId>
		<scope>runtime</scope>
	</dependency>

	<dependency>
		<groupId>org.projectlombok</groupId>
		<artifactId>lombok</artifactId>
		<scope>provided</scope>
	</dependency>

</dependencies>
<dependencyManagement>
	<dependencies>
		<dependency>
			<groupId>org.springframework.ai</groupId>
			<artifactId>spring-ai-bom</artifactId>
			<version>${spring-ai.version}</version>
			<type>pom</type>
			<scope>import</scope>
		</dependency>
	</dependencies>
</dependencyManagement>
These dependencies provide:
- spring-ai-starter-mcp-server-webmvc: Integrates the MCP framework with your Spring Boot application, enabling automatic discovery and execution of exposed tool methods, making it easier to work with AI-driven functionalities.
- We will have 3 types of transport: STDIO server transport, WebMVC Server Transport and WebFlux Server Transport
- In this example, we will use WebMVC Server Transport
- spring-boot-starter-data-mongodb, spring-boot-starter-jdbc, postgresql: Helps connect and work with Data Source in a Spring Boot app, making it easy to store and retrieve data.
- lombok: Java library that provides annotations to simplify Java development by automating the generation of boilerplate code
Step 2: Add Application Properties
In the application.properties, add the below properties:
spring.application.name=mcp-server

# NOTE: We must disable the banner and the console logging
# to allow the STDIO transport to work !!!
# In this example, we are using WebMVC Server Transport
spring.main.banner-mode=off

#spring.main.web-application-type=none # This is not needed for WebMVC
logging.file.name=./logs/spring-boot-ai-mcp-server.log
#logging.pattern.console=

spring.ai.mcp.server.name=mcp-server
spring.ai.mcp.server.version=0.0.1

# MongoDB connection string
mongodb.uri=mongodb://localhost:27017

# Postgres connection properties
spring.datasource.url= jdbc:postgresql://localhost:5432/postgres
spring.datasource.driver-class-name=org.postgresql.Driver
spring.datasource.username= postgres
spring.datasource.password= 123
Step 3: Define the service
Service connect to the MongoDB and PostgreSQL server that is running locally and contains methods to interact with them. Each method is annotated with @Tool that describes it’s functionality and to expose it as a callable function.
@Service
@RequiredArgsConstructor
public class MongoService {

    private static final Logger logger = LoggerFactory.getLogger(MongoService.class);
    private final MongoClient mongoClient;

    /**
     * Lists all databases in MongoDB.
     */
    @Tool(description = "[MongoDB] List all databases")
    public List<String> listDatabases() {
        logger.info("Fetching list of databases.");
        List<String> databaseNames = new ArrayList<>();
        for (Document db : mongoClient.listDatabases()) {
            databaseNames.add(db.getString("name"));
        }
        logger.info("Databases found: {}", databaseNames);
        return databaseNames;
    }

}
@Service
@RequiredArgsConstructor
public class PostgresService {
private static final Logger logger = LoggerFactory.getLogger(PostgresService.class);
private final JdbcTemplate jdbcTemplate;
/**
* Lists all tables in the PostgreSQL public schema.
*/
@Tool(description = "[PostgreSQL] List all tables in the database.")
public List<String> listTables() {
String sql = "SELECT table_name FROM information_schema.tables WHERE table_schema = 'public'";
return jdbcTemplate.queryForList(sql, String.class);
}
}Step 4: MCP Server Configuration
Create a configuration class and set up a bean that registers a callback provider for all services:
@Configuration
public class McpConfig {

    @Bean
    public ToolCallbackProvider toolCallbackProvider(MongoService mongoService, PostgresService postgresService) {
        return MethodToolCallbackProvider
                .builder()
                .toolObjects(mongoService, postgresService)
                .build();
    }
}- Provides a
ToolCallbackProviderthat registers tools @Tool fromMongoServiceandPostgresService. - This method uses the
MethodToolCallbackProviderto build aToolCallbackProviderby registering the tool objects from the provided services. The auto-configuration ensures that the tool callbacks are automatically registered as MCP tools.
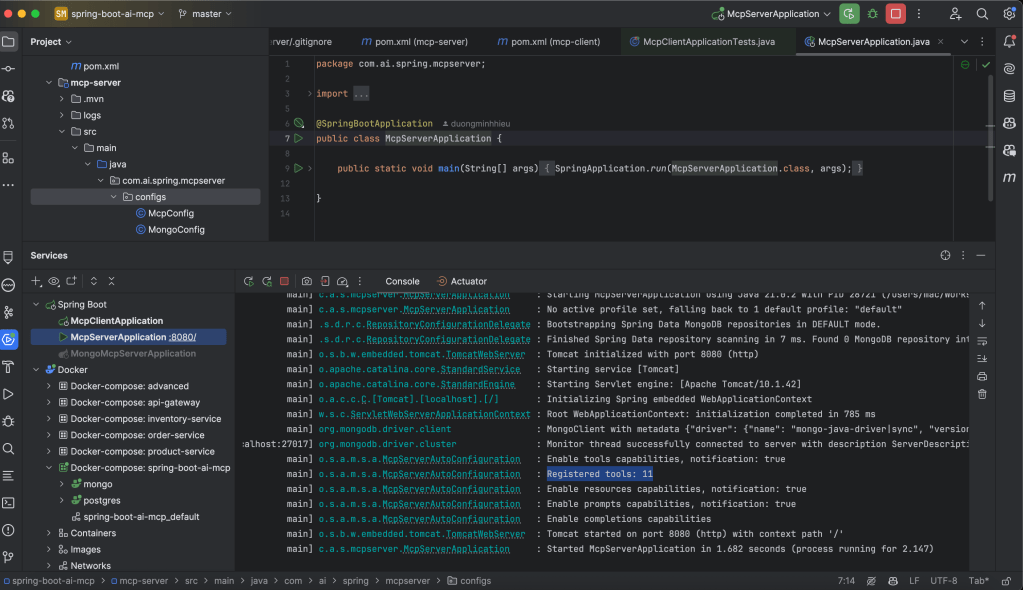
Step 5: Start the server
After starting the server, we can see that there are 11 registered tools.
5. Building MCP Client with Spring Boot AI
5.1. Key Concepts
The ChatClient and Its Role
The ChatClient is the core connector between the application and the AI model. In an MCP-based setup, it acts like an orchestrator—managing how the AI interacts with your tools and services.
Here’s what it does:
- Registers tools: It tells the AI model what tools are available and what each one can do.
- Routes tool calls: When the model decides to use a tool (based on your prompt), the
ChatClientsends that request to the correct handler. - Handles responses: After the tool finishes its task, the
ChatClientreceives the result and feeds it back into the model’s context.
You can think of the ChatClient as a bridge between the AI model, your application, and the external tools—making everything work together smoothly.
MCP Client Connection Types
Spring AI supports two main ways for your application to connect to MCP servers:
- STDIO Connection
- Launches the MCP server as a separate local process.
- Communicates using standard input and output (like running a CLI tool).
- Great for development and testing because it’s lightweight and easy to set up.
- Network Connection
- Connects to an MCP server running on a specific host and port (e.g. over HTTP/SSE).
- Ideal for production environments where the server runs independently.
💡In short: use STDIO for quick local experiments, and Network for scalable, real-world deployments. In our example, we use the Network Connection
5.2. MCP Client
Step 1: Setting Up Project Dependencies
<dependencies>
	<dependency>
		<groupId>org.springframework.boot</groupId>
		<artifactId>spring-boot-starter-web</artifactId>
	</dependency>
	<dependency>
		<groupId>org.springframework.ai</groupId>
		<artifactId>spring-ai-starter-mcp-client</artifactId>
	</dependency>
	<dependency>
		<groupId>org.springframework.ai</groupId>
		<artifactId>spring-ai-starter-model-openai</artifactId>
	</dependency>
	<dependency>
		<groupId>org.projectlombok</groupId>
		<artifactId>lombok</artifactId>
		<version>1.18.30</version>
		<scope>provided</scope>
	</dependency>
</dependencies>
<dependencyManagement>
	<dependencies>
		<dependency>
			<groupId>org.springframework.ai</groupId>
			<artifactId>spring-ai-bom</artifactId>
			<version>${spring-ai.version}</version>
			<type>pom</type>
			<scope>import</scope>
		</dependency>
	</dependencies>
</dependencyManagement>
These dependencies provide:
- spring-boot-starter-web: adds all the essentials for building RESTful web services in Spring Boot.
- spring-ai-starter-model-openai: plugs in to any OpenAI-compatible API so you can easily call AI models.
- spring-ai-starter-mcp-client: gives the core MCP client features needed to connect and communicate with an MCP server.
Step 2: Config MCP Server
We’ll continue to config the AI Model, and the connection to our MCP Server. Add to the application.yml file.
server:
    port: 8081

spring:
  application:
    name: spring-boot-ai-mcp-client
  ai:
    openai:
      api-key: <your-openai-api-key>
      chat:
        options:
          model: gpt-4o-mini # free model
    mcp:
      client:
        toolcallback:
          enabled: true
        sse:
          connections:
            mongo-mcp-server:
              url: http://localhost:8080
This configuration:
- Define the AI provider, api-key get here. For free, we can use gpt-4o-mini model
- toolcallback.enabled: This ensures that a ToolCallbackProvider bean is correctly registered during startup.
- Defines MCP server connections using the Network connector.
Step 3: Creating the ChatClient Configuration
Now, we’ll continue to define the ChatClient, the central component that connects your application to the AI model.
@Configuration
public class ChatClientConfig {
    @Bean
    public ChatClient chatClient(ChatClient.Builder chatClientBuilder, ToolCallbackProvider tools) {
        return chatClientBuilder.defaultToolCallbacks(tools).build();
    }
}- It injects a
ChatClient.Builderand aToolCallbackProvider: Spring Boot automatically provides these through dependency injection.
- The
ToolCallbackProviderholds all available tool callbacks: This includes tools discovered locally and any tools registered by connected MCP servers.
- We register the tools with the
ChatClient: By calling.defaultToolCallbacks(tools), we tell the client to use these tools when processing AI responses that require tool execution.
Step 4: Building a Controller
Finally, let’s create a REST controller to expose an endpoint for chatting with our AI
@RestController
@RequestMapping("/chat")
@RequiredArgsConstructor
public class ChatController {

    private final ChatClient chatClient;

    @PostMapping("/ask")
    public String chat(@RequestBody String userInput) {
        try {
            return chatClient.prompt(userInput).call().content();
        } catch (Exception e) {
            return (e.getMessage());
        }
    }
}
Our controller:
- Exposes a
/chat/askendpoint that accepts POST requests - Takes the user’s input as the request body
- Then it calls prompt() on the ChatClient, which processes the input, triggers any necessary tool calls (to MCP servers), and returns the final response.
- Returns the model’s response as a string
This minimalist implementation focuses on the core functionality. In a production application, you would likely add error handling, request validation, and a more structured response format.
Step 5: Start the MCP Client

6. Testing the Implementation
Test with PostgreSQL
curl --location 'localhost:8081/chat/ask' \
--header 'Content-Type: text/plain' \
--data 'Requirement: [Postgres] In the table orders, retrieve all orders that have status COMPLETED

Rules:
1. Respond strictly in JSON format, conforming to RFC 8259.
2. The JSON structure must align with the java.util.HashMap format.
3. Do not include explanations, comments, or any labels like ```json```.'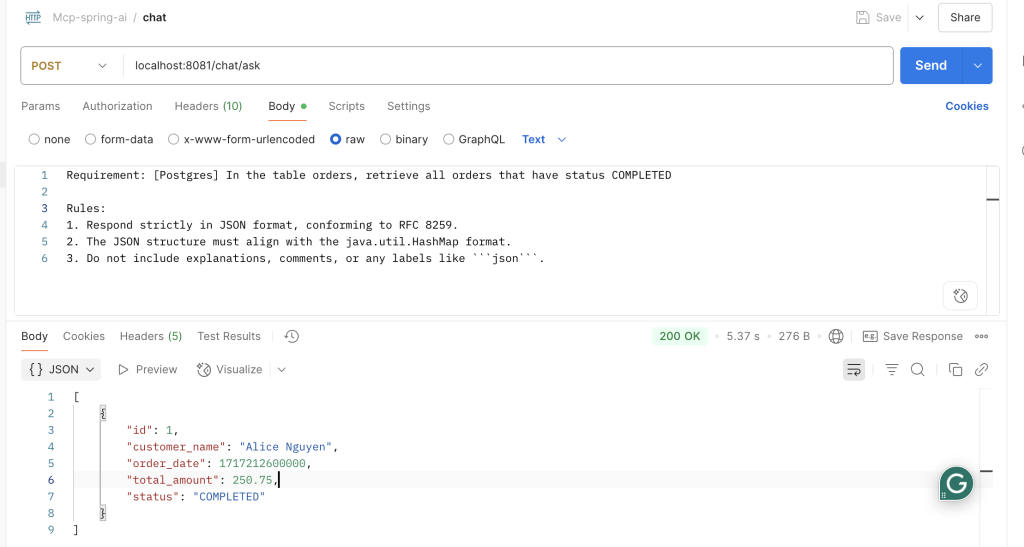
Test with MongoDB
curl --location 'localhost:8081/chat/ask' \
--header 'Content-Type: text/plain' \
--data 'Requirement: Retrieve all documents from the product-service collection, products table, where the price > 100

Rules:
1. Respond strictly in JSON format, conforming to RFC 8259.
2. The JSON structure must align with the java.util.HashMap format.
3. Do not include explanations, comments, or any labels like ```json```.'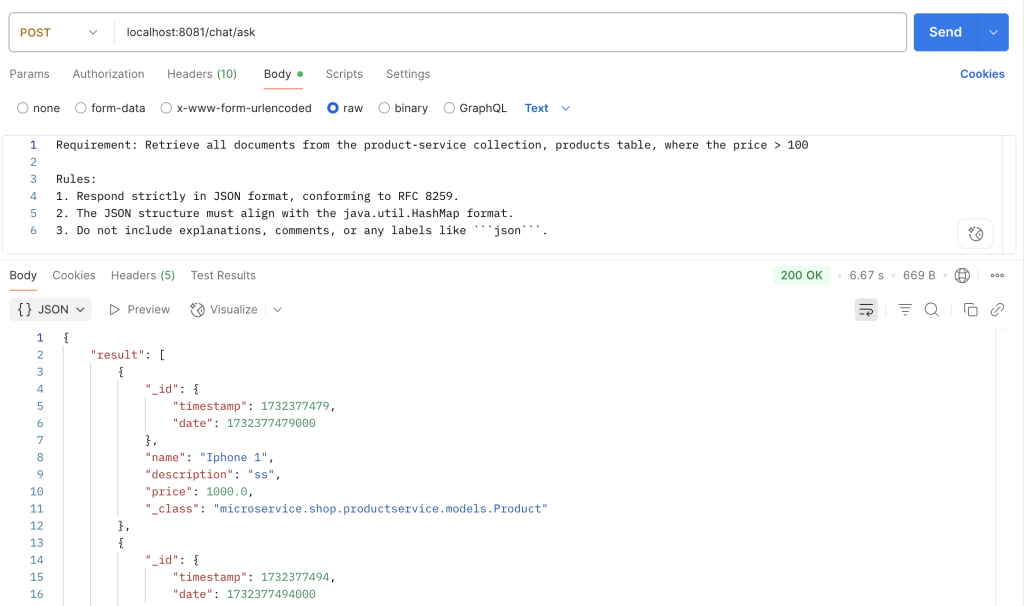
7. Source code
Full Source code and instruction setup: https://github.com/duongminhhieu/springboot-ai-mcp-example
8. References
- https://docs.spring.io/spring-ai/reference/api/mcp/mcp-overview.html
- https://modelcontextprotocol.io/introduction
- https://bootcamptoprod.com/build-mcp-servers-with-spring-boot-ai
- https://github.com/spring-projects/spring-ai-examples/tree/main
- Supported by ChatGPT