


I. What is Codeless Automation Testing
Codeless automation testing, also known as no-code or low-code testing, refers to a testing approach that allows individuals to create automated tests without the need for traditional programming or coding skills. The idea behind codeless automation is to simplify the test automation process, making it more accessible to a wider range of users, including those who may not have a strong programming background

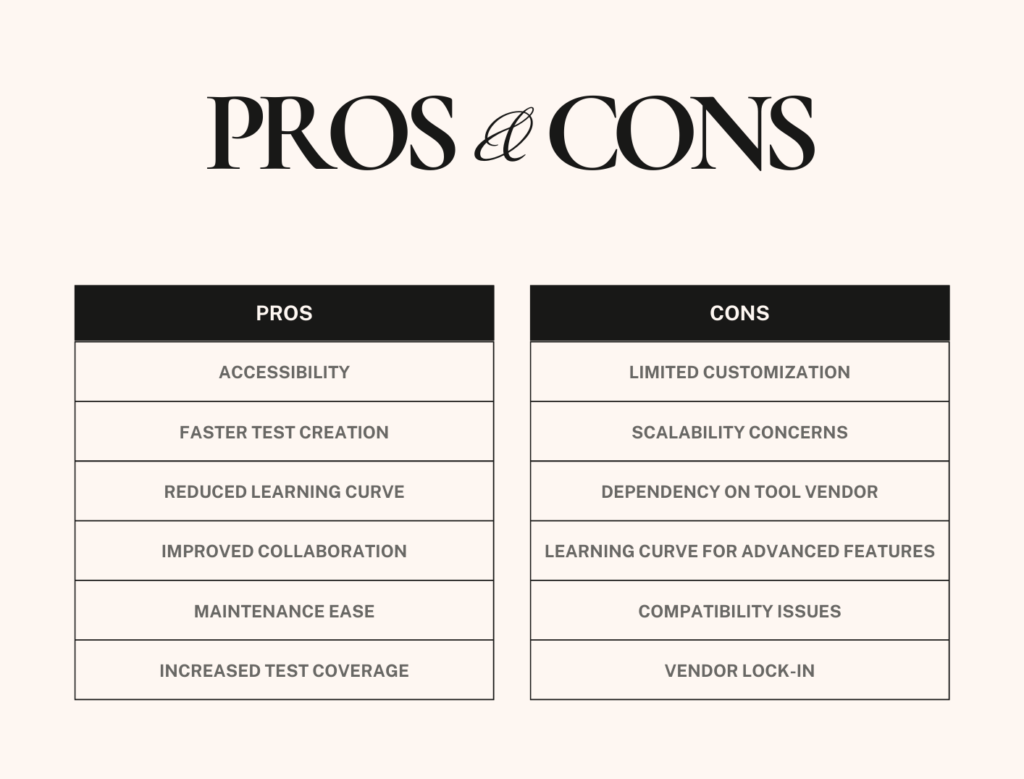
II. Pros and Cons of Codeless Automation
1. Pros
- Accessibility: Codeless automation makes test automation accessible to individuals with limited or no programming skills
- Faster Test Creation: Codeless automation tools often provide a user-friendly interface with drag-and-drop features, enabling faster creation of automated test scripts compared to manual coding
- Reduced Learning Curve: Learning to use codeless automation tools is generally faster and requires less training compared to learning programming languages. This can lead to quicker onboarding of team members
- Improved Collaboration: Codeless automation facilitates collaboration between technical and non-technical team members, allowing stakeholders from different domains to contribute to the testing process
- Maintenance Ease: Many codeless automation tools offer features like reusable components and modular test design, which can simplify test maintenance and updates
- Increased Test Coverage: With the ease of test creation, codeless automation can potentially lead to increased test coverage as more tests can be created in a shorter amount of time
2. Cons
- Limited Customization: Codeless automation tools may lack the flexibility and customization options available in traditional scripting. Complex scenarios or specific requirements may be challenging to address without coding
- Scalability Concerns: For large and complex projects, codeless automation might face challenges in terms of scalability
- Dependency on Tool Vendor: Users are often tied to the features and updates provided by the specific codeless automation tool vendor. If the tool lacks a certain capability, users may be limited in their ability to address specific testing requirements
- Learning Curve for Advanced Features: While the initial learning curve might be low, using advanced features of codeless tools or addressing complex scenarios might still require a certain level of expertise, limiting the tool’s benefits
- Compatibility Issues: Codeless automation tools may face challenges in handling certain technologies, frameworks, or environments. Compatibility issues may arise, especially when dealing with cutting-edge or specialized technologies
- Vendor Lock-in: Adopting a codeless automation tool may lead to vendor lock-in, making it difficult to switch to another tool in the future without significant effort and cost
III. Codeless automation with TestSigma
Testsigma is an AI-driven SaaS test automation tool that facilitates continuous testing by providing a unified platform for requirement management, creation of manual and automated test cases, and execution of these test cases on cloud and local devices.
Testsigma helps you to test your Web Applications, Mobile Applications, and APIs using tests written in simple English which allows manual testers to become automation testers without going through the hassles of learning a programming language.
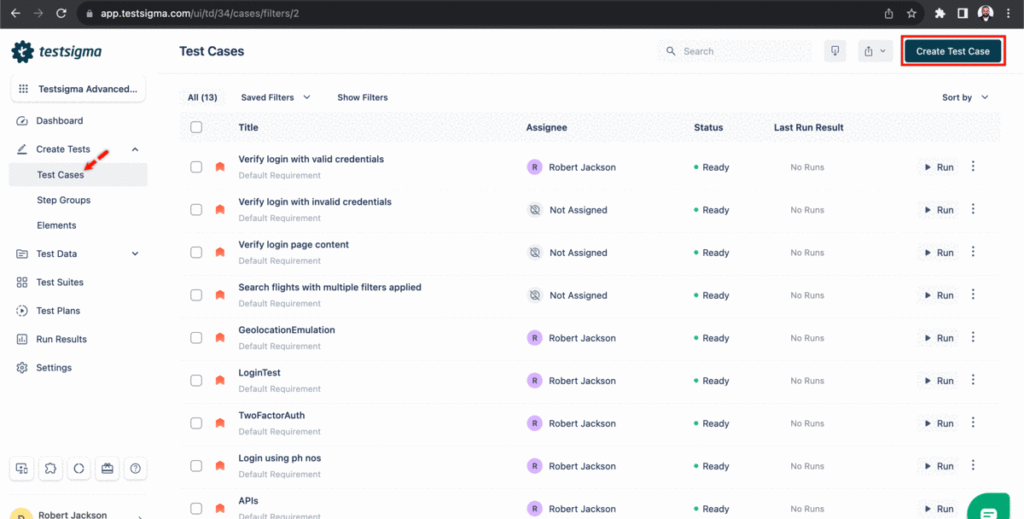
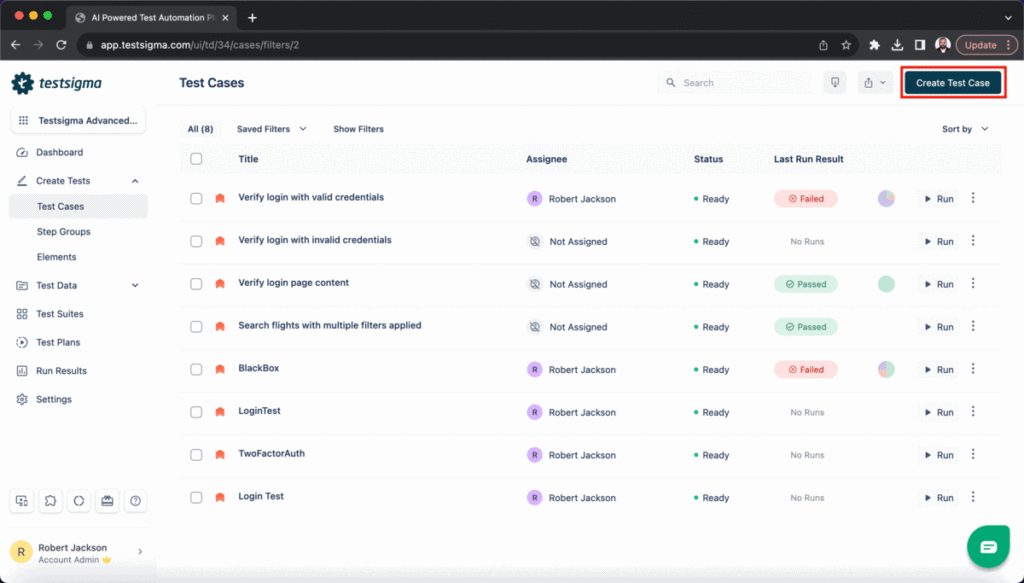
1. Test case creation
Navigate to Create Tests > Test Cases, and click on Create Test Cases
2. Test data profile
Test data profiles can significantly help the efficiency of your testing process, especially when dealing with large sets of similar data
2.1 Create test data profile

2.2 Associate Test Data Profile to a Test Case

2.3 Using Test Data Profile in a Test Case
3. Using environment variable
Create environment test data in Testsigma to ensure effective and accurate testing of your applications. Test data will allow you to simulate real-world scenarios by providing necessary input for your tests. Use different test data for each environment if you have multiple testing environments. For example, if your test runs in both staging and QA environments use two separate test data sets for each environment.

4. Create Elements
4.1. Create elements using Testsigma test Recorder
Sometimes, during test creation, we need to capture the details of multiple elements. This article discusses how to capture multiple elements using recorder
Prerequisites:
– You should have Testsigma chrome extension installed.

4.2. Create element manually
For dynamic websites such as E-commerce websites, the elements might be dynamic in nature i.e none of their attributes/properties remain constant across sessions. In such cases, there are chances for the elements created using Testsigma test Recorder to fail. In those specific cases, we might need to create some of the elements manually
Supported Locators in Testsigma
- XPath
- CSS Selector
- Link Text and Partial Link Text
- ID
- Name
- Class Name
- Tag Name

5. Organizing test cases
5.1 Test Suite
Organize your test cases into test suites based on common functionalities or scenarios to manage and execute them effectively. Test suites will help you in executing and reporting the test plan status. You can add a test case to multiple test suites. This document will provide an overview and guidelines to create, edit, delete, and list test suites in Testsigma.
Step to create a Test Suite
Navigate to Test Suites in the left-side navbar. Click the Create Test Suite button in the top right corner of the Test Suites List page. Provide below details to Create Test Suite:
- Name(Required): Enter the title of the Test Suite in the Name field on the Create Test Suite page.
- Description: You can enable the toggle switch for the Description and provide a brief description explaining the test suite’s purpose and scope. This will help your team members understand the objectives of the test suite.
- Pre-Requisite: Specify any Pre-Requisite for executing the test suite, such as specific test data, system configurations, or test environment setup.
- Label: You can assign a Label to the test suite. This will allow easier management of multiple test suites, as labels can be used for categorization and filtering.
- Add/Remove Test Cases: Click the Add/Remove Test Cases button to add or remove test cases from the Test Suite. An Add/Remove Test Case overlay will appear, allowing you to select test cases from the Available Test Case list by checking the box next to them or clicking the + icon to select individual test cases.
- Add to Suite: Click the >> icon to move the desired test cases from Available Test Case to Selected for Test Suite. You can drag and drop the test cases to change their order in the Test Suite. Finally, add the selected test cases to the Test Suite by clicking the Add to Suite button. To remove test cases from the Test Suite, select them from Selected Test Cases and click the << icon.
- After Test Suite: Enable the AfterTest Suite feature toggle switch, which enables you to define actions or test cases to execute after completing all test cases within the suite. You can use this feature to perform clean-up or post-test activities.
- When to execute After Test Suite – Once After All Test Cases: Select this option to execute the actions or test cases within the After Test Suite section only once after all the test cases have completed execution.
- When to execute After Test Suite – For Every Test Case: Select this option to execute the actions or test cases within the After Test Suite section for every individual test case within the suite after each test case is executed.
- If After Test Suite fails – Fail the test suite: Choose this option to mark the test suite as failed during execution if any of the actions or test cases within the After Test Suite section fails.
- If After Test Suite fails – Show the test suite result: Select this option to display the test suite result even if any of the actions or test cases within the After Test Suite section fail during execution.
- Add After Suite Test Cases: You can add specific test cases within the After Test Suite section that will execute after completing all the other test cases in the suite.

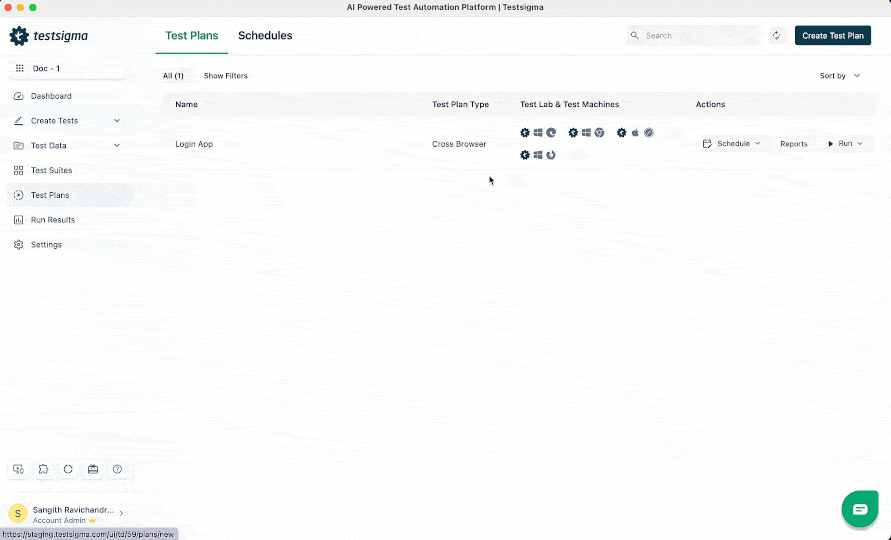
5.2 Test plan
In Testsigma, the Test Plan helps plan and organise software testing. The Test Plan efficiently executes the tests, manages test data, and reports results. It includes details such as the scope of testing, objectives, features to be tested, testing resources, testing environment, test cases, schedules, and risk assessment. The Test Plan makes sure testing is organised and helps find problems early. It also helps the team work together.
Step to creating a Test Plan
Navigate to Test Plans in the left-side navbar. Click the Create Test Plan button in the top right corner of the Test Plans List page.
- In the Basic Details tab, provide the following details and then click Continue:
- Name (Required): Enter the Test Plan’s title in the Name field on the Basic Details page.
- Description: Enable the toggle for Description and briefly explain the Test Plan’s purpose and scope. This helps your team understand what the Test Plan aims to do.
- Labels: You can label the Test Plan. Labels make it easier to manage multiple Test Plans, as they help with sorting and grouping.
- Test Plan Type: Select either the test plan type: Cross Browser Testing (Use single/ multiple browsers to test all the test suites) or Custom Test Plan (Manually add test machine profiles to individual test suites).
- In the Add Test Suites & Link Machine Profiles tab, provide the following details and then click Continue:
- Click Add Test Suites to include test suites in the test plan.
- Next, click the Test Machine icon to add machine profiles to the test plan. An overlay will appear, and you can select a pre-defined machine or create a new test machine. Once you have selected, click Save Selection (for more information, refer to Manage Test Machines in Test Plan).
- In the Test Plan Settings tab, provide the following details, and click Create:
- Send Notification: Enable the toggle for Send Notification and specify when to receive the notifications (for example, select to receive notifications when your test plans are Passed, Failed, Not Executed, Queued, Stopped, or Running. You can enter the emails or check the box to Add my email for receiving notifications through email. Messages can also be sent to collaboration tools like Google Chat, Slack, or MS Teams.
- Additional Settings: Provide the following details under additional settings:
- Environment: Select the test environment.
- Screenshot Capture: Select when the screenshots need to be taken, for None, All Steps, or Failed Steps alone.
- Page Timeout: Duration for which the test should wait for the page to load.
- Element Timeout: Duration for which the test should wait for the element to load.
- Recovery Actions: Click Recovery Actions to open the recovery actions section and define what actions should happen.
- Post Plan Hook: Select the Post Plan Hook and define actions or tasks to be performed once the test plan is executed and conditions are met.
6. Test runs and executions
6.1 Ad-hoc run
Testsigma’s Ad-hoc Run feature allows you to run your test cases without impacting the real test outcomes. You can use this functionality to verify if your test cases are set up accurately and performing as intended before proceeding with full-scale testing.
Ad-hoc Run in Test Case
- Create a Test Case with a list of the test steps and then click Run in the top right of the Test Case Details page to initiate an Ad-hoc Run overlay.
- Configure the ad-hoc run in the Ad-hoc Run overlay based on the application type in the below section.

- Click Save Configuration in the screen’s bottom right corner to save the Ad-hoc Run setups configuration. Then, enter a Name for the configuration in the pop-up window that appears and click Save.
- Click on Saved Configs at the top of the screen to reuse the saved configuration, and a drop-down list will appear. Select the Saved Config from this list.

- The Ad-hoc Run overlay will be automatically pre-filled with the saved configuration for your next runs when selected.
- In the Test Case Details page, click Ad-Hoc Runs in the right Navigation Bar to open the right sidebar. This will enable you to view the history and details of Ad-Hoc Run results for the Test Case.

6.2 Test plan execution
A test plan is a set of test suites. When a test plan is executed, the test suites and their corresponding test cases are executed, either serially or parallelly, as configured.
Steps to create and execute Test Plan
- Create a test case with all the necessary steps.

- Create a test suite and add the test case created in step 1 to this test suite.
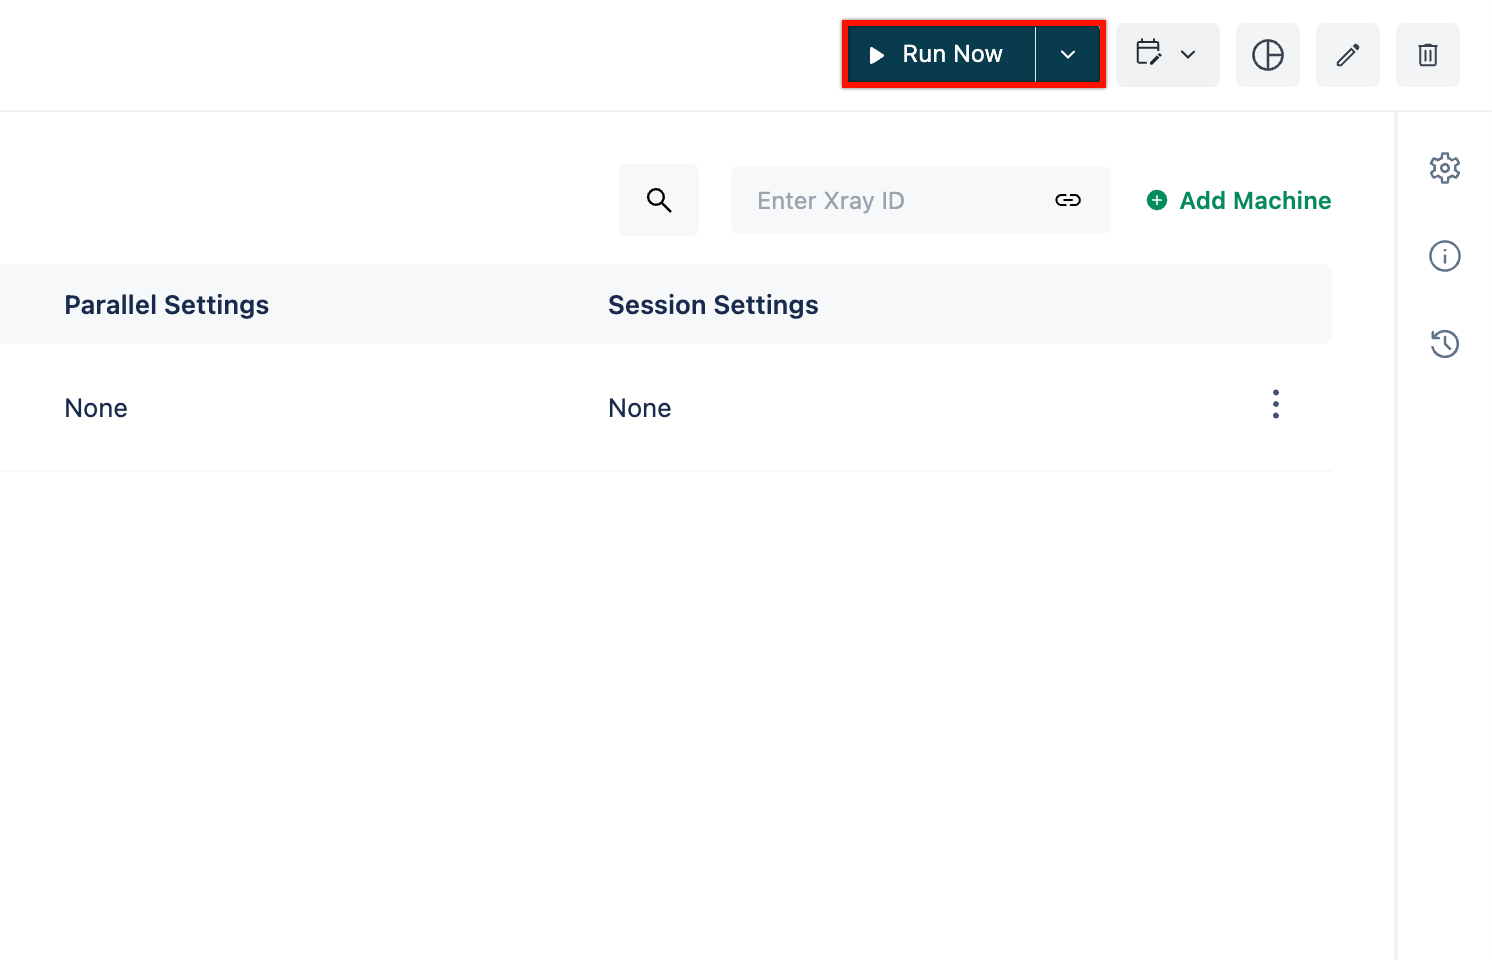
 Create a test plan and add the test suite we just created to this test plan.
 Click on the Run Now to start the test plan execution
IV. Conclusion
Testsigma is a low-code, test automation platform for end-to-end testing that works out of the box. It’s built to enable Agile teams to collaboratively plan, develop, execute, analyze, debug, and report on their automated testing—for websites, native Android and iOS apps, and APIs.
Testsigma can replace tens of different tools in the QA toolchain to enable teams to test easily throughout their continuous delivery pipeline.
Besides the benefits, like the other tools, Testsigma also has some limitations that we need to consider when we decide to apply it to our project:
- Test Data Limitations: While Testsigma manages test executions adeptly, handling complex test data scenarios can sometimes pose challenges
- The learning curve was not too hard but TestSigma has some Layers that you need to understand in order to be proficient with it
- Unable to deal with some complex test cases with complex data setup and tear down
V. References
– https://testsigma.com/docs/
– https://theqalead.com/tools/testsigma-review/
– https://www.capterra.com/p/171626/Testsigma/reviews/