


Welcome to a hands-on tutorial series, “End-to-End AWS Lakehouse Pipeline”. Over the coming weeks, we’ll guide you through each step needed to design a modern Lakehouse architecture. We will also cover how to build and run it on AWS. Whether you’re a data engineer, architect, or analytics specialist, this series is tailored to give you practical guidance. It provides clear examples you can apply directly in your organization.
Why a Lakehouse on AWS?
The modern Lakehouse architecture is the combination of a traditional data lake (for raw, low-cost, and unstructured data) and an old-school data warehouse (for structured, curated analytics). A lakehouse lets you:
- Unified Storage: Keep raw, cleaned, and curated data in a single object store (Amazon S3), reducing data duplication.
- Flexible Schema (Schema Evolution): Support schema-on-read for exploration and schema enforcement for production analytics.
- Open Formats: Leverage Apache Iceberg or Delta Lake tables for ACID transactions, time travel, and faster queries.
- Scalable Processing: Use serverless engines like AWS Glue, Amazon EMR, or Amazon Athena to process data at petabyte scale.
By the end of this tutorial, you will learn and gain a deep knowledge of Data Lakehouse architecture. You will also understand how Lakehouse leverages the flexibility of a data lake and the performance of a data warehouse.
Overall architecture of the series
This series will try to implement the following architecture:
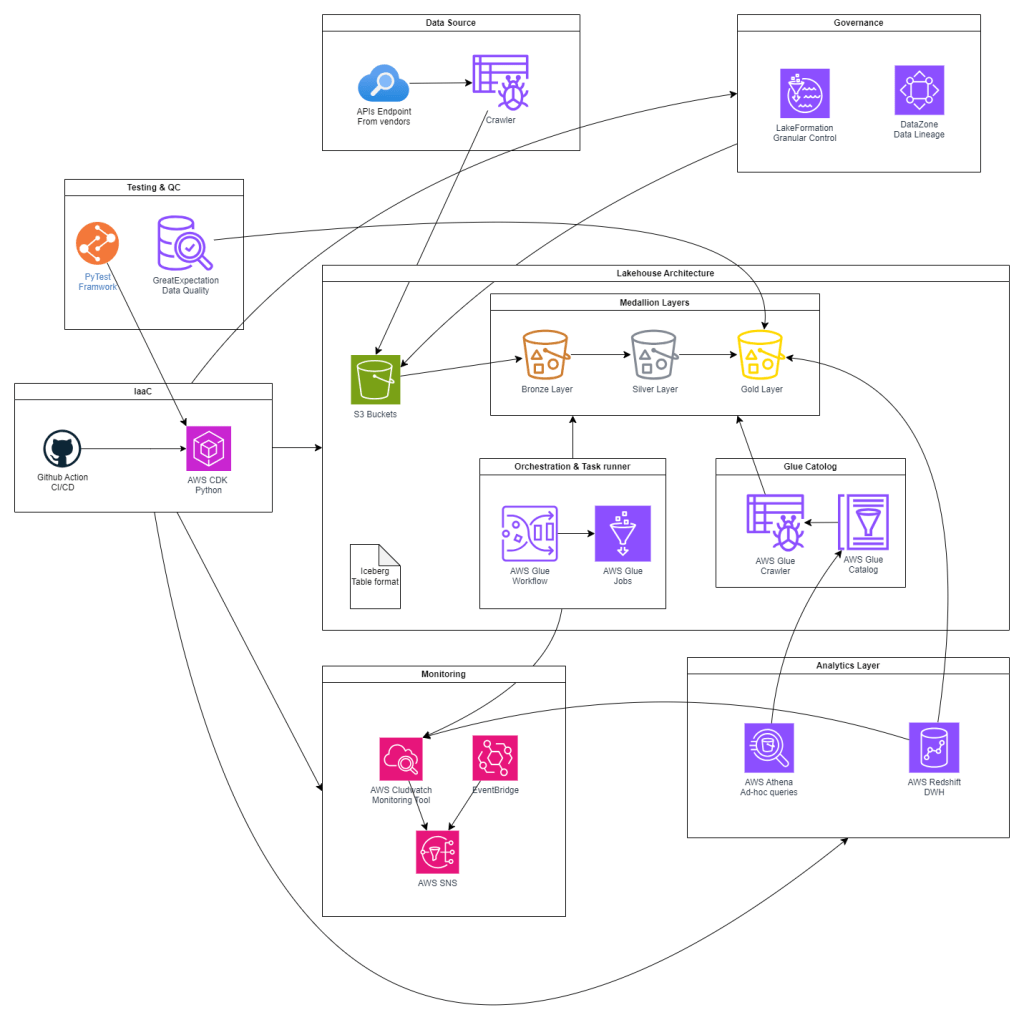
Key Components and Terminology
Before diving in, let’s align on the main AWS services and patterns as shown above:
- Amazon S3: Durable, scalable object store for raw and processed data.
- AWS Glue: Serverless ETL and Data Catalog service (Jobs, Crawlers, Workflows).
- EventBridge: Event bus for triggering workflows on data arrival or status changes.
- Apache Iceberg: Table format for ACID, partition evolution, and time travel on S3 data.
- Amazon Athena: Serverless, interactive query service reading Iceberg tables.
- Amazon Redshift Spectrum: Federated querying of S3-backed tables from Redshift.
- AWS Lake Formation: Centralized security, governance, and fine-grained access control.
- Amazon CloudWatch: Monitoring, logging, and alerting for all pipeline components.
Additionally, there are security services as IAM, KMS, Secret Manager, and VPC, that should be provisioned as the foundation of the whole pipeline. We will walk through them via the coming articles.
Implementation Timeline
Our provisioning and implementation will follow these eight phases:
- Phase 1: Foundation Infrastructure
- IAM roles, KMS keys, SSM parameters
- VPC, subnets, security groups
- S3 buckets for Bronze/Silver/Gold layers + access logs
- Phase 2: Core Data Services
- Register S3 locations in Lake Formation
- Set up Glue Data Catalog and Crawlers
- Phase 3: Processing Layer
- Configure Apache Iceberg tables
- Develop Glue ETL jobs for medallion transformations
- Phase 4: Analytics Layer
- Provision Redshift cluster and Spectrum integration
- Create Athena workgroups and resource configurations
- Phase 5: Governance & Monitoring
- Define DataZone domain for lineage/governance
- Build CloudWatch dashboards, alarms, and SNS topics
- Create EventBridge rules for pipeline events
- Phase 6: Data Pipeline
- Extract: Copy legacy data into raw S3
- Transform: Bronze→Silver→Gold processing
- Load: Push curated data into Redshift
- Phase 7: Testing & Quality
- Implement data quality checks with Great Expectations
- Develop unit/integration tests using pytest
- Phase 8: CI/CD
- Automate deployments with GitHub Actions and CodePipeline
This timeline ensures dependencies—like security, S3, and the Glue catalog—are in place before later phases such as ETL, governance, and CI/CD.
Hands-On Prerequisites
To follow along, you’ll need:
- AWS account with permissions for IAM, S3, Glue, EventBridge, Lake Formation, Redshift, Athena, CloudWatch, SNS, and DataZone.
- Familiarity with AWS CLI or Console.
- Python or Scala experience for Spark/Glue scripting.
- Sample dataset (e.g., CSV or Parquet) for ingestion—details to come in Part 1.
Tip: Use a dedicated sandbox AWS account to isolate tutorial resources.
Foundation and Core Services Implementation
Before taking a deeper look at the internal architecture of the AWS Lakehouse. We need to initialize the foundation services:
Part A: Security Stack Setup
1. Create KMS Keys for Data Encryption
1.1 Create S3 Data Encryption Key
- Navigate to AWS KMS service in the console
- Click Create key
- Configure key:
- Key type: Symmetric
- Key usage: Encrypt and decrypt
- Click Next
- Add alias and description:
- Alias:
ecom-lakehouse-s3-key - Description:
KMS key for S3 data encryption in ecom lakehouse - Click Next
- Alias:
- Define key administrative permissions:
- Keep default root account permissions
- Click Next
- Define key usage permissions:
- Keep default root account permissions
- Click Next
- Review and click Finish
1.2 Create Glue/ETL Encryption Key
- Repeat steps 1-7 above with:
- Alias:
ecom-lakehouse-glue-key - Description:
KMS key for Glue ETL jobs encryption
- Alias:

2. Create IAM Roles
2.1 Create Glue Service Role
- Navigate to IAM service
- Click Roles → Create role
- Select trusted entity:
- AWS service
- Use case: Glue
- Click Next
- Add permissions policies:
AWSGlueServiceRoleAmazonS3FullAccessAWSLakeFormationDataAdmin- Click Next
- Role details:
- Role name:
EcomLakehouseGlueRole - Description:
Service role for Glue ETL jobs in ecom lakehouse - Click Create role
- Role name:
2.2 Create Lake Formation Admin Role
- Click Create role
- Select trusted entity:
- AWS service
- Use case: Lake Formation
- Click Next
- Add permissions policies:
AWSLakeFormationDataAdminAmazonS3FullAccessIAMReadOnlyAccess- Click Next
- Role details:
- Role name:
EcomLakehouseLakeFormationRole - Description:
Admin role for Lake Formation data governance - Click Create role
- Role name:
2.3 Create Athena Query Role
- Click Create role
- Select trusted entity:
- Custom trust policy
- Paste this trust policy:
{ "Version": "2012-10-17", "Statement": [ { "Effect": "Allow", "Principal": { "Service": "athena.amazonaws.com" }, "Action": "sts:AssumeRole" } ] }- Click Next
- Add permissions policies:
AmazonAthenaFullAccessAmazonS3ReadOnlyAccessAWSGlueConsoleFullAccess- Click Next
- Role details:
- Role name:
EcomLakehouseAthenaRole - Description:
Role for Athena query execution - Click Create role
- Role name:
2.4 Create Redshift Role
- Click Create role
- Select trusted entity:
- AWS service
- Use case: Redshift – Customizable
- Click Next
- Add permissions policies:
AmazonRedshiftAllCommandsFullAccessAmazonS3ReadOnlyAccessAWSGlueConsoleFullAccess- Click Next
- Role details:
- Role name:
EcomLakehouseRedshiftRole - Description:
Role for Redshift cluster operations - Click Create role
- Role name:

3. Create SSM Parameters for Configuration
- Navigate to AWS Systems Manager
- Click Parameter Store → Create parameter
3.1 Create Database Configuration Parameters
Create the following parameters one by one:
Parameter 1:
- Name:
/ecom-lakehouse/config/s3-bucket-name - Type: String
- Value:
ecom-analyzer-lakehouse - Description:
Main S3 bucket for lakehouse data
Parameter 2:
- Name:
/ecom-lakehouse/config/glue-role-arn - Type: String
- Value:
arn:aws:iam::YOUR-ACCOUNT-ID:role/EcomLakehouseGlueRole - Description:
ARN of Glue service role
Parameter 3:
- Name:
/ecom-lakehouse/config/kms-s3-key-id - Type: String
- Value:
alias/ecom-lakehouse-s3-key - Description:
KMS key for S3 encryption
Parameter 4:
- Name:
/ecom-lakehouse/config/database-name - Type: String
- Value:
ecom_lakehouse_db - Description:
Glue catalog database name

Part B: Network Stack Setup
1. Create VPC for Redshift and Secure Resources
1.1 Create VPC
- Navigate to VPC service
- Click Create VPC
- VPC configuration:
- Resources to create: VPC and more
- Name tag:
ecom-lakehouse-vpc - IPv4 CIDR block:
10.0.0.0/16 - IPv6 CIDR block: No IPv6 CIDR block
- Tenancy: Default
- Number of Availability Zones: 2
- Number of public subnets: 2
- Number of private subnets: 2
- NAT gateways: In 1 AZ
- VPC endpoints: None
- DNS options: Enable both DNS hostnames and DNS resolution
- Click Create VPC
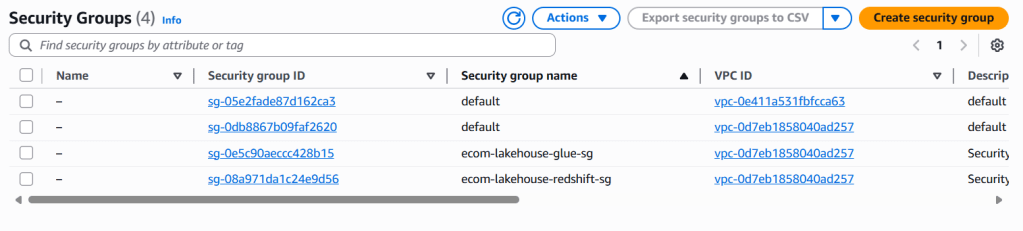
1.2 Create Security Groups
Security Group 1: Redshift Security Group
- In VPC console, click Security Groups → Create security group
- Basic details:
- Name:
ecom-lakehouse-redshift-sg - Description:
Security group for Redshift cluster - VPC: Select
ecom-lakehouse-vpc
- Name:
- Inbound rules:
- Type: Redshift
- Protocol: TCP
- Port: 5439
- Source: Custom → Select the VPC CIDR
10.0.0.0/16
- Outbound rules: Keep default (All traffic)
- Click Create security group
Security Group 2: Glue Connection Security Group
Step 1: Create an empty SG for Glue
- Create another security group:
- Name:
ecom-lakehouse-glue-sg - Description:
Security group for Glue connections - VPC: Select
ecom-lakehouse-vpc
- Name:
- Inbound rules: Leave it empty for now
- Outbound rules: Keep default
- Click Create security group
Step 2: Edit the SG to Add Self-Reference
- Find your newly created security group in the list
- Click Actions → Edit inbound rules (or click the Inbound rules tab → Edit inbound rules)
- Click Add rule
- Configure the rule:
- Type: All traffic
- Protocol: All
- Port range: All
- Source: Custom
- In the source field, start typing
ecom-lakehouse-glue-sg - Select the security group from dropdown (it will show: sg-xxxxxxxxx – ecom-lakehouse-glue-sg)

Part C: Enhanced S3 Configuration
1. Configure S3 Bucket Policies and Encryption
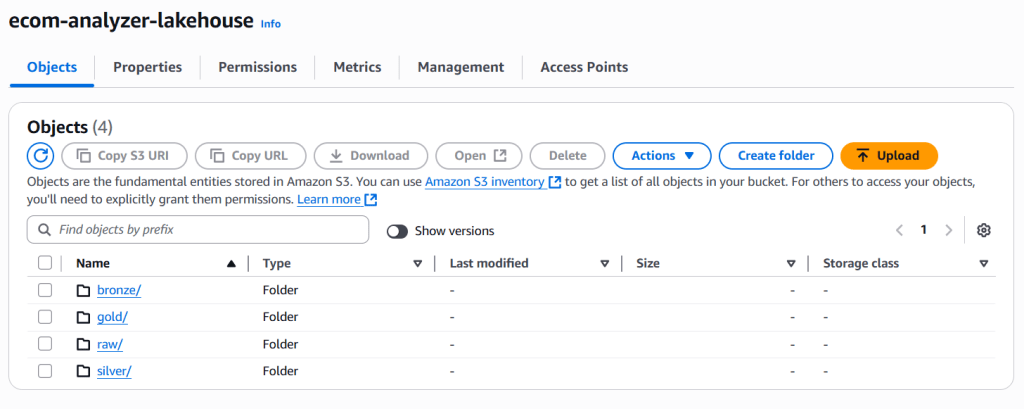
Assume that the S3 bucket ecom-analyzer-lakehouse already created with folders: raw, bronze, silver, gold
1.1 Enable S3 Bucket Encryption
- Navigate to S3 service
- Click on bucket
ecom-analyzer-lakehouse - Go to Properties tab
- Scroll to Default encryption
- Click Edit
- Configure encryption:
- Encryption type: Server-side encryption with AWS KMS keys (SSE-KMS)
- AWS KMS key: Choose from your AWS KMS keys
- Select:
ecom-lakehouse-s3-key - Bucket Key: Enable
- Click Save changes
1.2 Enable S3 Versioning
- In the same bucket, go to Properties
- Find Versioning section
- Click Edit
- Select Enable
- Click Save changes
1.3 Configure S3 Lifecycle Rules (Optional)
- Go to Management tab
- Click Create lifecycle rule
- Lifecycle rule configuration:
- Name:
ecom-lakehouse-lifecycle - Status: Enabled
- Rule scope: Apply to all objects in the bucket
- Name:
- Lifecycle rule actions:
- ✅ Transition current versions of objects between storage classes
- ✅ Transition noncurrent versions of objects between storage classes
- ✅ Delete noncurrent versions of objects
- Transition current versions:
- Days after object creation: 30
- Storage class: Standard-IA
- Add another transition:
- Days: 90
- Storage class: Glacier Flexible Retrieval
- Delete noncurrent versions:
- Days after objects become noncurrent: 30
- Click Create rule
2. Create Additional S3 Buckets
2.1 Create Logs Bucket
- Click Create bucket
- Bucket configuration:
- Name:
ecom-analyzer-lakehouse-logs - Region: Same as main bucket
- Object Ownership: ACLs disabled
- Block Public Access: Block all public access
- Versioning: Enable
- Default encryption: SSE-KMS with
ecom-lakehouse-s3-key
- Name:
- Click Create bucket
2.2 Create Athena Query Results Bucket
- Click Create bucket
- Bucket configuration:
- Name:
ecom-analyzer-athena-results - Region: Same as main bucket
- Object Ownership: ACLs disabled
- Block Public Access: Block all public access
- Versioning: Enable
- Default encryption: SSE-KMS with
ecom-lakehouse-s3-key
- Name:
- Click Create bucket
Part D: Integrated Data Catalog & Lake Formation Setup
1. Configure Lake Formation Foundation
- Navigate to AWS Lake Formation
- Administrative roles and tasks → Data lake administrators → Add
- Add
EcomLakehouseLakeFormationRole - Data lake locations → Register location:
- Path:
s3://ecom-analyzer-lakehouse/ - IAM role:
EcomLakehouseLakeFormationRole
- Path:
2. Create Glue Database with Lake Formation Integration
- Navigate to AWS Glue → Databases → Create database
- Configure:
- Name:
ecom_lakehouse_db - Location:
s3://ecom-analyzer-lakehouse/
- Name:
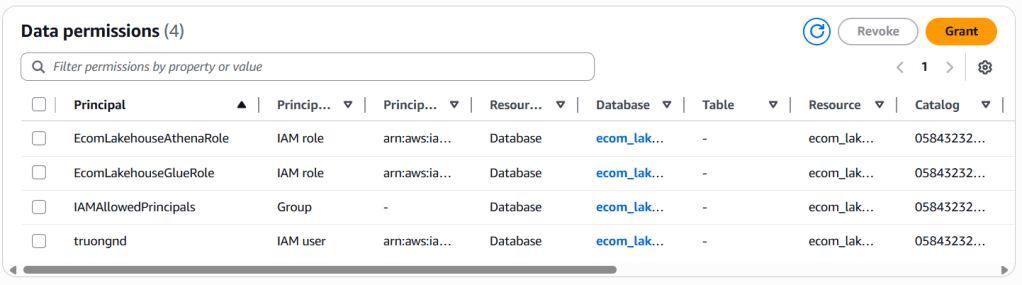
3. Grant Unified Permissions
- Lake Formation → Permissions → Data permissions → Grant
- For Glue Role:
- Principal:
EcomLakehouseGlueRole - Database:
ecom_lakehouse_db - Database Permissions:
All
- Principal:
- For Athena Role:
- Principal:
EcomLakehouseAthenaRole - Database:
ecom_lakehouse_db - Database Permissions:
All
- Principal:


Part E: Medallion Architecture Crawlers
1. Create Multi-Layer Crawler (Consolidated Approach)
-
Glue → Crawlers → Create crawler
-
Properties:
- Name:
ecom-medallion-crawler - Description:
Unified crawler for all medallion layers
- Name:
-
Data sources (Add multiple):
- Source 1:
s3://ecom-analyzer-lakehouse/bronze/ - Source 2:
s3://ecom-analyzer-lakehouse/silver/ - Source 3:
s3://ecom-analyzer-lakehouse/gold/
- Source 1:
-
Security: IAM role
EcomLakehouseGlueRole -
Output:
- Database:
ecom_lakehouse_db - Table name prefix: (Empty)
- Schedule: On demand
- Database:
-
Run crawler and verify tables created
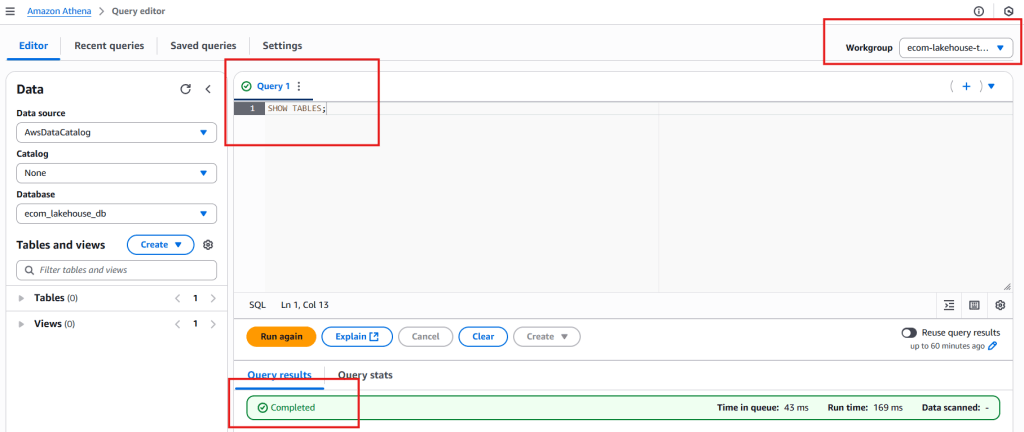
Part F: Athena Workgroup Setup
1. Configure Athena Workgroup
- Amazon Athena → Workgroups → Create workgroup
- Configure:
- Name:
ecom-lakehouse-workgroup - Query results:
s3://ecom-analyzer-athena-results/
- Name:
2. Test Integration
- Query editor → Select
ecom-lakehouse-workgroup - Database:
ecom_lakehouse_db - Test query:
SHOW TABLES;
Next Steps
In Part 2, we will create Glue Jobs and configure the Iceberg table format for our S3 bucket. If you have questions or need clarification, drop a comment below – let’s build this AWS Lakehouse pipeline together!
1 thought on “Data Lakehouse on AWS: Step-by-Step Tutorial (Part 1)”
Good article!