


Snowflake is a powerful cloud-native data platform that allows us to store, process, and analyze data at scale — all without managing infrastructure. Its fully managed, elastic, and SQL-based architecture makes it an ideal tool for those who need to validate data pipelines and transformations in a modern environment. In this blog, we will walk through the basics of Snowflake, including how to set it up and run a simple example to get started with testing.
What is Snowflake?
Snowflake is a Software-as-a-Service (SaaS) data warehouse built on top of major cloud providers (AWS, Azure, or Google Cloud). Its unique architecture separates compute and storage, allowing each to scale independently — a major advantage for teams running heavy analytical or validation workloads.
Key Features:
- Automatic scaling of compute clusters based on workload
- Zero infrastructure management – fully cloud-native
- Multi-language support: SQL, Python, and JavaScript
- Secure data sharing and access control
- Performance optimization with caching and micro-partitions
This architecture allows us to easily simulate different load levels, validate data quality, and analyze performance under realistic conditions.
Step-by-Step: Setting Up Snowflake
Step 1: Create a Free Snowflake Account
1. Go to https://signup.snowflake.com
2. Choose the cloud provider (AWS, Azure, or GCP) and region.
3. Enter the email address and organization name
4. Check the inbox for a Snowflake activation email.
5. Click the activation link and set the username and password.
We now have access to the Snowflake web interface, where we can write SQL queries and manage our database.
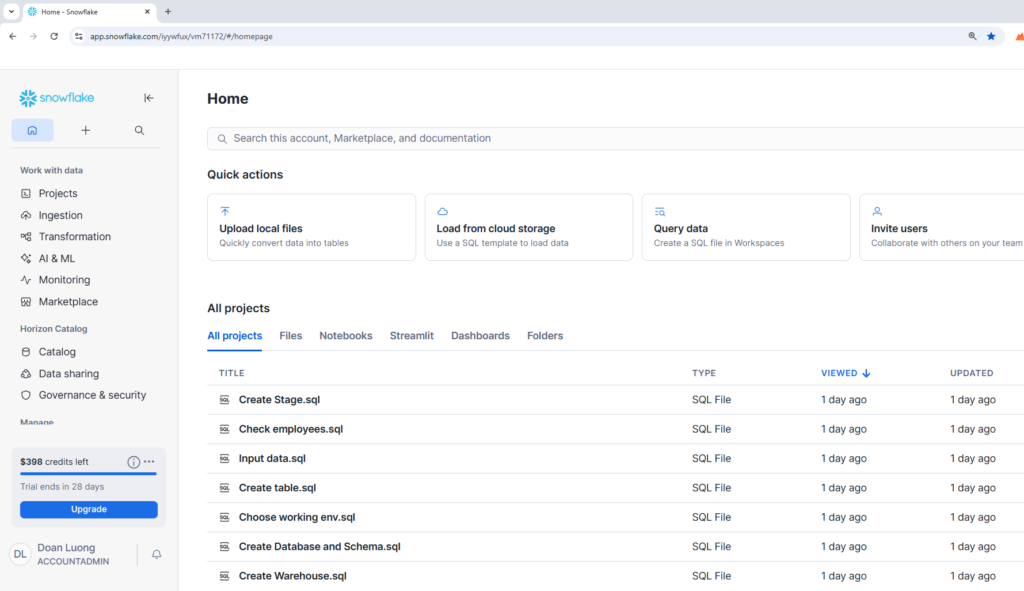
Step 2: Explore the Snowflake Interface
Once logged in, we will see:
- Worksheets: Where we write and run SQL queries.
- Databases: Collections of schemas and tables.
- Warehouses: Compute resources that process queries.
- History: Shows executed queries and the performance.
If we don’t see a “Worksheet” tab, click + Worksheet at the top to open one.
Step 3: Create the first database and schema
In our worksheet, run the following example commands:
— Create a new database
CREATE DATABASE my_db;
— Create a new schema (like a folder inside the database)
CREATE SCHEMA my_db.public;
We have just created our first data environment.
Step 4: Create a Virtual Warehouse
Before we can run queries, we need a warehouse — Snowflake’s compute engine.
— Create a small virtual warehouse
CREATE WAREHOUSE my_wh WITH WAREHOUSE_SIZE = ‘XSMALL’ AUTO_SUSPEND = 300 AUTO_RESUME = TRUE;
Then activate it:
USE WAREHOUSE my_wh;
Step 5: Create and Load Our First Table
Let’s create a simple table for employees:
CREATE TABLE employees (id INT, name STRING, department STRING, salary NUMBER );
Insert some data:
INSERT INTO employees VALUES
(1, ‘Alice’, ‘HR’, 5000),
(2, ‘Bob’, ‘Engineering’, 7000),
(3, ‘Charlie’, ‘Marketing’, 6000);
Now, query our data:
SELECT * FROM employees;
We should see our data neatly displayed in the results pane!
Step 6: Run Queries and Transform Data
We can perform analytics easily using SQL.
Example: — Find total salary by department
SELECT department, SUM(salary) AS total_salary FROM employees GROUP BY department;
Or filter records:
SELECT name, salary FROM employees WHERE salary > 5500;
Step 7: Clean Up (Optional)
When we have done testing, we can clean up resources to save credits. This step needs to be considered carefully.
DROP DATABASE my_db;
DROP WAREHOUSE my_wh;
Snowflake bills only for storage and warehouse usage — so dropping or suspending warehouses when not needed keeps costs low.
Snowflake Concepts to Know
- Warehouses: Compute resources used to run queries. We can start/stop them as needed.
- Databases & Schemas: Logical containers for organizing data.
- Roles & Permissions: Snowflake uses role-based access control (RBAC) to manage security.
- Stages: Temporary storage areas for loading/unloading data.
Understanding these components helps testers structure test data, isolate test environments, and manage access during multi-team testing.
Tips for Tester
- Use Snowsight’s query history to analyze execution time and performance metrics.
- Test at scale by running queries with different warehouse sizes.
- Integrate with CI/CD pipelines using Snowflake’s Python or Node.js SDKs for automated data validation.
- Explore sample datasets provided by Snowflake for quick experimentation.
- Set up Resource Monitors to track compute cost during test runs.
Conclusion
Snowflake is more than just a data warehouse—it’s a platform that empowers to build reliable, scalable, and secure data solutions. By learning how to set up Snowflake, write SQL tests, and integrate with modern tools, we can ensure our data pipelines are robust and trustworthy.
Whether we’re validating ETL jobs, testing schema changes, or monitoring performance, Snowflake provides the flexibility and power to support your goals. As we grow more comfortable with its features, we’ll find new ways to automate, optimize, and innovate within our data ecosystem.