In today’s distributed systems, services often need to talk to each other in real time. REST has become super popular for this because it’s simple, easy to use, and builds on the familiar HTTP protocol we all know. With REST APIs, everything is treated like a resource, and you interact with these resources using common HTTP methods like GET, POST, and PUT. But here’s the catch — HTTP only gives you a handful of verbs to work with, which can make it tricky to handle more complex business needs. That’s where gRPC steps in, offering a faster, smarter way for services to communicate. In this blog, we will explore how to transition from REST to gRPC and leverage its performance benefits for building faster, more scalable microservices with Spring Boot.
Introduction to gRPC and Protocol Buffers (Protobuf)
gRPC is a high-performance, open-source RPC framework developed by Google that uses HTTP/2 and Protocol Buffers to enable fast, efficient communication between services written in different languages. Protocol Buffers (Protobuf) is a binary message format defined in .proto files. While Protobuf is not human-readable, it is incredibly efficient. You define the message structure upfront using Interface Definition Language (IDL), and the Protobuf compiler automatically generates the necessary code for serialization and deserialization.
This approach enforces an API-first design, ensuring that APIs are defined from the start. If you’re working with strongly typed languages, the compiler helps catch errors early, ensuring clients use the API correctly. Additionally, Protobuf is language-neutral, making it easier to manage as your API evolves. Each field is tagged, allowing consumers to skip unknown fields, which enhances flexibility when the API changes over time.
Drawbacks of REST vs. How gRPC Solves Them
1. Increased Network Latency
Problem:
In a microservices environment, communication between services introduces network latency. For example, with 20+ microservices, each interaction involves the serialization and deserialization of data, which adds overhead and impacts performance. REST APIs often use HTTP/1.1, where each request opens a new connection, waits for a response, and then proceeds. This sequential nature leads to higher network latency and slower application performance, especially in real-time systems.
Solution (gRPC):
gRPC utilizes HTTP/2 for multiplexing. Unlike REST, which opens a new connection for each request, gRPC can handle multiple requests over a single connection simultaneously. This multiplexing reduces connection overhead and results in faster, more efficient communication.
2. Data Processing Overhead
Problem:
REST APIs typically exchange data in JSON format, which, while human-readable, is bulky and not the most efficient format for high-frequency communication.
Each request and response must undergo:
- Serialization (object → JSON) on the sender side (often using libraries like Jackson).
- Deserialization (JSON → object) on the receiver side.
In high-throughput applications, this process consumes considerable CPU and memory resources, especially when handling large or frequent data exchanges, making the system slower.
Solution (gRPC):
gRPC uses Protocol Buffers (Protobuf), a binary message format that is far more compact and efficient than JSON. Protobuf’s binary format is compressed, which allows faster serialization and deserialization. This reduces CPU and memory usage, making gRPC ideal for performance-critical, high-throughput applications.
3. No Real-Time Streaming
Problem:
REST APIs follow a request-response model:
- The client sends a request.
- The server responds.
- The client sends another request to receive further updates.
This model lacks continuous data flow or real-time updates, requiring the client to keep polling the server, leading to inefficiencies. For example, in applications like live cricket scores, the client would need to keep refreshing the page to get updates.
Solution (gRPC):
gRPC supports four communication patterns, which enables real-time streaming and continuous data flow, eliminating the need for polling.
- Unary RPC: 1 request, 1 response.
- Server Streaming: 1 request, multiple responses.
- Client Streaming: Multiple requests, 1 response.
- Bidirectional Streaming: Both client and server send messages continuously at the same time.
CODE
As we go through this blog, feel free to refer to the complete working repository here: spring-grpc-demo , which contains the complete implementation and project structure. It will help you follow along and better understand each step in context.
Implement grpc server
1. Add Dependencies
- Go to Spring Initializer.
- Add the following dependencies : Lombok, MySQL Driver SQL, Spring gRPC, Spring Data JPA, Spring Web
- Name the project as
playerServiceand generate.
2. Create the proto file
- Extract and open the project in an IDE.
- In the s
rc/main/protopackage, create a file witn.protoextention. - Add the following code.
syntax = "proto3";

package player;
option  java_multiple_files=true;
option java_package="com.nashtech.grpc";
option  java_outer_classname="PlayerProto";

message PlayerRequest{
  int64 team_id=1;
}

message PlayerResponse{
   int64 player_id=1;
   string player_name=2;
   int64 team_id=3;
}

service PlayerService{

  //server streaming
  rpc getPlayersOfTeam(PlayerRequest) returns (stream PlayerResponse);

}
Understanding the .proto file
- In the provided proto file, the first thing is the proto version that is mentioned at the top using
syntax = "proto3";. - A package is also defined for the proto file. This helps in organizing the proto definitions and avoids naming conflicts when generating code.
- Classes are defined using the
messagekeyword. If you need a list of elements inside a message, therepeatedkeyword is used. - Inside each message, fields are assigned numbers like 1, 2, 3, and so on. These numbers are called field tags. Protocol Buffers use these field tags instead of field names for serialization and deserialization. Because of this, the serialized data is compact — only the field tags and their values are included in the binary output, not the field names.
- The proto file also defines the contract for gRPC communication. A
serviceis defined, which is similar to an interface in Java. It declares the methods that the client must use. - One important thing to note is that in ProtoBuf, you cannot directly pass a single field as input to a service method. You must always wrap the input inside a message. If there’s no input, you still have to pass an empty message because every gRPC method expects a message as a parameter.
- By default, all message classes are bundled into a single outer class. If you prefer each message to be generated as a separate class, set the following option in your .proto file:
option java_multiple_files = true;- You can also specify a custom package for the generated Java classes using:
option java_package="com.nashtech.grpc";- To define a custom outer class name use:
option java_outer_classname="PlayerProto";3. Generate Java Classes
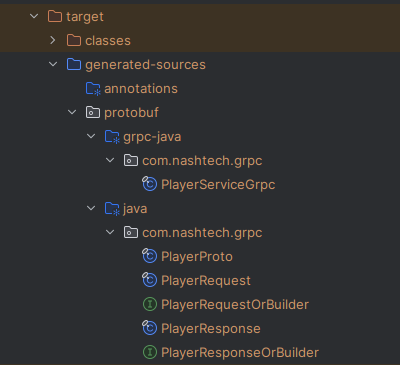
As we added the Spring gRPC while creating the project, hence it will add a protobuf-maven-plugin in our pom.xml, This plugin will generate the java classes on running the command:
mvn clean installInside the target/generated-sources/protobuf directory, you’ll find the generated-sources folder which contains the generated Java classes for messages, requests, and responses. Make sure to mark generated-sources as source root in your IDE.
Understanding the Generated Classes
The service class is auto generated based on the service methods defined in the proto file. Each message is generated as a separate class, and for every field, getter methods are provided.
The Player class includes a constructor that initializes all fields, while the corresponding builder classes (e.g., PlayerRequest, PlayerResponse) allow you to build request and response objects using the newBuilder() method. The service class(PlayerServiceGrpc) contains method stubs for all RPC methods defined in the proto file.
To invoke a specific RPC method via gRPC, you need to use the service name and method name as defined in the proto file. To implement the service, simply create a Java class, extend the generated abstract base class, and provide implementations for the RPC methods. Remember, both the client and the server rely on the proto file as a shared contract.
4. Business Logic and Entity Setup
Create the necessary JPA entity class (Player) to represent the data structure. Then, create a service class (PlayerDatabaseServiceImpl) to handle DB operations like saving or fetching players.
5. REST API for Testing
Build a REST controller class to expose endpoint (/teams). This allows you to create players and view them.
6. Implementing the GRPC Service
To implement the gRPC service, create a Java class and annotate it with @GrpcService instead of @Service—this ensures it behaves as a gRPC service rather than a standard Spring component. Extend the generated base class (from the proto file) which contains the RPC method stubs, and override the required method(s).
Although your proto method might define only one parameter (e.g., PlayerRequest), the generated method in Java includes a second parameter of type StreamObserver<T>. The StreamObserver is used to send responses back to the client—in this case, it streams multiple responses because the RPC method is defined as server streaming.
The StreamObserver provides three key methods:
- onNext(response): Sends the response to the client.
- onError(Throwable): Indicates an error occurred and sends an error response.
- onCompleted(): Signals to the client that the response is fully sent and the call is complete.
You send your response using the onNext method, then call onCompleted to finish the interaction. If any issue occurs, use onError to report the error.
package com.nashtech.playerService.service.implementation;

import com.nashtech.grpc.PlayerRequest;
import com.nashtech.grpc.PlayerResponse;
import com.nashtech.grpc.PlayerServiceGrpc;
import com.nashtech.playerService.entity.Player;
import com.nashtech.playerService.repository.PlayerRepository;
import io.grpc.stub.StreamObserver;
import org.springframework.grpc.server.service.GrpcService;

import java.util.List;
import java.util.concurrent.TimeUnit;

@GrpcService
public class PlayerGrpcServerServiceImpl extends PlayerServiceGrpc.PlayerServiceImplBase {

    private final PlayerRepository playerRepository;

    public PlayerGrpcServerServiceImpl(PlayerRepository playerRepository) {
        this.playerRepository = playerRepository;
    }

    @Override
    public void getPlayersOfTeam(PlayerRequest request,
                                 StreamObserver<PlayerResponse> responseObserver) {
        Long teamId = request.getTeamId();
        List<Player> players = playerRepository.findByTeamId(teamId);

        for(Player player : players){
            PlayerResponse playerResponse = PlayerResponse.newBuilder()
                .setPlayerId(player.getPlayerId())
                .setPlayerName(player.getPlayerName()).setTeamId(player.getTeamId())
                .build();
            responseObserver.onNext(playerResponse); // Send response to client

            try {
                TimeUnit.SECONDS.sleep(1); // Simulate delay
            } catch (InterruptedException e) {
                e.printStackTrace();
            }
        }
        responseObserver.onCompleted();
    }
}
7. Configure the settings
In application.properties, configure the gRPC server to run on port 9090 and enable reflection. Reflection is necessary to test the service using Postman or other third-party tools—it exposes the service metadata, allowing external clients to discover and interact with the gRPC methods.
spring.application.name=playerService
spring.datasource.url=jdbc:mysql://localhost:3306/schema-name
spring.datasource.username=username
spring.datasource.password=password
spring.jpa.properties.hibernate.dialect=org.hibernate.dialect.MySQLDialect
spring.jpa.hibernate.ddl-auto=update
spring.server.port=8080
grpc.server.enable-reflection=true
Implement grpc client
1. Add Dependencies
- Go to Spring Initializer.
- Add the following dependencies : Lombok, MySQL Driver SQL, Spring Data JPA, Spring Web
- Name the project as
teamServiceand generate. - Extract and open the project in an IDE.
- Spring Boot does not offer direct, built-in support for
gRPCclients. To usegRPCwith Spring Boot, you need to leverage third-party libraries and integrate them into your Spring Boot application:
                <!-- https://mvnrepository.com/artifact/net.devh/grpc-client-spring-boot-starter -->
		<dependency>
			<groupId>net.devh</groupId>
			<artifactId>grpc-client-spring-boot-starter</artifactId>
			<version>3.1.0.RELEASE</version>
		</dependency>
		<!-- https://mvnrepository.com/artifact/io.grpc/grpc-netty-shaded -->
		<dependency>
			<groupId>io.grpc</groupId>
			<artifactId>grpc-netty-shaded</artifactId>
			<version>${grpc.version}</version>
		</dependency>
		<!-- https://mvnrepository.com/artifact/io.grpc/grpc-protobuf -->
		<dependency>
			<groupId>io.grpc</groupId>
			<artifactId>grpc-protobuf</artifactId>
			<version>${grpc.version}</version>
		</dependency>
		<!-- https://mvnrepository.com/artifact/io.grpc/grpc-stub -->
		<dependency>
			<groupId>io.grpc</groupId>
			<artifactId>grpc-stub</artifactId>
			<version>${grpc.version}</version>
		</dependency>
		<!-- https://mvnrepository.com/artifact/io.grpc/grpc-census -->
		<dependency>
			<groupId>io.grpc</groupId>
			<artifactId>grpc-census</artifactId>
			<version>${grpc.version}</version>
		</dependency>
		<!-- https://mvnrepository.com/artifact/com.google.protobuf/protobuf-java -->
		<dependency>
			<groupId>com.google.protobuf</groupId>
			<artifactId>protobuf-java</artifactId>
			<version>${protobuf-java.version}</version>
		</dependency>
2. Create the proto file
- In the s
rc/main/protopackage, create a file witn.protoextention. - Add the same code as the proto file created in the grpc server.
3. Generate Java classes
Run the command to generate the required stub classes.
mvn clean install4. Business Logic and Entity Setup
Create the necessary JPA entity classes (Team and Player) to represent the data structure. Then, create a service class (TeamDatabaseServiceImpl) to handle DB operations like saving or fetching teams, not the related players.
5. REST API for Testing
Build a REST controller class that exposes the /teams endpoint to support team creation and retrieval, including associated players. Since player data resides in a separate database managed by a gRPC server, this setup indirectly tests the gRPC client. When the REST endpoint is called, it uses an injected gRPC stub to fetch player details from the gRPC server, validating end-to-end communication.
6. Implementing the GRPC Client
Since gRPC does not use standard HTTP URLs like REST, we can’t use RestTemplate or WebClient to make calls. Instead, gRPC provides a proxy object known as a stub to communicate with the server. To access the server:
- Locate the generated stub class in
PlayerServiceGrpc. - Use the blocking stub for synchronous communication.
- In your client application, create a service bean.
- Inject the stub using
@GrpcClientand assign it an alias name (e.g., “teamService“). - Use this stub to call the methods exposed by the gRPC server (as defined in the proto file).
package com.nashtech.teamService.service.implementation;

import com.nashtech.grpc.PlayerRequest;
import com.nashtech.grpc.PlayerResponse;
import com.nashtech.grpc.PlayerServiceGrpc;
import com.nashtech.teamService.entities.Player;
import io.grpc.StatusRuntimeException;
import net.devh.boot.grpc.client.inject.GrpcClient;
import org.springframework.stereotype.Service;

import java.util.ArrayList;
import java.util.Iterator;
import java.util.List;

@Service
public class TeamGrpcClientService{

    @GrpcClient("teamDatabaseService")
    private PlayerServiceGrpc.PlayerServiceBlockingStub serviceBlockingStub;

    public List<Player> getPlayersOfTeam(Long teamId) {
        PlayerRequest request = PlayerRequest.newBuilder().setTeamId(teamId).build();
        List<Player> players = new ArrayList<>();
        try {
            Iterator<PlayerResponse> playerResponses = serviceBlockingStub.getPlayersOfTeam(request);
            while (playerResponses.hasNext()) {
                PlayerResponse playerResponse = playerResponses.next();
                Player player = new Player(playerResponse.getPlayerId(), playerResponse.getPlayerName(), playerResponse.getTeamId());
                players.add(player);
            }
        } catch (StatusRuntimeException e) {
            e.printStackTrace();
        }
        return players;
    }

}
7. Configure the settings
To enable the gRPC client to connect to the server, we configure the server address in the client’s application.yml file. gRPC doesn’t use standard HTTP URLs, so instead of endpoints, we define the server address and connection type under the grpc.client section.
spring.application.name=teamService
spring.datasource.url=jdbc:mysql://localhost:3306/microservicesDemo
spring.datasource.username=root
spring.datasource.password=Nash@187
spring.jpa.properties.hibernate.dialect=org.hibernate.dialect.MySQLDialect
spring.jpa.hibernate.ddl-auto=update
server.port=8081
grpc.client.teamService.address=static://localhost:8080
grpc.client.teamService.negotiationType=PLAINTEXT
Testing
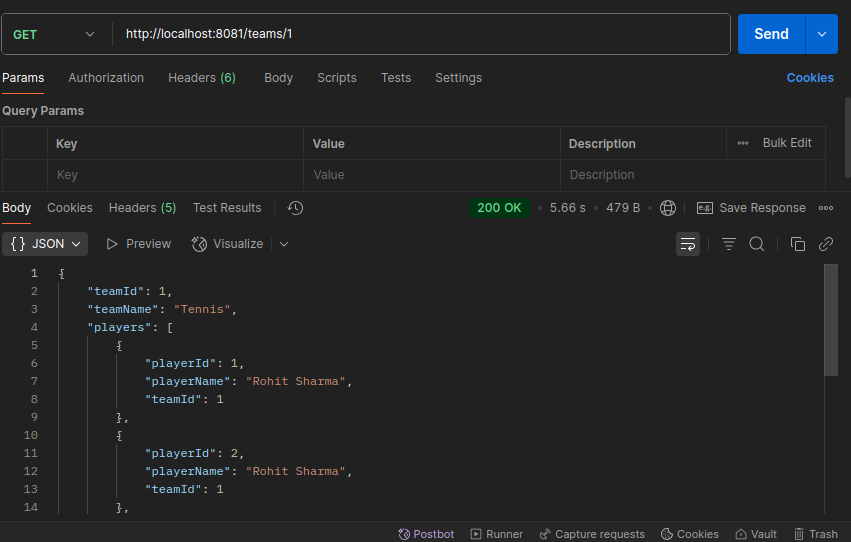
To test the application, start both the Team and Player services. Begin by creating a few teams and their associated players using their respective endpoints. Then, call the Get Teams endpoint. You’ll notice it returns each team along with its list of players—even though they are stored separately in different databases and managed by different services.
This demonstrates how the services interact through gRPC to fetch and combine data across boundaries, while still maintaining separation of responsibilities.