


Containerization is a handy way to organize and run software smoothly. It’s like putting apps in virtual boxes to keep them tidy and easy to use. In this guide, I’ll show you how to set up DynamoDB, a database tool, on your computer using Docker. It’s a simple way to create a mini DynamoDB world right on your PC for testing and tinkering.
Prerequisite
Before you begin, ensure you have the necessary tools installed on your computer:
- Docker: Docker acts like a magic box that contains everything required to run DynamoDB and AWS NoSQL Workbench smoothly. It provides a convenient way to manage software applications in isolated environments known as containers.
- AWS NoSQL Workbench: AWS NoSQL Workbench is a powerful tool for designing, managing, and querying DynamoDB databases. It simplifies database design, query development, and data visualization, making DynamoDB development more efficient.
- AWS CLI: AWS Command Line Interface (CLI) is a unified tool to manage your AWS services from the command line. It allows you to interact with DynamoDB and other AWS services directly from your terminal.
Create docker-compose.yml
version: '3.8'
services:
 dynamodb-local:
  command: "-jar DynamoDBLocal.jar -sharedDb -dbPath ./data"
  image: "amazon/dynamodb-local:latest"
  container_name: dynamodb-local
  ports:
    - "8000:8000"
  volumes:
    - "./docker/dynamodb:/home/dynamodblocal/data"
  working_dir: /home/dynamodblocal
Here’s a simplified explanation:
- version: Specifies the version of docker-compose being used.
- services: Indicates the containers being started. We’re starting only the database here.
- ports: Maps port 8000 on the host system to port 8000 inside the container.
- volumes: Creates a volume named dynamodata, ensuring data persistence across container restarts.
- command: Executes the DynamoDBLocal jar file using Java’s -jar command. The -sharedDb option creates a shared database, while -dbPath . specifies the current directory for the shared database.
Start Database
docker-compose up
Using the AWS CLI with DynamoDB
This example demonstrates how to use AWS CLI to interact with DynamoDB, including creating a table, inserting an item, updating an item, and querying items.
1. Create a Table:
aws dynamodb create-table \
--table-name Demo-UserTable \
--attribute-definitions AttributeName=userId,AttributeType=S \
--key-schema AttributeName=userId,KeyType=HASH \
--provisioned-throughput ReadCapacityUnits=5,WriteCapacityUnits=5 \
--endpoint-url http://localhost:8000
aws dynamodb create-table: Creates a new DynamoDB table namedDemo-UserTable.--attribute-definitions: Specifies the attribute definitions. In this case,userIdis the primary key and is of typeS(string).--key-schema: Specifies the key schema for the table. TheuserIdattribute is used as the partition key (HASH).--provisioned-throughput: Specifies the read and write capacity units for the table.
2. Insert an Item:
 aws dynamodb put-item \
 --table-name Demo-UserTable \
 --item '{
  "userId": {"S": "1"},
  "userName": {"S": "JohnDoe"},
  "email": {"S": "johndoe@example.com"},
  "age": {"N": "30"},
  "joinedDate": {"S": "2023-05-17"}
 }' \
 --endpoint-url http://localhost:8000
aws dynamodb put-item: Inserts a new item into theDemo-UserTabletable.--item: Specifies the item to be inserted in JSON format. In this case, the item has attributesuserId,username,email,age, andjoinedDate.
3. Update an Item:
aws dynamodb update-item \
--table-name Demo-UserTable \
--key '{"userId": {"S": "1"}}' \
--update-expression "SET age = :new_age" \
--expression-attribute-values '{":new_age": {"N": "31"}}' \
--endpoint-url http://localhost:8000
aws dynamodb update-item: Updates an existing item in theDemo-UserTabletable.--key: Specifies the key of the item to be updated in JSON format. TheuserIdattribute is used to identify the item.--update-expression: Specifies the update expression. In this case, it sets theageattribute to a new value.--expression-attribute-values: Specifies the values for the update expression in JSON format. In this case, the new age value is31.
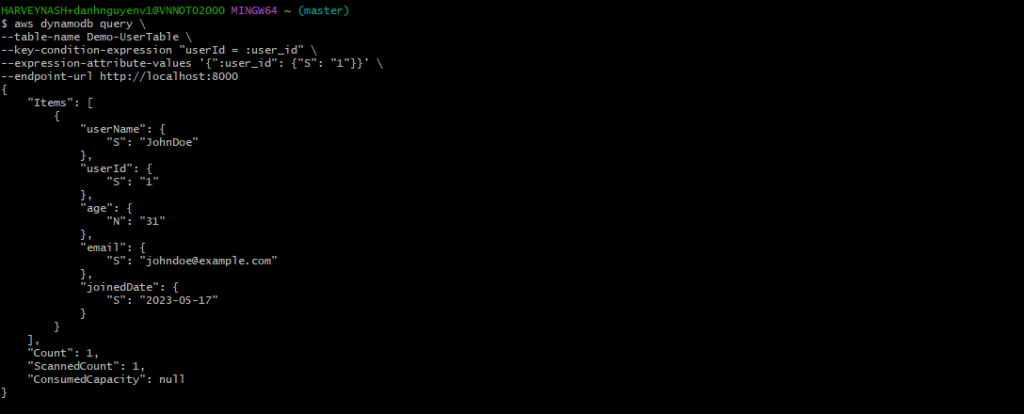
4. Query Items:
aws dynamodb query \
--table-name Demo-UserTable \
--key-condition-expression "userId = :user_id" \
--expression-attribute-values '{":user_id": {"S": "1"}}' \
--endpoint-url http://localhost:8000
aws dynamodb query: Queries items from theDemo-UserTabletable.--key-condition-expression: Specifies the condition to query items. In this case, it queries items withuserIdequal to1.--expression-attribute-values: Specifies the values for the query expression in JSON format. In this case, the value foruserIdis1.
After executing the AWS CLI commands above, the results will be shown below:
Using NoSQL Workbench
In case we want to interact with DynamoDB in a more visual manner instead of using AWS CLI, we can try NoSQL Workbench. This tool provides data modeling, data visualization, and query development features to help you design, create, query, and manage DynamoDB tables.
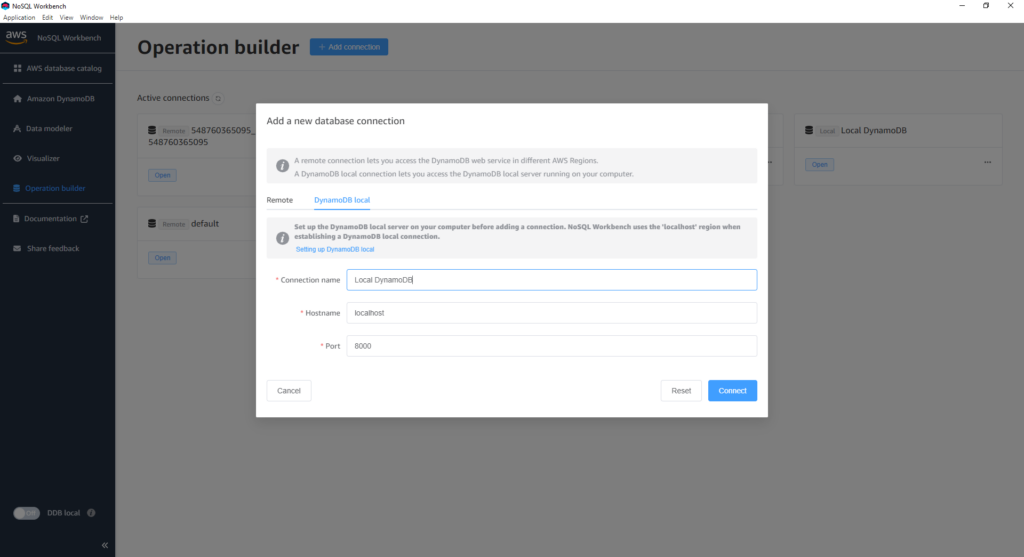
1. Add a new database connection.
2. Scan data for table
When scanning data in the table, it will display the data we have inserted into the table, similar to the AWS CLI commands we executed earlier.

Additionally, we can perform queries directly within this tool.

And there are many other operations supported by this tool such as update, put, delete, scan, …
Conclusion
Containerization with Docker makes it easy to set up and manage DynamoDB locally, providing a convenient environment for testing and development. By using AWS CLI and AWS NoSQL Workbench, you can efficiently create, manage, and query DynamoDB tables, whether you prefer command-line operations or a visual interface. This guide equips you with the necessary steps and tools to get started with DynamoDB on your computer, enhancing your development workflow and database management capabilities.
Stay tuned for my next blog post, where I will show you how to create a simple Spring Boot application and integrate it with your local DynamoDB setup.
For further reference, check out the official AWS documentation: