


If Copilot seems off or keeps guessing, it usually just needs context. Give it the project layout, test setup, and style rules, and it’ll start giving useful suggestions instead of random ones.
This guide walks you through how to make GitHub Copilot context‑aware using custom instruction files and prompt files
- Define repository‑level instructions (
.github/copilot-instructions.md) - Add path‑specific instructions (
.github/instructions/*.instructions.md) - Create reusable chat prompts (
.github/prompts/*.prompt.md) - Understand how Copilot merges instruction layers
- Write efficient prompts that save tokens
- Verify that your instructions are being applied
- Keep them fresh and version controlled
How Copilot Uses Your Instructions (What’s Under the Hood)
When you ask Copilot for help (inline completion, chat, agent mode, or code review) it quietly assembles a context package:
- The open file and surrounding code.
- Repository‑level instructions:
.github/copilot-instructions.md - Path‑specific instruction files that match via their
applyTo:patterns inside.github/instructions/. - User or organization‑level global instructions (if configured in GitHub or IDE).
- Active prompt files (
.prompt.md) and your chat text.
Copilot merges all of these, compresses them into the model’s input window, and uses that combined context to produce its output.
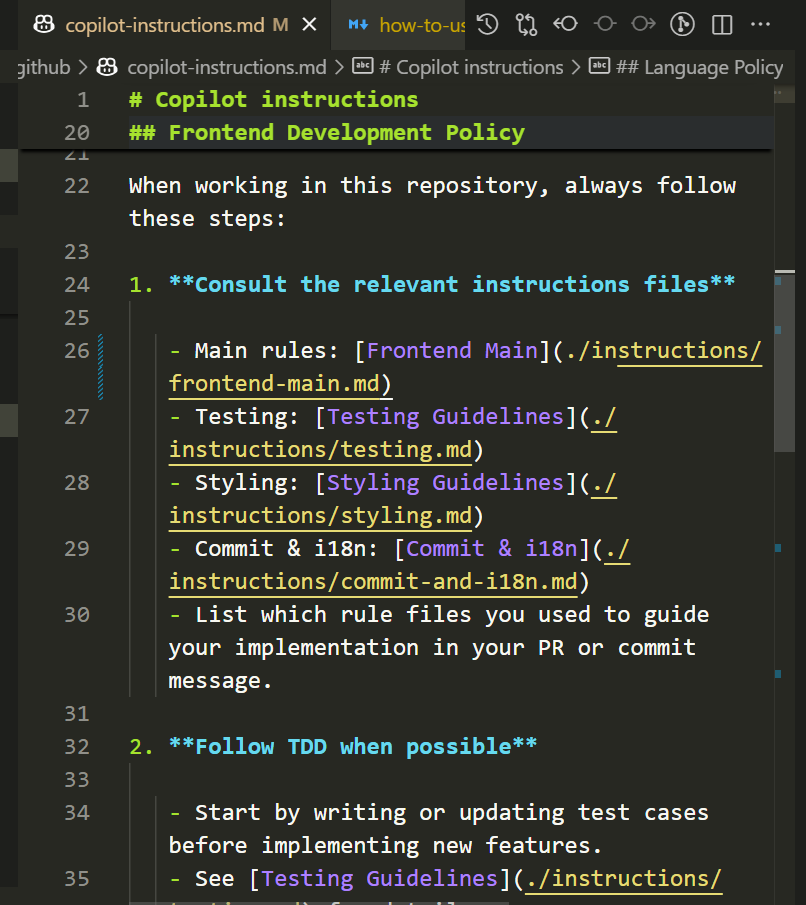
What Belongs in .github/copilot-instructions.md
Include the essentials Copilot always needs to know:
- Project overview and tech stack
- Coding standards and naming conventions
- Folder structure and responsibilities
- Build / test / run commands
- Testing philosophy
- Security & performance guardrails
- Prompt usage examples
Keep it concise (under 2 pages) and review it regularly.
Path: .github/copilot-instructions.md
Example Template
# Project Overview
Modern multi tenant scheduling platform. Users book, manage, and report on events. Admins configure availability, pricing, and notifications.

## Tech Stack
- Frontend: React + TypeScript + Vite + Tailwind
- Backend: Node.js (Express) + PostgreSQL (Prisma)
- Auth: OAuth2 + JWT sessions
- Testing: Jest (unit), Playwright (e2e), React Testing Library (UI)

## Coding Guidelines
- Functional React components + hooks
- Strong TypeScript types (no implicit any)
- Named exports only
- JSDoc for all exported functions/components
- Accessibility: ARIA roles on interactive elements

## Project Layout
- src/components: shared UI atoms/molecules
- src/features: feature modules (UI + logic)
- src/services: API client wrappers
- src/lib: cross-cutting utilities
- e2e/: Playwright specs
- scripts/: automation tasks

## Commands
- Install: npm install
- Dev: npm run dev
- Test (unit): npm test
- Test (e2e): npm run test:e2e
- Lint: npm run lint

## Testing Philosophy
- Unit: pure logic & rendering states
- Avoid implementation detail assertions
- e2e: critical flows + accessibility smoke

## Scripts & Automation
- scripts/seed-db.ts: seeds local data
- scripts/sync-types.ts: regenerates API types

## Prompt Tips
- “Implement component X with loading + error states”
- “Rewrite #file:src/services/userService.ts for clarity”

## Maintenance
Review after dependency upgrades or major feature domains.
In my project, I’ve split the rules into multiple instruction files for better organization and clarity.
Path-Specific Instructions: Fine‑Tune Behavior
Use these when different zones (tests, styles, infra, migrations) need tailored rules. Each starts with applyTo frontmatter.
Path: .github/instructions/*.instructions.md
Example 1: Testing Rules (Keep Tests Consistent)
---
applyTo: "**/__tests__/**/*.ts,**/*.test.tsx"
---
## Testing Zone Guidelines
- Use React Testing Library (no enzyme-style APIs)
- Prefer data-testid="component-element"
- Mock network & external services
- Assert user-visible outcomes, not implementation details
Example 2: Styling Conventions (Prevent Style Drift)
---
applyTo: "src/**/*.tsx"
---
## Styling Rules
- Tailwind first; CSS Modules only when necessary
- Avoid inline styles except dynamic calculations
- Use existing dark mode tokens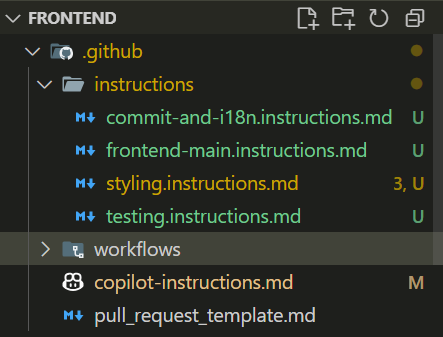
Reusable Prompt Files: Your Prompt Library
Prompt files let you create reusable Copilot Chat commands for tasks like scaffolding components, generating tests, or refactoring code.
They live in your repository and act like mini templates that Copilot can run with context aware variables.
Enable Prompt Files (VS Code Setup)
- Command Palette → “Open Workspace Settings (JSON)”
- Add:
"chat.promptFiles": true - Create
.github/prompts
After saving, restart VS Code. Copilot Chat will now recognize all *.prompt.md files in that folder.

Example Prompt: new-component.prompt.md
---
name: New Component
description: Generate a new React form component with props and tests.
mode: agent
model: GPT-4o
tools: ['githubRepo', 'search/codebase']
parameters:
  - name: Name
    description: Component name (e.g. UserForm)
  - name: Props
    description: List of props and types (e.g. name: string, age: number)
---

# New Component Generator

Generate a new React form component named ${input:Name}.

## Requirements
- Define a strongly typed props interface `${input:Name}Props` including ${input:Props}
- Implement controlled inputs with validation
- Include loading and error states
- Accessible: labels, focus order, ARIA roles
- Add a matching test file validating rendering and user interactions
- Place files in: `src/components/${input:Name}/`
Using a Prompt File in VS Code
Once you’ve created a prompt file in .github/prompts, there are several ways to use it in Copilot Chat:
Option 1: Run from the Chat Input
In the Chat view, type / followed by the name of your prompt file.
For example:
/your-prompt-nameYou can also pass parameters directly after the command (new-component prompt above):
/new-component Name=UserForm Props="name: string, age: number"This approach lets you quickly run prompts with extra context or inputs right from the chat input field.
Option 2: Run Prompt Command from the Command Palette
- Open the Command Palette (
Ctrl + Shift + PorCmd + Shift + Pon macOS). - Choose “Copilot Chat: Run Prompt”.
- Select a prompt file from the Quick Pick list.
Option 3: Run from the Prompt File Editor
Open the prompt file directly in VS Code.
In the editor’s title bar, click the ▶ Run Prompt button.
You can choose whether to: Run it in the current chat session, or Open a new chat session to test it independently.

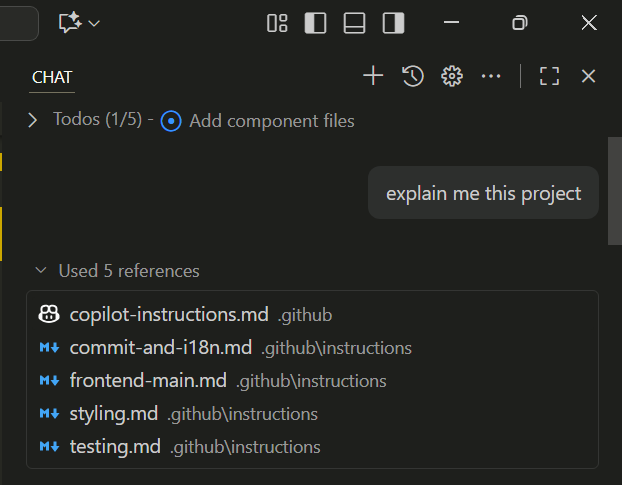
Verifying That Instructions Are Used
After a response, expand the References panel in Copilot Chat. You should see:
.github/copilot-instructions.md- Matching
*.instructions.md
If they’re missing:
- Ensure file paths and extensions are correct
- Check glob patterns under
applyTo:
Prompt Writing Tips
Structure formula:Action | Target | Constraints | Outcome
Examples you can copy‑paste:
- Refactor #file:src/services/auth.ts for clarity; add JSDoc; keep public API stable
- Generate Playwright test for checkout flow (valid + invalid card)
- Create responsive dashboard card with skeleton loading
- Rewrite #file:src/lib/date.ts for UTC safety and add unit tests
Avoid:
- Vague: “Improve code”
- Overloaded: “Rewrite whole app”
Common Mistakes & Simple Fixes
| Issue | Cause | Fix |
|---|---|---|
| Irrelevant suggestions | Missing overview | Add clear top section |
| Wrong test style | No test rules | Add testing .instructions.md |
| Styling drift | No styling guidance | Document style system |
| Verbose answers | Bloated prompts | Trim to action + constraints |
| Conflicting behavior | Duplicate rules | Consolidate & simplify |
Security & Safety Guidance
Only list rules you always want enforced.
- Never commit secrets—use env vars
- Sanitize user input
- Use parameterized queries / ORM
- Validate external data (schema-based)
Keeping It Fresh
Review when any of these happen:
- New framework added
- Testing stack change
- Architecture refactor
- Drop in acceptance rate
Archive outdated guidance instead of deleting (e.g. move to docs/legacy-instructions.md).
Final Thoughts
A clean hierarchy of .github/copilot-instructions.md, .github/instructions/*.instructions.md, and .github/prompts/*.prompt.md transforms Copilot from “suggestion machine” into a context aware teammate.
Start small: add the main instruction file, one path specific rule, and one prompt file. Iterate weekly — every refinement compounds Copilot’s accuracy.