


What is an API Automation Testing in Postman?
Automating API Testing in Postman includes creating request collections, organizing them in folders, using variables, scripts and assertions to automate testing.
In Postman, API automation testing primarily relies on JavaScript for writing test scripts. Moreover, Postman also allows users to use libraries and frameworks for more advanced testing scenarios.
Why should you do an API Testing Automation in Postman?
Postman offers several advantages for users to improve the quality API Tests and testing performance, as outlined below:
- Friendly Interface: provides a user-friendly interface for creating, organizing and executing Tests.
- Scripting: allows users to use pre-defined code templates called “Snippets”. The “Snippets” supports a quick and convenient way to insert common code patterns.
- Environment Variables: supports using the environment variables to handle dynamic values such as URIs, Authentication Token, Environment…
- Reusability: allows organizing API Tests into Collections and Folders, simplifying the reuse across various projects and environments.
- Details Reporting: supports generating detailed test reports such as: execution results, export results…
In summary, API Testing Automation in Postman offers a user-friendly interface and a reliable platform. Therefore, it helps users execute API Testing rapidly and effectively, especially in regression testing, without spending excessive time.
When should you do an API Testing Automation in Postman?
You should take into account API Testing Automation in Postman in the following scenarios:
- Repetitive Testing: Postman can save time and effort when executing the same set of API Tests repeatedly.
- Regression Testing: automating API Tests in Postman allows doing regression testing to ensure that new changes do not impact to existing functionalities.
- Cross-Environment Testing: when executing API Tests across multiple environments such as development, testing and UAT, environment variables simplify the process and ensure consistent behavior.
- API Changes and Versioning: when APIs are evolved or versions change, automating API Tests ensure that existing functionalities are not impacted.
- Cost and Resource Optimization: reduces the manual testing efforts and improves testing efficiency.
How to automate an API Collection in Postman?
If this is the first time you have learned about Postman, please refer to https://learning.postman.com/docs/introduction/overview/
Before getting started with API automation testing in Postman, we should get familiar with some elements that serve for scripting as outlined below:
- Pre-request Script Tab & Tests Tab
-
-
- Pre-request Script tab allows users to write scripts to execute any processing before sending an API request. It is used to prepare data such as setting variable values.
- Tests tab allows users to write scripts to execute any processing after sending an API request and receiving response data. It is used to validate and extract data. This tab has the Chai.js library built-in, allowing users can access to this library for reference. (https://www.chaijs.com/api/bdd/)
-
- Snippets
-
-
- Snippets refer to pre-defined code templates that allow users to insert them into their scripts as needed effectively handling response data, assertions, extracting values from responses and so more.
-
- Console
-
-
- This panel allows users to view detailed logs and information related to request body and response data.
-
- Runner
-
-
- Runner is a feature that allows the user to execute API collection automatically based on configuration such as Iterations (how many times the collection should be run), Delay (delay between requests), data files and so more.
-
Steps to automate API Tests:
-
-
- Do API Testing manually;
- Understanding the structure of the request body and responded data;
- Write scripts;
- Run scripts and collect Test Results;
- (Re-use script for other endpoints.).
-
Let’s follow the above steps to automate the “Register Account” API in Postman with the outlined below scenario:
| A user registers for an account to a website | |
| Username | random |
| Password | random |
| Using email with domain: @test.com | |
| Newsletter | 1 or 0 |
1- Create a “Register an account” request in a collection “Register an account” with valid keys/ values in the request body and run manually.
-
-
- Method: POST
- URL: postman-echo.com/post
(Postman Echo is a service provided by Postman for testing and debugging APIs.) - Content-Type: application/json
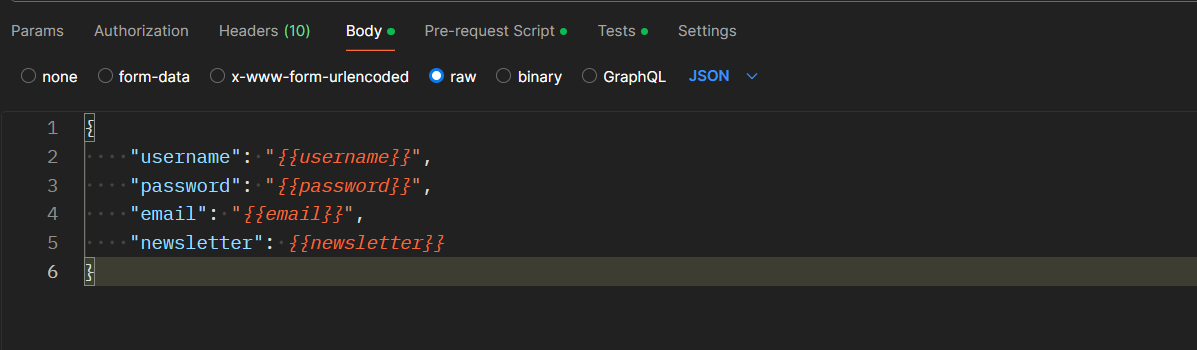
- Request body
-
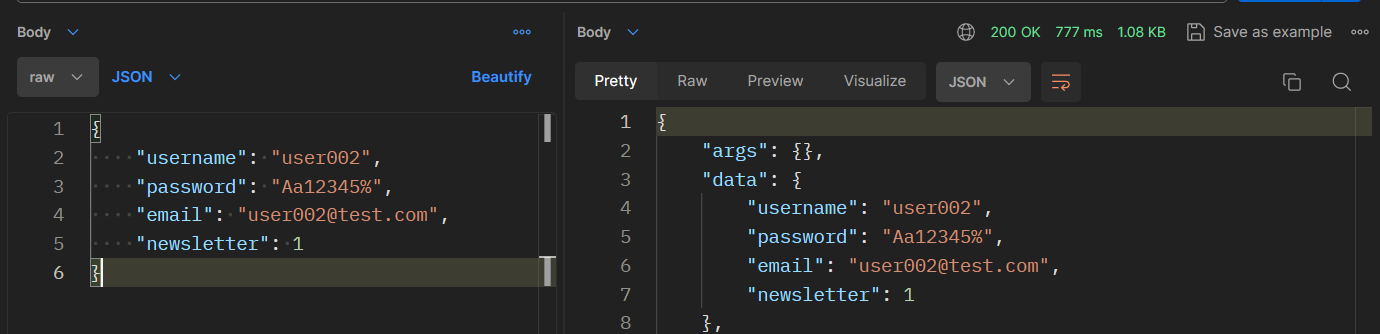
2- Observe from the above screenshot, you can see the response data returned with status code 200 OK and the “data” object that includes all information of the request body.
3- We are going to write a script to generate value for each key in the request body to run automatically
-
- First, declare an Environment variable to re-use when doing cross-environment testing.

Access variable with a syntax: {{variable_name}}

-
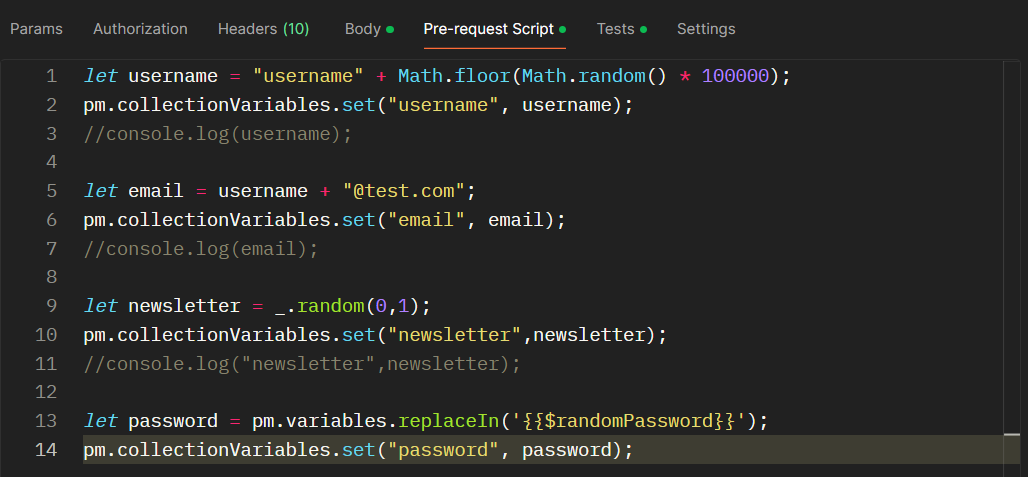
- Second, we need to prepare data such as username, password, email… for the request body before sending the endpoint so we declare those variables in the Pre-request script Tab.
-
-
-
- pm.collectionVariables: refers to a collection-level variable. It can be used to store and access data within a collection.
- pm.collectionVariables.set: update the value of a collection variable.
- _.random: a function provided by the lodash library to generate random numbers within a specified range. (https://lodash.com/docs/3.10.1#random)
-
-
-
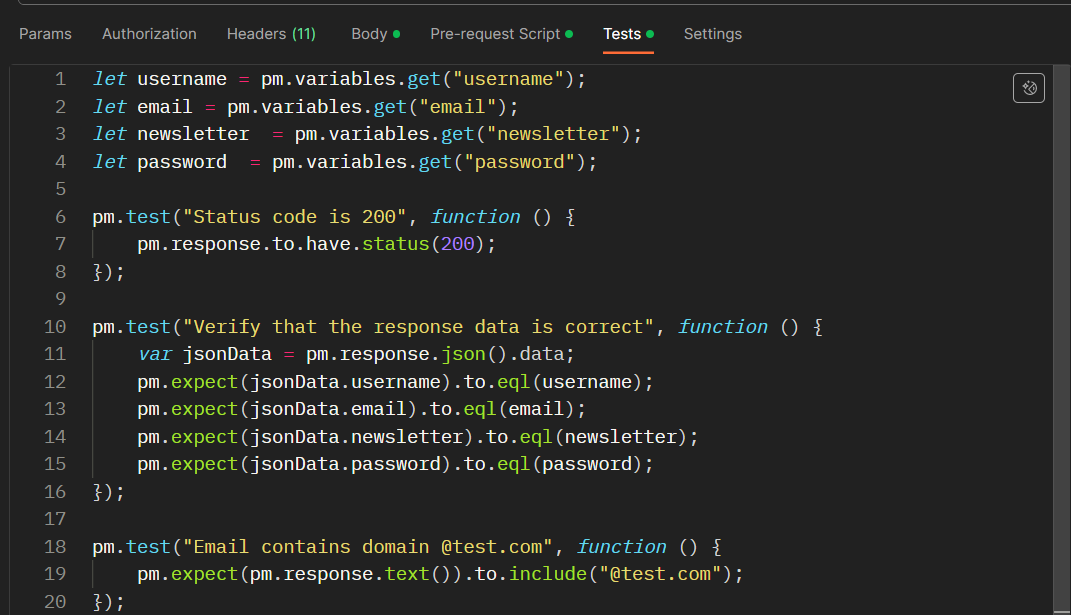
- Then, declaring variables to store the random data in the Pre-request Tab and adding the assertions as shown in the captured screenshot below.
-
-
-
- pm.variables.get(“variableName”): retrieves the value of the specified variable.
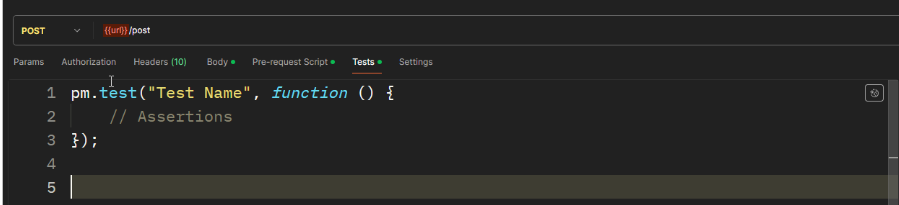
- pm.test: used to define and execute tests within the Postman scripting. It allows users to write assertions to validate the responses received from API requests.
-
-
-
- Finally, using the variables in the Request Body
4- Run Script and collect Test Results
-
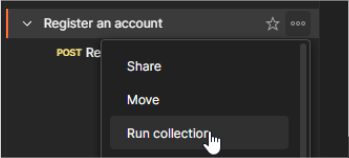
- Click on “…” icon on “Register an account” Collection-> select “Run Collection”
-
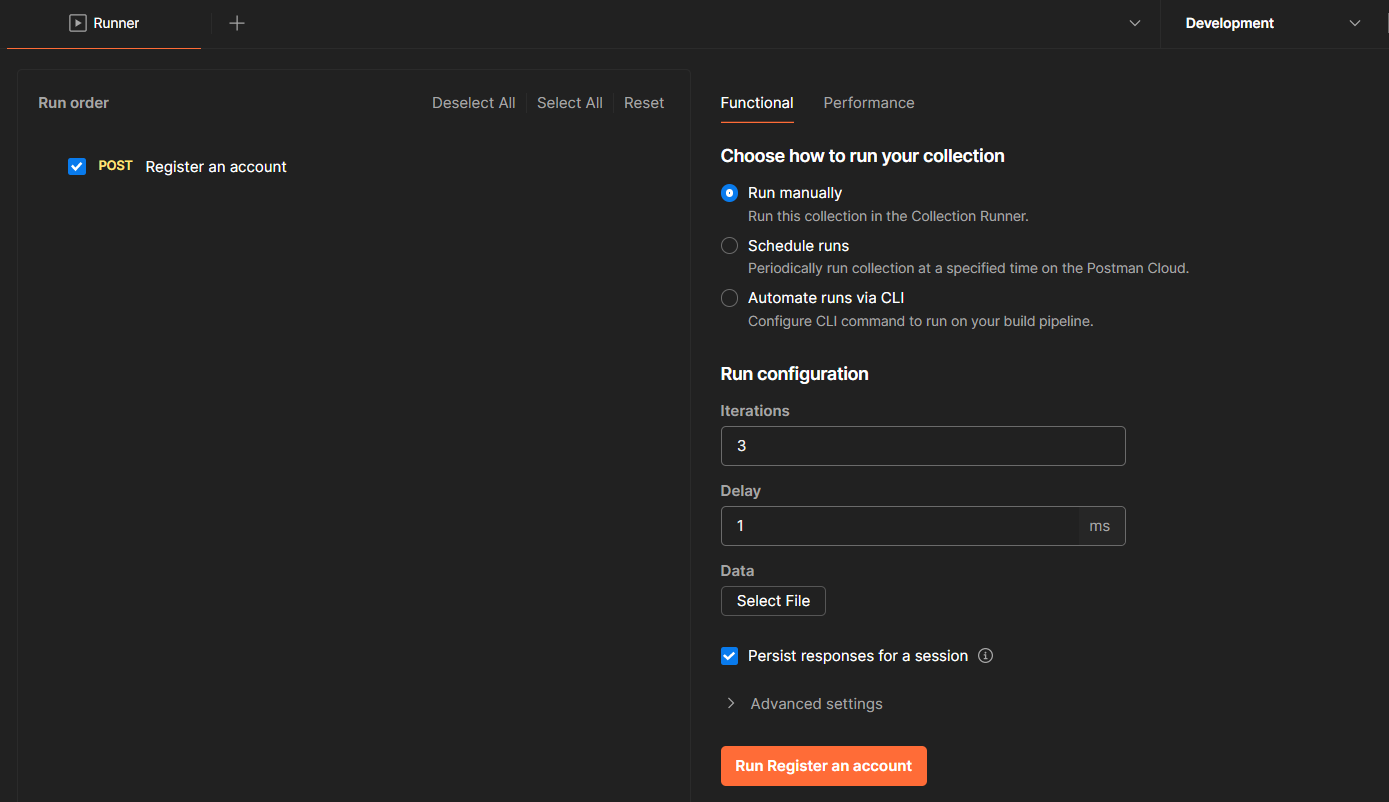
- We can choose how to run your collection: run manually, schedule runs or automate runs via CLI. Configuration depends on your choice.
- Configure: Iterations (how many times the collection should be run), Delay (delay between requests) …
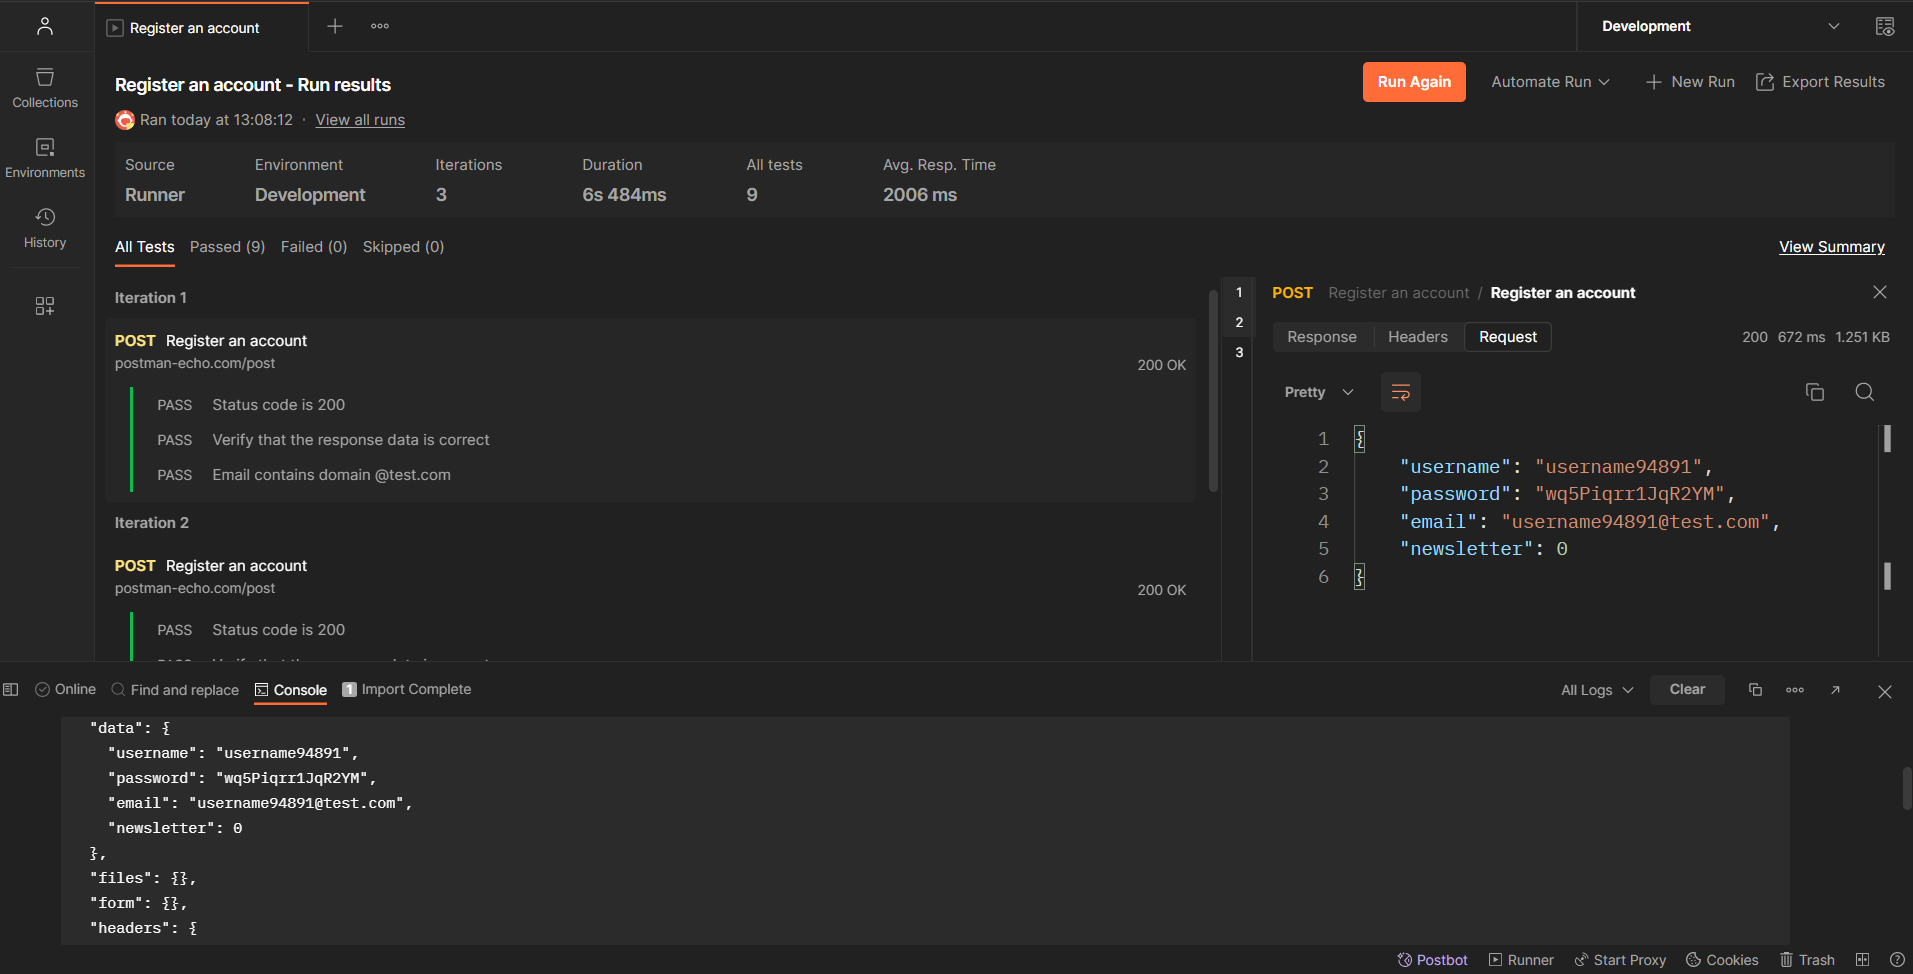
Collect Test Result
-
- Test Results can be filtered by Passed, Failed, Skipped.
- To view general information of a request such as Response/ Headers/ Request, we can click on a request and the data is shown on the left.
- To debug or view a detailed log of an API Test, we can use the Console panel as shown in the captured screenshot below. Recommend that you should keep the Console panel open while running your scripts to track log messages.
- Or console.log() statement in your scripts.
console.log() is helpful for verifying data and checking logic of the script when any warning or error occurs.
NOTE:
- If we run many requests in a Collection, we need to use a function in the Tests tab “postman.setNextRequest” to specify the next request to be executed after the current request in a collection run.
Syntax: postman.setNextRequest(“Request Name”);
- If you don’t have any specific requirements regarding automated data, it’s beneficial to take advantage of predefined variables provided by Postman.
https://learning.postman.com/docs/writing-scripts/script-references/variables-list/
Ultimately, the effectiveness of API testing automation depends on your specific goals and objectives.
References
https://learning.postman.com/docs/introduction/overview/
https://community.postman.com/
https://www.chaijs.com/api/bdd/
…