

In recent years, Micro Frontends have gained popularity as a way to scale and modularize frontend applications. Micro Frontends enable you to break down your monolithic frontend into smaller, independently deployable and maintainable parts. One of the key technologies for implementing Micro Frontends is Webpack Module Federation. In this blog post, we will walk you through the process of building a Micro Frontend architecture using Module Federation.
What is Webpack Module Federation?
Webpack Module Federation is a feature provided by Webpack 5 and later versions that allows you to share JavaScript modules between multiple applications at runtime. It enables you to create a Micro Frontend architecture by splitting your frontend into smaller, reusable modules that can be developed and deployed independently.
Prerequisites
Before we dive into building a Micro Frontend with Module Federation, make sure you have the following prerequisites:
-
- Node.js and npm (Node Package Manager) installed on your system.
-
- Basic knowledge of React or any other frontend framework you prefer.
Step 1: Setting up the Applications
Create project folder
					mkdr simple-react-micro-frontends
cd simple-react-micro-frontends
Then, create applications inside the project folder
					npx create-react-app app-shell
npx create-react-app home-app
Step 2: Install Webpack
For each application, install webpack 5 and other dependencies
npm i –D webpack webpack-cli html-webpack-plugin webpack-dev-server babel-loader css-loader
Step 3: Customize micro-frontends
1. Update home-app and blog-app in home-app/App.js
					import React from 'react'; // Must be imported for webpack to work
import './App.css';

function App() {
    return (
        <div>
            <div>This is Home page</div>
        </div>
    );
}

export default App;
2. We need add a file entry.js as an entry to each of our app
We need this additional layer of indirection because it allows Webpack to load all necessary imports for rendering the remote app.
Create home-app/src/entry.js
import('./index.js')
3. Create webpack.config.js file at the root of home-app/ and blog-app/
					// home-app/webpack.config.js
const HtmlWebpackPlugin = require("html-webpack-plugin");

module.exports = {
    entry: "./src/entry.js", // using /entry.js file in previous step
    mode: "development",
    devServer: {
        port: 3001,
    },
    module: {
        rules: [
            {
                test: /\.(js|jsx)?$/,
                exclude: /node_modules/,
                use: [
                    {
                        loader: "babel-loader",
                        options: {
                            presets: ["@babel/preset-env", "@babel/preset-react"],
                        },
                    },
                ],
            },
            {
                test: /\.css$/i,
                use: ["style-loader", "css-loader"],
            },
        ],
    },
    plugins: [
        new HtmlWebpackPlugin({
            template: "./public/index.html",
        }),
    ],
    resolve: {
        extensions: [".js", ".jsx"],
    },
    target: "web",
};
4. Add the following code to expose these applications using Module Federation
					// home-app/webpack.config.js
const HtmlWebpackPlugin = require("html-webpack-plugin");
// import ModuleFederationPlugin from webpack
const ModuleFederationPlugin = require("webpack/lib/container/ModuleFederationPlugin");
// import dependencies from package.json, which includes react and react-dom
const { dependencies } = require("./package.json");

module.exports = {
    // ...
    plugins: [
        // ...
        new ModuleFederationPlugin({
            name: "HomeApp",
            filename: "remoteEntry.js", // output a js file
            exposes: { // to expose the application
                "./Home": "./src/App",
            },
            shared: { // and shared
                ...dependencies, // some other dependencies
                react: { // react
                    singleton: true,
                    requiredVersion: dependencies["react"],
                },
                "react-dom": { // react-dom
                    singleton: true,
                    requiredVersion: dependencies["react-dom"],
                },
            },
        }),
    ],
};
5. Change the start script in home-app/package.json to utilize our webpack config
					"scripts": {
    "start": "webpack serve",
    "build": "webpack --mode production"
},
6. Start the application
					cd home-app
npm run build
npm start
Step 4: Customize Host Application (app-shell)
1. Similar with micro-frontend apps, we need to create an entry.js file as an entry in app-shell/src/entry.js
import('./index.js')
2. Create webpack.config.js file in app-shell/webpack.config.js
					// app-shell/webpack.config.js
const HtmlWebpackPlugin = require("html-webpack-plugin");

module.exports = {
    entry: "./src/entry.js", // using /entry.js file in previous step
    mode: "development",
    devServer: {
        port: 3000,
    },
    module: {
        rules: [
            {
                test: /\.(js|jsx)?$/,
                exclude: /node_modules/,
                use: [
                    {
                        loader: "babel-loader",
                        options: {
                            presets: ["@babel/preset-env", "@babel/preset-react"],
                        },
                    },
                ],
            },
            {
                test: /\.css$/i,
                use: ["style-loader", "css-loader"],
            },
        ],
    },
    plugins: [
        new HtmlWebpackPlugin({
            template: "./public/index.html",
        }),
    ],
    resolve: {
        extensions: [".js", ".jsx"],
    },
    target: "web",
};
3. Now it’s time to configure Module Federation to allow your host to load Micro Frontends dynamically.
					// app-shell/webpack.config.js
const HtmlWebpackPlugin = require("html-webpack-plugin");
// import ModuleFederationPlugin from webpack
const ModuleFederationPlugin = require("webpack/lib/container/ModuleFederationPlugin");
// import dependencies from package.json, which includes react and react-dom
const { dependencies } = require("./package.json");

module.exports = {
    //...
    plugins: [
        //...
        new ModuleFederationPlugin({
            name: "AppShell",
            // This is where we define the federated modules that we want to consume in this app.
            // Note that we specify "HomeApp" and "BlogApp" as the internal name
            // so that we can load the components using import
            // We also define the location where the remote's module definition is hosted:
            // HomeApp@[http://localhost:3001/remoteEntry.js].
            remotes: {
                "HomeApp": "HomeApp@http://localhost:3001/remoteEntry.js",
            },
            shared: {  // and shared
                ...dependencies,  // other dependencies
                react: { // react
                    singleton: true,
                    requiredVersion: dependencies["react"],
                },
                "react-dom": { // react-dom
                    singleton: true,
                    requiredVersion: dependencies["react-dom"],
                },
            },
        }),
    ],
};
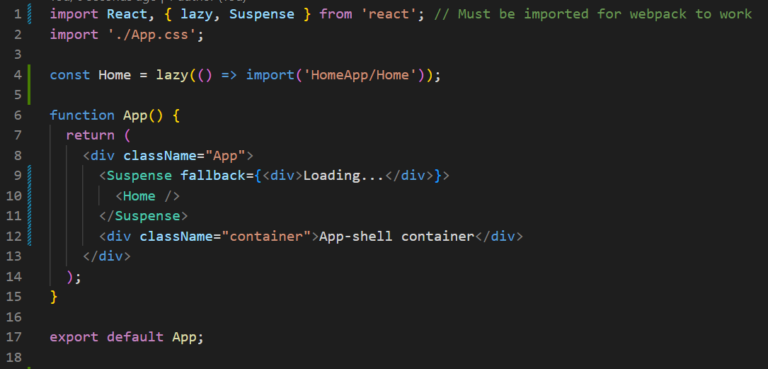
4. Modify app-shell/src/App.js to use the components from the remote apps:
5. Change the start script in app-shell/package.json
					"scripts": {
    "start": "webpack serve",
    "build": "webpack --mode production"
  },
6. Run your app-shell application:
					cd app-shell
npm run build
npm start
Done!
Open browser and navigate to url: http://localhost:3000
(Optional) Add script to start all applications
To start both the host application and the micro-frontends with a single script, you can use a task runner like npm scripts.
1. Navigate to simple-react-micro-frontend/ folder and run:
npm init
2. Answer the questions in the command line questionnaire. (Follow the link for more details)
3. After creating the package.json file, we should install all the necessary dependencies:
npm install webpack concurrently
3. After created package.json, we can add script to start both the host application and micro-frontends:
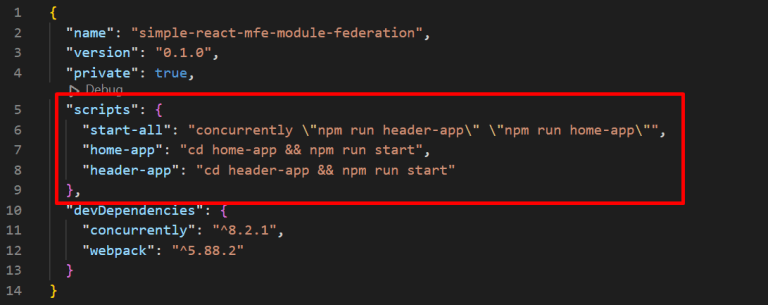
4. With these configurations in place, we can start all the applications
npm run start-all
Conclusion
Webpack Module Federation is a powerful tool for building Micro Frontend architectures that enable you to scale and modularize your frontend applications. By following the steps outlined in this blog post, you can create a host application that dynamically loads and orchestrates Micro Frontends, allowing for a more maintainable and scalable frontend architecture.