


I once encountered an issue in my project, that when I tried to click on a button to go to the next page, I saw it existed in the DOM, I ran the test and hoped it was clickable and navigated to the next page as expected. But the test failed as it couldn’t locate the element, and I received NoSuchElementException exception.
On analyzing the issue further, expanding the DOM, and checking the root elements, I found that the button locator was inside the #shadow-root tree node, which made me realize that it needs to be handled in a different way as it is a Shadow DOM element. We’ll explore different approaches, including the use of getShadowRoot() method and JavaScriptExecutor to help you choose the most suitable solution for your testing needs. Let’s dig into it.
1. What is Shadow DOM?
Shadow DOM is a browser feature that enables web developers to attach a DOM tree to an element, and have the internals of this tree hidden from the main document’s DOM APIs by default, but can still be accessed with JavaScript if the shadow root is open. This means that certain elements and styles are hidden from the outside world and can only be accessed and manipulated within the Shadow DOM itself.
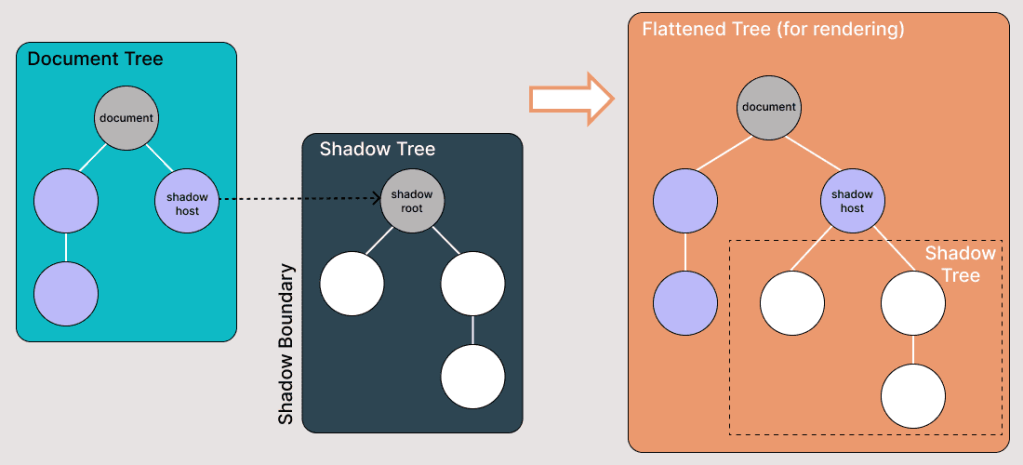
Shadow DOM allows hidden DOM trees to be attached to elements in the regular DOM tree — this shadow DOM tree starts with a shadow root, underneath which you can attach any element, in the same way as the normal DOM.
There are some bits of shadow DOM terminology to be aware of:
Shadow host: The regular DOM node that the shadow DOM is attached to.
Shadow tree: The DOM tree inside the shadow DOM.
Shadow boundary: the place where the shadow DOM ends, and the regular DOM begins.
Shadow root: The root node of the shadow tree.
2. Finding Shadow DOM Elements Using Selenium WebDriver
When we try to find the Shadow DOM elements using Selenium locators, we get NoSuchElementException as it is not directly accessible to the DOM.
We would use the following strategy to access the Shadow DOM locators:
- Using Selenium WebDriver getShadowRoot() method.
- Using JavaScriptExecutor.
In this blog section on automating Shadow DOM in Selenium, let’s take an example of Shadow DOM and try to assert the Shadow DOM with Selenium WebDriver:

Now, if we try to locate the element using the xpath(“//button[text()=’Click Shadow’]”), it doesn’t get located, and Selenium WebDriver will throw NoSuchElementException.
3. Handling Shadow Root with getShadowRoot()
With the release of Selenium WebDriver’s version 4 and above, the getShadowRoot() method was introduced and helped locate Shadow Root elements. This method returns a ShadowRoot object representing the Shadow DOM of a web component. By using this method, you can access and interact with elements within the Shadow DOM.
Steps to locate and interact with elements within Shadow DOM
Locate the Shadow Host: Identify the element in the main DOM that contains the Shadow DOM. This element is often referred to as the Shadow Host.
Obtain the Shadow Root: Use the getShadowRoot() method on the Shadow Host to access the Shadow DOM.
Locate elements within the Shadow DOM: Employ standard Selenium locators (ID, name, XPath, CSS selector) to find elements within the Shadow Root.
Perform actions: Once you have located the desired element, you can perform actions like clicking, sending keys, or getting text.
Let’s see how:
// Locate the shadow host element
WebElement shadowHost = driver.findElement(By.id("shadow-root"));
// Get shadow root from the shadow host
SearchContext shadowRoot = shadowHost.getShadowRoot();
// Now you can find elements inside shadow root
WebElement button = shadowRoot.findElement(By.cssSelector("button"));
button.click();
WebElement paragraph = shadowRoot.findElement(By.cssSelector("p"));
System.out.println(paragraph.getText());
4. How to Find Shadow DOM Using JavaScriptExecutor?
In the above code examples of this Shadow DOM in the Selenium tutorial, we located elements using the getShadowRoot() method. If you’re using Selenium versions before 4, or in cases where you want more flexibility, you can use JavaScriptExecutor.
JavascriptExecutor js = (JavascriptExecutor) driver;
// Locate shadow host
WebElement shadowHost = driver.findElement(By.id("shadow-root"));

// Get shadow root using JavaScript
String script = "return arguments[0].shadowRoot"
SearchContext shadowRoot = (SearchContext) js.executeScript(script, shadowHost);

// Find elements inside shadow root
WebElement button = shadowRoot.findElement(By.cssSelector("button"));
button.click();
WebElement paragraph = shadowRoot.findElement(By.cssSelector("p"));
System.out.println(paragraph.getText());
5. Conclusion
Shadow DOM provides encapsulation but introduces complexity in test automation. Fortunately, Selenium WebDriver provides two ways to handle it:
- getShadowRoot() (recommended in Selenium 4+).
- JavaScriptExecutor (useful for older versions or advanced scenarios).
By mastering these techniques, you can automate interactions with Shadow DOM elements in real-world applications like Chrome settings, Salesforce, and other modern web apps.