


What are Azure Functions?
Azure Functions are serverless computing services provided by Microsoft Azure. It allows developers to create small pieces of code known as “Functions”, without having to maintain the underlying infrastructure. This service is designed to help you develop event-driven applications at minimal cost, making it ideal for more flexible and efficient cloud solutions.
Why use Azure Functions?
Azure Functions offers several key benefits that make it an attractive choice for modern cloud applications:
Scalability:
Azure Functions can actually scale out based on requirements. Whether you need to handle a few requests per day or millions of requests per second, Azure Functions can adapt to meet your needs.
Cost efficiency:
With Azure Functions, you only pay for the computing resources you use. This pay-as-you-go model can provide significant cost savings compared to traditional server-based methods.
Simplified Management:
Azure Functions abstracts the underlying infrastructure, allowing developers to focus on writing code instead of managing servers. This accelerates the development cycle and reduces operating costs.
Event-Driven Programming:
Azure Functions seamlessly integrates with Azure services and external systems, making it easy to create event-driven applications Services can be triggered by HTTP requests, timers, queued messages, database changes in databases, and so on.
Let’s create a simple HTTP Triggered Azure Function
Note: Create Azure Function as per your OS/ System Configuration, You will find steps to install Azure Functions on Microsoft official website. I am using Linux; I will Set up Azure Functions Core Tools using CMD.
Setting up Azure Function
Create an Azure Account:
You’ll need to create one Azure Account; Microsoft offers a free tier includes a generous number of free function executions each month.
Install Azure Functions Core Tools (Linux):
To develop and test your Azure Functions locally, you need to install the Azure Functions Core Tools. Azure Functions Core Tools allows you to create, run and debug functions on your local machine.
For Windows you can download and install with MSI https://go.microsoft.com/fwlink/?linkid=2174087
and for macOS you can install Azure Functions Core Tools using Homebrew
For Linux you can install Azure Functions Core Tools following command lines.
1. Install the Microsoft Package Repository GPC Key, to validate package integrity.
curl https://packages.microsoft.com/keys/microsoft.asc | gpg --dearmor > microsoft.gpg
sudo mv microsoft.gpg /etc/apt/trusted.gpg.d/microsoft.gpg
2. Set up the APT source list before doing an APT update.
sudo sh -c 'echo "deb [arch=amd64] https://packages.microsoft.com/repos/microsoft-ubuntu-$(lsb_release -cs)-prod $(lsb_release -cs) main" > /etc/apt/sources.list.d/dotnetdev.list'
3. Start the APT source update:
sudo apt-get update
4. Install the Core Tools package: Install the Core Tools package:
sudo apt-get install azure-functions-core-tools-4
Create a New Functions App
Open a cmd/terminal and create a new directory for Function App. Navigate to the path/directory and initialize a new Function App project:

This command creates the necessary files and folders for Azure Function App with .Net runtime.
Create a New HTTP-Triggered Function
To create a new function with an HTTP Trigger:
func new --template "HTTP trigger" --name MyHttpTrigger

This command creates a new function name “MyHttpTrigger” in a project.
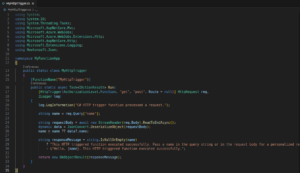
Function Code:
Open the created function file located under “MyFunctionApp/MyHttpTrigger.cs” file. It should look like this:
using System;

using System.IO;

using System.Threading.Tasks;

using Microsoft.AspNetCore.Mvc;

using Microsoft.Azure.WebJobs;

using Microsoft.Azure.WebJobs.Extensions.Http;

using Microsoft.AspNetCore.Http;

using Microsoft.Extensions.Logging;

using Newtonsoft.Json;

namespace MyFunctionApp

{

publicstaticclassMyHttpTrigger

{

[FunctionName("MyHttpTrigger")]

publicstaticasyncTask<IActionResult> Run(

[HttpTrigger(AuthorizationLevel.Function, "get", "post", Route = null)] HttpRequest req,

ILoggerlog)

{

log.LogInformation("C# HTTP trigger function processed a request.");

stringname=req.Query["name"];

stringrequestBody=awaitnewStreamReader(req.Body).ReadToEndAsync();

dynamicdata=JsonConvert.DeserializeObject(requestBody);

name=name??data?.name;

stringresponseMessage=string.IsNullOrEmpty(name)

?"This HTTP triggered function executed successfully. Pass a name in the query string or in the request body for a personalized response."

:$"Hello, {name}. This HTTP triggered function executed successfully.";

returnnewOkObjectResult(responseMessage);

}

}

}
Run Function Locally:
Run the below command to start the Function App locally
func start
You should see the response reflecting that your function is running and listening on the particular URL, such as “http://localhost:7071/api/MyHttpTrigger”
Test your Function:
Use a Web browser or a testing tool like Postman and Paste and Hit the URL.
http://localhost:7071/api/MyHttpTrigger?name=MudassirQ
You should see a response “Hello, YourName”.
Publish Function App:
To deploy your Function to Azure, you need an Azure Account and Function App set up in the Azure Portal, you need to set up function app in azure portal with similar name as your function.
Let’s look how to set up Function App in Azure Portal.
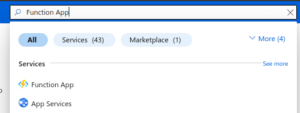
1. Login to the Azure Portal and search for the Function App in search box and select it.
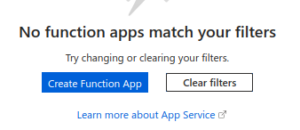
2. Create Function App
3. Choose the hosting plan based on your resource planning (Choose consumption if you are using trial version).
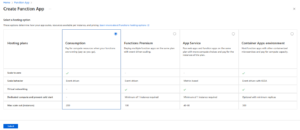
4. Configure the Basics:
- Select the subscription you want use, for now we will select trial.
- Create a new resource group or select existing one.
- Enter a unique app name for Function App. This will be the prefix of your Function App URL
- Select the runtime stack you are using (e.g., .NET Core, Python) and version.
- Choose the desired hosting region.
- Select OS Linux/Windows.
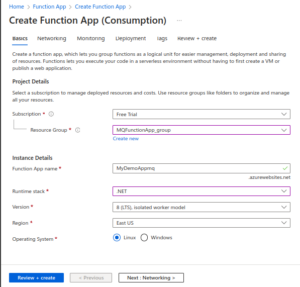
4. Review + Create.
![]()
Wait for the deployment to be completed, this might take few minutes.
You can also create a Function App through the IDE by choosing Create function App in Azure option by logging in Azure Resources.
Once you’re ready with Function App and ready to deploy it to Azure you can use Azure Functions Core Tools to publish it to Azure. (Above we’ve installed Azure Functions Core Tools)
Methods to Publish:
There are several methods to publish/upload function app on Azure Portal
Method 1- Publish it using CLI.
Use this command to publish Function App:
func azure functionapp publish <ourFunctionAppName>
Method 2- Using Azure CLI with Azure Storage and Function App Configuration.
You need ready Storage and Container in Azure Portal to publish using this method.
- Ensure you have Azure CLI installed in your system.
- Login to Azure using az login.
- Compress you Function App file to Zip and upload it to the storage containers by using this command (az storage blob upload –account-name <StorageAccountName> –container-name <ContainerName> –name functionapp.zip –file /path/to/your/functionapp.zip).
In my case the command will be as follows:
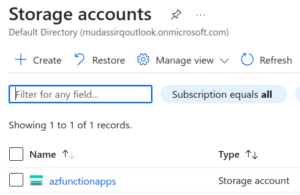
az storage blob upload --account-name azfunctionapps --container-name deployements --name functionapp.zip --file MyDemoAppmq.zip
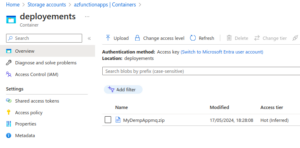
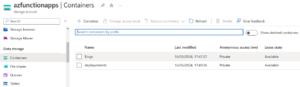
You can see ZIP file has been upload to the Azure Portal in the storage account name “azfunctionapps” under the deployment container.
- Now get the URL of the Uploaded ZIP file by using command (az storage blob url –account-name <StorageAccountName> –container-name <ContainerName> –name functionapp.zip)
In my case the command will be as follows:
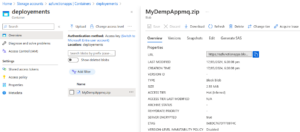
az storage blob url --account-name azfunctionapps --container-name deployements --name MyDemoAppmq.zip
- Or you can retrieve the URL from Azure portal by following Storage Account > Containers > Zip file > URL
https://azfunctionapps.blob.core.windows.net/deployements/MyDempAppmq.zip
- Use the URL from the previous step to set ‘WEBSITE_RUN-FROM-PACKAGE’ application setting. You can also do it manually from Azure Portal Under the Function App navigate to configuration and Application Settings then add new settings and values the URL. Update the URL using Command: (az functionapp config appsettings set –name <FunctionAppName> –resource-group <ResourceGroupName> –settings WEBSITE_RUN_FROM_PACKAGE=https://<StorageAccountName>.blob.core.windows.net/<ContainerName>/functionapp.zip).
In my case the command will be follow as:
az functionapp config appsettings set --name MyDemoAppmq --resource-group MQFunctionApp_group --settings WEBSITE_RUN_FROM_PACKAGE=http://azfunctionapps.blob.core.windows.net/deployements/MyDemoAppmq.zip
- Once updated restart your Function app using command:
az functionapp restart --name MyDemoAppmq --resource-group MQFunctionApp_group
Your function is now live and can be accessed via url provided by Azure.
Understanding serverless model
Serverless computing is a cloud-computing execution model in which the cloud provider dynamically manages the allocation and provisioning of servers. Azure Functions incorporates this pattern by allowing developers run code to respond to events without having to manage the underlying server.
Key characteristics of serverless computing:
Event-driven:
Funtions are created in response to various events, such as HTTP requests, database changes, or timeline events.
Ephemeral:
Tasks run in stateless computing environments that are ephemeral, meaning they can scale in and out quickly.
Resource Management:
The cloud provider manages all infrastructure, including server maintenance, scaling, and provisioning.
Summarize:
Azure Functions simplifies the development and deployment of scalable applications, which build and deploy them. Abstracting the underlying infrastructure lets developers focus on writing code and solving business problems. Whether you’re building an API, managing a database, or integrating with other cloud services, Azure Functions provides a powerful and flexible platform for serverless computing.