


What is MudBlazor?
MudBlazor is an open-source UI library for Blazor, a web development framework that allows you to build modern, interactive web applications using C# and Razor syntax. It provides a collection of pre-built UI components that adhere to the Material Design guidelines, making it easier to create visually appealing and responsive user interfaces.
MudBlazor offers a wide range of components, including buttons, input fields, dialogs, menus, tables, and more. These components are highly customizable, allowing developers to adjust their appearance and behavior to match the specific needs of their application. Additionally, MudBlazor supports theming, enabling developers to create a consistent look and feel across their application by defining custom color schemes, typography, and other design elements.
Features of MudBlazor:
- Material Design Adherence: MudBlazor components follow the Material Design guidelines, ensuring a modern and visually appealing user interface.
- Responsive Design: The components are designed to be responsive and adapt seamlessly to different screen sizes and devices.
- Rich Component Set: MudBlazor offers a comprehensive set of pre-built components, including buttons, input fields, dialogs, menus, tables, charts, and more.
- Customization: Developers can easily customize the appearance and behavior of components through various properties and CSS styling.
- Theming Support: MudBlazor provides built-in support for theming, allowing developers to define custom color schemes, typography, and other design elements for a consistent look and feel across the application.
- Accessibility: The library follows accessibility best practices, ensuring that the components are usable by individuals with disabilities.
- Localization: MudBlazor supports localization, making it easier to adapt the components to different languages and cultures.
- Performance: The library is optimized for performance, ensuring smooth and responsive user experiences.
- Open-Source: MudBlazor is an open-source project, allowing developers to contribute to its development and customization.
- Integration with Blazor: As a Blazor UI library, MudBlazor seamlessly integrates with the Blazor framework, enabling developers to leverage the power of C# and Razor syntax for building web applications.
Installation
In this section we will learn how to get started with MudBlazor. First we will see what the prerequisites are.
- A system that can compile and run the .NET Framework
- .NET SDK – We recommend the main version MudBlazor is using, generally its the latest LTS version.
- A code editor, we recommend Jet Brains Rider, Visual Studio or VS Code
Adding MudBlazor using dotnet template
We can create a dotnet project which is pre-configured with the MudBlazor template. This is quick and easy to do. First we will be installing the MudBlazor templates. Open a terminal and install them with this command.
dotnet new install MudBlazor.Templates
Now we can initiate a project. Navigate to the follower where you want to create the project and open type this command into the terminal
dotnet new mudblazor MyApplication
Manually Installing MudBlazor
If you have an existing project and wish to incorporate MudBlazor, whether starting from a default template or an already functional application, follow these steps.
Install the package
Find the package through NuGet Package Manager or install it with following command.
dotnet add package MudBlazor
Add Imports
After the package is added, you need to add the following in your _Imports.razor
@using MudBlazor
Building a simple app using MudBlazor
Let’s build a simple CRUD (Create, Read, Update, Delete) application called “PokéPedia” using Blazor and MudBlazor. “PokéPedia” will serve as a way for the users allowing them to browse, add, edit, and delete Pokémon entries.
Step 1: Create a Blazor app with MudBlazor Component Library
Navigate to the folder you want to create the project in. Open the terminal and type the following command.
dotnet new mudblazor --name PokePedia
Open the project in Visual Studio.
Step 2: Add Razor Component
Here we will add two components to the “PokePedia” project. “PokeList.razor” to view pokemon records, “AddPokemon.razor” page for add and edit element details
Proceed by right-clicking on the “Pages” folder within the “PokePedia” project and choose “Add”, followed by “Razor Component”. This action will prompt the opening of an “Add New Item” dialog box. Assign the name “PokeList.razor”. Likewise, repeat this process to add one more page, namely “AddPokemon.razor” to the “PokePedia” project.

Step 3: Pokemon Model
public class Pokemon
{
     public int Id { get; set; }
     public string Name { get; set; }
     public string Type { get; set; }
     public int Level { get; set; }
     public string Description { get; set; }
     // Constructor
     public Pokemon() { }
     public Pokemon(int id, string name, string type, int level, string description)
     {
         Id = id;
         Name = name;
         Type = type;
         Level = level;
         Description = description;
     }
}
Step 4: Creating the PokemonService
We are going to simulate the API functionality using this service. The views will use this service to perfor the CRUD operations.
public class PokemonService
{
    private static int Id = 13;
    private static List<Pokemon> pokemons = new List<Pokemon>()
    {
         new Pokemon(1, "Pikachu", "Electric", 25, "Pikachu is an Electric-type Pokémon known for its lightning-fast speed."),
         new Pokemon(2, "Charizard", "Fire/Flying", 36, "Charizard is a Fire/Flying-type Pokémon, the final evolution of Charmander."),
         new Pokemon(3, "Bulbasaur", "Grass/Poison", 5, "Bulbasaur is a Grass/Poison-type Pokémon, the first stage of the Bulbasaur evolutionary line."),
         new Pokemon(4, "Squirtle", "Water", 5, "Squirtle is a Water-type Pokémon, known for its ability to shoot water from its mouth."),
         new Pokemon(5, "Blastoise", "Water", 36, "Blastoise is the evolved form of Squirtle. It is a Water-type Pokémon known for its powerful water cannons on its shell."),
         new Pokemon(6, "Venusaur", "Grass/Poison", 36, "Venusaur is the final evolution of Bulbasaur. It is a Grass/Poison-type Pokémon with a large flower on its back."),
         new Pokemon(7, "Charmander", "Fire", 5, "Charmander is a Fire-type Pokémon known for the flame on the tip of its tail."),
         new Pokemon(8, "Jigglypuff", "Normal/Fairy", 12, "Jigglypuff is a Normal/Fairy-type Pokémon known for its soothing singing voice, which can put foes to sleep."),
         new Pokemon(9, "Snorlax", "Normal", 30, "Snorlax is a large, sleepy Normal-type Pokémon known for its immense appetite and ability to block paths."),
         new Pokemon(10, "Gengar", "Ghost/Poison", 45, "Gengar is a Ghost/Poison-type Pokémon known for its mischievous nature and ability to hide in the shadows."),
         new Pokemon(11, "Pidgey", "Normal/Flying", 8, "Pidgey is a Normal/Flying-type Pokémon known for its keen eyesight and ability to fly gracefully."),
         new Pokemon(12, "Mewtwo", "Psychic", 70, "Mewtwo is a Psychic-type Pokémon known for its immense psychic powers and mysterious origins.")
    };
    public IEnumerable<Pokemon> GetPokemon()
    {
         return pokemons;
    }
    public Pokemon GetPokemonbyId(int id)
    {
        return pokemons.FirstOrDefault(p => p.Id == id);
    }
    public void DeletePokemon(int id)
    {
        var pokemonToRemove = pokemons.Find(p => p.Id == id);
        if (pokemonToRemove != null)
        {
           pokemons.Remove(pokemonToRemove);
        }
    }
    public void AddPokemon(Pokemon pokemon)
    {
        pokemon.Id = Id;
        Id++;
        pokemons.Add(pokemon);
    }
    public void EditPokemon(Pokemon pokemon)
    {
        Pokemon existingPokemon = pokemons.Find(p => p.Name == pokemon.Name);
        if (existingPokemon != null)
        {
            existingPokemon.Name = pokemon.Name;
            existingPokemon.Type = pokemon.Type;
            existingPokemon.Level = pokemon.Level;
            existingPokemon.Description = pokemon.Description;
        }
    }
}
Step 4: Designing the Views
Now open the “PokeList.razor” file and put the below code to it.
@page "/"
@using PokePedia.Data
@inject PokemonService PokeService
@inject NavigationManager NavManager
<PageTitle>Pokemon List</PageTitle>
<h1>Pokemon List</h1>
@if (pokemons == null)
{
    <p><em>Loading...</em></p>
}
else
{
    <MudTable Items="@pokemons" Hover="true">
     <HeaderContent>
       <MudTh Style="font-weight:bold">Id</MudTh>
       <MudTh Style="font-weight:bold">Name</MudTh>
       <MudTh Style="font-weight:bold">Type</MudTh>
       <MudTh Style="font-weight:bold">Level</MudTh>
       <MudTh Style="font-weight:bold">Descriptions</MudTh>
       <MudTh Style="font-weight:bold">Actions</MudTh>
     </HeaderContent>
     <RowTemplate>
       <MudTd DataLabel="Id">@context.Id</MudTd>
       <MudTd DataLabel="Name">@context.Name</MudTd>
       <MudTd DataLabel="Type">@context.Type</MudTd>
       <MudTd DataLabel="Level">@context.Level</MudTd>
       <MudTd DataLabel="Descriptions">@context.Description</MudTd>
       <MudTd>
         <MudIconButton Icon="@Icons.Material.Filled.Edit" aria-label="edit" Color="Color.Primary" OnClick="@(() => OnEdit(context.Id))"></MudIconButton>
         <MudIconButton Icon="@Icons.Material.Filled.Delete" aria-label="delete" Color="Color.Primary" OnClick="@(() => OnDelete(context.Id))"></MudIconButton>
       </MudTd>
     </RowTemplate>
    </MudTable>
}
@code {
    private IEnumerable<Pokemon> pokemons;
    private readonly PokemonService pokemonService = new PokemonService();
    protected override void OnInitialized()
    {
        pokemons = pokemonService.GetPokemon();
    }
    protected void OnEdit(int id)
    {
        NavManager.NavigateTo("/add/" + id);
    }
    protected void OnDelete(int id)
    {
        pokemonService.DeletePokemon(id);
    }
}
This Razor component serves as the main page for a Blazor application, displaying a list of Pokemon fetched from a PokemonService. Upon initialization, the component populates the pokemons variable with data from the service. It renders a table listing each Pokemon’s ID, name, type, level, and description, along with edit and delete buttons for each entry. Clicking the edit button navigates to a URL for editing the selected Pokemon, while clicking delete triggers the removal of the respective Pokemon entry via the pokemonService.DeletePokemon(id) method.
AddPokemon.razor
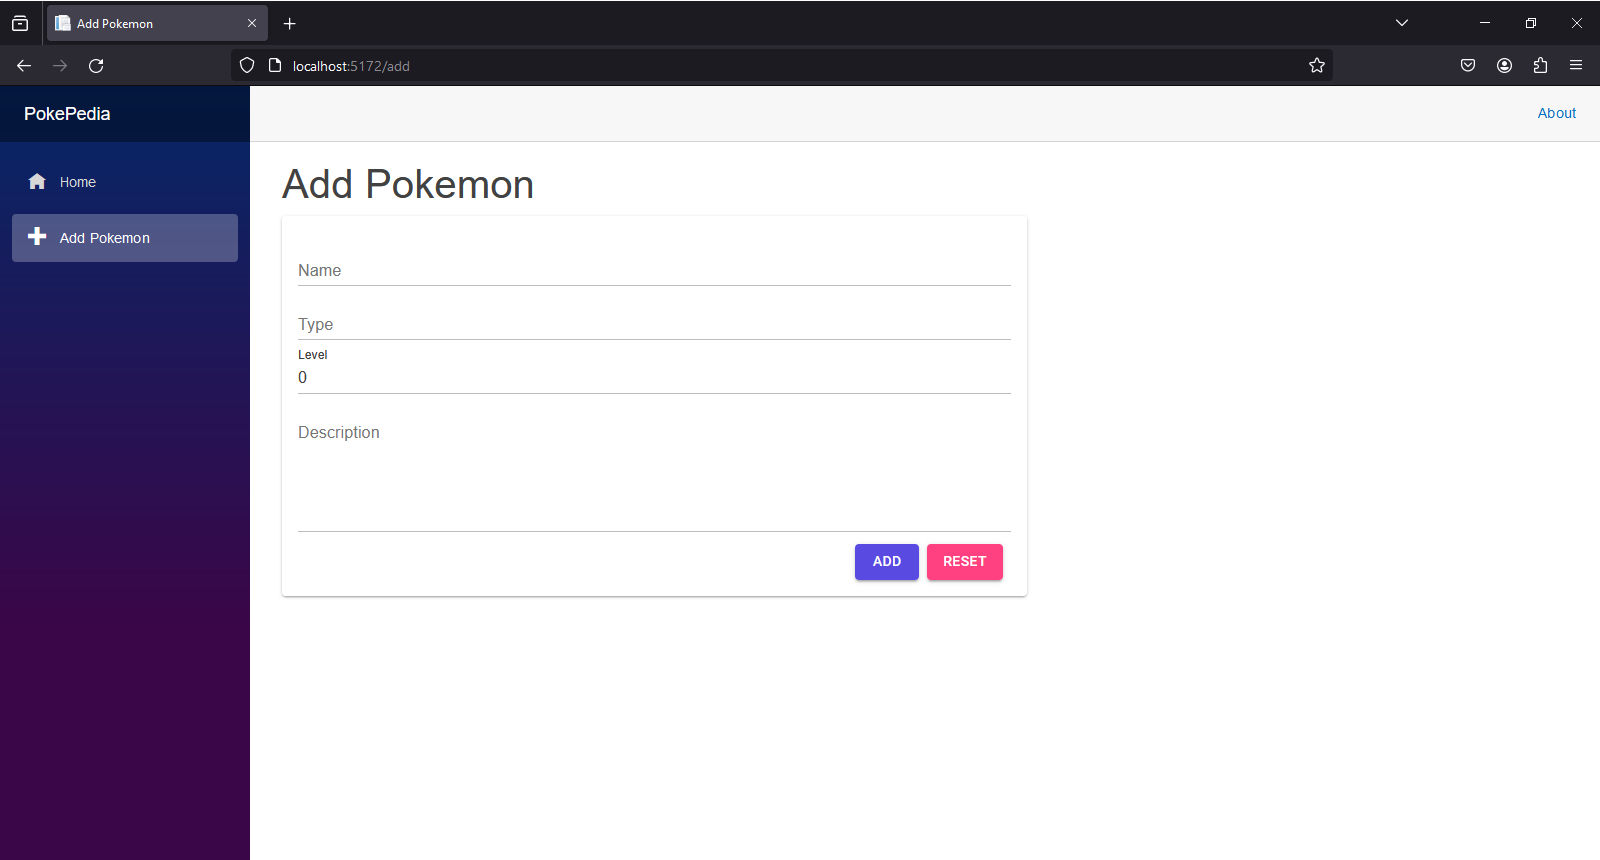
@page "/add/{id:int?}"
@using PokePedia.Data
@using System.Text.RegularExpressions
@using System.ComponentModel.DataAnnotations
@inject NavigationManager NavManager
@inject PokemonService PokeService
<PageTitle>@(IsEditMode ? "Update" : "Add") Pokemon</PageTitle>
<h1>@(IsEditMode ? "Update" : "Add") Pokemon</h1>
<EditForm Model="@pokemon" OnValidSubmit="OnValidSubmitHandler" >
    <MudGrid>
     <MudItem xs="12" sm="7">
       <MudPaper Class="pa-4">
         <MudTextField T="string" Label="Name" @bind-Value="@pokemon.Name" />
         <MudTextField T="string" Label="Type" @bind-Value="@pokemon.Type" />
         <MudTextField T="int" Label="Level" @bind-Value="@pokemon.Level" />
         <MudTextField T="string" Label="Description" @bind-Value="@pokemon.Description" Lines="5" />
         <div class="d-flex align-center justify-space-between mt-3">
           <MudButton Variant="Variant.Filled" Color="Color.Primary" Class="ml-auto" ButtonType="ButtonType.Submit">@(IsEditMode ? "Update" : "Add")</MudButton>
           <MudButton Variant="Variant.Filled" Color="Color.Secondary"  Class="mx-2" ButtonType="ButtonType.Reset">Reset</MudButton>
         </div>
       </MudPaper>
     </MudItem>
    </MudGrid>
</EditForm>
@code {
    [Parameter]
    public int? Id { get; set; }
    private bool IsEditMode = false;
    Pokemon pokemon = new Pokemon();
    PokemonService pokemonService = new PokemonService();
    protected override void OnParametersSet()
    {
     IsEditMode = Id.HasValue;
     if (Id != null)
     {
         pokemon = pokemonService.GetPokemonbyId(Id ?? 0);
     }
    }
    protected void OnValidSubmitHandler()
    {
     if (IsEditMode)
     {
         pokemonService.EditPokemon(pokemon);
     }
     else
     {
         pokemonService.AddPokemon(pokemon);
     }
     NavManager.NavigateTo("/");
    }
}
This Razor component manages adding or updating Pokemon data in the application, accessible via the “/add/{id:int?}” URL. It determines edit mode based on the presence of an ID parameter in the URL, initializes a Pokemon object, and renders a form with fields for name, type, level, and description. On submission, it either adds a new Pokemon or updates an existing one through the `pokemonService` and then navigates back to the root page.


Conclusion
To conclude, we studied about the ins and outs of MudBlazor UI component library for Blazor. We also looked into its features, how we can install it to our local machine and how to build a simple CRUD application using the MudBlazor components.