


Authentication and authorization are unavoidable in real-world applications. Every system must verify a user’s identity and control what the user can access. This typically involves managing roles, tokens, sessions, password policies, and features such as Single Sign-On (SSO) or social login.
While implementing these capabilities from scratch may seem straightforward, it quickly becomes complex and risky. Concerns such as password hashing, token generation and refresh flows, role management, security vulnerabilities, and compliance often distract from core business logic.
Instead of reinventing these mechanisms, it is more practical to rely on a proven Identity and Access Management (IAM) solution. Among the available options, Keycloak stands out as a widely adopted open-source platform.
This post is the first part of a blog series on Keycloak. In this part, we focus on the fundamentals—key concepts, basic configuration, and initial validation using the Admin Console. The subsequent posts in this series will build on this foundation by exploring token handling and securing backend APIs.
What is Keycloak
Keycloak is an open-source Identity and Access Management (IAM) solution that enables applications to handle authentication and authorization without building these mechanisms from scratch.
It externalizes responsibilities such as login, user management, password policies, role handling, and token issuance. As a result, by delegating these concerns to Keycloak, applications can rely on a trusted identity provider and, in turn, focus solely on implementing business logic.
Keycloak supports standard security protocols like OAuth 2.0, OpenID Connect (OIDC), and SAML, making it easy to integrate with modern web, mobile, and microservice-based applications. At a high level:
- it authenticates users
- Issues access and refresh tokens
- Manages users, roles, and permissions
- Provides features like Single Sign-On (SSO), social login, and password policies
- Acts as a central auth server for multiple applications
Standard Security Protocols Supported by Keycloak
Modern applications rarely implement proprietary security mechanisms. Instead, they rely on well-defined, industry-standard protocols that are widely tested, interoperable, and secure. Keycloak builds on these standards, making it easy to integrate with different types of applications and frameworks.
OAuth 2.0
OAuth 2.0 is an authorization framework that allows applications to access protected resources in a secure and standardized way.
In practice:
- The user authenticates with Keycloak
- Keycloak uses OAuth 2.0 to issue access tokens
- The client application sends this token with each request
- The resource server validates the token before serving the request
OAuth 2.0 focuses on access delegation, not on user identity itself.
OpenID Connect (OIDC)
OpenID Connect is an identity layer built on top of OAuth 2.0. While OAuth 2.0 focuses on authorization, OpenID Connect adds authentication on top of it. OIDC fills this gap by providing a standardized way to authenticate users and share identity information.
With OIDC, Keycloak can:
- Verify a user’s identity
- Issue an ID token containing user details
- Provide a consistent login and logout experience
Most modern applications that require user login use OAuth 2.0 + OIDC together, and Keycloak fully supports this combination.
SAML
SAML (Security Assertion Markup Language) is an XML-based protocol primarily used in enterprise and legacy systems.
Keycloak supports SAML to:
- Integrate with older applications
- Enable Single Sign-On in enterprise environments
- Act as a bridge between modern and legacy authentication systems.
Key concepts in Keycloak
Realm
A realm is an isolated space in Keycloak where users, roles, clients, and configurations live. Each realm is independent, meaning users and roles in one realm are not visible to another. Typically, a single application or organization uses one realm. A Keycloak instance always has a default master realm (used for admin purposes).
Client
A client represents an application that uses Keycloak for authentication. This can include a web application, backend service, mobile app, or another service. Each client defines settings such as redirect URLs, allowed grant types, and access roles.
User
A User represents an individual who can authenticate. Users can be created manually, imported, or synced from external identity providers. Keycloak manages user credentials, attributes, and role assignments.
Roles
Roles define what actions a user can perform. Keycloak supports:
- Realm roles – applicable across the entire realm
- Client roles – specific to a particular application
These roles are typically included in tokens and used by applications to enforce authorization.
Groups
Groups are collections of users. Assigning roles to a group lets all users in that group inherit those roles. This process makes role management easier at scale.
Tokens
Keycloak issues tokens after successful authentication:
- Access Token – used to access protected APIs
- Refresh Token – used to obtain new access tokens
- ID Token – contains authenticated user identity information (OIDC)
Applications validate these tokens instead of managing sessions themselves.
Keycloak Admin Console
The Keycloak Admin Console is a web-based interface for configuring and managing Keycloak. Through this console, administrators can set up authentication, authorization, users, roles, and security settings without having to write any code.
Most application integrations rely entirely on configuration done in the Admin Console, while the application itself simply validates the tokens issued by Keycloak
Setting Up Keycloak Using the Keycloak Admin Console
Keycloak is typically configured once and then used as a central identity provider. Applications do not manage users or passwords directly; instead, they trust the tokens issued by Keycloak.
In this section, we perform a basic Keycloak setup, log in through the UI, and verify that Keycloak creates a user session successfully. For now, the focus remains on understanding the authentication flow and session creation using the Admin Console. Application integration and token enforcement, however, will be covered in the next parts of this series.
1. Start Keycloak (Docker or Local Installation)
Keycloak can be started either by running it locally or by using Docker. For demos and local development, Docker is the recommended approach, as it provides the quickest and simplest way to get started.
docker run -p 8080:8080 \
  -e KEYCLOAK_ADMIN=admin \
  -e KEYCLOAK_ADMIN_PASSWORD=admin \
  quay.io/keycloak/keycloak:latest \
  start-dev
This command starts it on port 8080, creates an admin user and runs in development mode.
Once started, the Admin UI will be available at: http://localhost:8080. You can log in using the admin credentials provided in the command. After logging in, you’ll land on the Keycloak Admin UI dashboard.

2. Create a Realm
By default, Keycloak logs you into the master realm. The master realm is meant only for managing Keycloak itself and should not be used for application users.
Steps
- Click the realm dropdown in the top-left corner
- Select Create Realm
- Enter a name for the realm. Ex:
demo-realm
- Click Create

The new realm is now active, and all further configuration—clients, users, roles, and groups—will be done inside this realm.
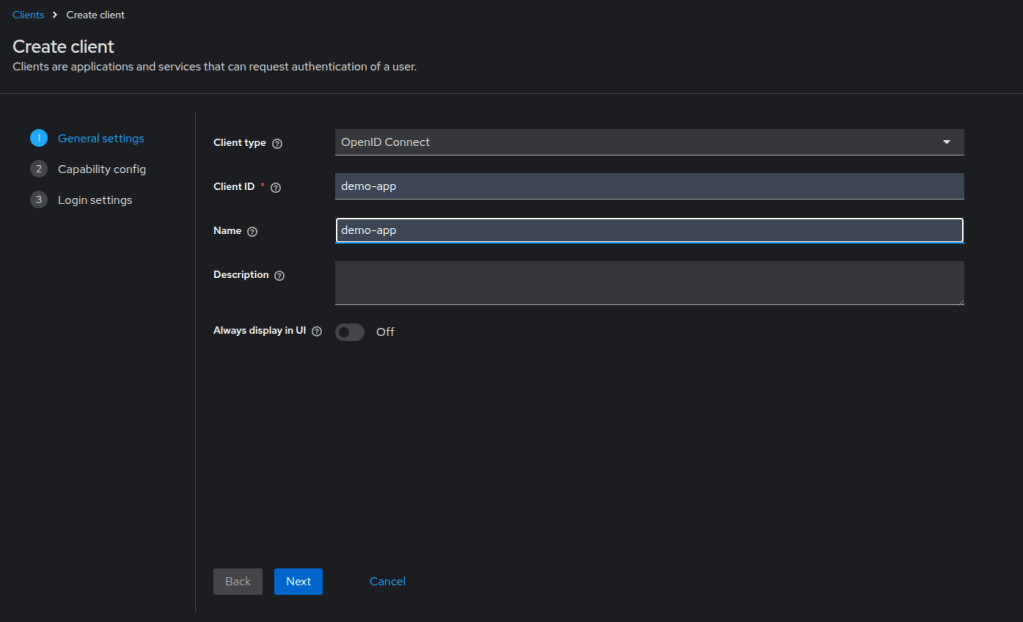
3. Create a Client
Keycloak works around the concept of clients, and tokens are always issued for a client. So, any application that plans to use Keycloak must be registered as a client inside a realm. Even though we are not integrating the application yet, we create the client with basic details. So, Keycloak is ready to issue tokens and manage access later.
Steps
- Make sure you are inside the created realm (e.g.
demo-realm) - Go to Clients from the left menu
- Click Create client
Client Configuration (For Initial Testing)
- Enter the basic client details. Example:
- Client ID:
demo-app - Client type: Confidential
- Protocol: OpenID Connect
- Click Next
Configure Client Settings
- Configure the following settings for initial testing:
- Client authentication: Enabled
- Standard flow: Enabled (OIDC authorization code flow)
- Authorization: Disabled
- Direct access grants: Disabled (not required for UI-based login testing)
Redirect URIs and Web Origins are not required at this stage. We are testing authentication and token issuance directly via the Keycloak UI.
- Click Save
Client Secret Will Be Used During Application Integration
For confidential clients, Keycloak generates a client secret. Applications use this secret to authenticate with it. You can find it under: Clients → demo-app → Credentials.
For now, we don’t need the client secret. We only test user login through the UI. We’ll use the client secret later when we integrate the application with Keycloak.
4. Create Roles
We’ll create simple roles to show how Keycloak configures authorization and includes role information in issued tokens.
Steps
- Make sure you are inside the
demo-realm - Go to Realm Roles from the left menu
(For this example, realm roles are sufficient) - Click Create role
- Enter the role name. Example:
USERandADMIN. - Optionally add a description
- Click Save

Repeat the same steps to create additional roles if required.
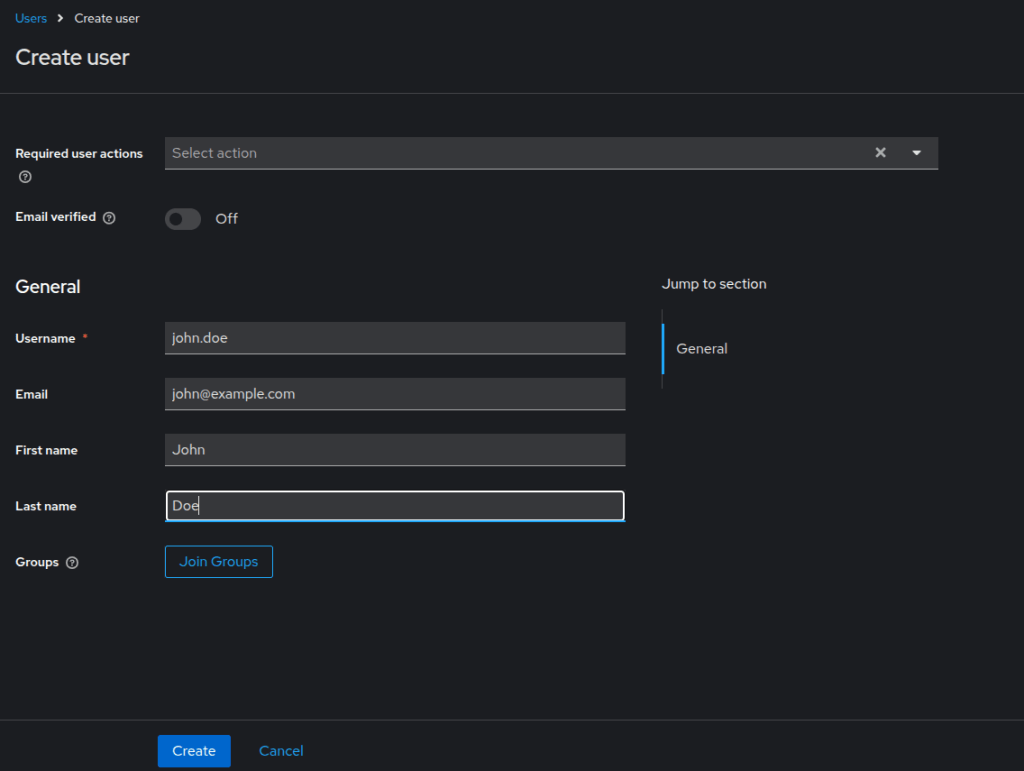
5. Create Users
Now that we set up the realm, client, and roles, we can create users who authenticate through Keycloak.
Steps
- Navigate to Users from the left menu in the
demo-realm - Click Create user
- Enter the user details. Example: Username:
john.doe, Email:john@example.com - Click Create.
Set Password
- Open the user
- Go to the Credentials tab
- Set a password
- Disable Temporary if you don’t want a forced reset
- Save the changes.
6. Assign Roles to Users
With users and roles already created, the next step is to assign roles to users.
Steps
- Go to Users in the
demo-realm - Select a user (e.g.
john.doe) - Open the Role mapping tab
- Under Realm roles, click Assign role
- Select the required role(s). Example: Assign
USERrole tojohn.doe - Click Assign to save the changes.
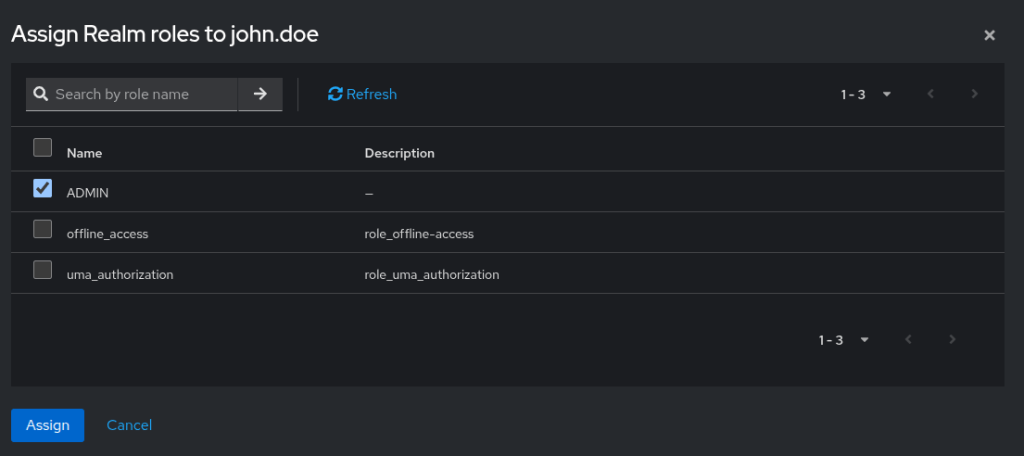
Keycloak now includes the assigned roles in the tokens it issues for this user. The backend application can use these tokens to control access.
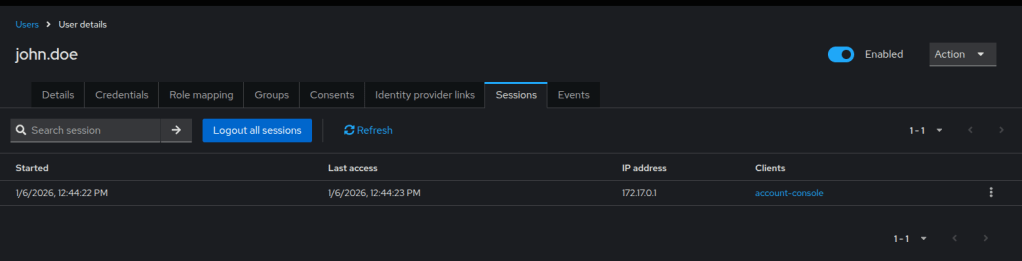
7. Test Login and Verify Tokens
The final step verifies that authentication works and that Keycloak issues tokens correctly.
Steps
- Open a new browser window (or an incognito window)
- Navigate to the Keycloak Account Console: http://localhost:8080/realms/demo-realm/account
- Log in using a created user (e.g.
john.doe) - After a successful login, the application displays the user account page.

Verify the session creation
- In the Admin Console, go to: Clients → demo-app
- Open the Client Scopes or Sessions section to view active sessions
Conclusion
In this blog, we covered the fundamentals of Keycloak by configuring realms, clients, users, and roles entirely through the Admin Console. We then validated the setup by logging in through the UI and confirming that a user session was created successfully.
With this foundation in place, the next step is to understand what Keycloak issues after successful authentication. In the next part of this series, we will explore access tokens, refresh tokens, and ID tokens, and examine how it generates, decodes, and validates them.