
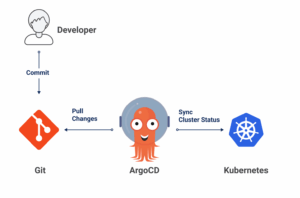
In our previous blog, we introduced ArgoCD and discussed its key features and benefits. Now, it’s time to see ArgoCD in action. In this blog, we’ll walk through the process of deploying a Kubernetes application using ArgoCD and GitHub, demonstrating the power of GitOps in managing application deployments.
Prerequisites
Before we begin, ensure you have the following:
- A Kubernetes cluster (you can use a local setup like Minikube or a mnaged service like Google Kubernetes Engine (GKE), Amazon EKS, or Azure AKS).
- kubectl installed and configured to interact with your cluster.
- A GitHub account and a repository to store your Kubernetes manifests.
- ArgoCD installed on your Kubernetes cluster.
Step 1: Install ArgoCD on Kubernetes
First, we need to install ArgoCD on our Kubernetes cluster. You can do this by applying the official ArgoCD manifests:
$ kubectl create namespace argocd

kubectl apply -n argocd -f
$ https://raw.githubusercontent.com/argoproj/argo-cd/stable/manifests/install.yamlThis command creates a new namespace called argocd and installs all the necessary ArgoCD components in that namespace.
Step 2: Access the ArgoCD UI
To access the ArgoCD web UI, you need to port-forward the argocd-server service to your local machine:
$kubectl port-forward svc/argocd-server -n argocd 8080:443
You can now access the ArgoCD web UI at https://localhost:8080
Step 3: Log In to ArgoCD
Retrieve the initial admin password:
$ kubectl -n argocd get secret argocd-initial-admin-secret -o jsonpath="{.data.password}" | base64 -d; echo
Use the username admin and the retrieved password to log in to the ArgoCD web UI.
Step 4: Add Your GitHub Repository
In the ArgoCD web UI, navigate to Settings > Repositories and add your GitHub repository containing your Kubernetes manifests.
Step 5: Define Your kubernetes Application
You can define your application directly in the ArgoCD web UI or create an application manifest and apply it using kubectl.
Here’s an example of an application manifest (argocd-app.yaml):
apiVersion: argoproj.io/v1alpha1 kind: Application metadata: name: my-app namespace: argocd spec: project: default source:repoURL: 'https://github.com/yourusername/your-repo.git' targetRevision: HEAD path: 'path/to/manifests'destination: server: 'https://kubernetes.default.svc'namespace: default syncPolicy: automated: prune: true selfHeal: true
Apply the manifest:
$ kubectl apply -f argocd-app.yaml
Step 6: Sync Your kubernetes Application
ArgoCD will automatically detect the new application and start syncing it to your cluster. You can monitor the progress in the ArgoCD web UI.
Step 7: Verify the Deployment
Once the sync is complete, you can verify that your application is running correctly in your cluster:
$ kubectl get pods -n default
You should see the pods for your application running in the specified namespace.
Conclusion
By following these steps, you have successfully deployed a Kubernetes application using ArgoCD and GitHub. This GitOps workflow simplifies the management of your applications, ensuring that your deployments are always in sync with the desired state defined in your Git repository.
ArgoCD not only enhances the reliability and auditability of your deployments but also empowers your team to collaborate more effectively by leveraging the power of Git.