


Introduction
Hi readers! As we know after angular 14, we can create standalone components. But what are those?
What are Standalone Components?
Standalone components are those components which are not part of any angular module. Before Angular 14, when you created any component using the angular CLI, it created 4 files and also updates the Module file adding the component in the declarations array of that module. But when you create a standalone component, you don’t have to add it in any declarations array, as it is not part of any module.
The existing applications can optionally and incrementally adapt to the concept of standalone components.
You can easily create standalone components with the help of angular CLI. Here is the command to do that.
ng g c login –standalone
The same command just with another flag. This will create a new component login as a standalone component.
Not only you can create standalone components, but also pipes and directives. Just add the –standalone flag in your command as we did it for components.
This is how a standalone components looks:
/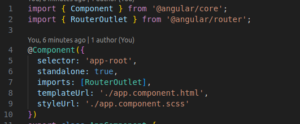
We already had selector, templateUrl and styleUrl. Now we have standalone property and an imports array to add all the dependencies.
If you want to modify an existing components into a standalone components, then you can also do that. First of all add a standalone property in your components and mark it as true. Then remove it from the declarations array of the module in which it was declared. And then add all the dependencies of that component in the imports array of the components.
Bootstrapping an application using Standalone component
If you want to bootstrap your application using a standalone component then that is possible using the bootstrapApplication api. In your main.ts file, you can mention the name of your component. For example you have a component named Product, then you can do it as:
bootstrapApplication(ProductComponent)
Now when you are bootstrapping the application , you may want to provide some configurations which you can pass in the providers array.
bootstrapApplication(ProductComponent, {
providers: []
})
Lets now set up the routes. To add the routes here, you can use importProvidersFrom
bootstrapApplication(ProductComponent, {
providers: [importProvidersFrom(RouterModule.forRoot(APP_ROUTES))]
})
Here APP_ROUTES will contain all your routing paths.
Routing standalone components
Create a standalone component. You can name it whatever you want. I have created a Products components. While routing to a component, we usually mention the path and the component name. Now to lazy load the component we will use, path and loadComponent. This is how you can use it:
{

path:'products',

loadComponent: () =>import('./product/product.component').then(c => c.ProductComponent)

}
You can simply add this to your routes array. And now you can open your network tab and try to navigate to the path /products. You will see that it is loaded only when it is invoked.
Lazy Loading Child Routes
Your application may contain child routes as well and you may want to lazy load all those routes. So lets see how we can lazy load all of them. I am taking a user route which will have a profile route as a child route. So add a new file in your application and define these two routes as:
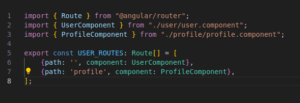
After adding these routes, move to your main routing file and use loadChildren now to lazy load all the routes.
{

path:'user',

loadChildren: () =>import('./user.routes').then(m => m.USER_ROUTES)

}
Now you can save these changes and check your application. When you will navigate to /user, you will see a new request being loaded on the networks tab and the /profile route is also loaded with it.
Conclusion
Today we saw what are standalone components and how we can create them. Then we had a look on how we can lazy load such components and how to lazy load children routes as well. For more updates on it, you can refer the angular documentation here.
Finally, for more such posts like this, please follow our LinkedIn page- FrontEnd Competency.