


For performance test, no matter what you’re running: a web application, an API, or a microservices-based system, you need to know how it behaves under heavy traffic. One of the best tools to achieve this is Locust – a Python-based, open-source load testing framework.
In this blog, we’ll explore what Locust is, why you should use it, and how to get started with a simple test.
1. What is Locust?
Locust is an open-source load testing tool written in Python that allows you to simulate millions of concurrent users to test how your system performs under stress. Unlike traditional load testing tools that use heavy GUI-based clients, Locust is lightweight and highly customizable.
Key highlights:
- Python-based – Write your test scenarios in plain Python.
- Distributed & scalable – Supports running on multiple machines for massive tests.
- Event-based – Built on gevent (lightweight coroutines), allowing high concurrency with fewer resources.
- Web-based UI – Monitor performance in real-time.
- API & CLI Support – Perfect for CI/CD pipelines.
2. Why Use Locust for Load Testing?
There are many load testing tools like JMeter, Gatling, and k6, but Locust stands out because:
- Developer-Friendly – Test scenarios are written in Python, making them easy to read, maintain, and version-control.
- Lightweight & Scalable – Can simulate millions of users without consuming excessive hardware.
- Easy to Integrate – Works well with CI/CD pipelines and cloud environments.
- Flexible – You can define complex user behaviors and even call databases or message queues during tests.
- Real-Time Monitoring – Locust provides an intuitive web interface to track requests per second (RPS), failures, and response times live.
3. Installing Locust
Locust requires Python 3.7 or higher. Install it using pip:
pip install locust
Verify the installation
locust –version
4. Writing Your First Locust Test
Locust uses Python classes to define user behavior. Let’s write a simple test for a web application
Let’s first create a file named simple-loadtest.py
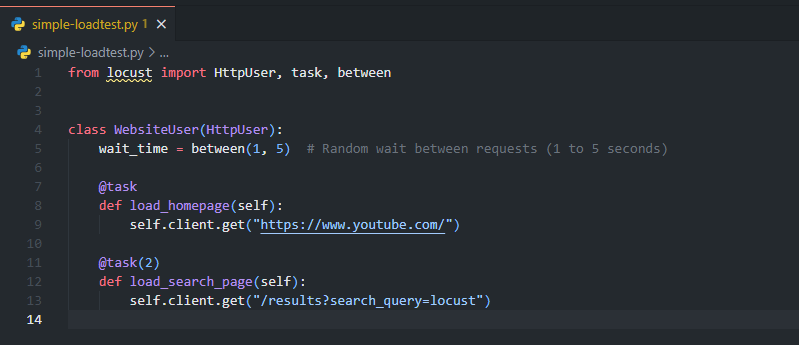
Explanation:
HttpUser– Represents a simulated user.@taskdecorator – Defines actions the user performs.wait_time– Controls how long a user waits between tasks.@task(2)– Means this task is executed twice as often as other tasks.
Running the Test
Run the test with:
locust -f simple-loadtest.pyOpen your browser and navigate to:
http://localhost:8089You’ll see a web UI where you can:
- Set the number of users to simulate.
- Define the spawn rate (how fast users are created).
- Start the test and monitor metrics like response time, requests per second, and failure rates.
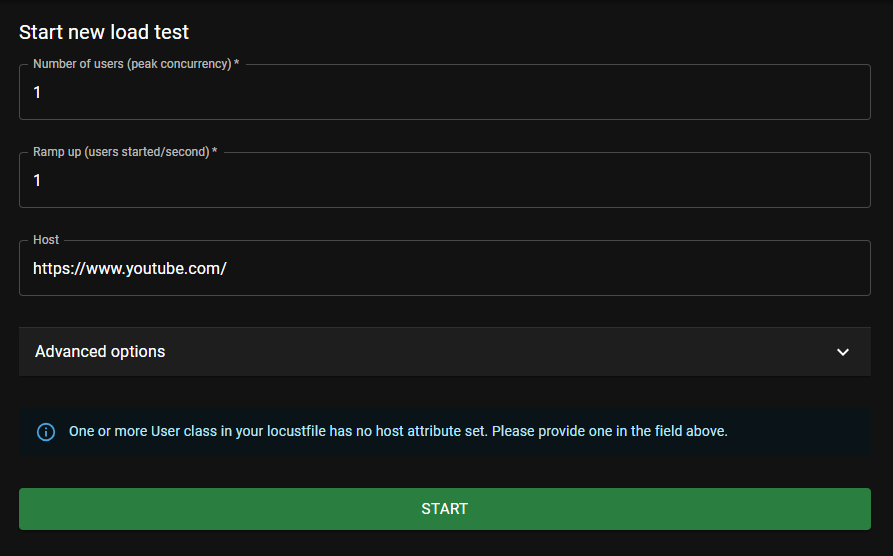
Once click the Start button, the test starts to run
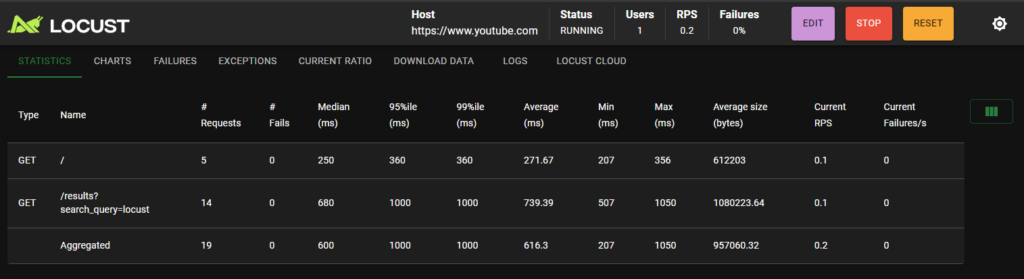
Key Metrics to Monitor
When running a load test with Locust, keep an eye on:
- Response Time – Average, median, and percentile (95th/99th).
- RPS (Requests Per Second) – Throughput of your system.
- Failure Rate – Percentage of failed requests.
- System Resource Usage – CPU, RAM, and database load.
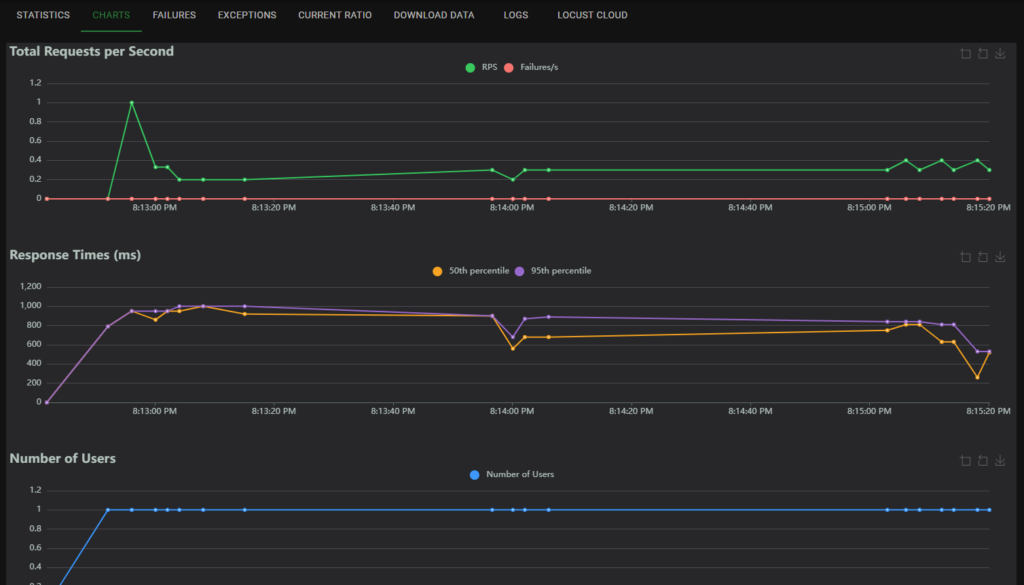
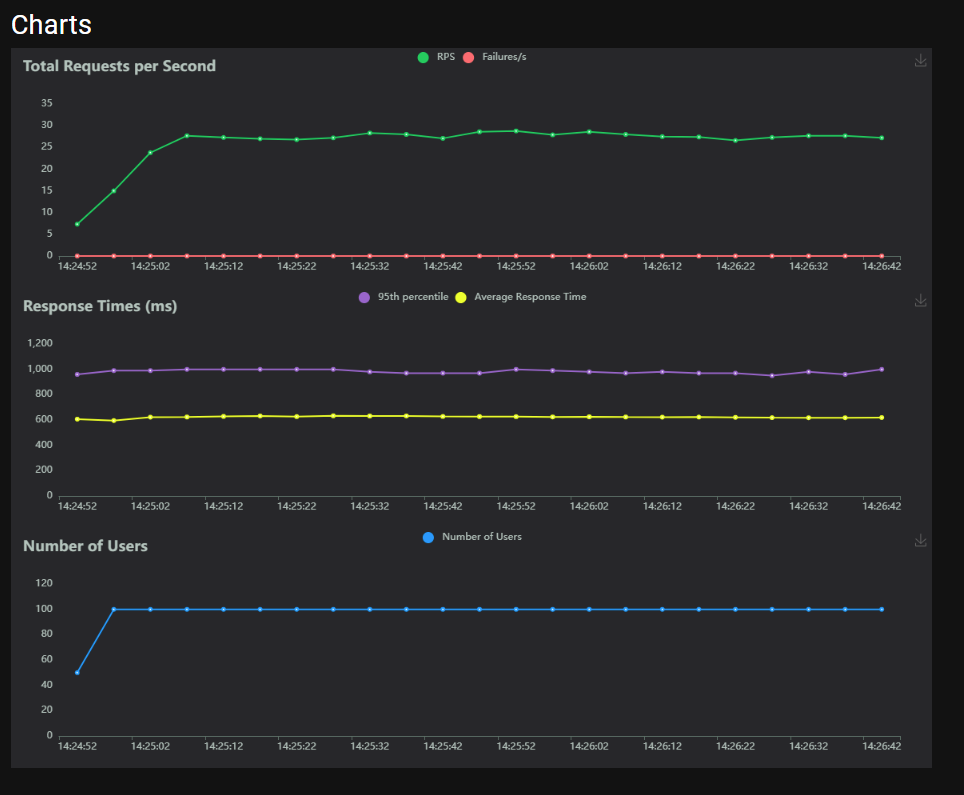
You can even switch to the Chart tab to have a better visualization of metrics
Within the Exception tab, all exceptions that occur during the load test will show here

5. Distributed Load Testing
If you need to simulate millions of users, you can run Locust in distributed mode.
Step 1: Start the Master Node
locust -f locustfile.py --masterStep 2: Start Worker Nodes
locust -f locustfile.py --worker --master-host=<MASTER_IP>You can run multiple workers across different machines to scale horizontally.
6. Integrate with CI/CD Pipeline
6.1. Run Locust in Headless Mode and publish the report CLI command
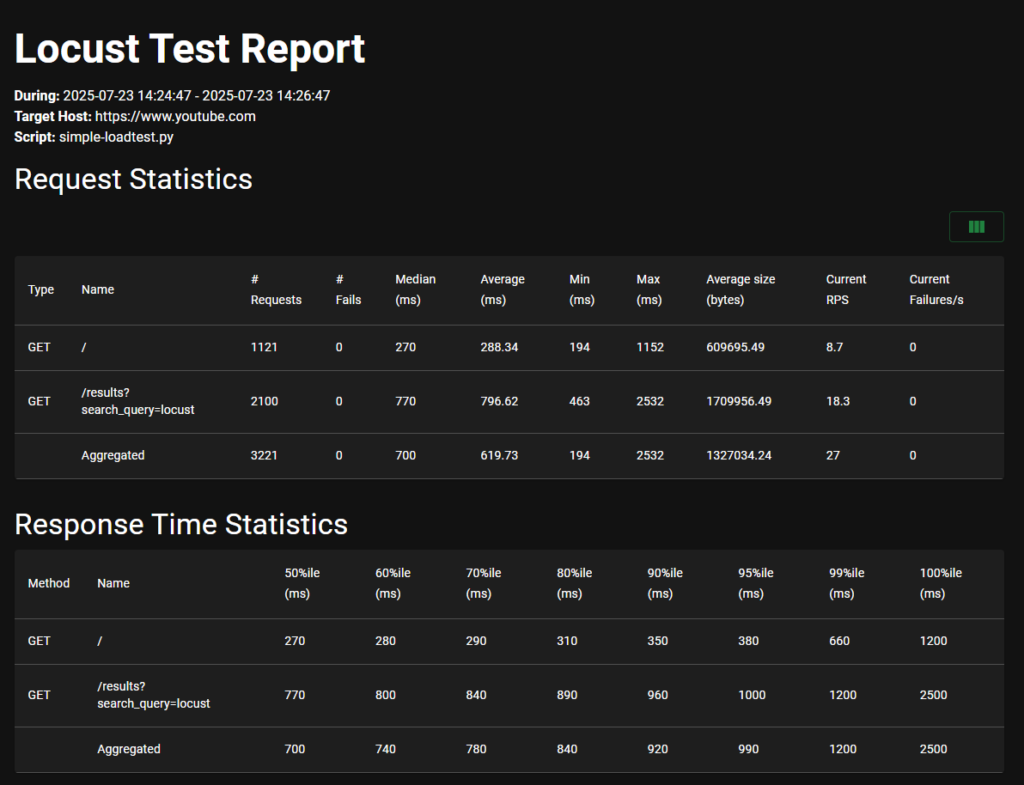
In CI/CD, you won’t use the web UI, so run tests in headless mode, and we might need Locust to generate a report in HTML/CSV format in order to review the test result from the pipeline
locust -f simple-loadtest.py \
                 --headless \
                 --users 100 \
                 --spawn-rate 10 \
                 --run-time 2m \
                 --host https://www.youtube.com \
                 --csv=locust_report \
                 --html=locust_report.html \
                 --exit-code-on-error 1
6.2. Integrate with GitHub CI/CD
Sample YAML file
name: Performance Test

on:
  push:
    branches:
      - master

jobs:
  locust:
    runs-on: ubuntu-latest
    steps:
      - name: Checkout repository
        uses: actions/checkout@v3

      - name: Set up Python
        uses: actions/setup-python@v4
        with:
          python-version: 3.8

      - name: Install dependencies
        run: |
          pip install locust

      - name: Run Locust Performance Test
        run: |
          locust -f simple-loadtest.py \
                 --headless \
                 --users 100 \
                 --spawn-rate 10 \
                 --run-time 2m \
                 --host https://www.youtube.com \
                 --csv=locust_report \
                 --html=locust_report.html \
                 --exit-code-on-error 1

      - name: Get current date
        id: date
        run: echo "date=$(date +'%Y-%m-%d')" >> $GITHUB_OUTPUT

      - uses: actions/upload-artifact@v4
        if: ${{ !cancelled() }}
        with:
          name: locust report - ${{ steps.date.outputs.date }}
          path: locust_report.html
6.3. Run a load test on the pipeline
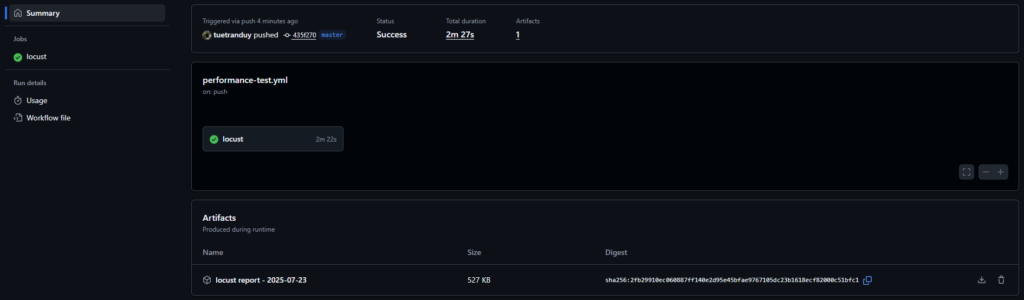
6.4. Download and view load test report
Check out the sample repository here: tuetranduy/locust-demo
7. Best Practices for Locust Load Testing
- Automate in CI/CD – Run periodic load tests to catch performance regressions early.
- Start Small & Scale Up – Gradually increase user count to find bottlenecks.
- Use Realistic User Flows – Mimic real-world usage patterns.
- Run Tests in Production-Like Environments – Avoid inaccurate results from underpowered test servers.
- Monitor System Metrics – Combine Locust results with server monitoring (Prometheus, Grafana).
8. Conclusion
Locust is a powerful yet simple tool for load testing. Its Python-based scripting, real-time monitoring, and scalability make it perfect for modern web applications and APIs. Whether you’re a developer, QA engineer, or DevOps specialist, adding Locust to your testing toolkit will help ensure your system can handle real-world traffic.