


This informative post provides you with the knowledge and tools required to effectively manage the Databricks projects using Git versioning control system. We’ll explore the details of integrating Git workflows for development and collaboration.
Introduction
What is Databricks & what to use it for?
Databricks serves as a comprehensive platform for analysis, implementation, distribution, and preserving data and AI systems on a large scale. It seamlessly incorporates cloud storage within your cloud environment, orchestrating cloud infrastructure management and deployment for you. The Databricks workspace provides tools for data tasks, such as:
- Generating dashboards and visualizations.
- Data annotation, and exploration.
- Machine learning (ML) modelling, tracking, and model serving.
- Data processing scheduling and management, in particular ETL.
Why use Versioning Control for Databricks Projects?
Data science is all about transforming data into insights, but keeping track of changes in your code can turn messy. Imagine spending hours building a data pipeline, only to have a teammate accidentally overwrite your code with a different version. Similar challenges are faced when managing data science projects without version control. This blog post tackles these frustrations by introducing you to the power of version control with Databricks. We’ll explore how Git can save you with all this and how to use Git within your Databricks workspace.
Prerequisites
Before diving into managing Databricks projects with Git, there are a few prerequisites that need to be in place:
- Databricks Workspace: Ensure you have access to a Databricks workspace where you can perform data engineering tasks and collaborate with your team.
- Git Integration: Familiarize yourself with the Git integration within Databricks. Databricks provides Repos with integrated Git folder functionality within Databricks workspaces.
- Supported Git Providers: Verify that your Git repository is hosted by a supported cloud or enterprise Git provider. Databricks supports common Git operations with providers like GitHub, Microsoft, GitLab, and Atlassian.
- Git Credentials: Set up your Git Personal Access Token (PAT) and Git provider username in Databricks. This is essential for cloning private repositories and pushing changes.
- Understanding Git Operations: Be comfortable with basic Git operations such as cloning a repository, committing and pushing changes, pulling updates, branch management, and resolving merge conflicts.
- Knowledge of Databricks Notebooks: Be aware of the types of notebooks supported by Databricks, including IPYNB notebooks, and how to export and import them for version control and collaboration.
Key Features of Git Versioning in Databricks
- Version Control: Track changes, manage branches, and maintain the history of your Databricks notebooks and files.
- Collaboration: Collaborate with team members on notebooks and code files, leveraging Git’s capabilities for branching, merging, and pull requests.
- Integration: Directly link your Databricks workspace with Git repositories, allowing for easy synchronization of changes between Databricks and the Git provider.
- Continuous Integration/Continuous Deployment (CI/CD): Automate the testing and deployment of Databricks notebooks and code using Git-based workflows.
Setting Up: Git integration with Databricks Git folders (Repos)
- Configure User Settings: In your Databricks workspace, configure your user settings. This includes setting up your profile, preferences etc.
- Add/Edit Git Credentials in Databricks: Add your Git credentials, including your Git Personal Access Token (PAT) and Git provider username. These credentials are essential for cloning private repositories and pushing changes.
- Network Connectivity Between Databricks Git Folders and Git Provider: Ensure that there is network connectivity between your Databricks Git folders and the Git provider (e.g., GitHub/GitLab/Microsoft). This allows you to interact with remote Git repositories.
- Security Features in Git Folders:
- Familiarize yourself with the security features provided by Git folders. For example:
- Bring Your Own Key (BYOK): Encrypt Git credentials to enhance security.
- Restrict Usage to URLs in an Allow List: Control access to specific repositories.
- Allow Access to All Repositories: Configure access permissions based on your requirements.
- Familiarize yourself with the security features provided by Git folders. For example:
- Understand Development Flow:
- Databricks Git folders operate at the user level. Each user has their own folder where they can clone a remote repository and make changes.
- Best practice: Work on feature branches rather than directly committing to the main branch. Resolve merge conflicts effectively.
Supported Git providers
Databricks Git folders are backed by an integrated Git repository. The repository can be hosted by any of the Git providers listed below:
Cloud Git providers supported by Databricks
- GitHub, GitHub AE, and GitHub Enterprise Cloud
- Atlassian BitBucket Cloud
- GitLab and GitLab EE
- Microsoft Azure DevOps (Azure Repos)
- AWS CodeCommit
On-premises Git providers supported by Databricks
- GitHub Enterprise Server
- Atlassian BitBucket Server and Data Center
- GitLab Self-Managed
- Microsoft Azure DevOps Server
Required resources for Git integration
Use the Databricks CLI 2.0 for Git integration with Databricks:
Git Credentials Configuration & Remote Repo Connection
The steps mentioned below would be applicable to the users of GitHub and you must have the Databricks GitHub application.
- GitHub account linking using Databricks GitHub Application: Follow the below steps after navigating to the User Settings page:
-
- In the upper-right corner of any page, click your username, then select Settings.
- Click the Linked accounts tab.
- Change your provider to GitHub, select Link Git account, and click Link, as shown in the below snap:

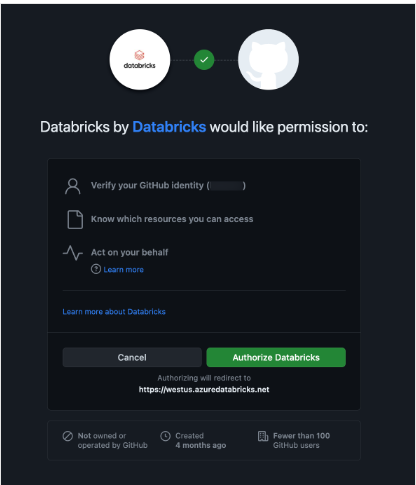
- Setting Up Databricks GitHub App Authorization
- When configuring Databricks for Git integration, you’ll encounter the Databricks GitHub App authorization page as shown on sub-step 4.
- On this page, authorize the GitHub App. This step is crucial because it enables Databricks to act on your behalf when you interact with Git operations within Git folders (such as cloning repositories).
- For additional information and specifics about app authorization, refer to the GitHub documentation.
- To allow access to GitHub repositories, follow the steps below to install and configure the Databricks GitHub app.
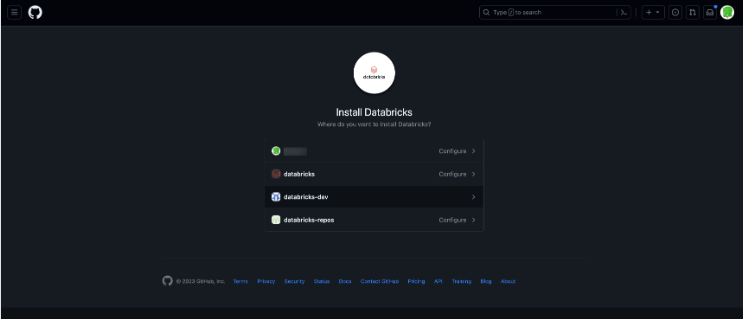
- Install and Configure the Databricks GitHub App
To enable seamless access to GitHub repositories from Databricks Git folders, follow these steps:
-
- Open the Databricks GitHub App Installation Page:
- Navigate to the Databricks GitHub App installation page.
- This step initiates the setup process.
- Select the Relevant Account:
- Choose the GitHub account that owns the repositories you want to access.
- If you’re not the account owner, coordinate with the owner to install and configure the app on your behalf.
- Installation for Account Owners:
- Install the GitHub App.
- This installation grants read and write access to code.
- Note that code access occurs on behalf of users (e.g., when a user clones a repository in Databricks Git folders).
- Fine-Tune Repository Access (Optional):
- For more control, consider selecting the “Only select repositories” option.
- This allows you to limit access to a specific subset of repositories.
- Open the Databricks GitHub App Installation Page:
Connection via Personal Access Token (PAT)
Users can also connect to a GitHub Repository using PAT by following the below steps:
- Access GitHub Settings:
- Click your profile photo in the upper-right corner of any GitHub page.
- Select “Settings.”
- Navigate to Developer Settings:
- Click on “Developer settings.”
- Generate a Personal Access Token:
- In the left-hand pane, choose “Personal access tokens” and then select “Tokens (classic).”
- Click the “Generate new token” button.
- Provide Token Details:
- Enter a description for the token.
- Select the appropriate scopes:
- repo: Required for repository access.
- workflow: Necessary if your repository uses GitHub Action workflows.
- Generate the Token:
- Click the “Generate token” button.
- Copy the generated token to your clipboard.
- Configure Databricks:
- In Databricks, navigate to “User Settings” > “Linked accounts.”
- Enter the copied token to link your GitHub account.
By following these steps, you’ll be able to securely connect your Databricks environment to your GitHub repositories using the personal access token.
Conclusion
This post has highlighted the critical role of version control in Databricks projects. Git has capabilities to meticulously track code changes, facilitate reverting to previous versions, and enable seamless collaboration through branching and merging strategies. Furthermore, Databricks seamlessly integrates with Git folders. Users can leverage familiar Git operations directly from the Databricks interface, including cloning repositories, managing branches, committing and pushing changes, and pulling updates. This eliminates the need to switch between separate tools, enhancing workflow efficiency.
References
- Official Databricks Documentation – https://docs.databricks.com/en/repos/index.html