


Introduction
In this article, we’ll explore ML.NET, a powerful framework that seamlessly integrates machine learning capabilities into the .NET ecosystem. Whether you’re a seasoned data scientist or a curious .NET developer, ML.NET offers an exciting journey into the world of predictive modelling and intelligent applications.
ML.NET stands for Machine Learning for .NET. It’s an open-source, cross-platform framework developed by Microsoft to empower .NET developers with machine learning capabilities. ML.NET provides a rich set of tools, libraries, and APIs that allow us to build, train, and deploy custom machine learning models using familiar languages like C#.
Why Choose ML.NET?
Some compelling reasons why one should consider ML.NET:
- Seamless Integration: ML.NET seamlessly integrates into your existing .NET applications. You don’t need to switch to a different language or ecosystem. If you’re comfortable with C# or F#, you’re already halfway there.
- Developer-Friendly: As a .NET developer, you’ll appreciate the familiar syntax and tooling. ML.NET leverages your existing knowledge, making it easier to transition from traditional software development to machine learning.
- Cross-Platform: Whether you’re building desktop applications, web services, or mobile apps, ML.NET works across platforms. Write once, deploy anywhere.
- Scalability: ML.NET scales well, allowing you to handle large datasets and complex models efficiently.
Setting Up Your Environment
This section will guide you through the necessary steps to ensure you have the right tools and frameworks in place to start building machine learning models with ML.NET.
Prerequisites
Before we dive into the setup process, let’s ensure you have the following prerequisites ready:
- .NET SDK: The latest version of the .NET SDK is essential for developing with ML.NET.
- Visual Studio: A robust IDE like Visual Studio is recommended for its integrated development features and support for ML.NET.
- ML.NET CLI: The ML.NET Command Line Interface is a valuable tool for scaffolding and managing your ML.NET projects.
Installation Steps
After we ensure that all the prerequisites are installed and configured in the system, install the ML.NET CLI. For this, open your command prompt or terminal and run the following command:
dotnet tool install -g mlnet
For Linux x64 MACHINES – Run the following command:
dotnet tool install -g mlnet-linux-x64
Try the following command to run the mlnet tool:
~/.dotnet/tools/mlnet
Creating Your First ML.NET Project
If you are using Linux, simply create a dotnet project using CLI command. The ML model will be added later. But if you are using Visual Studio on a Windows machine, follow these steps –
- Select Create a new project from the Visual Studio 2022 start window.
- Select the C# Console App project template.
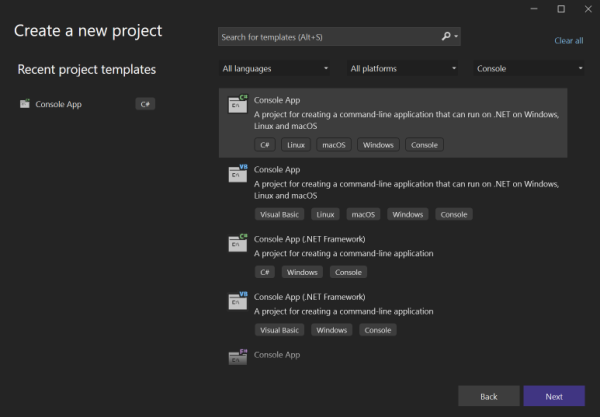
- Change the project name to your desired project name, in this case –
myMLApp. - Make sure Place solution and project in the same directory checkbox is unchecked.
- Select the Next button.
- Select .NET 8.0 (Long Term support) as the Framework.
- Select the Create button. Visual Studio creates your project and loads the
Program.csfile.
Add machine learning
- Right-click on the
myMLAppproject in Solution Explorer and select Add > Machine Learning Model.
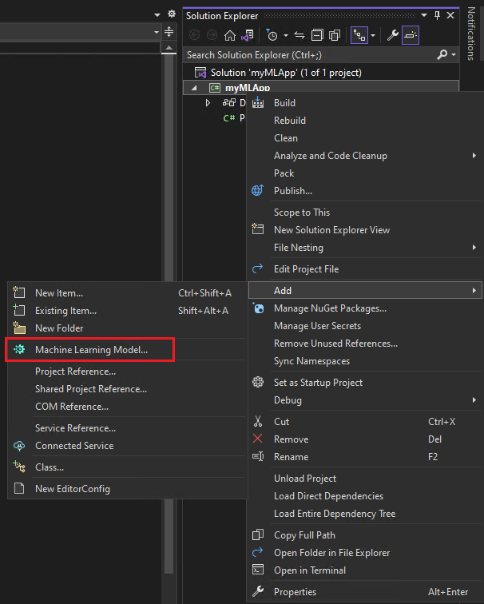
- In the Add New Item dialog, make sure Machine Learning Model (ML.NET) is selected.
- Change the Name field to
SentimentModel.mbconfigand select the Add button.
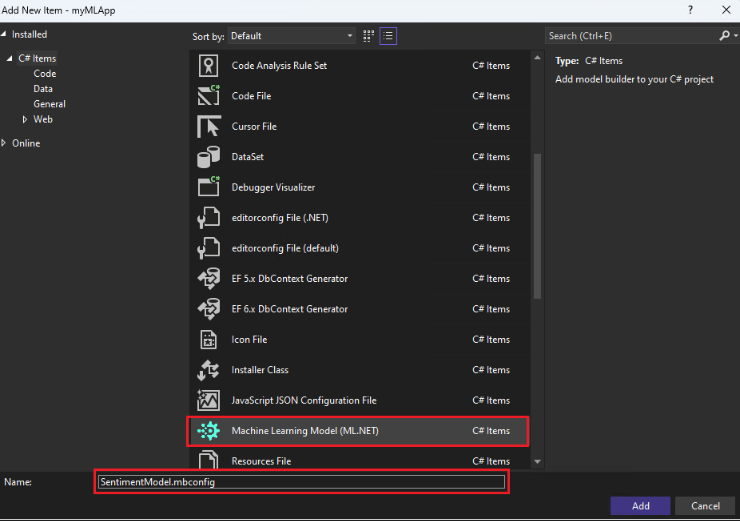
The file which you created now is a JSON file that keeps track of UI state and it will be added to your solution. A new window of Model Builder would pop up that will guide you for building a machine learning model.
Before generating the model, we need to first select the machine learning scenario, like which scenario our model is more likely to fall. There are several ML scenarios that are supported by the ML.NET CLI:
- Classification – When prediction for categorization of data is needed (for example, analyzing customer sentiments).
- Image classification – Use this when you want to predict which category an image belongs to (for example, predicting an image of an animal).
- Regression (for example, value prediction) – When prediction of a numeric value is needed. (for example, predicting stock price).
- Forecasting – When forecast of future values in a time-series is needed (for example, forecast annual sales).
- Recommendation – When model is needed to be used to recommend items to users based on their historical ratings.
Building Your First ML Model
Download and add the model data
Download the Sentiment Labelled Sentences, which is a predefined datasets from the UCI Machine Learning Repository. Unzip sentiment labelled sentences.zip and save the yelp_labelled.txt file to the myMLApp directory. The link to both are added in the References section of this post.
The data can be added either from a local file or via connection to a SQL Server database. In this case, you’ll add yelp_labelled.txt from a file.
- Select File as the input data source type.
- Browse for
yelp_labelled.txt. After dataset is selected, a preview of data appears in the Data Preview section. Since our dataset does not have a header, headers are auto-generated (“col0” and “col1”). - Under Column to predict (Label), select “col1”. The Label is what we’re predicting, which in this case is the sentiment found in the second column (“col1”) of the dataset.
- The columns that are used to help predict the Label are called Features. In this case, the review comment column (“col0”) is the Feature column.
Training the Model
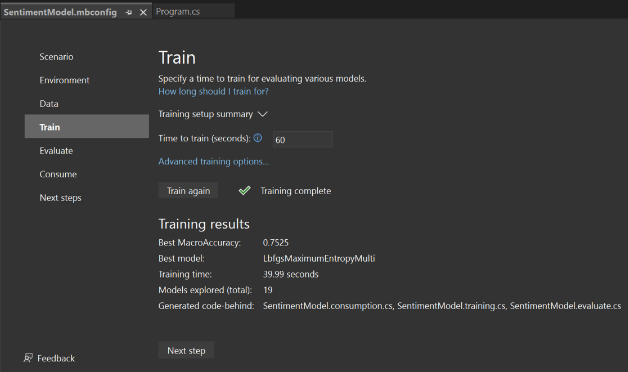
Navigate to the Train section of the SentimentModel.mbconfig model builder. We will train our model with yelp_labelled.txt dataset.
- Change the Time to train, which is the amount of time you’d like Model Builder to explore various models, to 60 seconds (increase this number if no models are found after training).
- Select Start training to start the training process. Once training starts, you can see the time remaining.
- The summary of training results, after the training is completed can be seen as shown below.
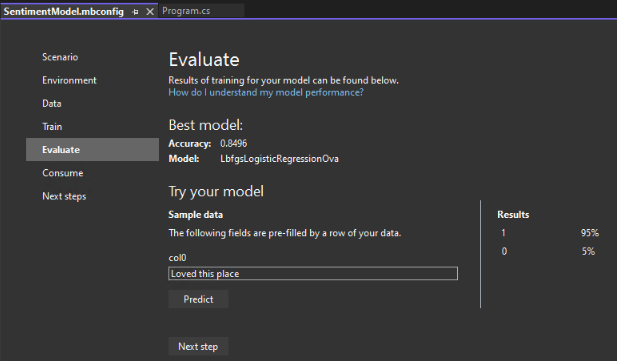
Evaluating Model Performance
Navigate to the Evaluate section, where you can view the statistics for Best Model along with the option to try out your trained model.
Try the trained model
The textbox here is pre-filled with the first line of data from our dataset, but we can type the desired input and click Predict button to generate sentiment predictions.
After evaluation of the model, we proceed with the final step in our journey, i.e. consuming the generated model. For this, we will navigate to the Consume section of the model builder UI.
Consuming the Model
Here, a code snippet is provided which creates sample input for the model and uses the model to make a prediction on that input. There are two project templates (a console app and a web API), both which consume the trained model. Project templates are also provided that we can optionally add to the solution, in this case, Console and Web API projects.
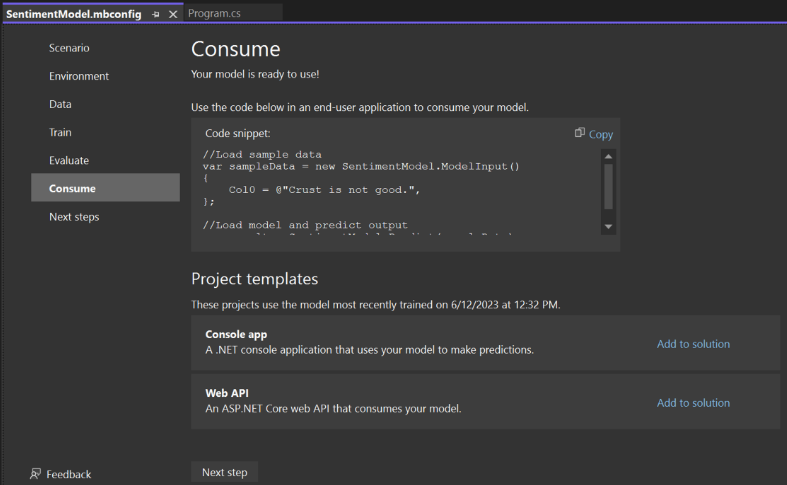
The following steps are to be followed to consume the model:
- Replace the
Program.cscode in yourmyMLAppproject with the following code:
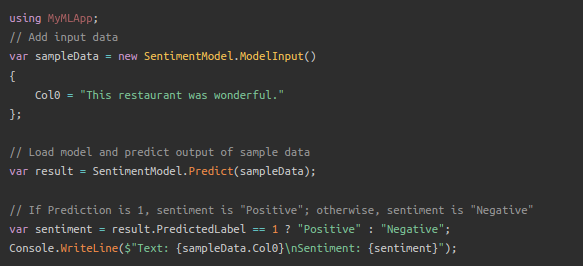
- Now run the application, you can view the provided text as input along with the sentiment predicted by our trained model as the output.
Text: This restaurant was wonderful.
Sentiment: Positive.
Conclusion
As we reach the end of our exploration into ML.NET, it’s clear that this framework is a game-changer for .NET developers looking to integrate ML into their applications. This was an introduction to the world of ML.NET, as there are more advanced topics like developing Custom Machine Learning Tasks where we implement custom algorithms and develop custom transformers. As ML.NET continues to evolve, it promises to offer more features and improved performance.
References
- Official Microsoft ML.NET tutorial – https://dotnet.microsoft.com/en-us/learn/ml-dotnet/get-started-tutorial/intro
- Sentiment Labelled Sentences zip – https://archive.ics.uci.edu/ml/machine-learning-databases/00331/sentiment%20labelled%20sentences.zip
- UCI Machine Learning Repository – https://archive.ics.uci.edu/dataset/331/sentiment+labelled+sentences