


Introduction
In the world of software development, making sure applications work well is very important. Traditional testing methods are essential, but they follow a structured approach that might not uncover all potential issues. Monkey Testing, an unconventional yet effective method, introduces randomness to identify unexpected behaviors and vulnerabilities. This blog explores Monkey Testing, its types, advantages, disadvantages, and how it compares to other testing techniques.
What is Monkey Testing?
Monkey Testing is a software testing technique where testers input random data into an application to identify crashes, bugs, or unexpected behaviors. The randomness mimics a monkey’s actions, leading to the discovery of issues that structured testing might miss. This approach evaluates the software’s stability and error-handling capabilities under unpredictable conditions.
Why Use Monkey Testing?
Monkey Testing is beneficial for several reasons:
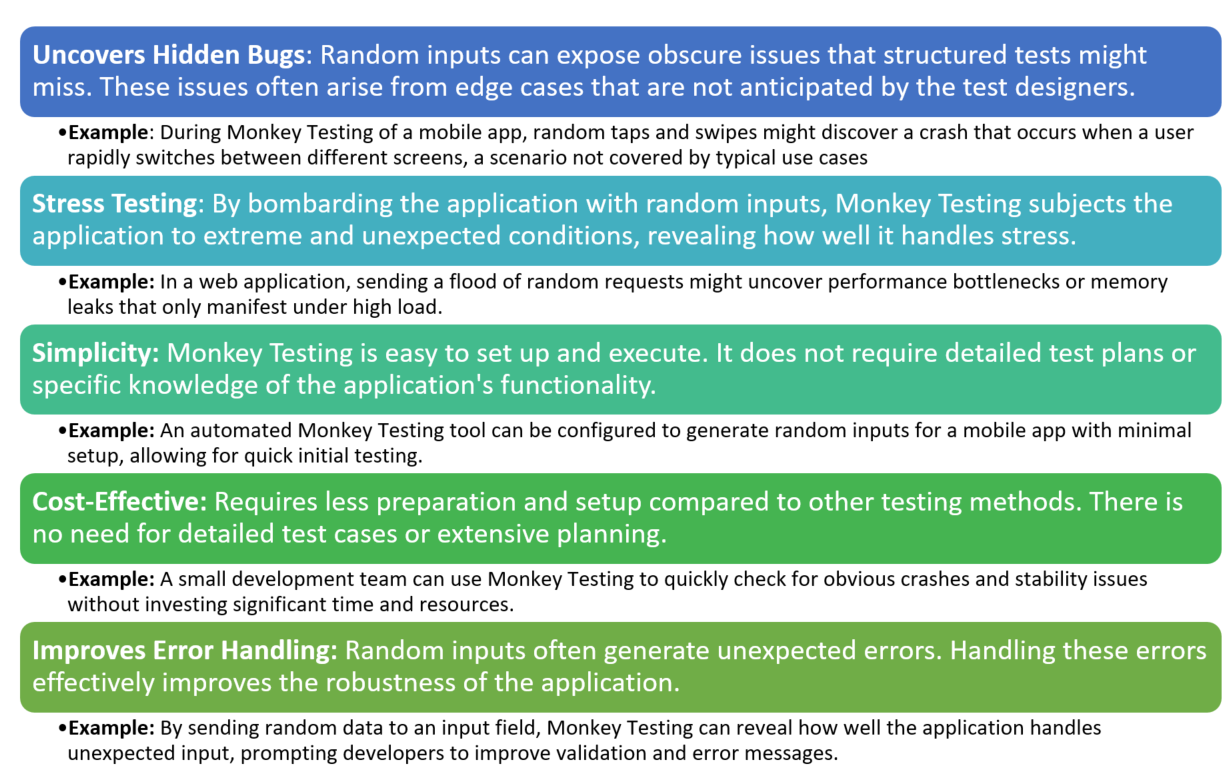
- Discover Hidden Bugs: Random inputs can reveal obscure issues not covered by structured tests.
- Stress Testing: Evaluates how the application handles unexpected and extreme conditions.
- Simplicity and Cost-Effectiveness: Requires minimal planning and preparation.
- Robustness Assessment: Ensures the application can handle random and unexpected user interactions.
Types of Monkey Testing
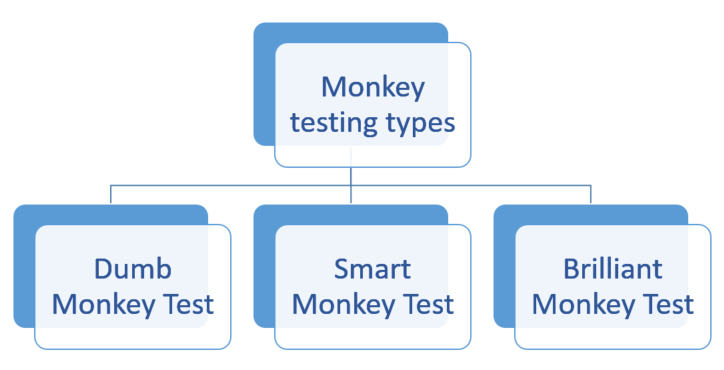
Dumb Monkey Test
In this approach, testers have no knowledge of the application’s functionality. Inputs are completely random with no specific logic or pattern. Useful for general stability testing, especially in early development stages to ensure the application does not crash under random interactions.
Example: A tester inputs random keystrokes and clicks anywhere on a web application without understanding its structure. For instance, a tester might randomly click around on a form without regard to input fields or buttons.
Smart Monkey Test
Testers have a basic understanding of the application and focus on areas more likely to contain defects. Inputs are random but directed towards specific parts of the application. Suitable for identifying issues in high-risk areas of the application, ensuring critical functionalities are robust under random inputs.
Example: In a shopping app, a tester might randomly add items to the cart, proceed to checkout, and enter random payment information. This approach targets the checkout process, which is critical for user satisfaction. For instance, the tester might randomly select items, enter random shipping addresses, and use various payment methods to ensure the process is robust.
Brilliant Monkey Test
Testers have in-depth knowledge of the application and use random inputs to test specific scenarios that are likely to contain complex defects. Ideal for applications with complex logic and high security requirements, ensuring thorough testing of critical and intricate scenarios.
Example: In a banking application, a tester might perform random transactions, including edge cases like transferring negative amounts or using special characters in input fields. This method aims to uncover complex issues that could impact security and functionality. For example, the tester might randomly input negative numbers for transfers, attempt to withdraw more than the account balance, or enter unexpected characters into form fields.
Best Situations to Use Monkey Testing
Monkey Testing works well in situations where you need to find unexpected problems by randomly interacting with the software. Here are some examples of when to use it:
- Early in Development: At the beginning of a project, before you have a proper test plan, Monkey Testing can help spot major issues quickly.
Example: A small team developing a new mobile app can do Monkey Testing early on to check if the app crashes when users tap around randomly. - Stress Testing: When you want to see how the system reacts to extreme or random actions and check if it crashes or freezes.
Example: A gaming app might undergo Monkey Testing to see what happens if a user taps buttons wildly, switches screens quickly, or inputs strange data. - Exploratory Phases: When the software is still changing a lot, Monkey Testing can help see how it handles unplanned user actions.
Example: During the beta phase of a new social media platform, random actions like rapid screen switching or unexpected data entry might reveal hidden bugs. - Post-Deployment Checks: After updates or major releases, you can use Monkey Testing for a quick check to see if anything important broke.
Example: After a big update to a messaging app, Monkey Testing might reveal crashes caused by random user actions that weren’t covered in regular tests.
Advantages of Monkey Testing
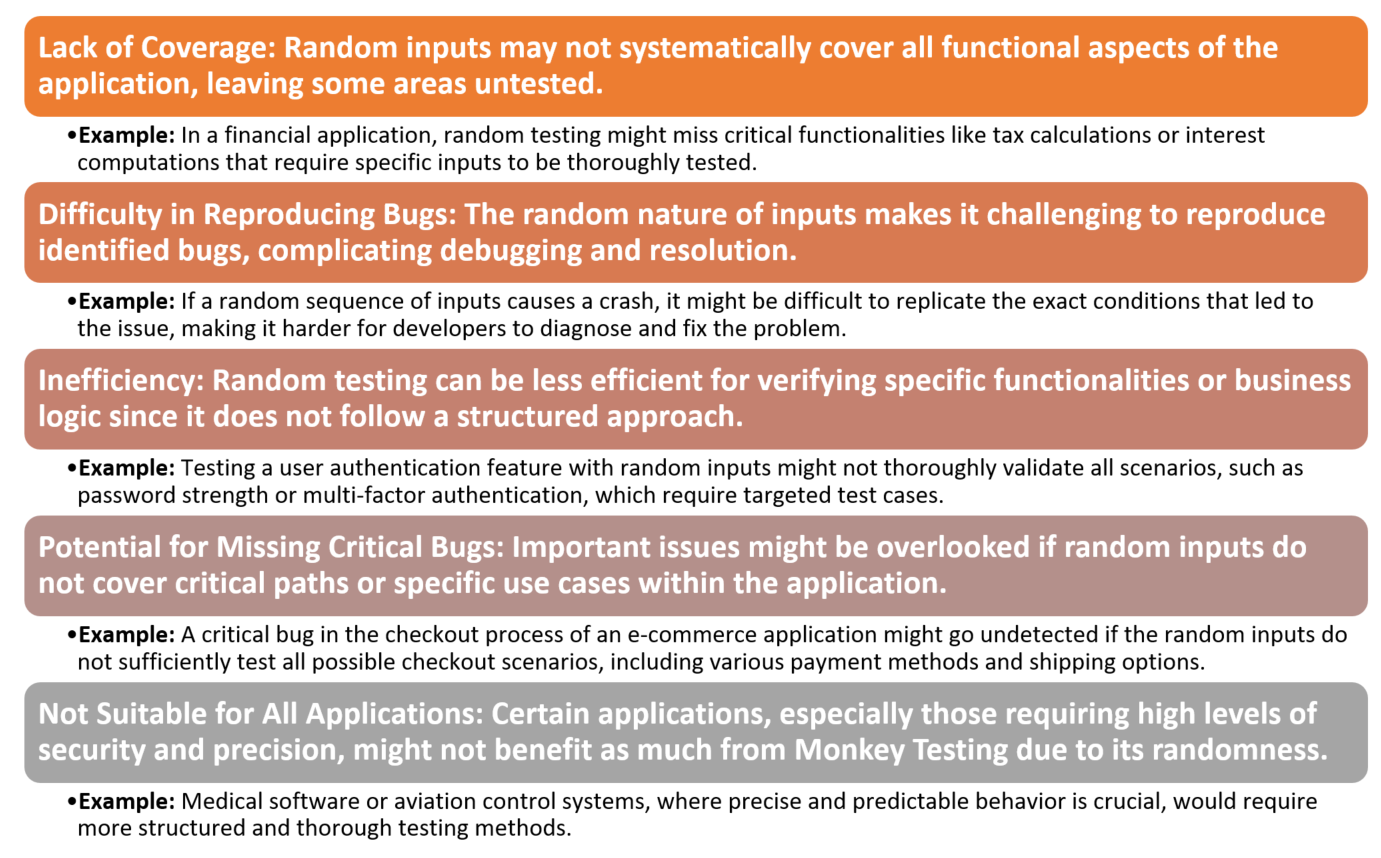
Disadvantages of Monkey Testing
The main differences between Monkey Testing, Gorilla Testing, and Ad-Hoc Testing

How to Estimate Effort and Resources for Monkey Testing
It can be tough to predict how much time and effort Monkey Testing will take since it’s random. Here’s how you can plan it:
- Define the Scope: Decide which parts of the software you’ll test randomly. This helps estimate how big the testing task will be.
Example: In an e-commerce app, you might focus Monkey Testing on the checkout process by trying out random actions like back-and-forth navigation or entering incorrect payment details. - Set a Time Limit: Choose how long each testing session should be. You might plan for one or two hours of random testing, then review what you found.
Example: For a mobile app, you might schedule three 30-minute Monkey Testing sessions on different devices to see how they handle unplanned actions. - Plan for Issue Reporting: Random testing can uncover strange behaviors, so allow time to document and understand these issues.
Example: If tapping repeatedly on a button causes the app to freeze, extra time might be needed to investigate whether it’s a serious bug. - Allocate Resources: Anyone can do Monkey Testing, but experienced testers can spot more critical issues during the process.
Example: In a content management system (CMS) project, junior testers might focus on random navigation, while more experienced testers analyze performance issues during random actions. - Plan Iteration Cycles: Estimate how many rounds of Monkey Testing you’ll need, especially for larger projects.
Example: A healthcare app might have three rounds of Monkey Testing: after the first build, after fixing bugs, and finally before release, making sure no new issues pop up.
How Do We Know When Monkey Testing Is Done?
It’s hard to know when to stop Monkey Testing since it’s unstructured. Here’s how you can decide:
- Set a Time or Iteration Limit: Decide on a specific amount of time or number of cycles for testing, like 10 hours or 5 rounds of testing.
Example: For a banking app, the team might do random testing for 2 hours, focusing on key features like transactions and navigation. Once the time is up, testing ends. - Stop When Enough Bugs Are Found: You might end testing after finding a certain number of serious bugs, or when no new issues show up after several rounds.
Example: An e-learning platform might stop Monkey Testing after three rounds with no new critical issues, allowing the team to move forward. - Check for Stability: If the app runs smoothly without crashing or freezing after extended random testing, it may be ready.
Example: After 5 hours of Monkey Testing on a smart home app without any major crashes, the team decides the software is stable. - Focus on High-Risk Areas: Test critical or complex parts of the software. If those areas pass random testing, you might consider testing complete.
Example: For a cloud storage service, if important features like file uploads and sharing work fine after random tests, the testing might be considered done. - Set Clear Criteria for Completion: Use a simple exit rule like “no crashes in the last 2 hours of testing.”
Example: In a logistics system, Monkey Testing might be done if the software runs smoothly for two hours under random actions like saving, editing, and screen switching.
Conclusion
Monkey Testing is a valuable technique for uncovering hidden bugs and assessing the robustness of software applications through random input generation. While it has limitations, it complements structured testing methods to ensure comprehensive software quality assurance. Understanding the differences between Monkey Testing, Gorilla Testing, and Ad-Hoc Testing helps in selecting the appropriate technique based on the testing goals and context.