


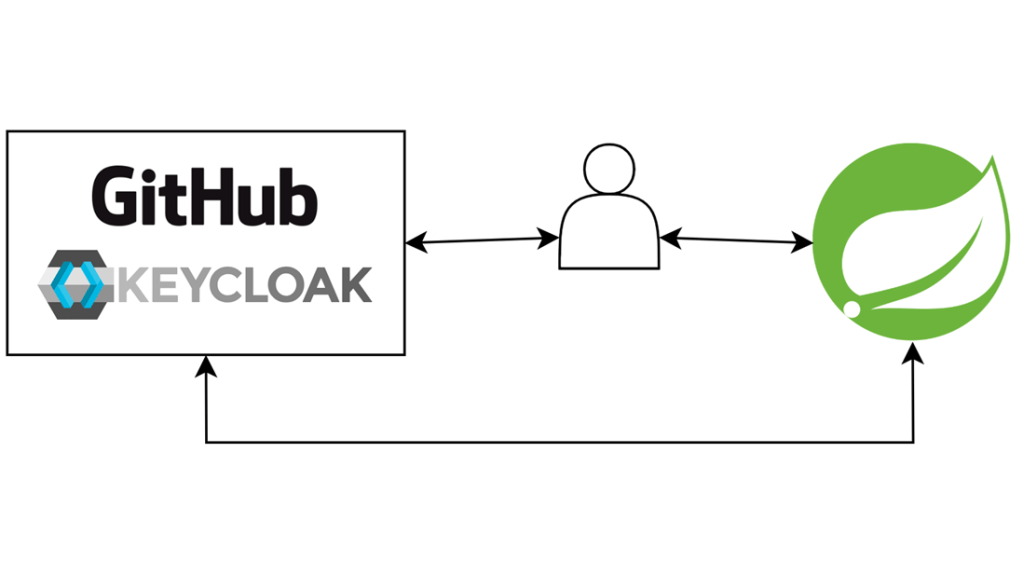
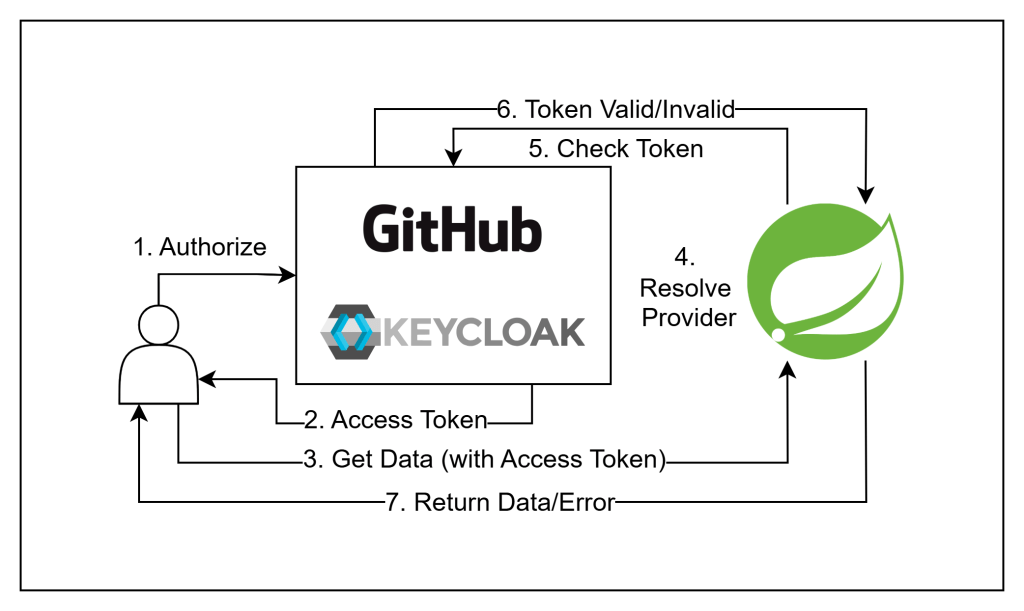
OAuth 2.0 allows us to delegate authentication and authorization processes to a third-party provider like GitHub, Facebook or Google. But different providers can issue either JWT or opaque token. In that case, Spring Boot provides us a way to resolve the token using an authentication resolver.
1. Overview
To access data from a resource server, a client must first obtain a token from an authentication provider, such as GitHub or Keycloak. They can then include that token within a request header. The resource server would then validate the token, either by JWT signature or validation from authentication server, and send back the requested data, or error in case the token is invalid.
2. Prerequisite
- PostgreSQL database: You will need an empty database to use with Keycloak.
- Ability to run Docker containers.
- A GitHub account.
- Postman.
- JDK 21.
- An IDE of your choice.
3. Create new Spring Boot project
Step 1: Navigate to Spring Initializr
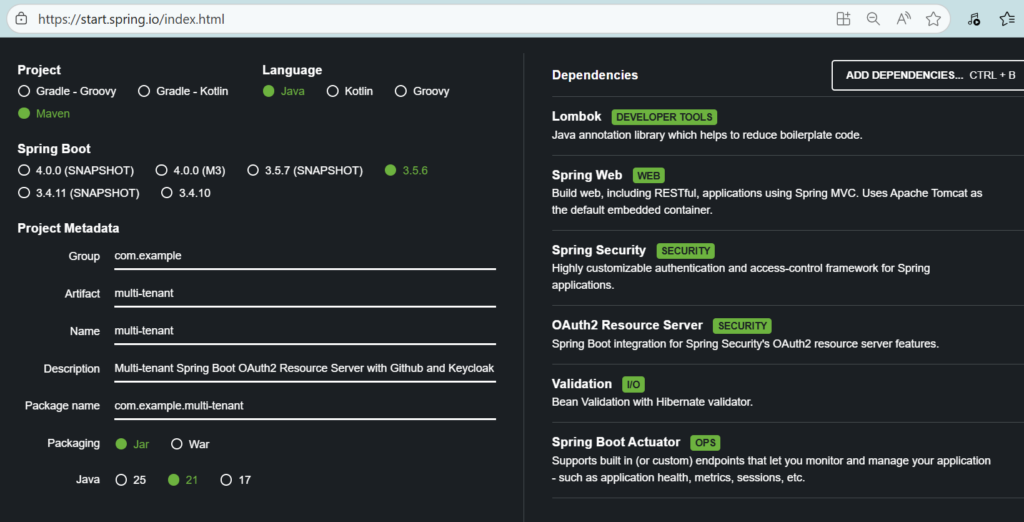
Step 2: Fill out the require metadata and add the following needed dependencies:
- Spring Web
- Spring Security
- OAuth2 Resource Server
- Lombok
Step 3: Click “Generate” to download the project.
Step 4: Unzip the project and open it with your selected IDE.
4. Setup Keycloak
In this example, we will configure Keycloak to run inside a Docker container and act as a JWT provider for our resource server.
Step 1: Create a new docker-compose.yaml file in the project folder
services:
  keycloak:
    container_name: multi_tenant_keycloak
    build: .
    image: quay.io/keycloak/keycloak:26.0
    env_file: ".env"
    healthcheck:
      test: ["CMD", "curl", "-f", "http://localhost:8080/health/ready"]
      interval: 15s
      timeout: 2s
      retries: 15
    command: [ "start-dev", "--http-port", "8080", "--https-port", "7443", "--import-realm"]
    ports:
      - "8080:8080"
      - "7443:7443"
    networks:
      - local_network
networks:
  local_network:
    driver: bridge
Step 2: Create a .env file
For safety, we will store environment variables inside .env file.
KC_HOSTNAME=localhost
KC_HOSTNAME_PORT=8080
KC_HOSTNAME_STRICT_BACKCHANNEL="true"
KC_PROXY=passthrough
KEYCLOAK_ADMIN={your_keycloak_admin_username_here}
KEYCLOAK_ADMIN_PASSWORD={your_keycloak_admin_password_here}
KC_HEALTH_ENABLED="true"
KC_LOG_LEVEL=info
KC_DB=postgres
KC_DB_URL=jdbc:postgresql://host.docker.internal:5432/{your_database_name_here}
KC_DB_USERNAME={your_database_username_here}
KC_DB_PASSWORD={your_database_password_here}
QUARKUS_TRANSACTION_MANAGER_ENABLE_RECOVERY="true"
KC_HTTPS_KEY_STORE_PASSWORD="password"
Remember to change the values denoted by “{your_value_here}” with actual values of your choice.
Step 3: Run the container
Open a terminal at your docker-compose.yaml file location and enter command: docker compose up to start up a Keycloak instance at port 8080.

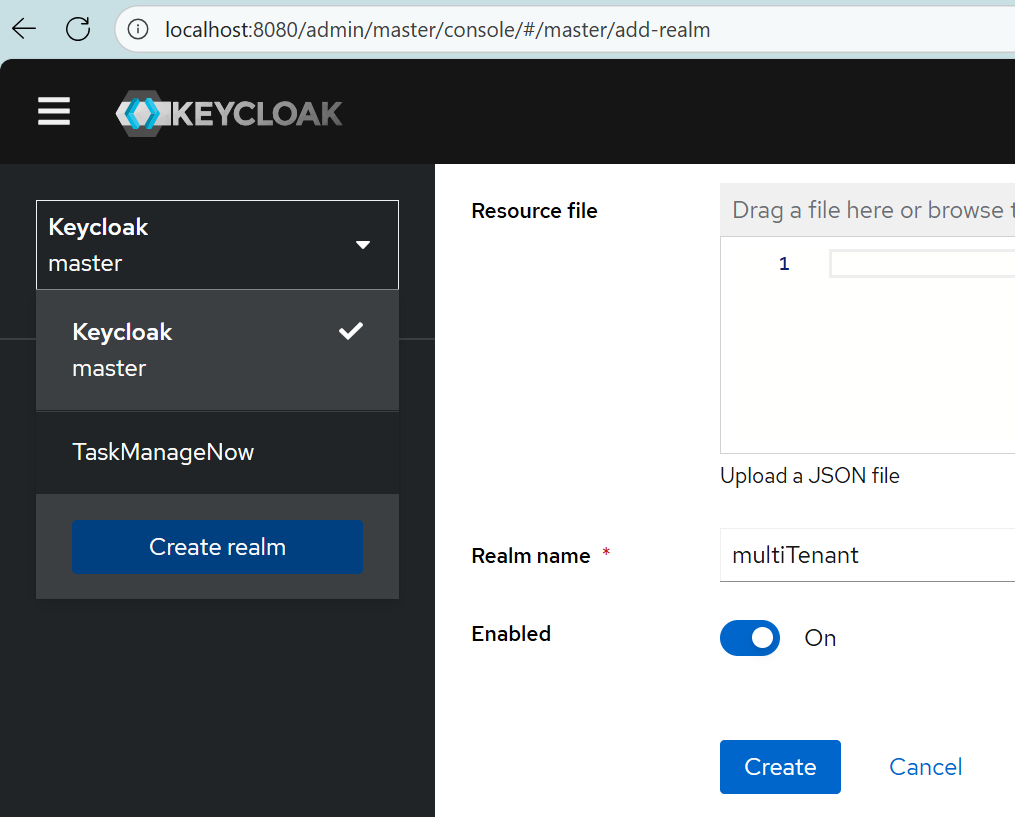
Step 4: Create a new realm
Navigate to http://localhost:8080 and enter your admin username and password to access the admin board
Once you in, select the Keycloak – master dropdown on the left, and select Create realm to create new realm.
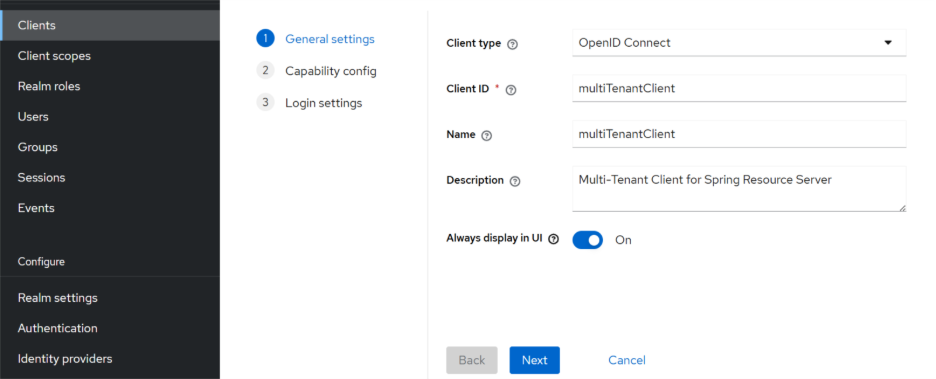
Step 4: Create new client
Once you created a new realm, go to Clients tab and select Create client button to create new client. Fill out Client ID and Name fields, then hit Next.
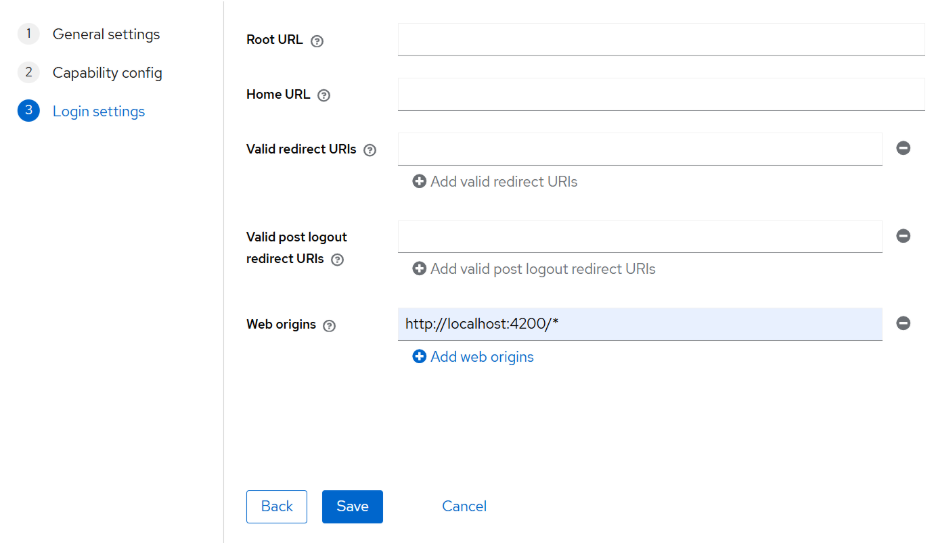
Fill in Web origins field with your Spring Boot Server URL, in this case, I use http://localhost:4200/*. Keep other settings as they are and click Save to create new client.
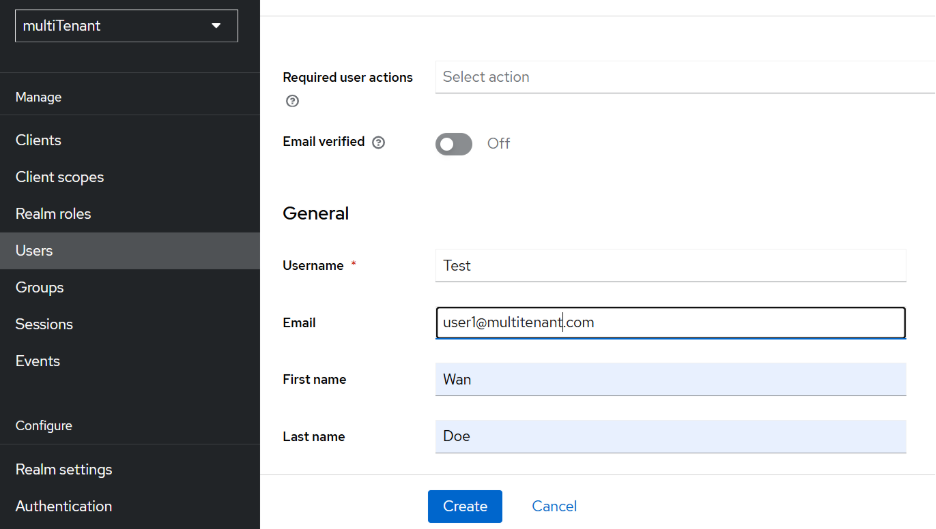
Step 5: Create a user
Go to Users tab and click Add user. Fill out the required fields and click Create to create new user.
Once you created a user, select that user and head to Credentials tab to add new password.
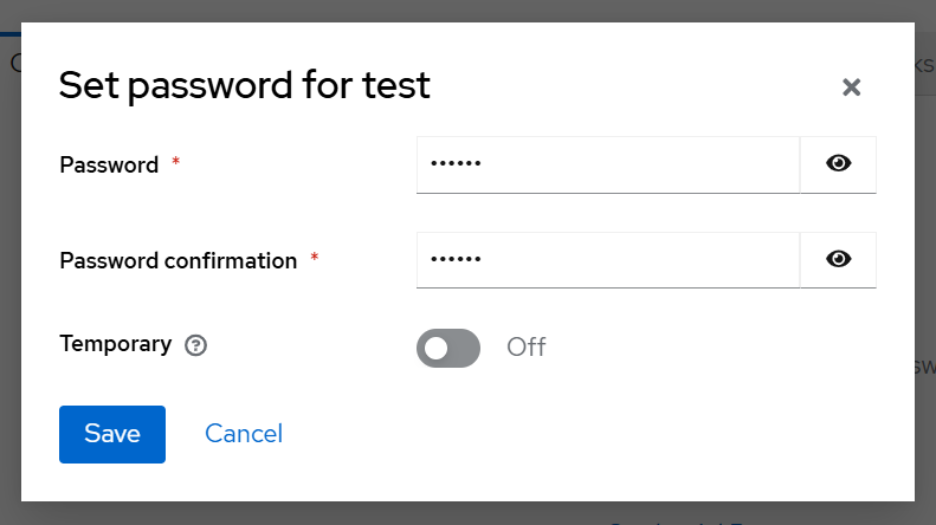
Fill out Password, Password confirmation fields, turn off Temporary toggle and click Save to create new password.
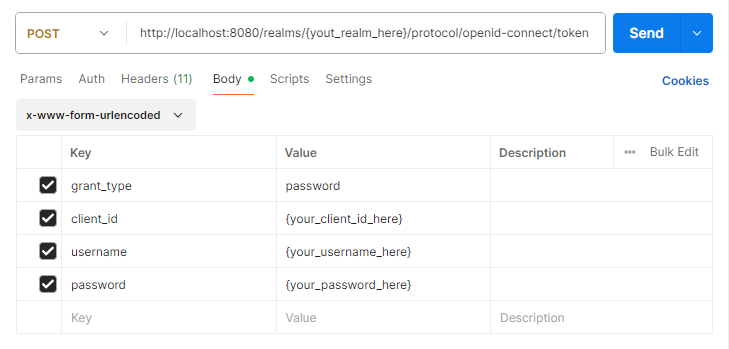
Step 6: Get access token from Postman
Open Postman, create a new request and copy-paste the following cURL code into the URL bar of the request:
curl --location 'http://localhost:8080/realms/{yout_realm_here}/protocol/openid-connect/token' \
--header 'Content-Type: application/x-www-form-urlencoded' \
--data-urlencode 'grant_type=password' \
--data-urlencode 'client_id={your_client_id_here}' \
--data-urlencode 'username={your_username_here}' \
--data-urlencode 'password={your_password_here}'
The request should look like this:
Replace the values denoted by “{your_value_here}” with actual values.
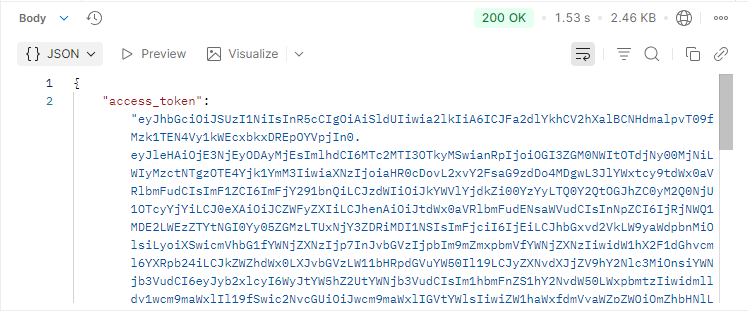
To save the access token for later use, head to Scripts tab and enter the following code:
var jsonData = JSON.parse(pm.response.text());
pm.environment.set("access_token", jsonData.access_token);
pm.globals.set("access_token", jsonData.access_token);
pm.environment.set("refresh_token", jsonData.refresh_token);
pm.globals.set("refresh_token", jsonData.refresh_token);
Once done, you can click Send to obtain an access token from Keycloak:
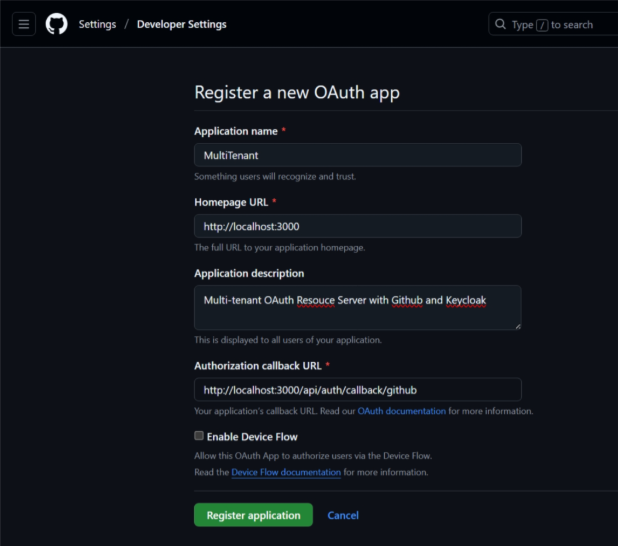
5. Create OAuth app from GitHub
GitHub will serve as authentication server which use opaque token.
Step 1: Navigate to GitHub > Settings > Developer settings > OAuth Apps > New OAuth App
Fill out the required fields and click Register application to create new OAuth app.
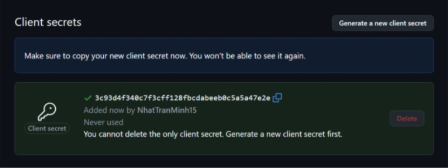
Step 2: Create new client secret
Once the OAuth app is created, you can select it and click Generate a new client secret to generate a new client secret. Remember to save the secret for later use.
Step 3: Test with Postman
In Postman, create a new request and select the Authorization tab to config a new Oauth2 token:
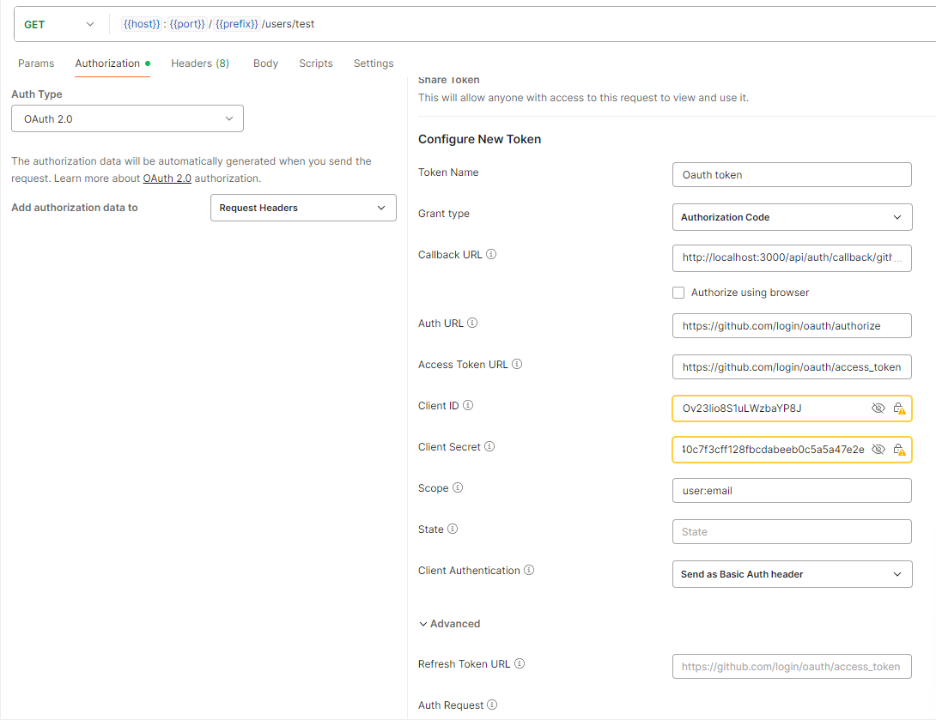
Insert the following value to these fields, replace the values denoted by “{your_value_here}” with actual values from GitHub, and click Get New Access Token:
- Callback URL : http://localhost:3000/api/auth/callback/github
- Auth URL: https://github.com/login/oauth/authorize
- Access Token URL: https://github.com/login/oauth/access_token
- Client ID: {your_client_id_here}
- Client Secret: {your_client_secret_here}
- Scope: user:email
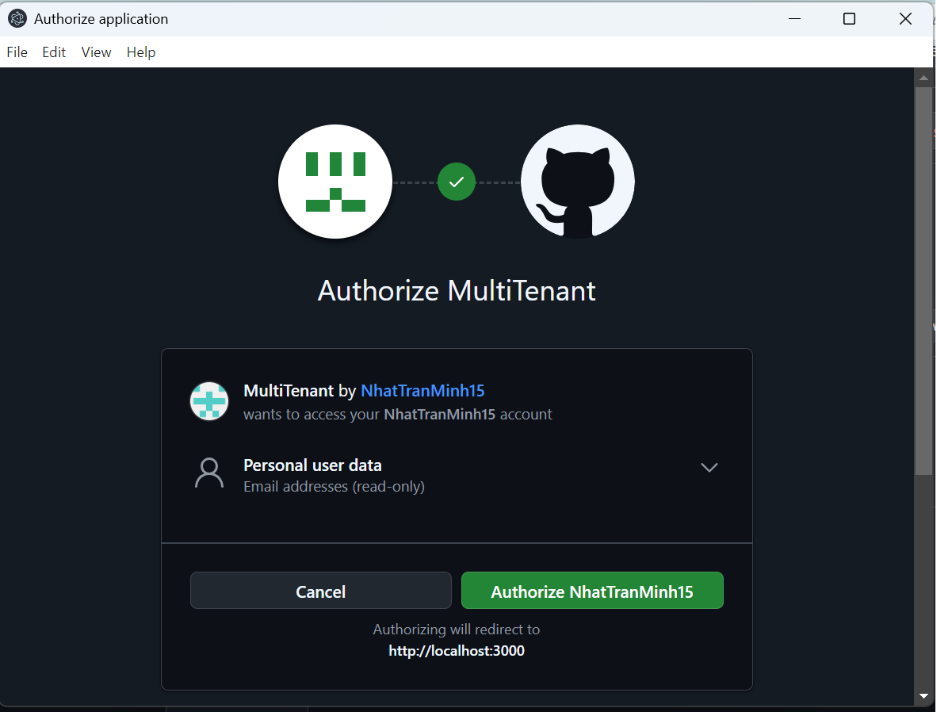
You will be asked to authorize the request, select Authorize:
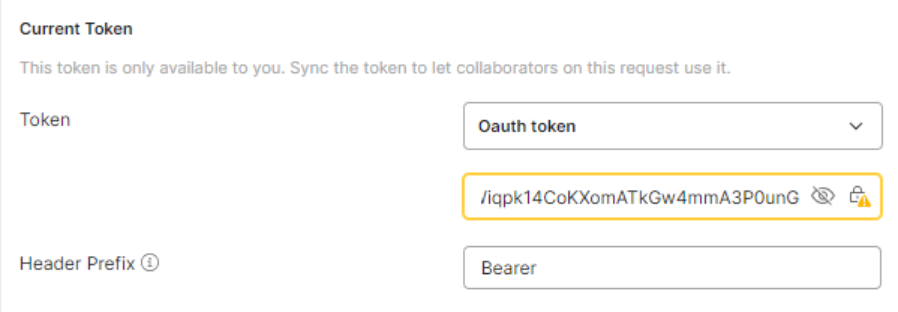
After you done, the Current Token will have value:
6. Configure the Spring Boot app
Step 1: Add properties to application.properties file.
# set application name and port:
spring.application.name=demo
server.port=4200

# set up actuator properties, you can skip this if you do not use actuator
# turn off all endpoints
management.endpoints.enabled-by-default=false
management.endpoints.web.exposure.include=*
# open shutdown endpoint
management.endpoint.shutdown.enabled=true

# set up security properties to supprort JWT
spring.security.oauth2.resourceserver.jwt.issuer-uri=http://localhost:8080/realms/${KEYCLOAK_REALM}
spring.security.oauth2.resourceserver.jwt.jwk-set-uri=${spring.security.oauth2.resourceserver.jwt.issuer-uri}/protocol/openid-connect/certs
jwt.auth.converter.resource-id=multitenant
jwt.auth.converter.principal-attribute=principal_username

# set up security properties to support Opaque token
spring.security.oauth2.resourceserver.opaquetoken.introspection-uri=https://api.github.com/applications/${GITHUB_APP_CLIENT_ID}
spring.security.oauth2.resourceserver.opaquetoken.client-id=${GITHUB_APP_CLIENT_ID}
spring.security.oauth2.resourceserver.opaquetoken.client-secret=${GITHUB_APP_CLIENT_SECRET}
Remember to change the values denoted by “${YOUR_VALUE_HERE}” with actual values.
Step 2: Create a JWT converter
The JWTConverter class will convert a JWT from Keycloak into Spring Boot Authentication token by extract well-known GrantedAuthority using JwtGrantedAuthoritiesConverter and custom authorities defined in application.properties file by extractResourceRoles method.
@Component
class JWTConverter implements Converter<Jwt, AbstractAuthenticationToken> {

    private final JwtGrantedAuthoritiesConverter jwtGrantedAuthoritiesConverter = new JwtGrantedAuthoritiesConverter();

    private final JwtConverterProperties properties;

    public JWTConverter(JwtConverterProperties properties) {
        this.properties = properties;
    }

    @Override
    public AbstractAuthenticationToken convert(Jwt jwt) {
        Collection<GrantedAuthority> authorities = Stream.concat(
                jwtGrantedAuthoritiesConverter.convert(jwt).stream(),
                extractResourceRoles(jwt).stream()).collect(Collectors.toSet());
        return new JwtAuthenticationToken(jwt, authorities, getPrincipalClaimName(jwt));
    }

    private String getPrincipalClaimName(Jwt jwt) {
        String claimName = JwtClaimNames.SUB;
        if (properties.getPrincipalAttribute() != null) {
            claimName = properties.getPrincipalAttribute();
        }
        return jwt.getClaim(claimName);
    }

    private Collection<? extends GrantedAuthority> extractResourceRoles(Jwt jwt) {
        Map<String, Object> resourceAccess = jwt.getClaim("resource_access");
        Map<String, Object> resource;
        Collection<String> resourceRoles;
        if (resourceAccess == null
                || (resource = (Map<String, Object>) resourceAccess.get(properties.getResourceId())) == null
                || (resourceRoles = (Collection<String>) resource.get("roles")) == null) {
            return Set.of();
        }
        return resourceRoles.stream()
                .map(role -> new SimpleGrantedAuthority("ROLE_" + role))
                .collect(Collectors.toSet());
    }
}

@Data
@Validated
@Configuration
@ConfigurationProperties(prefix = "jwt.auth.converter")
class JwtConverterProperties {

    private String resourceId;
    private String principalAttribute;
}
Step 3: Create JWT authentication manager
The class JWTAuthenticationManager will be used to authenticate any request that use JWT in its header. It first parses and verify the access token into JWT, then add custom tenant claims to distinct between tenants and convert the JWT into an Authentication object for further filters.
@Component
public class JWTAuthenticationManager implements AuthenticationManager {

    @Autowired
    JwtDecoder jwtDecoder;

    @Autowired
    JWTConverter jwtConverter;

    @Override
    public Authentication authenticate(Authentication authentication) throws AuthenticationException {
        String accessToken = (String) authentication.getCredentials();
        try {
            Jwt jwt = jwtDecoder.decode(accessToken);
            Map claims = new HashMap(jwt.getClaims());
            TokenAuthenticationManagerResolver.addCustomClaim(claims, "jwt", SecurityConfig.KEYCLOAK_PROVIDER);
            Jwt nJwt = new Jwt(jwt.getTokenValue(), jwt.getIssuedAt(), jwt.getExpiresAt(), jwt.getHeaders(), Map.copyOf(claims));
            Authentication JWTAuthentication = jwtConverter.convert(nJwt);
            return JWTAuthentication;
        } catch (JwtException ex) {
            // Keep error log short
            Logger.getLogger(JWTAuthenticationManager.class.getName()).log(Level.SEVERE, ex.getMessage());
            authentication.setAuthenticated(false);
            return authentication;
        }
    }
}
Step 4: Create class to send request to GitHub endpoint
To introspect an opaque token issue by GitHub, we need to send request to GitHub’s REST API endpoints for OAuth authorizations. As written in the documentation, introspection request needs to have:
- POST method
- Basic authentication with
client_idas the username and theclient_secretas the password. client_idin the path, i.e.https://api.github.com/applications/{client_id}/tokenaccess_tokenin the request body, i.e.{"access_token": "AccessTokenValueHere"}
The class GithubRequest provide methods to send introspection requests to GitHub API.
@Component
public class GithubRequest {

    @Value("${spring.security.oauth2.resourceserver.opaquetoken.introspection-uri}")
    private String introspectionUri;

    @Value("${spring.security.oauth2.resourceserver.opaquetoken.client-id}")
    private String clientId;

    @Value("${spring.security.oauth2.resourceserver.opaquetoken.client-secret}")
    private String clientSecret;

    private String authValue;
    private String authHeader;

    private static URI introspectionURI;
    private static URI logoutURI;

    private static final HttpClient client = HttpClient.newHttpClient();

    /**
     * Initialize variable after dependency injection is done
     *
     * @throws URISyntaxException
     */
    @PostConstruct
    private void init() throws URISyntaxException {
        authValue = clientId + ":" + clientSecret;
        authHeader = "Basic " + Base64.getUrlEncoder().encodeToString(authValue.getBytes());
        if (introspectionURI == null) {
            introspectionURI = new URI(introspectionUri + "/token");
        }
        if (logoutURI == null) {
            logoutURI = new URI(introspectionUri + "/grant");
        }
    }

    /**
     * Get a {@link HttpRequest} to GitHub API
     *
     * @param uri         the endpoint
     * @param accessToken the OAuth2 access token
     * @param httpMethod
     * @return an {@link HttpRequest}
     */
    public HttpRequest getRequest(URI uri, String accessToken, HttpMethod httpMethod) {
        HttpRequest.Builder builder = HttpRequest.newBuilder()
                .uri(uri)
                .header("X-GitHub-Api-Version", "2022-11-28")
                .header("Accept", "application/vnd.github+json")
                .header("Authorization", authHeader)
                .header("Content-Type", "application/json");

        HttpRequest.BodyPublisher body = HttpRequest.BodyPublishers.ofString("{\"access_token\":\"" + accessToken + "\"}");

        switch (httpMethod.name()) {
            case "GET" ->
                builder.GET();
            case "POST" ->
                builder.POST(body);
            case "PUT" ->
                builder.PUT(body);
            case "DELETE" ->
                builder.method("DELETE", body);
        }

        return builder.build();
    }

    /**
     * Send an request to GitHub API
     *
     * @param uri         the endpoint
     * @param accessToken the OAuth2 access token
     * @param httpMethod
     * @return an {@link HttpResponse} of type {@link String}
     * @throws java.io.IOException
     * @throws java.lang.InterruptedException
     */
    public HttpResponse<String> sendRequest(URI uri, String accessToken, HttpMethod httpMethod) throws IOException, InterruptedException, IllegalArgumentException {
        HttpRequest httpRequest = getRequest(uri, accessToken, httpMethod);
        HttpResponse<String> response = client.send(httpRequest, HttpResponse.BodyHandlers.ofString());
        return response;
    }

    /**
     * Send an introspection request to GitHub API
     *
     * @param accessToken the OAuth2 access token
     * @return an {@link HttpResponse} of type {@link String}
     * @throws java.io.IOException
     * @throws java.lang.InterruptedException
     */
    public HttpResponse<String> introspect(String accessToken) throws IOException, InterruptedException, IllegalArgumentException {
        return sendRequest(introspectionURI, accessToken, HttpMethod.POST);
    }
}
Step 5: Create an opaque token introspector
OpaqueTokenIntrospector class implements Spring Boot introspector class to introspect an opaque token through GitHub API and add custom tenant claims to the return values.
@Component
public class OpaqueTokenIntrospector implements org.springframework.security.oauth2.server.resource.introspection.OpaqueTokenIntrospector {

    @Autowired
    GithubRequest githubRequest;

    @Override
    public OAuth2AuthenticatedPrincipal introspect(String accessToken) {
        try {
            HttpResponse<String> response = githubRequest.introspect(accessToken);

            JSONParser parser = new JSONParser(response.body());
            Map<String, Object> json = parser.parseObject();

            if (response.statusCode() != 200) {
                throw new BadCredentialsException(json.get("message").toString());
            }

            TokenAuthenticationManagerResolver.addCustomClaim(json, "opaque", SecurityConfig.GITHUB_PROVIDER);

            OAuth2AuthenticatedPrincipal principal = new DefaultOAuth2AuthenticatedPrincipal(githubRequest.getClientId(), json, List.of());
            return principal;
        } catch (IOException | InterruptedException | BadCredentialsException | ParseException ex) {
            Logger.getLogger(SecurityConfig.class.getName()).log(Level.SEVERE, ex.getMessage());
            return null;
        }
    }
}
Step 6: Create opaque token authentication manager
OpaqueTokenAuthenticationManager class will be used to authenticate any request that use opaque token in its header.
@Primary
@Component
public class OpaqueTokenAuthenticationManager implements AuthenticationManager {

    @Autowired
    OpaqueTokenIntrospector opaqueTokenIntrospector;

    @Override
    public Authentication authenticate(Authentication authentication) throws AuthenticationException {
        String accessToken = (String) authentication.getCredentials();

        OAuth2AuthenticatedPrincipal principal = opaqueTokenIntrospector.introspect(accessToken);

        if (principal == null) {
            authentication.setAuthenticated(false);
            return authentication;
        }

        OAuth2AccessToken credentials = new OAuth2AccessToken(OAuth2AccessToken.TokenType.BEARER, accessToken, Instant.now(), Instant.now().plusSeconds(86400));

        BearerTokenAuthentication bearerTokenAuthentication = new BearerTokenAuthentication(principal, credentials, List.copyOf(authentication.getAuthorities()));
        return bearerTokenAuthentication;
    }

}
Step 7: Create authentication resolver class
To know which AuthenticationManager to use, the resolver will look at the access token in the Authorization header. If the access token has JWT structure, a JWT AuthenticationManager will be used, else an opaque token AuthenticationManager will be used.
@Component
public class TokenAuthenticationManagerResolver implements AuthenticationManagerResolver<HttpServletRequest> {

    public static final String TOKEN_TYPE = "token_type";
    public static final String AUTH_PROVIDER = "auth_provider";

    public static final void addCustomClaim(Map<String, Object> claimSet, String tokenType, String authProvider) {
        claimSet.put(TOKEN_TYPE, tokenType);
        claimSet.put(AUTH_PROVIDER, authProvider);
    }

    /**
     * The {@link AuthenticationManager} used for JWT
     */
    private final JWTAuthenticationManager jwtAuthenticationManager;

    /**
     * The {@link AuthenticationManager} used for opaque token
     */
    private final OpaqueTokenAuthenticationManager opaqueTokenAuthenticationManager;

    @Autowired
    public TokenAuthenticationManagerResolver(JWTAuthenticationManager jwtAuthenticationManager, OpaqueTokenAuthenticationManager opaqueTokenAuthenticationManager) {
        this.jwtAuthenticationManager = jwtAuthenticationManager;
        this.opaqueTokenAuthenticationManager = opaqueTokenAuthenticationManager;
    }

    @Override
    public AuthenticationManager resolve(HttpServletRequest context) {
        String authHeader = context.getHeader("Authorization");
        if (authHeader == null) {
            return null;
        }
        String token = authHeader.split(" ")[1];
        if (token.split("\\.").length > 1) {
            System.out.println("Decode JWT with " + jwtAuthenticationManager.getClass().getSimpleName());
            return jwtAuthenticationManager;
        } else {
            System.out.println("Decode Opaque token with " + opaqueTokenAuthenticationManager.getClass().getSimpleName());
            return opaqueTokenAuthenticationManager;
        }
    }
}
Step 8: Create the security config class
@RequiredArgsConstructor
@Configuration
@EnableWebSecurity
@EnableMethodSecurity
public class SecurityConfig {

    public static final String GITHUB_PROVIDER = "github";
    public static final String KEYCLOAK_PROVIDER = "keycloak";

    @Autowired
    private TokenAuthenticationManagerResolver authenticationManagerResolver;

    @Bean
    public SecurityFilterChain securityFilterChain(HttpSecurity http) throws Exception {
        http.authorizeHttpRequests((req) -> req
                .requestMatchers("/actuator/*").permitAll()
                .requestMatchers("/public").permitAll()
                .anyRequest().authenticated());
        http.csrf((t) -> t.disable());
        http.sessionManagement(sess -> sess.sessionCreationPolicy(SessionCreationPolicy.STATELESS));
        http.oauth2ResourceServer(oauth2 -> oauth2.authenticationManagerResolver(authenticationManagerResolver));
        return http.build();
    }

}
Step 9: Create a REST endpoint
Create two simple REST endpoints, one public and one require token, for testing. The endpoints will be in the same class as the main application.
The public endpoint (/public) will simply return hello phrase.
The secure endpoint (/secure) will print out the token attributes and return hello phrase with the provider that authenticate the access token.
@SpringBootApplication
@RestController
public class MultiTenantApplication {

    public static void main(String[] args) {
        SpringApplication.run(MultiTenantApplication.class, args);
    }

    @GetMapping("/secure")
    public String home(AbstractOAuth2TokenAuthenticationToken authentication) {
        System.out.println("---------------");
        Map<String, Object> attributes = authentication.getTokenAttributes();
        attributes.forEach((t, u) -> {
            System.out.println(t + ": " + u);
        });
        System.out.println("---------------");
        String provider = (String) attributes.getOrDefault("auth_provider", "none");
        return "Hello using " + provider + " provider";
    }

    @GetMapping("/public")
    public String noAuth() {
        return "Public Hello to all";
    }

}
7. Testing
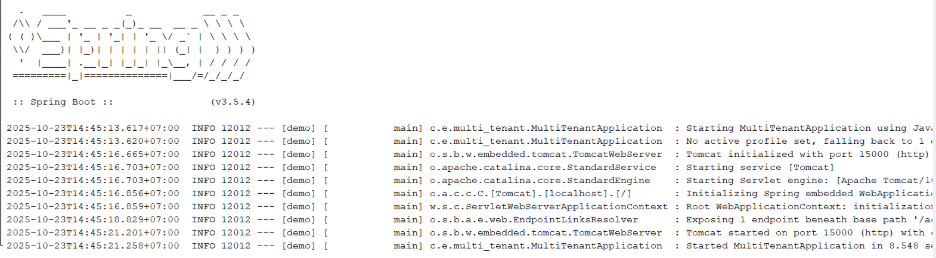
First, start up the Spring Boot app:
Test #1: Hitting the secure endpoint with no token
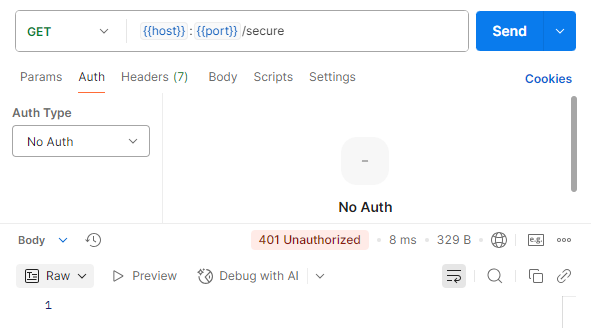
We see status 401 Unauthorize, which is correct.
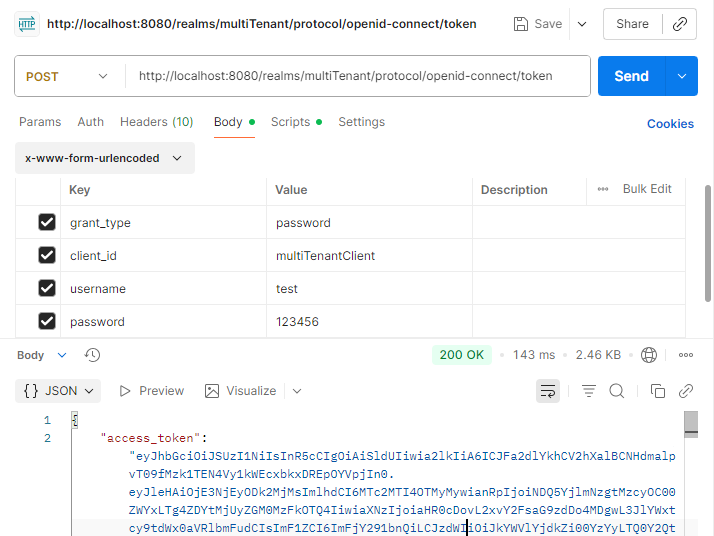
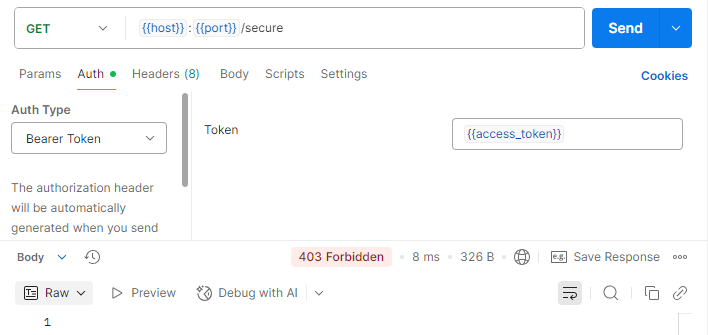
Test #2: Using JWT
First, we get the JWT from Keycloak:
Then, set the Authorization to Bearer Token
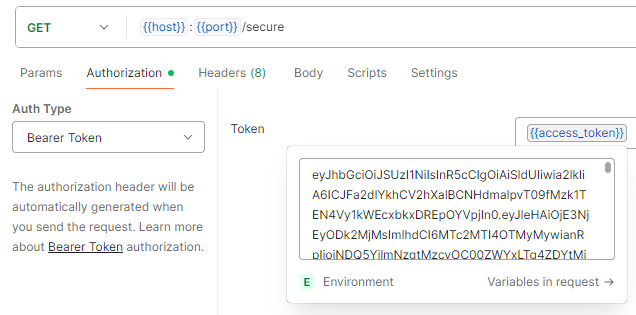
and send the request:
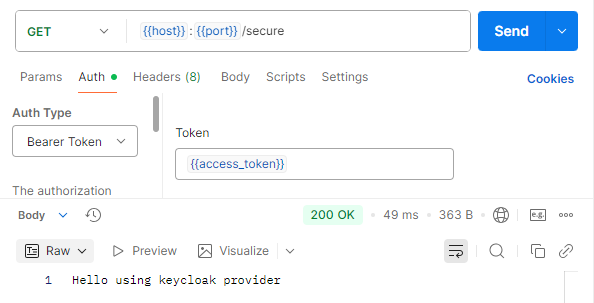
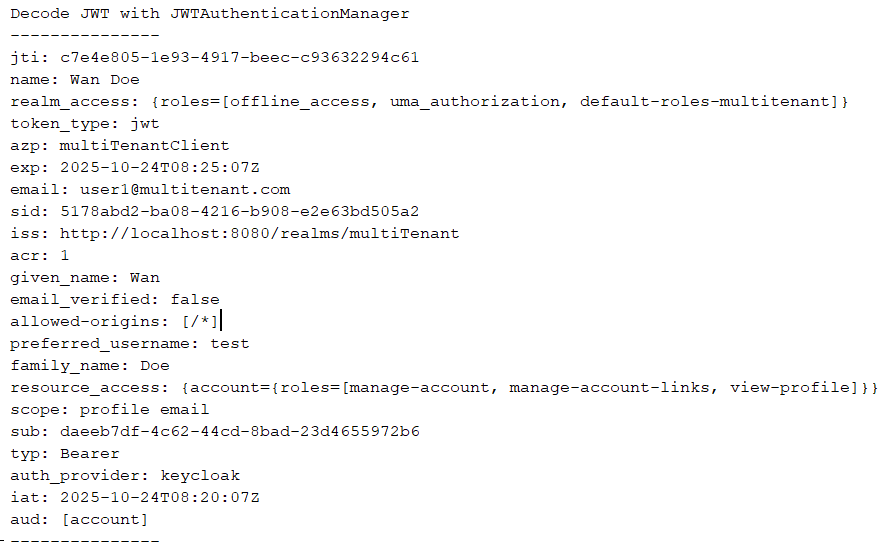
We successfully send the request. In the server, info about the JWT was printed:
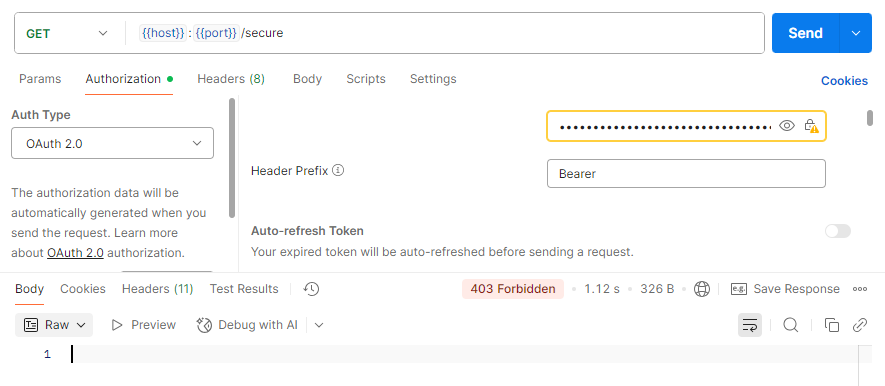
Test #3: Using opaque token
First, set the Authorization to OAuth 2.0, which will have the token we have gotten from GitHub when we set up the OAuth app.
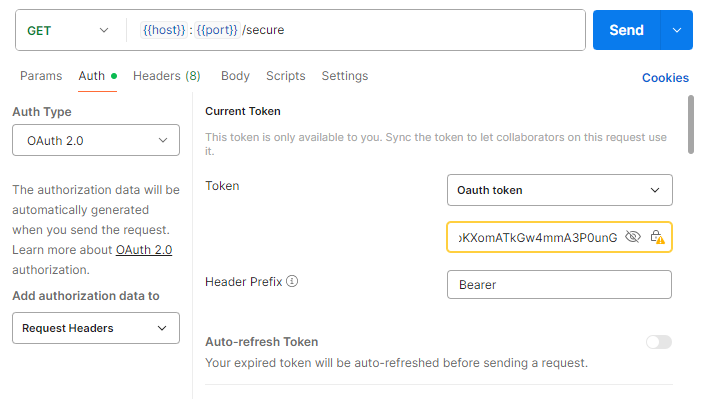
and send request:

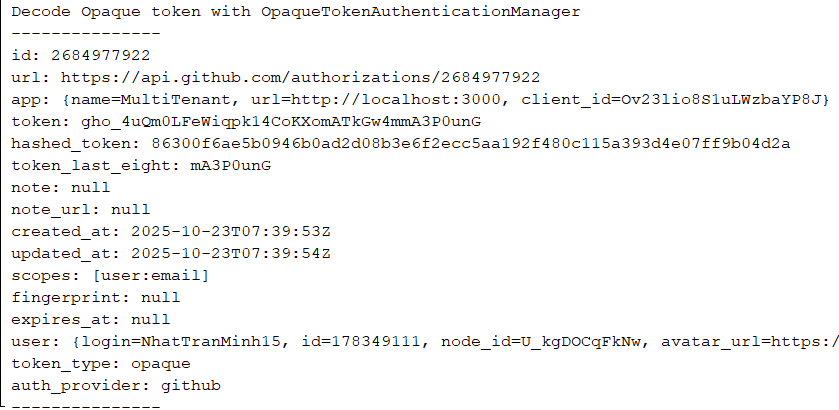
We successfully send the request. In the server, info about the opaque token was printed:
Test #4: Call public API endpoint:
Change the request to /public with no Authorization and send:
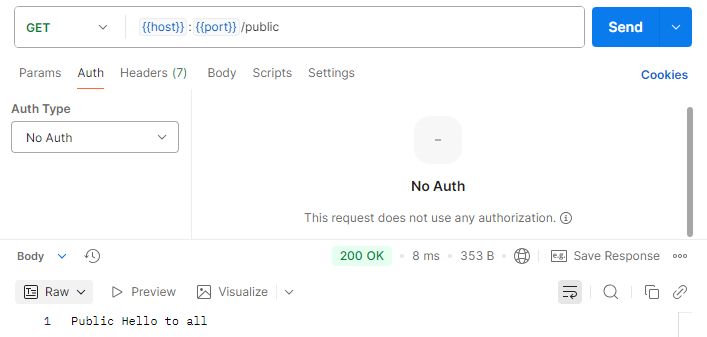
We successfully send the request without any token.
Test #5: Send request with expired JWT
First, wait a few minutes for the JWT to expired, then send the request to /secure API:
We get 403 Forbidden, which is correct, and in the server, an error was logged:

Test #6: Send request with logout user
First, go to the GitHub OAuth app, and click Revoke all user tokens. This will force all user to re-login to the application. Then, send a request like test #3:
We get 403 Forbidden, which is correct, as our token no longer valid. In the server, we see Not Found error, which indicate Resource not found, as per GitHub documentation.

8. Conclusion
In this blog, we have look at a simple example to support 2 authentication providers within a Spring Boot OAuth Resource Server. This is a foundation to extend the server further with more providers and implement role-based access control, which provide fine-gain control over our resources and improve overall security.
9. Reference
Integrating Keycloak Authentication with Spring Boot: A Complete Guide | by Isuru Aravinda | Medium