


mabl – AI in software testing is the top trend in test automation tools. I am going to go very basic step by step so do not worry if you have never worked with any automation tool. Let’s get started with “What is mabl?”.
1. What is mabl?
mabl is indeed a low-code software testing platform that provides a comprehensive suite of features for automated testing across various dimensions, including browser, API, accessibility, performance, and responsive testing.
The mabl Trainer is a key component of the platform that empowers users to create and maintain automated tests.
mabl’s integration of AI and machine learning enables it to deliver faster, more reliable end-to-end test coverage while minimizing manual effort and maximizing test effectiveness.
2. Sign up an mabl account
You can access to mabl website at https://www.mabl.com/.
Register for mabl’s 14 day free trial account with business email.

You need to confirm and process to set password via the email.

3. Install mabl application
When you finish confirming the account, mabl will navigate you to mabl download page.

Download the suitable mabl application for your operating system.
After installation, log in to access the platform. Start with create an application and environment.

4. Creating an applications and environments
4.1 Applications
Applications in mabl represent the list of applications you are testing.
For create application, clicking on Configuration menu on the left side of the mabl trainer.
Click on New application button.

When you create a new application, mabl adds two default plans and tests to the workspace.
4.2 Environments
Environments in mabl are aligned with your development environment where you deploy your code to, such as Dev, Testing, Staging, and Production.
While creating an application, mabl asks to create new environment or choo existing environment.
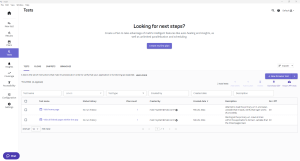
5. Creating tests
After creating an application and environment, we start testing. There are some testing types with mabl:
- Browser tests
- API tests
- Data-driven testing
- Accessibility testing
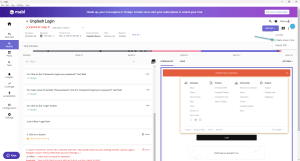
For this article, I focus on Browser tests, I’m creating simple tests that validate Login and Sign up an account first.
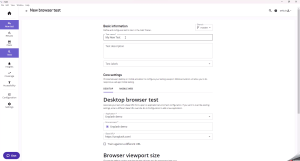
5.1 Creating a new browser test
To create a new browser test, click on New test and choose Browser test.
Input Test name, Description, Test labels. Label for distinguishing the practice tests.
Select device: Desktop or Mobile web.
Select plan.
After creating test, a Chrome browser is opened to the test site with mabl Trainer windows and default steps.

5.1.1 Recording Test
Use mabl’s recording feature to record your test scenarios.
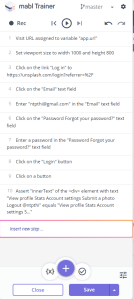
On mabl Trainer, click on Rec button, do the step you need to mabl Trainer to record your test scenarios. If you want to stop the recording, click on Rec again.

5.1.2 Adding steps
After recording, you can enhance your tests by adding steps such as assertions, validations, and conditions to ensure they accurately reflect your desired behavior.
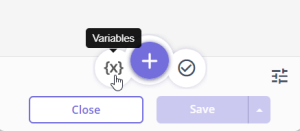
5.1.2.1 Variable
Variables help to test scenarios that require a variety of dynamic values and shorten the tests by passing variables in between one another. By adding variables, click on the {x} icon in mabl Trainer to create, manage, and use variables in the test.
The following variables source in mabl:

- String template: Using string template variables to create strings from constant values, other variables, random values, or mathematical expressions.

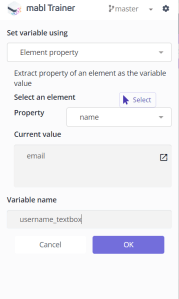
- Element properties: Using element property variables to extract a property from an element on the page and store it in a variable.
- Custom JavaScript code: We can generate variable values from custom JavaScript snippets.

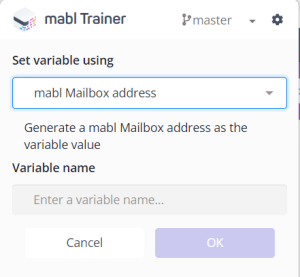
- mabl mailbox address: Allows users to generate an email address specifically for email testing purposes.
- Cookie value: You can effectively find a cookie by name and use its value as a variable in your mabl tests, even if the cookie is an HTTP Only cookie that is not accessible via JavaScript snippets. This allows you to incorporate authentication-related functionality into your automated testing workflows with ease and reliability.

5.1.2.2 Assertions
When creating an assertion in mabl, you are defining the criteria or conditions that mabl should use to validate whether your application is in the expected state at a particular step during a test run. In a mabl browser test, you can make assertions against the following:
- Elements on the page
- The page URL
- Cookies
- Variables
- File downloads
By adding assertion, click on the checkmark icon in mabl Trainer to create, manage, and use assertion in the test.
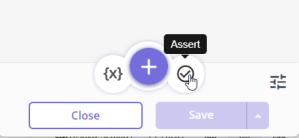
After clicking on checkmark icon, select an element you want to assert on.

After that, you can configure assertion details and indicate what should happen if the assertion fails.

5.1.3 Parameterize Your Tests
Make your tests more versatile by parameterizing them. This allows you to reuse the same test with different data inputs. To increase test scalability, maximize test maintenance efforts, and build a library of frequently used test steps, we use flows or loops.
5.1.3.1 Flows
Reusable flows are not supported by mabl for API tests.
For creating a flow, click on + icon in mabl Trainer to add step then click on Create a flow and input flow name.


Once the flow has been added, the step can be moved by dragging and dropping it into the flow and update default parameter values.


For managing parameters in flow, we edit flow, click on Parameters tab.

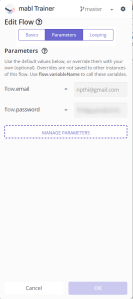
For using parameter in flow, we edit step in the flow, select parameter in variable option.


Loops will detail in the upcoming session.
5.1.4 Runing tests
Once your tests are ready, execute them against your chosen environments. mabl will simulate user interactions and report any issues it encounters.
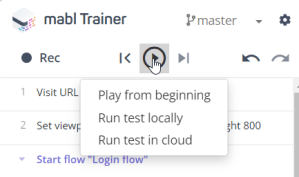

You can run the tests by clicking on the play icon and selecting the run options:
- Play from beginning.
- Play from cursor If the cursor is not at the step’s conclusion.
- Play through here and Play step by clicking on “…” more action icon in each step.
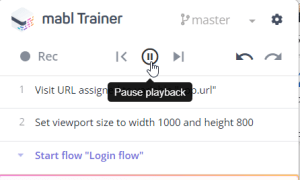
Clicking on Pause Trainer reply button to pause to stop running step.
6. Creating plans
After creating some tests, collect the test in a test plan.
Click on Plans menu on the left side of the mabl apps.
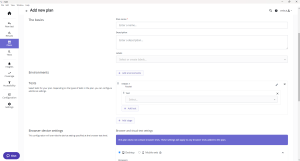
- The basics: A plan’s name, description, and labelling are among its essential details.
- Environment: The environment is necessary for a plan such as: web URLs, API URL.
- Tests: Selects the tests on each stage depending on each test type for a plan. The selected tests are run in parallel in one stage. We can configure single or multiple stages.
- Browsers device setting: We should configure details for desktop or mobile testing for a plan.
- Triggers: We can trigger a plan on a schedule, by deployment or on a time for a plan

7. Set up integrations
mabl integrates easily with Github, Slack, Jira, and Bamboo….
7.1 Jira integration
Create and link a Jira issue for a failure test by integrating mabl with Jira.
For integrating Jira, click on Settings, click on Setup button on Jira Cloud or Server. After integration successful, we see the list of active services under Active integrations section.

8. Analyze Test Results
Review the test results to identify any failures or regressions. mabl provides detailed reports and insights to help you diagnose and resolve issues quickly.
8.1 Report Jira issue
To report a Jira issue in mabl, click on Results menu, click on “…” more action and select Create issue in Jira.
We can link Jira issue with create new or link existing issue.
For example, I create new Jira issue. The project name is automatically populated.
We select issue type such as Bug.

Enter issue information such as summary, description …. Then click on Submit button.

The Jira ticket is created successfully and linked to the failed step.

The Jira ticket in Jira system.

Conclusion
By following the step-by-step tutorial, you’ve laid a solid foundation for leveraging mabl effectively in your automated testing efforts. From test creation using the mabl Trainer to enhancing tests with assertions and integrating mabl with Jira for streamlined issue tracking, you’ve gained valuable insights into optimizing your testing processes. Let’s discover more in the next session.