


In this blog, we will see how Openkruise extends the features of a generic deployment in Kubernetes by introducing a CloneSet.
There are so many features of Cloneset, but we will cover just one of them in this blog. Do follow this series of Openkruise to know more about Advanced Workloads provided by Openkruise.
Pre-requisites:
- Kubernetes cluster (>=1.16)
- Helm v3 installed
Install helm v3:
curl –fsSL -o get_helm.sh https://raw.githubusercontent.com/helm/helm/master/scripts/get-helm-3
chmod 700 get_helm.sh
./get_helm.sh
Install Openkruise:
We will begin by installing openkruise and its related components via helm. Use the following cli commands to install Openkruise:
- Add the helm repository
helm repo add openkruise https://openkruise.github.io/charts/ - Install the latest version of kruise
helm install kruise openkruise/kruise –version 1.5.2# You can check the official doc to see the latest version
- Install the Kruise state metrics
helm install kruise-state-metrics openkruise/kruise-state-metrics –version 0.1.0
Openkruise: Cloneset
It’s like a more advanced version of a common tool called Deployment, which is used to managed these kinds of applications. But CloneSet does a lot more than Deployment. It offers extra features and capabilities that make it even better suited for handling these stateless applications, especially in large-scale environments. It manages the pod directly without the need for relicaset or replication controller.
Scale Features of Cloneset
Selective Pod Deletion
Now this might not be of much interest to many people, but it is indeed something that can be useful in some of the use-cases. Let’s suppose you have a deployment with 4 replicas which you want to scale down to 3, but you want a specific replica pod to go down. If you scale down the replicas of the deployment, Kubernetes automatically picks one pod and removes it from the workload. In case, you want to decide which one it should pick and remove, you can use a Cloneset instead of Deployment for it. Lets see how it works:
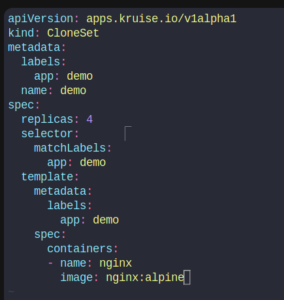
Consider this definition of CloneSet:
apiVersion: apps.kruise.io/v1alpha1
kind: CloneSet
metadata:
labels:
app: demo
name: demo
spec:
replicas: 4
selector:
matchLabels:
app: demo
template:
metadata:
labels:
app: demo
spec:
containers:
– name: nginx
image: nginx:alpine
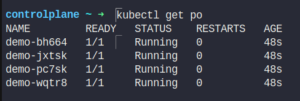
kubectl apply -f cloneset.yaml
![]()
kubectl get po
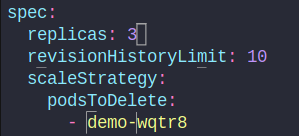
Let’s specify a pod to be deleted during scale down. We will add this snippet in the cloneset as:
kubectl edit cloneset demo
replicas: 3
  scaleStrategy:
    podsToDelete:
    - demo-wqtr8
Save the changes. Check the pods in the default status.
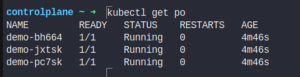
As you can see the pod which I specified to delete in the CloneSet is deleted when scaling down.
Hey, readers! Thank you for sticking up till the end. This was a brief on spinning AWS resources using Spacelift and Terraform. If you have any questions/feedbacks regarding this blog, I am reachable at vidushi.bansal@nashtechglobal.com. You can find more of my blogs here.