


Introduction
In Kubernetes, managing and expanding Persistent Volumes (PVs) is crucial for maintaining optimal storage solutions. This guide will walk you through the process of persistent volume management and expansion in Azure Kubernetes Service (AKS) using Azure File Share as the storage backend. We’ll cover the necessary steps, provide code snippets, and offer insights to ensure a smooth experience. This article will explore the utilization of Azure File as an adaptable storage solution for applications running in Kubernetes. The following activities will be covered in detail:
- Create an Azure Kubernetes Service (AKS) cluster.
- Establish an Azure File Share and a Persistent Volume (PV).
- Create a Persistent Volume Claim (PVC).
- Expand and resize the Persistent Volume Claim.
- Test the Application.
Kubernetes supports the creation of volumes in two distinct modes:
Static mode: In this mode, volumes are manually created and referenced in the Pod specification.
Dynamic mode: In dynamic mode, AKS automatically creates volumes and associates them with Persistent Volume Claims (PVCs) using specifications defined within the cluster.
Prerequisites
Before embarking on this journey, make sure you have the following prerequisites in place:
- An active Azure Kubernetes Service (AKS) cluster.
- A provisioned and accessible Azure File Share.
- A Kubernetes secret to access fileshare.
Statically provision a volume:
Mount file share as a persistent volume->
let’s create a Persistent Volume (PV) statically linked to your Azure File Share. This PV will act as the underlying storage entity for your applications. Create a file named pv.yaml :
apiVersion: v1
kind: PersistentVolume
metadata:
  annotations:
    pv.kubernetes.io/provisioned-by: file.csi.azure.com
  name: azurefile-pv
spec:
  capacity:
    storage: 5Gi
  accessModes:
    - ReadWriteMany
  persistentVolumeReclaimPolicy: Retain
  storageClassName: azurefile-csi
  csi:
    driver: file.csi.azure.com
    volumeHandle: MC_RG-Devops_01_aks-01_eastus#pvccapacity01#filestore-one#azurefile-pv  # make sure this volumeid is unique for every identical share in the cluster
    volumeAttributes:
      #resourceGroup: MC_RG-Devops_01_aks-01_eastus  # optional, only set this when storage account is not in the same resource group as node
      shareName: filestore-one
    nodeStageSecretRef:
      name: azure-secret #Kubernetes needs credentials to access the file share created in the previous step. These credentials are stored in a Kubernetes secret, which is referenced when you create a Kubernetes pod.
      namespace: default
  mountOptions:
    - dir_mode=0777
    - file_mode=0777
    - uid=0
    - gid=0
    - mfsymlinks
    - cache=strict
    - nosharesock
    - nobrl
Create the persistent volume using the kubectl create command.
kubectl create -f pv.yaml
Let’s create PersistentVolumeClaim (PVC) linked to the previously defined PV. This PVC represents the storage needs of your applications. Create a file named pvc.yaml:
apiVersion: v1
kind: PersistentVolumeClaim
metadata:
  name: azurefile-pvc
spec:
  accessModes:
    - ReadWriteMany
  storageClassName: azurefile-csi
  volumeName: azurefile-pv
  resources:
    requests:
      storage: 5Gi
Create the persistent volume claim using the kubectl create command.
kubectl create -f pvc.yaml
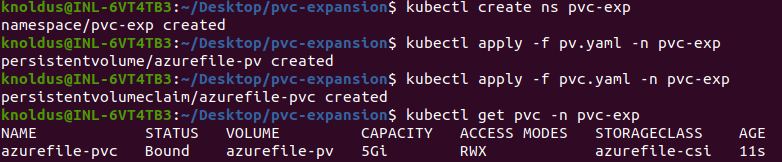
We can verify if our PersistentVolumeClaim is created and bound to the PersistentVolume.
Let’s deploy a sample nginx pod and use the persistent volume and do some changes in the application and then we will expand the size of the Persistent volume and see if the changes get persisted. let’s create a deploy.yaml file:
apiVersion: v1
kind: Pod
metadata:
  name: nginx-pod
spec:
  volumes:
    - name: azurefile-pvc
      persistentVolumeClaim:
        claimName: azurefile-pvc
  containers:
    - name: nginx-container
      image: nginx:latest
      ports:
        - containerPort: 80
          name: "http-server"
      volumeMounts:
        - mountPath: "/usr/share/nginx/html"
          name: azurefile-pvc

Now let’s add a file to the volume mounted on the pod and try to access it via the NGINX running on the pod. Now we will create a index.html file write some custom text to it. Take note of the path to the “index.html” file within the PV. Understanding this path is crucial, as NGINX will serve the file to clients at a specific endpoint.
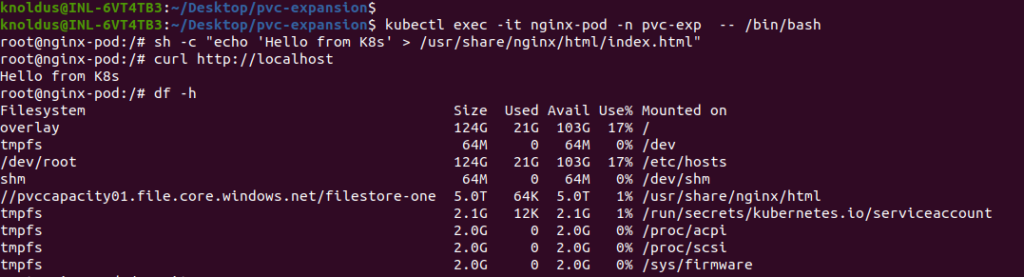
By following above steps, you’ve effectively interacted with the containerized environment, modified the content served by NGINX, and verified the changes by making a request to the NGINX endpoint.
Resize the PV and PVC by creating a new PV and PVC:
We will resize the PV and PVC by creating a new Persistent Volume and Persistent Volume Claim, but this time we will create with bigger storage. Before we claimed 5Gi in PVC but in new PVC we will take 10Gi for expansion.
Why We Can’t Resize Old PVC:
Resizing Persistent Volumes (PVs) and Persistent Volume Claims (PVCs) that are statically created is often not supported due to the nature of how these resources are provisioned.
When a PV is statically created, its storage capacity is typically set during the initial configuration. This fixed size is associated with the underlying storage resource (such as an Azure File Share or a physical disk). Once a PV is bound to a PVC, the capacity is effectively locked to the specified size, and attempts to resize it might not be supported by the underlying storage system.
Similarly, when a PVC is bound to a statically provisioned PV, it inherits the size of the PV. Attempting to resize the PVC directly might not be possible because it would require changing the size of the associated PV, which is not always supported.
Here are a few reasons why resizing statically provisioned PVs and PVCs is challenging:
Underlying Storage Constraints:
The size of the PV is often determined by the underlying storage system’s configuration. Some storage solutions might not support dynamic resizing.
Provisioning Model:
Statically provisioned PVs are often created with fixed sizes, and the concept of dynamic resizing however might not align with the provisioning model.
Data Integrity and Safety:
Resizing storage however involves complex operations that can impact data integrity and safety. Storage providers might restrict dynamic resizing to avoid potential issues.
While dynamic resizing is a feature supported in some storage systems and with dynamically provisioned PVs and PVCs, it might not be universally applicable to all storage solutions. Therefore If resizing is a critical requirement, it’s advisable to consider using dynamic provisioning with storage classes that support dynamic resizing capabilities.
Create new PV and PVC for Resizing:
Let’s create a persistent volume file pv2.yaml-
apiVersion: v1
kind: PersistentVolume
metadata:
  annotations:
    pv.kubernetes.io/provisioned-by: file.csi.azure.com
  name: azurefile-pv2
spec:
  capacity:
    storage: 10Gi
  accessModes:
    - ReadWriteMany
  persistentVolumeReclaimPolicy: Retain
  storageClassName: azurefile-csi
  csi:
    driver: file.csi.azure.com
    volumeHandle: MC_RG-Devops_01_aks-01_eastus#pvccapacity01#filestore-one#azurefile-pv2  # make sure this volumeid is unique for every identical share in the cluster
    volumeAttributes:
      shareName: filestore-one
    nodeStageSecretRef:
      name: azure-secret
      namespace: default
  mountOptions:
    - dir_mode=0777
    - file_mode=0777
    - uid=0
    - gid=0
    - mfsymlinks
    - cache=strict
    - nosharesock
    - nobrl
persistent volume claim pvc2.yaml –
apiVersion: v1
kind: PersistentVolumeClaim
metadata:
  name: azurefile-pvc2
spec:
  accessModes:
    - ReadWriteMany
  storageClassName: azurefile-csi
  volumeName: azurefile-pv2
  resources:
    requests:
      storage: 10Gi
Now let’s create these PV and PVC using kubectl apply command. After creating these, now we just need to connect our NGINX pod to this PV and PVC. For that We must recreate the pod so that changes can take effect.
apiVersion: v1
kind: Pod
metadata:
  name: nginx-pod
spec:
  volumes:
    - name: azurefile-pvc2
      persistentVolumeClaim:
        claimName: azurefile-pvc2
  containers:
    - name: nginx-container
      image: nginx:latest
      ports:
        - containerPort: 80
          name: "http-server"
      volumeMounts:
        - mountPath: "/usr/share/nginx/html"
          name: azurefile-pvc2
Let’s check now if the pod is recreated and our data is persisted and our pod is using new PVC for volume mount.
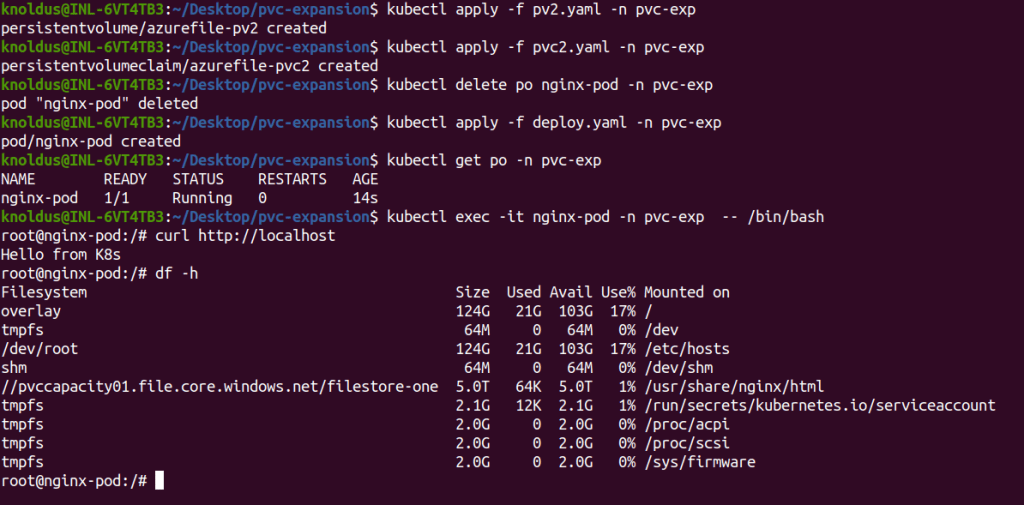
So we can see that our pod’s data is persisted and using “df -h” command we can see our fileshare “//pvccapacity01.file.core.windows.net/filestore-one” used in both PVs. So we successfully expand our PV capacity by creating a new Persistent volume and Persistent volume claim and mounting on Fileshare.
Conclusion
In conclusion, mastering Persistent Volume management and expansion in Azure Kubernetes Service with Azure File Share provides you with a robust foundation for your storage needs. This guide empowers you to navigate the complexities of AKS storage, so that you can ensure a scalable and efficient Kubernetes experience. Always tailor the configurations to your specific use case and environment, and consider testing changes in a controlled setting before deploying to production. Elevate your AKS storage management with adaptability.
Reference
https://learn.microsoft.com/en-us/azure/aks/azure-csi-files-storage-provision