


Front-end developers often shy away from backend development due to the perceived complexity of setting up servers, databases, and APIs. PocketBase aims to change that. PocketBase is an open-source backend in one tiny file that provides database, authentication, real-time data, file storage, and a web dashboard – all without you writing a single line of backend code. In this guide, I’ll introduce PocketBase’s key features and walk through building a simple Todo app with PocketBase as the backend. You’ll learn how to install PocketBase, understand its basic concepts (collections, auth, realtime), and integrate it with a frontend (using plain HTML/JS or your framework of choice) for full CRUD functionality. By the end, you’ll see why PocketBase is perfect for quick prototypes and solo projects.
CAUTION ⚠️: As of the time this blog is written (December 01st, 2025), PocketBase is still in the development phase and not yet in a stable release. So be cautious when using it in production.
What is PocketBase and Why Use It?
PocketBase is an all-in-one backend server packaged as a single executable (built in Go). Despite its small size, it rolls together a database, REST API, user authentication, real-time updates via WebSockets, and file storage into one solution. In other words, it provides all the typical backend services (database, auth, file uploads, etc.) that a modern app needs, but with minimal setup.
Key features of PocketBase include:
- Embedded Database (SQLite) – Your data is stored in a local SQLite database, so you don’t need to set up MySQL or Postgres. Collections in PocketBase are essentially database tables under the hood.
- REST-ish API – For every collection you create, PocketBase automatically exposes a full set of HTTP REST endpoints for CRUD (Create, Read, Update, Delete) operations. You can query, filter, and sort results with ease.
- Built-in Authentication – PocketBase comes with built-in email/password auth (and even OAuth2 integration for Google, GitHub, etc. if you need it). It has a special
userscollection out of the box for managing user accounts, including verification and password handling. - Real-time Subscriptions – Clients can subscribe to real-time updates on any collection or record. When something changes (create, update, delete), PocketBase will instantly notify subscribed clients over a WebSocket (SSE) connection. This is great for live dashboards, chats, or collaborative apps that need instant updates.
- Admin Dashboard UI – PocketBase provides a web-based admin dashboard (no extra coding needed) where you can visually manage your backend: create collections and fields, view and edit records, set access rules, manage files, and more. This is perfect for frontend devs, as you can configure your backend through a friendly UI rather than code.
- File Storage – You can upload and serve files (images, etc.) via PocketBase’s API. It handles storing the files on disk and referencing them in records.
- Single Binary & Cross-Platform – PocketBase runs from a single file you download. It works on Windows, macOS, and Linux. You can even run it on a Raspberry Pi or embed it in a Go app. Deployment is as simple as running that one file on a server.
- Extensibility – For advanced use cases, PocketBase can be extended with custom code (in Go or JavaScript) if needed. But for most needs (especially prototypes or simple apps), you won’t have to write any backend code at all.
Why is this useful for frontend developers? If you know how to build UIs but feel less confident setting up a backend, PocketBase offers a plug-and-play backend for your project. You don’t need to configure servers, databases, or authentication systems individually – PocketBase gives you all that out of the box. You can focus on the frontend and just consume the PocketBase API for data. In short, PocketBase lets you spin up a backend in minutes, so you can focus on building features rather than infrastructure.
Tip: PocketBase is especially great for prototyping, MVPs, small apps, and solo projects. Instead of setting up a complex stack (Node.js, Express, PostgreSQL, etc.), you run one PocketBase file and get going. If your project later grows big, you can migrate to a heavier stack, but PocketBase lets you get started fast without worrying about backend maintenance.
Installing and Running PocketBase Locally
Let’s get PocketBase running on your machine. The setup is incredibly simple:
- Download the PocketBase binary for your OS. Visit the official PocketBase download page and grab the latest release for Windows, macOS, or Linux (it’s a ZIP file around 10–12 MB). Unzip the file – inside, you’ll find the
pocketbaseexecutable (orpocketbase.exeon Windows). - Run the PocketBase server by opening a terminal/command prompt in the extracted folder and running:
./pocketbase serve(On Windows, you might double-click or usepocketbase.exe serve.) PocketBase will start a local web server on port 8090 by default. - Create the admin account. On first run, PocketBase will output an installer link and automatically open your browser to create your initial admin (superuser) account. Just enter an email and password for your PocketBase admin. (If the browser doesn’t open, you can visit
http://127.0.0.1:8090/_/manually to access the web dashboard.)
If everything went well, your terminal should show something like this:
> Server started at: <http://127.0.0.1:8090>
  - REST API: <http://127.0.0.1:8090/api/>
  - Dashboard: <http://127.0.0.1:8090/_/>
(These are the default addresses when running locally.)
PocketBase is now up and running! You have a fully functional backend server on 127.0.0.1:8090. Let’s break down what’s available:
- Admin UI: Open
http://127.0.0.1:8090/_/in your browser. This is the PocketBase Dashboard where you (as admin) can configure the backend. When you log in with the admin credentials you just set, you’ll see an interface to create collections, manage records, users, files, settings, etc.
")
- API Endpoint: The base URL for the API is
http://127.0.0.1:8090/api/. All data operations (e.g., creating or reading records) go through this RESTful API. You can interact with it via HTTP calls or using the provided SDKs. - Data & Migrations Folders: PocketBase created a
pb_data/folder (for the SQLite database and files) and apb_migrations/folder (to track schema changes) in the same directory as the executable. You usually don’t need to touch these, but it’s good to know where your data lives (for backups, etc.).
So far, you didn’t write any code or install a DB – PocketBase handled it. Next, let’s understand some core concepts (collections, auth, realtime) before diving into building the Todo app.
PocketBase Basics: Collections, Users, and Real-Time Updates
Before writing our Todo app, let’s cover a few PocketBase fundamentals in simple terms.
Collections (Data Storage)
A Collection in PocketBase is like a table in a database – it defines a type of data you want to store. Each collection has a name and a set of fields (columns). For example, you might have collections like “products”, “posts”, or “todos” to store different entities. Under the hood, PocketBase uses SQLite, and each collection corresponds to a SQLite table with the defined fields.
Each individual entry in a collection is called a Record (analogous to a row in a table). Records are just JSON objects when you access them via the API. For instance, a record in a “todos” collection might look like:
{
  "id": "jv1rdz24sgp0xbn",       // unique ID of the record
  "text": "Buy groceries",      // a text field
  "done": false,                // a boolean field
  "created": "2025-11-17 09:00:00.123Z",  // timestamps are included
  "updated": "2025-11-17 09:00:00.123Z"
}
Creating collections: You can define collections and their fields easily through the PocketBase Admin UI. (You can also do it via code or migration scripts, but using the dashboard is easier for beginners.) For example, in the dashboard you might create a collection “todos” with fields: text (Text type) and done (Boolean type). PocketBase will automatically generate the SQLite table and API endpoints for this collection once you save it.
Collection Types: PocketBase has three types of collections:
- Base collections – the default, used for any generic data (like our todos, posts, etc.).
- Auth collections – special collections for managing users (see next section). The default “users” collection that comes with PocketBase is an auth collection. These have built-in fields for email, password, verification, etc., and support login/out.
- View collections – read-only collections defined by an SQL query (advanced use case, e.g. for analytics or reports). Beginners can ignore this.
Access rules: By default, collections are locked down (only the admin can access them via the API) until you set rules. PocketBase allows you to define API rules for each collection action (list, view, create, update, delete) to control who can do what. For example, you could set the rules so that only authenticated users can create or view records, or even that users can only see their own records. For simplicity, you can also make a collection public by leaving the rule empty (meaning any user or guest can perform that action). We’ll see an example of setting a collection to public for our Todo app demo (so that we don’t need a login to use it initially).
User Authentication
PocketBase includes a built-in user management system via special Auth collections. Out of the box, your PocketBase instance has a default auth collection called “users”. This works like a typical user table: it has fields for email, password, etc., and PocketBase provides ready-made APIs for user registration, login (authentication), password reset, and even OAuth2 login options.
For frontend devs, this means you don’t have to roll your own auth. You can allow users to sign up and log in by calling the PocketBase API. If using the JavaScript SDK, it’s as simple as:
const pb = new PocketBase('<http://127.0.0.1:8090>');
// Logging in an existing user:
const authData = await pb.collection('users').authWithPassword('user@example.com', 'password123');
The authWithPassword function will verify the credentials and return auth data (including a token). The SDK then stores the auth token for you (in pb.authStore) so that subsequent requests are authenticated. PocketBase uses a token-based stateless auth (no sessions on the server) – essentially, the client stores a token and sends it with API calls. Logging out is just a matter of clearing that token on the client side (e.g. pb.authStore.clear()).
Signup is similarly easy: you can create a new user record in the “users” collection (via the API or admin UI) and PocketBase will handle hashing the password, verification emails (if enabled), etc. The admin UI also lets you manually add users if needed.
For our simple Todo app example, we might not require users to log in (we could make the todo collection publicly accessible for simplicity). But keep in mind that PocketBase makes it straightforward to secure data per user. You can, for instance, add a relation field to link a todo to a user, and set a rule that users can only access their own todos (using a rule like author = @request.auth.id to allow only the owner). The built-in auth gives you a path to multi-user apps with minimal effort.
Real-time Updates
One of the coolest features of PocketBase is real-time data subscriptions. Your frontend can subscribe to changes in the database and get notified instantly when something changes, without polling. Under the hood this uses Server-Sent Events (SSE) (a type of WebSocket connection) to push events to clients.
How it works in practice: from the client side (using the JS SDK), you can subscribe to a collection or a specific record. For example:
// Subscribe to *all* changes (create/update/delete) in the "todos" collection:
pb.collection('todos').subscribe('*', function(e) {
    console.log("Change detected:", e.action, e.record);
    // e.action will be 'create', 'update', or 'delete'
    // e.record will contain the new or updated record data (or the deleted record's last state)
});
This one line establishes a live connection. Whenever a todo is added, edited, or deleted by any client, our subscribed callback will fire with details of the change. We could use this to, say, automatically update the UI list of tasks when someone else adds a task (or when we add one from another tab).
PocketBase manages the realtime connection and reconnection for you in the SDK – it’s very handy for building reactive UIs. Just keep in mind that the same access rules apply: if you subscribe to a full collection ("todos" with "*" wildcard), the server will respect the collection’s ListRule to decide if you should receive an event. (For instance, if the collection is only accessible to logged-in users, you need to be authenticated before subscribing to get events.)
Now that we have a grasp of these concepts, let’s put them into action by creating our Todo app backend and connecting a frontend to it.
Tutorial: Building a Simple Todo App with PocketBase (Step by Step)
In this section, we’ll build a minimal Todo list application using PocketBase as the backend. The backend will store our todos and handle CRUD operations (and we’ll enable realtime updates for fun), while the frontend will be a simple HTML/JavaScript app (you can use React/Vue/etc. if you prefer, but we’ll keep it framework-free for clarity).
Scenario: Our Todo app will have a single list of tasks (not per user, to keep it simple). We want to be able to create new todo items, mark them as completed, and delete them. All changes should be saved in PocketBase, and any updates should reflect in the UI immediately (thanks to realtime subscriptions).
Let’s go through the steps:
1. Start PocketBase and Create a “todos” Collection
Make sure your PocketBase server is running (./pocketbase serve as described earlier). In the admin dashboard (open http://127.0.0.1:8090/_/ and log in as admin), create a new collection for the todos:
- Collection name:
todos(you can name it anything, but we’ll use “todos” here). - Collection type: Base (the default).
- Fields: Add two fields:
text– type Text (for the task description).done– type Bool or Boolean (for the completion status).
Save the collection. You now have a “todos” table with those fields. PocketBase automatically generates REST API endpoints for this collection. For example:
GET /api/collections/todos/recordswill list todos,POST /api/collections/todos/recordswill create a new todo,PATCH /api/collections/todos/records/{id}updates a todo,DELETE /api/collections/todos/records/{id}deletes a todo, etc.
(You can verify these in the API Preview section of the collection editor, which shows example requests and responses for each endpoint.)
Set collection access rules: By default, new collections are admin-only (locked). Since we haven’t set up user auth for this demo and we want anyone using our demo app to manipulate todos, let’s allow public access. In the collection editor, you’ll see API Rules for “List”, “View”, “Create”, “Update”, “Delete”. For each of these, set the rule to an empty value (blank) and save. An empty rule means anyone (even guests, i.e. no auth) can perform that action.

Note: Opening up all permissions is okay for a throwaway demo, but in a real app you might restrict these (e.g., require auth for creating todos or only allow owners to delete). PocketBase rules are very flexible; you could for instance allow only logged-in users to create (@request.auth.id != “”) or only allow updating if the todo’s done status is false, etc. For now, blank rules will let us test freely.
At this point, our PocketBase backend is fully configured for the Todo app:
- We have a
todoscollection ready to store tasks. - The API and realtime endpoints for
todosare active. - All clients (even without auth) can call the todos APIs (since we set rules open).
2. Set Up the Frontend (HTML and PocketBase JS SDK)
Now, let’s create a simple frontend to interact with this backend. You can use any setup (React app, Vue, plain HTML, etc.). To keep it beginner-friendly, we’ll use a single HTML file with some inline script – this keeps things easy to follow.
Create a file index.html (in a separate directory from PocketBase, or in the pb_public/ folder if you want PocketBase to serve it – either is fine). In the HTML, we’ll include the PocketBase JavaScript SDK and write some scripts to handle our Todo list.
Include the PocketBase SDK by adding a <script> tag pointing to the UMD bundle. For example, you can use unpkg CDN:
<!-- Include PocketBase JS SDK -->
<script src="<https://cdn.jsdelivr.net/npm/pocketbase@0.26.4/dist/pocketbase.umd.min.js>"></script>
(The version 0.26.4 is used here as an example; you can check for the latest version on npm.) This SDK gives us a global PocketBase class we can use.
Now, in a <script> tag (after including the SDK), initialize the PocketBase client and connect to our local server:
<script>
  // Initialize PocketBase client
  const pb = new PocketBase('<http://127.0.0.1:8090>');

  // Optionally, if auth was required, here is where we'd log in.
  // For example: await pb.collection('users').authWithPassword(email, pass);
</script>
At this point, pb is our handle to the PocketBase API. We can use pb.collection('todos') to interact with the todos collection.
Let’s set up a basic UI in the body of the HTML:
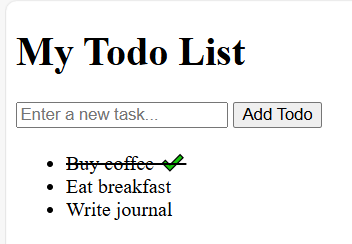
<h1>My Todo List</h1>
<input id="newTodoText" type="text" placeholder="Enter a new task..." />
<button id="addBtn">Add Todo</button>

<ul id="todoList"></ul>
This gives us an input field for new tasks, an “Add” button, and an unordered list to display tasks. We’ll use JavaScript to populate and update this list.
3. Integrating PocketBase API – CRUD Operations in the Frontend
Now we write the JavaScript to tie everything together. Below is a step-by-step of the logic we need, along with code snippets:
- Fetch and display existing todos on page load: We want to load any existing tasks from PocketBase when the app starts.
- Add a new todo: When the “Add” button is clicked, create a new record in the
todoscollection via the API, then update the UI. - Toggle completion: We should be able to mark a task as done/undone (this could be a checkbox or clicking the item). This will send an update to PocketBase.
- Delete a todo: Perhaps a delete button for each item to remove it.
- Realtime updates: Subscribe to
todosso that if any change occurs (from another client or another tab), we reflect it instantly.
Let’s implement each part:
a. Load and display todos on startup.
Using the JS SDK, we can retrieve all records in a collection with getFullList(). This returns an array of records (as JSON objects). For small lists, getFullList() is convenient (it grabs all records). For larger datasets, you could use pagination (getList(page, perPage)), but todos are usually few.
async function loadTodos() {
  try {
    const records = await pb.collection('todos').getFullList(/* batch size, etc can be specified */);
    // Clear current list UI
    todoListElem.innerHTML = "";
    // Render each todo item
    records.forEach(record => {
      addTodoToUI(record);
    });
  } catch (err) {
    console.error("Failed to load todos:", err);
  }
}
loadTodos()
Here, addTodoToUI(record) will be a helper that creates an <li> element for the todo and appends it to our list, including maybe a checkbox and delete button. For example:
function addTodoToUI(record) {
  const li = document.createElement('li');
  li.dataset.id = record.id;
  li.textContent = record.text + (record.done ? " ✔️" : "");
  // You can make this more elaborate: e.g., add a checkbox to toggle done, a delete [x] button, etc.
  // For brevity, we'll just indicate done with a checkmark.
  li.style.textDecoration = record.done ? "line-through" : "none";

  // Toggle done on click
  li.addEventListener('click', async () => {
    const newStatus = !record.done;
    try {
      // Update on server:
      const updated = await pb.collection('todos').update(record.id, { done: newStatus });
      record.done = updated.done;  // update local copy
      li.textContent = record.text + (record.done ? " ✔️" : "");
      li.style.textDecoration = record.done ? "line-through" : "none";
    } catch (err) {
      console.error("Failed to toggle todo:", err);
    }
  });

  // Delete on right-click (for example)
  li.addEventListener('contextmenu', async (e) => {
    e.preventDefault();
    try {
      await pb.collection('todos').delete(record.id);
      li.remove();  // remove from UI
    } catch (err) {
      console.error("Failed to delete todo:", err);
    }
  });

  todoListElem.appendChild(li);
}
(In the above code, clicking an item toggles its done status by sending a PATCH update, and right-clicking (context menu) deletes the item. This is just one way to implement; you could also add explicit buttons.)
b. Adding a new todo.
We handle the “Add” button click: read the input value and send a create request to PocketBase:
addBtn.addEventListener('click', async () => {
  const text = newTodoInput.value.trim();
  if (!text) return;
  try {
    const newRecord = await pb.collection('todos').create({ text: text, done: false });
    newTodoInput.value = "";  // clear input
    addTodoToUI(newRecord);   // add the new task to the list UI
  } catch (err) {
    console.error("Failed to create todo:", err);
  }
});
The create method sends a POST to create a new record. We provide the fields text and done. PocketBase will return the created record (including its id and timestamps). We then clear the input and update the list.
c. Real-time subscription (live updates).
Finally, let’s enable real-time updates so that if another client or browser tab adds/changes a todo, our list updates automatically. We already have the SDK subscribe method for that:
pb.collection('todos').subscribe('*', function(e) {
  console.log("Realtime event:", e.action, e.record);
  const record = e.record;
  if (e.action === 'update') {
    // A todo was modified (e.g., marked done)
    // Find it in the UI and update its display
    const li = document.querySelector(`li[data-id="${record.id}"]`);
    if (li) {
      li.textContent = record.text + (record.done ? " ✔️" : "");
      li.style.textDecoration = record.done ? "line-through" : "none";
    }
  } else if (e.action === 'delete') {
    // A todo was deleted
    const li = document.querySelector(`li[data-id="${record.id}"]`);
    if (li) li.remove();
  }
});
With this in place, you could open the app in two browser windows and see updates propagate between them instantly. The subscription listens to any create/update/delete on the todos collection and updates the DOM accordingly.
Putting it all together: The above code snippets would be inside our <script> tag. In summary:
- On page load, call
loadTodos()to fetch existing tasks. - Set up the event listeners for add, toggle, delete.
- Set up the realtime subscription.
Make sure to wrap your code in a DOMContentLoaded event or place the script at the bottom of the HTML so that elements like todoListElem (the UL) and newTodoInput are already in the DOM when the script runs. For example:
<script>
  const newTodoInput = document.getElementById('newTodoText');
  const addBtn = document.getElementById('addBtn');
  const todoListElem = document.getElementById('todoList');

  const pb = new PocketBase('<http://127.0.0.1:8090>');
  // (Auth not required for open rules; otherwise we'd authenticate here)

  // Define addTodoToUI, loadTodos as above...

  // Load existing todos
  loadTodos();

  // Setup Add button
  addBtn.addEventListener('click', async () => { /* ... */ });

  // Setup realtime subscription
  pb.collection('todos').subscribe('*', (e) => { /* ... */ });
</script>
Now you can open index.html in a browser (if using a simple static server or just double-clicking the file, but note: if you open as a file:// URL, the PocketBase calls might be blocked by CORS since it’s a different origin. It’s best to serve it via a local server, or place it in pb_public and access via http://127.0.0.1:8090). If everything is set up, you should be able to add todos and see them persist. Try opening another browser tab to the app and add a todo – it should appear in the first tab in real-time, thanks to the subscription.
4. Testing the Todo App (CRUD in action)
Let’s verify each operation is working using our setup:
- Create: Type a task in the input and click “Add Todo”. You should see it appear in the list. In the PocketBase admin UI, you can also navigate to Collections > todos > Records and confirm the new record is created.
- Read/List: On page load (or after adding), all tasks from the backend should display. If you add some tasks via the admin UI or via another client, our subscription will catch them.
- Update: Click an existing todo item in the list; it should toggle the strike-through and add/remove the checkmark as we update the
donefield. The change is saved in PocketBase (refresh the page or check the admin UI to confirm thedonevalue toggled). Also note, if you have two windows open, clicking in one triggers a realtime update in the other. - Delete: Right-click (as we implemented) or otherwise trigger the deletion for an item. It should disappear from the list and be removed from PocketBase (verify in admin UI that it’s gone). And if two clients are open, the other will get the delete event and remove it too.
Congratulations – you have a working backend-powered application! We built a simple Todo app where PocketBase handled the heavy lifting on the backend: storing data, providing a secure API, and broadcasting real-time updates. We didn’t write any server code, we just configured PocketBase and wrote frontend code to use its API.
Why PocketBase Is Great for Prototyping and Solo Projects
As you experienced, PocketBase allows you to set up a backend in minutes, which is a huge win for rapid development. Some key benefits for prototyping and individual developers include:
- Speed and Simplicity: Download one file and run it – you have a database, REST API, auth system, and admin UI ready to go. No need to configure multiple services. This lets you focus on building your app, not the boilerplate.
- Full Control & No Cloud Lock-In: PocketBase runs locally or on your own server. It’s open source and self-hosted, so you aren’t tied to a cloud BaaS pricing or platform. You can start locally for free, and later deploy to a cheap VPS or even a free hosting for small apps.
- Feature-Rich Out of the Box: Common features like user login, file uploads, and real-time updates are already built in. You don’t need to find separate libraries or write custom code for these. For example, enabling OAuth providers for login or configuring email verification is just a matter of settings, not custom coding.
- Admin Dashboard: The included web UI is a huge plus for solo developers – you can inspect and manually tweak data, set rules, and manage your app without building an admin interface yourself. This is a big time saver and lowers the barrier to backend management.
- Prototype to Production: PocketBase is still evolving (not 1.0 yet at the time of writing), but it’s designed to be lightweight yet scalable for moderate usage. You can start with it for a prototype or MVP. If your app grows, you can either continue with PocketBase (perhaps sharding data by using multiple instances or migrating the SQLite to a stronger DB with some effort) or use it as an interim solution before moving to a more complex stack. The important thing is it gets you to a working app quickly.
- Use Cases: It’s ideal for small web apps, mobile app backends, internal tools, hackathons, or learning projects. Anytime you need a quick backend and don’t want the DevOps headache, PocketBase is a good choice. For example, personal todo apps, blogging platforms, small e-commerce prototypes, chat apps, etc., can all be kicked off with PocketBase with minimal fuss.
In summary, PocketBase brings back the joy of fast development without complicated setups. For a frontend developer venturing into backend, it provides a gentle introduction: you learn about APIs, databases, and auth in a hands-on way, without getting bogged down in boilerplate or server configs. And with features like real-time updates, you can even build sophisticated apps that would be hard to implement from scratch.