


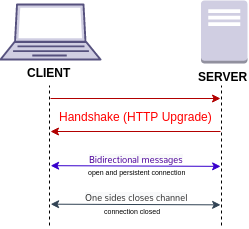
WebSockets serve as a technology facilitating the maintenance of an open connection between your server and client, allowing them to exchange requests. This proves particularly useful when synchronization between clients is necessary, or when sending messages or notifications to all clients is a requirement.
What is SignalR?
SignalR is a nifty technology that enables real-time communication in web applications, making it feel more dynamic and interactive. It’s like giving your website a direct line to the server, allowing it to push updates to the user’s browser instantly, instead of relying on the traditional request-response model. Think of it as a friendly chat between your frontend and backend, where they exchange messages seamlessly. This not only enhances user experience by providing live updates but also opens the door to various collaborative and real-time features. So, whether you’re building a live chat application, a collaborative editing tool, or anything that thrives on instant updates, SignalR is the behind-the-scenes magic that makes it happen.
Features of SignalR
Here are the features that collectively make SignalR a powerful tool for building real-time web applications that require efficient and responsive communication between the server and clients:
- Real-Time Communication: SignalR enables real-time bi-directional communication between the server and clients, allowing instant updates and interactions.
- Cross-Platform Support: It works seamlessly across various platforms, including web browsers, mobile devices, and desktop applications, providing a consistent real-time experience.
- Hub-based Architecture: SignalR uses a hub-based model where clients can call methods on the server and vice versa, simplifying the organization of real-time communication.
- Automatic Connection Management: SignalR handles the complexities of connection management, reconnecting automatically if a connection is lost and maintaining a persistent connection when possible.
- Grouping Connections: It allows organizing connections into groups, making it easy to broadcast messages to specific sets of clients, such as users in a chat room or participants in a specific event.
- Scalability: SignalR supports scaling out across multiple servers, making it suitable for applications with varying levels of traffic and ensuring performance under load.
- Fallback Mechanisms: In scenarios where WebSocket communication is not supported, SignalR automatically falls back to alternative transport mechanisms such as long polling, Server-Sent Events, or WebSockets over HTTP.
- Security: It provides built-in security features, including support for authentication and authorization, to ensure that only authorized users can access specific features or receive certain types of messages.
- Integration with ASP.NET Core: SignalR is seamlessly integrated with ASP.NET Core, making it easy to incorporate real-time functionality into web applications built on the ASP.NET Core framework.
- Customization and Extensibility: SignalR is designed to be extensible, allowing developers to customize and extend its functionality based on their application requirements.
Prerequisites
Before starting the development with SignalR, the following perquisites must be met:
- Operating System: Windows, macOS, or Linux
- Code Editor: Visual Studio (more feature rich) or Visual Studio Code (provides a lightweight experience).
- .NET SDK: .NET SDK is required to be installed on the development machine.
Initialise the project
Start up Visual Studio 2022 and opt for starting a new project. When the new project dialog pops up, choose ASP.NET Core Web App and hit Next.

In the Configure your new project dialog, type in SignalRChat as the Project name in the dialog box. Remember to keep the capitalization the same, as it needs to match the code in the tutorial for proper namespace alignment. Select Next.
In the Additional information dialog, select .NET 7.0, and after that, click on Create.

Install the SignalR client library
The ASP.NET Core shared framework already has the SignalR server library. However, the JavaScript client library isn’t added automatically to your project. In this guide, we’ll use Library Manager (LibMan) to fetch the client library from unpkg, a swift global content delivery network for npm packages. In the Solution Explorer, do a right-click on the project and choose Add > Client-Side Library. In the Add Client-Side Library window:
- Pick unpkg as the Provider.
- Type @microsoft/signalr@latest for the Library.
- Opt for Choose specific files, open the dist/browser folder, and pick signalr.js and signalr.min.js.
- Configure the Target Location to be wwwroot/js/signalr/.
- Finally, hit Install.

LibMan generates a wwwroot/js/signalr directory and transfers the chosen files into it.
Create the SignalR hub
A SignalR Hub is a central component in SignalR that enables real-time communication between a server and connected clients in web applications. It simplifies bi-directional communication, allowing the server to push updates to clients instantly. Hubs support method invocation, grouping of clients, and automatic connection management. With built-in protocols, SignalR Hubs abstract away transport details, making it easy for developers to create dynamic and responsive web applications with real-time features.
- In the SignalRChat project directory, make a new folder named Hubs.
- Inside the Hubs folder, produce the ChatHub class and insert the following code:
using Microsoft.AspNetCore.SignalR;

namespace SignalRChat.Hubs
{
    public class ChatHub : Hub
    {
        public async Task SendMessage(string user, string message)
        {
            await Clients.All.SendAsync("ReceiveMessage", user, message);
        }
    }
}
The ChatHub class is derived from the SignalR Hub class, which handles connections, groups, and messaging.
The SendMessage function can be invoked by any connected client to dispatch a message to all clients. The JavaScript client code demonstrating the method invocation will be presented in a subsequent part of the tutorial. SignalR code is designed to be asynchronous for optimal scalability.
Add dependency
Configure the SignalR server to route SignalR requests correctly and add the following code into the Program.cs file:

using SignalRChat.Hubs;

var builder = WebApplication.CreateBuilder(args);

// Add services to the container.
builder.Services.AddRazorPages();
builder.Services.AddSignalR();

var app = builder.Build();

// Configure the HTTP request pipeline.
if (!app.Environment.IsDevelopment())
{
    app.UseExceptionHandler("/Error");
    // The default HSTS value is 30 days. You may want to change this for production scenarios, see https://aka.ms/aspnetcore-hsts.
    app.UseHsts();
}

app.UseHttpsRedirection();
app.UseStaticFiles();

app.UseRouting();

app.UseAuthorization();

app.MapRazorPages();
app.MapHub<ChatHub>("/chatHub");

app.Run();
The highlighted code adds SignalR to the ASP.NET Core dependency injection and routing systems.
Adding the client code
Replace the existing content in Pages/Index.cshtml with the following code:
@page
<div class="container">
    <div class="row p-1">
        <div class="col-1">User</div>
        <div class="col-5"><input type="text" id="userInput" /></div>
    </div>
    <div class="row p-1">
        <div class="col-1">Message</div>
        <div class="col-5"><input type="text" class="w-100" id="messageInput" /></div>
    </div>
    <div class="row p-1">
        <div class="col-6 text-end">
            <input type="button" id="sendButton" value="Send Message" />
        </div>
    </div>
    <div class="row p-1">
        <div class="col-6">
            <hr />
        </div>
    </div>
    <div class="row p-1">
        <div class="col-6">
            <ul id="messagesList"></ul>
        </div>
    </div>
</div>
< script src="/js/signalr/dist/browser/signalr.js"></script>
< script src="/js/chat.js"></script>
The markup above:
- Generates text boxes and a submit button.
- Establishes a list with id=”messagesList” to exhibit messages received from the SignalR hub.
- Embeds script references for SignalR, with the chat.js app code to be created in the next step.
In the wwwroot/js folder, create a chat.js file with the following code:
"use strict";

var connection = new signalR.HubConnectionBuilder().withUrl("/chatHub").build();

//Disable the send button until connection is established.
document.getElementById("sendButton").disabled = true;

connection.on("ReceiveMessage", function (user, message) {
    var li = document.createElement("li");
    document.getElementById("messagesList").appendChild(li);
    // We can assign user-supplied strings to an element's textContent because it
    // is not interpreted as markup. If you're assigning in any other way, you
    // should be aware of possible script injection concerns.
    li.textContent = `${user} says ${message}`;
});

connection.start().then(function () {
    document.getElementById("sendButton").disabled = false;
}).catch(function (err) {
    return console.error(err.toString());
});

document.getElementById("sendButton").addEventListener("click", function (event) {
    var user = document.getElementById("userInput").value;
    var message = document.getElementById("messageInput").value;
    connection.invoke("SendMessage", user, message).catch(function (err) {
        return console.error(err.toString());
    });
    event.preventDefault();
});

The JavaScript above:
- Establishes and initiates a connection.
- Appends a handler to the submit button for sending messages to the hub.
- Appends a handler to the connection object for receiving messages from the hub and appending them to the list.
Run the App
Copy the URL from the address bar, open another browser instance or tab, and paste the URL into the address bar. In either browser, input a name and message, then click the “Send Message” button. The entered name and message will be promptly displayed on both pages.

Conclusion
In conclusion, we have delved into understanding SignalR, exploring its features for developers, and worked on building real-time chatting applications.