


1. Introduce
In today’s diverse web environment, it’s crucial to ensure your web application works seamlessly across all browsers. Without cross-browser testing, your site might look great on Chrome but break on Safari or Firefox, leading to poor user experiences for a significant portion of your audience. These inconsistencies can damage your brand, frustrate users, and ultimately hurt your business.
Ensuring your web application works smoothly across different browsers and devices is one of the big challenges while doing automation. We have variety of options if our project requires cross testing. In this post, we’ll look at the Playwright – a robust tool that automates cross-browser testing across Chromium, Firefox, and WebKit AND BrowserStack.
Playwright is a powerful tool that lets you automate testing across major browsers, while BrowserStack offers real browsers and devices in the cloud, making it easy to run tests without the hassle of setting up your own environment.
In this post, we’ll look at how combining these two tools can simplify your testing process and help you deliver a better user experience. With this integration, you can run Playwright tests at scale on over 100 browser versions seamlessly.
2. How to run your tests on BrowserStack
2.1. Sign up and get BrowserStack Credentials
- Sign Up: If you don’t already have a BrowserStack account, sign up at BrowserStack.
- Access Keys: Once logged in, navigate to the Account Settings to get your Username and Access Key. These credentials are necessary for authenticating your Playwright tests on BrowserStack.

2.2. Prepare your Playwright tests
I assume you already have a Playwright test set up with Typescript
2.3. Install the BrowserStack SDK dependency
To integrate Playwright with BrowserStack, you need to install the browserstack-node-sdk package:
npm install browserstack-node-sdk 2.4. Configure BrowserStack in Playwright project
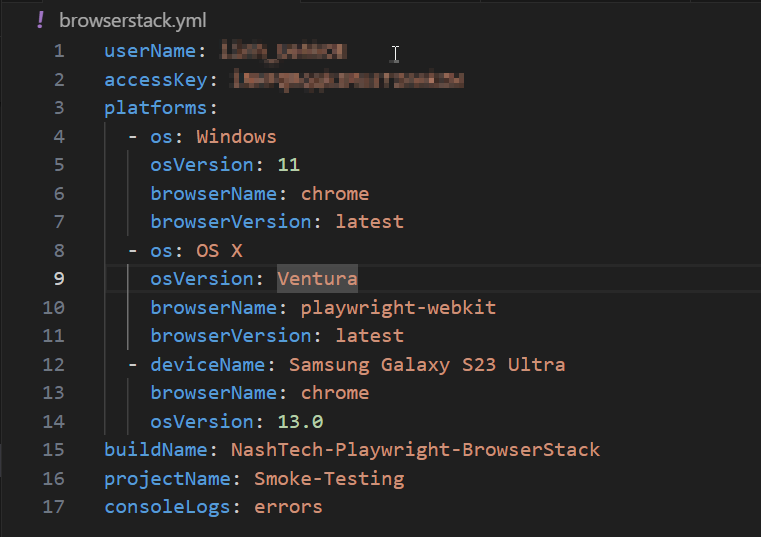
Step 1: Create a new browserstack.yml file
Create a new browserstack.yml file in your project’s root directory to define your testing environments. This file can include information about the browsers and devices you want to test on, parallel test execution, test observability, and other specific run settings.
In the YAML file for running Playwright tests on BrowserStack, several fields are required to properly configure the test execution environment:
- userName: BrowserStack username from Step 2.1
- accessKey: BrowserStack access key from Step 2.2
- platforms: this defines the environments (OS, browser, version, etc.) for running your tests.
- os: the operating system to run tests on.
- osVersion: the version of the operating system.
- browserName: the name of the browser.
- browserVersion: optional but recommended – the version of the browser (useful for cross-browser testing).
- deviceName: required for mobile testing – the name of the mobile device.
In order to define the browsers or devices you want to test under the platforms object, you can refer to the BrowserStack documentation. Simply select the browser, device, and its version for testing, and a corresponding YAML file will be generated.
Step 2: Add test script in package.json
Update your package.json to include a script for running Playwright tests on BrowserStack:
npx browserstack-node-sdk playwright test --config=./playwright.config.ts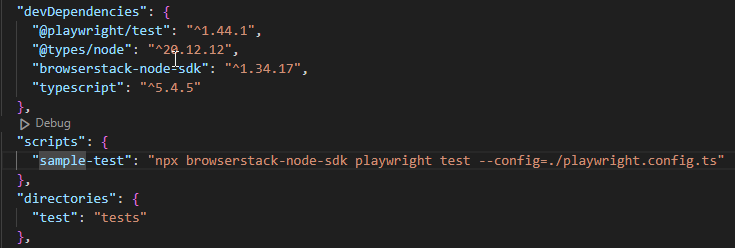
2.5. Execute test
Run your tests using the command. This command will start executing your Playwright tests on the BrowserStack cloud infrastructure according to the configuration specified in the playwright.config.ts and browserstack.yml files.
npm run sample-test3. Run tests by grep
When performing cross-browser testing, running the entire suite of test cases on every browser can be both time-consuming and costly. Instead, a more efficient approach is to selectively run only the most critical tests, such as smoke tests or UI tests, on different browsers.
In Playwright, you can use the grep feature. By tagging your tests with specific markers, you can easily filter and execute only those tests that are most important for cross-browser validation. For instance, you might tag key UI tests with @UI and smoke tests with @SmokeTest.
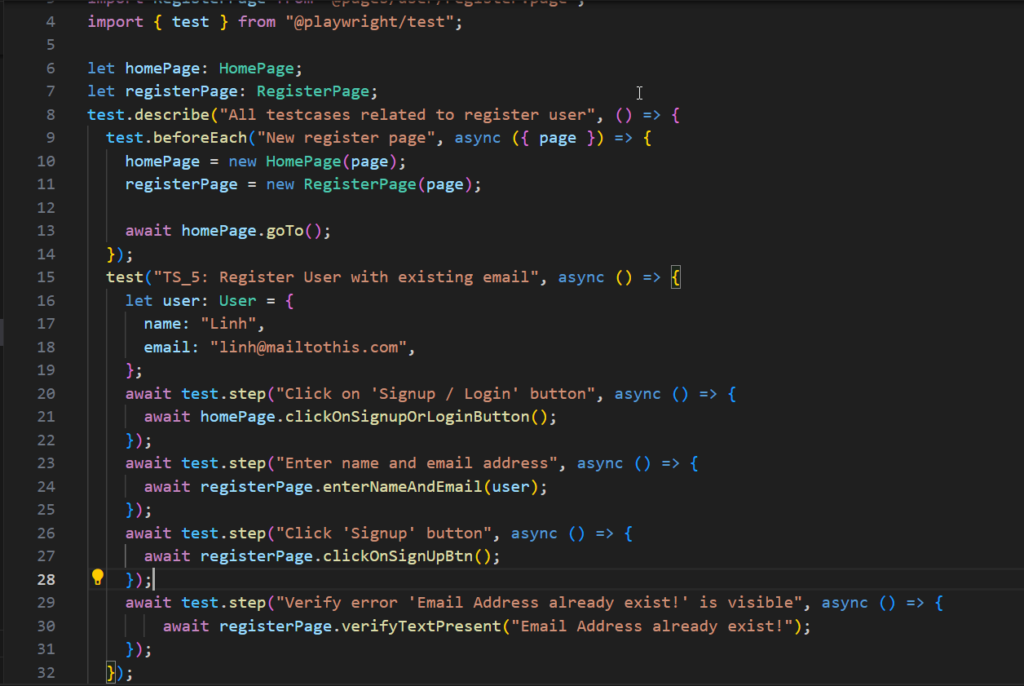
3.1. Add a specific tag for your testcase
Add the tag @SmokeTest to description of the testcase
3.2. Add scripts for smoke test
Add the following line to the scripts section of your package.json:
"smoke-test": "npx browserstack-node-sdk playwright test --config=./playwright.config.ts --grep @SmokeTest"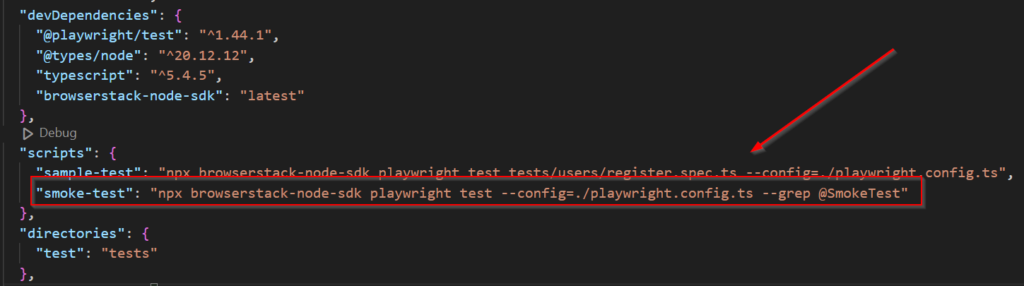
3.3. Execute test
Run your smoke tests using the command.
npx run smoke-test
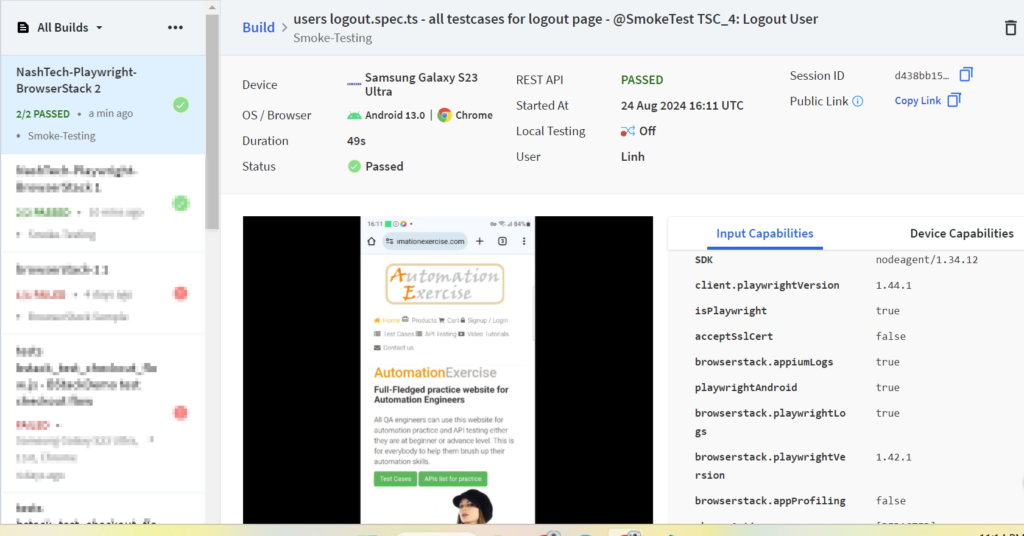
4. Test results
4.1 BrowserStack Automate dashboard.
Once your tests are complete, you can easily monitor and debug your automated test runs via BrowserStack Automate dashboard. Access comprehensive execution videos, and test logs for both successful and unsuccessful cases, along with execution duration.
4.2 Test Observability
Besides BrowserStack Automate dashboard, BrowserStack launched Test Observability in August 2023. It was designed to provide deeper insights into why tests fail and how they can be improved. For instances: automatically identify flaky tests, new test failures, or consistently failing tests. It also analyzes all error occurrences in a build run and groups similar failures together, making it easier to identify patterns and resolve issues faster, etc.
You can find more details here.
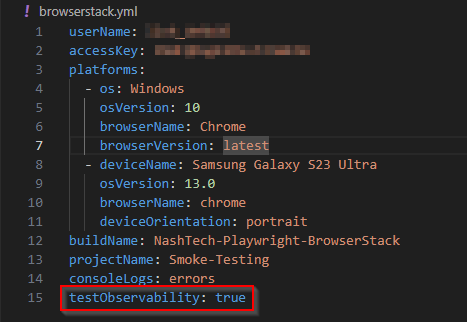
Step 1: Make sure you set the correct value in the YAML file:
Step 2: You can access Test Observability to view the results after executing tests:

5. Conclusion
Throughout this post, we’ve covered how to set up and run Playwright tests on BrowserStack from your local machine. Integrating Playwright with BrowserStack provides a powerful solution for cross-browser and cross-platform testing. This combination allows you to execute comprehensive tests across a wide range of browsers and devices, ensuring your web applications are reliable and performant for all users.
Besides, you can embrace this integration and unlock the full potential of automated testing in the cloud.