


Hello everyone. In this blog, we’ll learn about iOS automation testing, how to use Sauce Labs to execute automated iOS test suites and more. We’ll also discuss why iOS testing is more difficult than Android testing with users of Windows and Linux. To give you a better understanding of iOS application testing after this blog, I’ll try to present it as a step-by-step manual that goes through all the necessary building pieces. As I’ve previously mentioned, we’ll also look at how to integrate our iOS tests with Sauce Labs. So without further delay, let’s begin our brief excursion.
Even though there are many alternative solutions available in the market for mobile application testing, why do we choose Appium?
When discussing iOS testing, we cannot overlook XCUITest, a well-known alternative testing tool. XCUITest is a test automation framework for UI testing on iOS devices like iPads and iPhones. It supports testing for mobile apps and web applications. However, since XCUITest works only on iOS and does not support Android testing, many prefer Appium for cross-platform mobile automation.
Why Appium?
Appium stands out because it lets us write one test script for both iOS and Android. This makes it an efficient, scalable, and cost-effective solution for mobile automation. It supports multiple programming languages and integrates seamlessly with cloud-based testing services like Sauce Lab and browserstack etc. It also offers flexibility by interacting with native, hybrid, and mobile web apps.
Why do we use Sauce Labs and BrowserStack for automation testing?
Both are cloud-based web and mobile testing platforms. Each user gets a personal cloud of actual desktop and mobile devices, instantly available for testing websites and apps.
I assumed you were already aware of the automation testing needed/requirement for iOS-based applications. To start the ios mobile testing, we need iOS SDK and a Mac machine or even a real iOS device, which is the biggest challenge because it is very expensive, and ios testing is not possible with window and Linux-based systems due to the lack of an ios emulator for this OS, because ios emulator is also possible for mac OS. To address this issue, we use cloud-based services, which are available anywhere at a minimal cost and do not rely on the tester’s operating system.
Section 1: Getting Started with Running Appium Tests on iOS Devices
To begin the setup first, You will require an access key and a username. You must register for a free trial or buy a plan to get your access credentials on Sauce Labs.
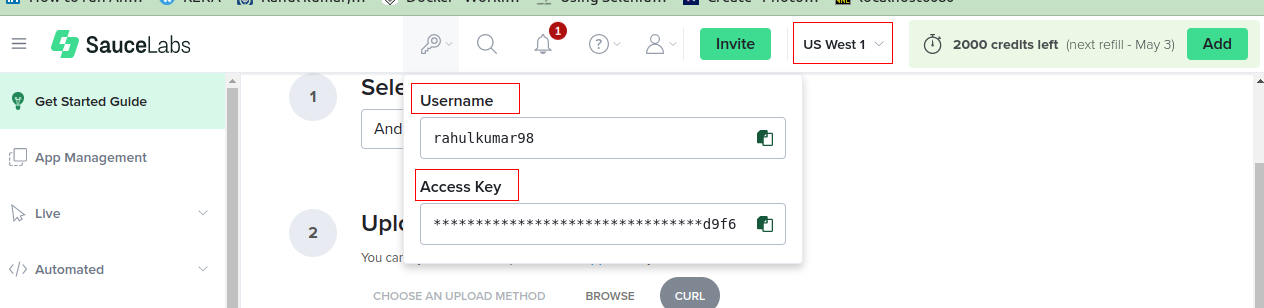
Since I am using a free account, my credit score is 2000, shown on the right side of the image. It will refill after 7 days, giving Sauce Labs an advantage over BrowserStack.
Uploading Your iOS Application
Similar to BrowserStack, Sauce Labs provides two options for uploading your iOS app:
- Manual Upload – Upload the app directly via the Sauce Labs dashboard.
- Using cURL – Upload the app via the command line for automation and CI/CD integration.
curl -u UserName:Access KEY--location \
--request POST https://api.us-west-1.saucelabs.com/v1/storage/upload \
--form payload=@"/path/to/<your-app>.apk" \
--form 'name="<your-app>.apk"'
replace the highlighted area with our test data
https://app.saucelabs.com/getting-started/manualtesting

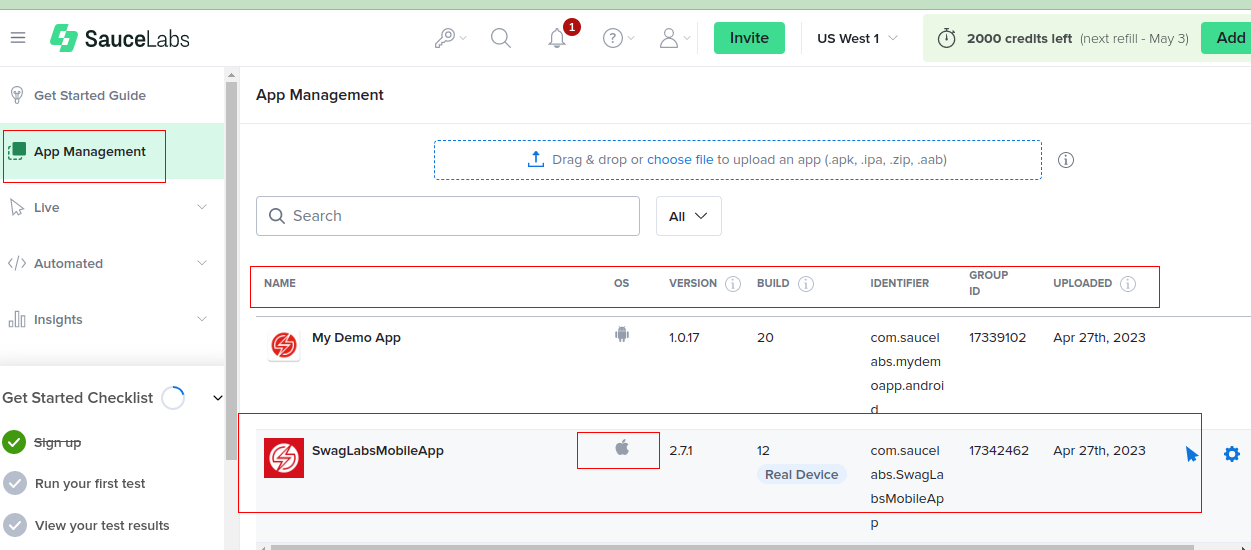
Before running your first iOS test, you need to ensure that your app is successfully uploaded to the Sauce Labs server. You can verify this by navigating to the Sauce Labs Dashboard, where all uploaded apps are listed.
Section 2: Writing Your First iOS Appium Test
Now, the real action begins! In this section, we’ll walk you through the process of writing and executing your first iOS test using Appium on Sauce Labs. You’ll learn how to interact with iOS elements, perform key actions, and make assertions using the powerful Appium framework.
We’ll also provide practical code examples and best practices to ensure your tests are effective, reliable, and optimized for execution on Sauce Labs’ cloud-based testing platform. Before diving in, let’s go over the essential steps required to set up and execute your first iOS test on Sauce Labs
1. Setup your POM File:
You need to include specific Maven dependencies in your project to integrate with Sauce Labs. These dependencies provide the essential libraries and tools required to establish a connection with Sauce Labs and execute your tests seamlessly. Here are the key Maven dependencies you need:
- Selenium WebDriver: Dependency:
org.seleniumhq.selenium:selenium-java
       <dependency>
            <groupId>org.seleniumhq.selenium</groupId>
            <artifactId>selenium-java</artifactId>
            <version>4.8.1</version>
       </dependency>
✨ Purpose: Selenium WebDriver is a powerful tool designed to automate browser interactions seamlessly. It enables users to interact with web elements, simulate user actions, and efficiently test web applications with ease.
- Appium Java Client: Dependency:
io.appium:java-client
        <dependency>
            <groupId>io.appium</groupId>
            <artifactId>java-client</artifactId>
            <version>8.3.0</version>
        </dependency>
✨ Purpose: The Appium Java Client library offers a powerful set of classes and methods to seamlessly interact with mobile devices and applications using Appium.
- JUnit(optional) : Dependency:
org.JUnit
 <dependency>
            <groupId>junit</groupId>
            <artifactId>junit</artifactId>
            <version>4.13.2</version>
        </dependency>
Purpose: ✨ JUnit is a powerful testing framework designed to streamline test management, configuration, and reporting. With its advanced features, you can efficiently organize, execute, and enhance your Appium test automation, ensuring a more structured and reliable testing process.
- Sauce Bindings: Enables seamless integration with Sauce Labs.
    <dependency>
        <groupId>com.saucelabs</groupId>
        <artifactId>sauce_bindings</artifactId>
        <version>4.10.0</version>
</dependency>- Cucumber: Allowing tests to be written in Gherkin syntax (Given-When-Then), which makes them readable for both technical and non-technical stakeholders
    <dependency>
        <groupId>io.cucumber</groupId>
        <artifactId>cucumber-java</artifactId>
        <version>7.15.0</version>
    </dependency>
In the POM file, you’ll notice that I’ve designed a test automation framework leveraging Appium and JUnit. Additionally, at the bottom, I’ve included a crucial dependency that enables seamless execution of tests on Sauce Labs, even in a local environment.
As you can see in the POM file, I built a framework based on Appium, JUnit, and Cucumber.
2. Configure Appium Server:
Set up your Appium server to seamlessly connect with Sauce Labs by configuring the Sauce Labs URL, along with your username and access key.
        HashMap<String, Object> sauceOptions = new HashMap<String, Object>();
       // Appium Version is mandatory to use Appium 2
        sauceOptions.put("build", "testBuild");
        sauceOptions.put("name", "appLaunch");

        URL url = new URL("https://oauth-UserName:AccessKeyxxxxxxxxxxx@ondemand.eu-central-1.saucelabs.com:443/wd/hub");
3. Define Desired Capabilities:
Desired capabilities serve as the blueprint for configuring your Appium tests on Sauce Labs. These parameters specify crucial details such as the device name, platform version, browser name, screen orientation, and other essential settings to ensure seamless test execution. Accurately defining your desired capabilities is key to optimizing test performance across your chosen devices and meeting your automation goals.
 DesiredCapabilities desiredCapabilities = new DesiredCapabilities();

        desiredCapabilities.setCapability("appium:deviceName", "iPhone XR");
        desiredCapabilities.setCapability("appium:os_version", "iOS 16.3");
        desiredCapabilities.setCapability("app", "storage:filename= .ipa-file name");
        desiredCapabilities.setCapability("appium:automationName", "XCUITest");
        desiredCapabilities.setCapability("platformName", "iOS");
        desiredCapabilities.setCapability("sauce:options", sauceOptions);

        IOSDriver  driver = new IOSDriver(url, desiredCapabilities);
As you can see in the above block, we declare the desired capabilities, which play a key role in mobile testing, and we need to configure these desired capabilities as per our needs. If you’re already familiar with these, that would be great. If not, you can read my other blog Why We Need Desired Capabilities in Appium, This short blog post may provide a fruitful amount of knowledge in a short amount of time because I tried to elaborate more about desired capabilities in a beautiful manner.
For iOS testing appium Supported automation names for platform ‘IOS’ are: [xcuitest, flutter] only.
Section 3: Executing the Test on SauceLabs
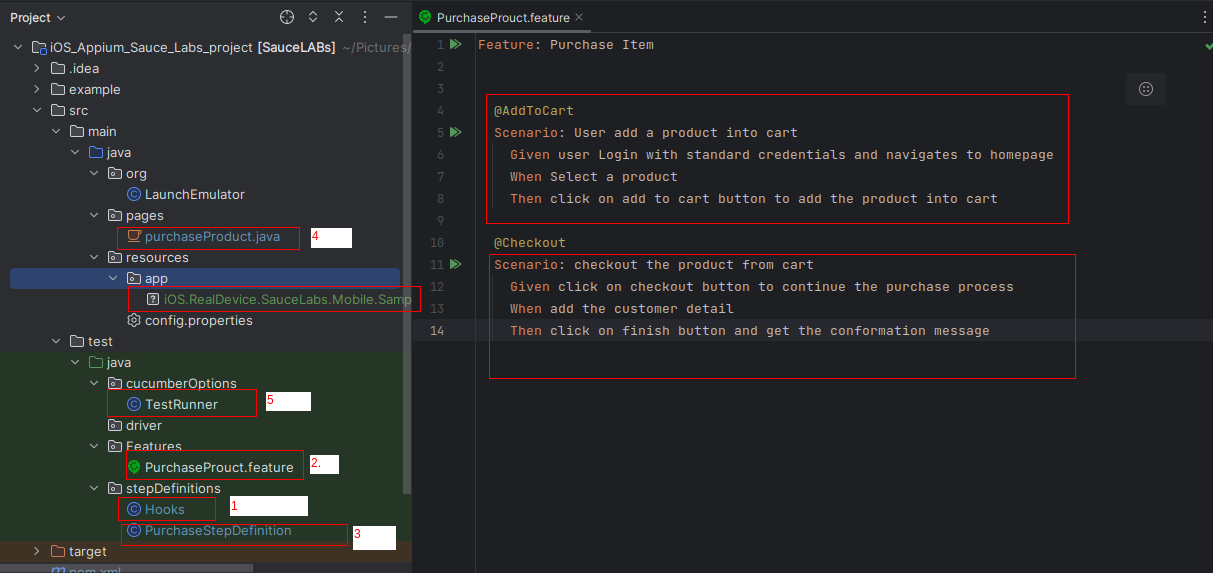
Since you’re already familiar with the functionality of the Cucumber-based framework, you can run your tests directly from the TestRunner. As shown in the screenshot, I have added two demo scenarios to the project’s feature file, along with their corresponding step definition and page classes. Alternatively, you can execute the following command in the terminal to run the test:
mvn test -Dtest=TestRunner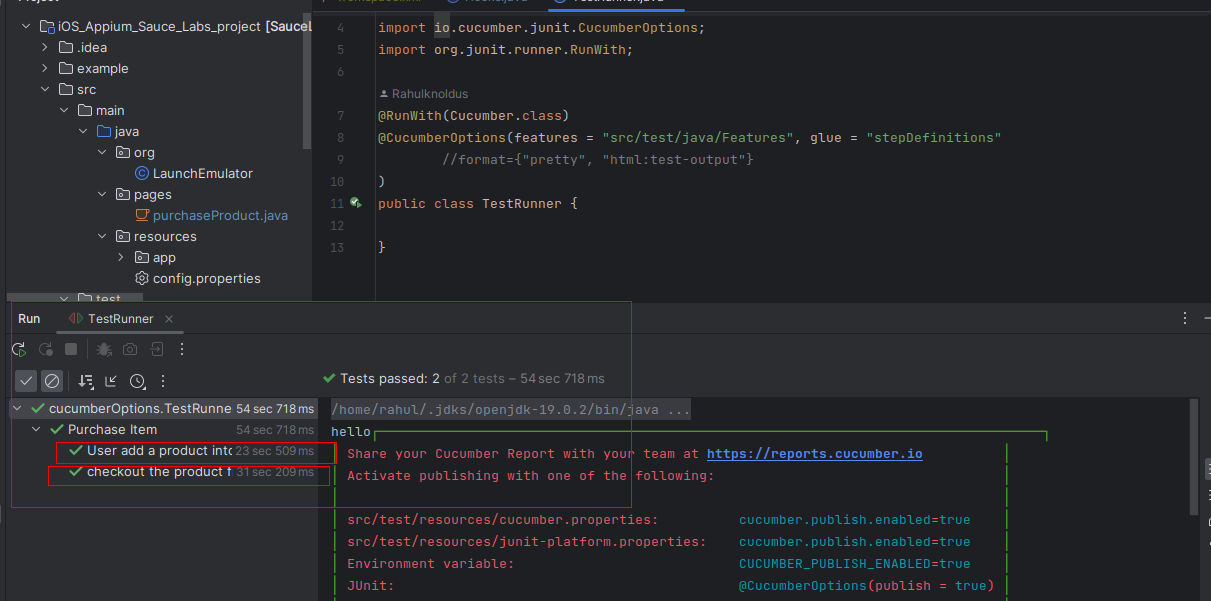
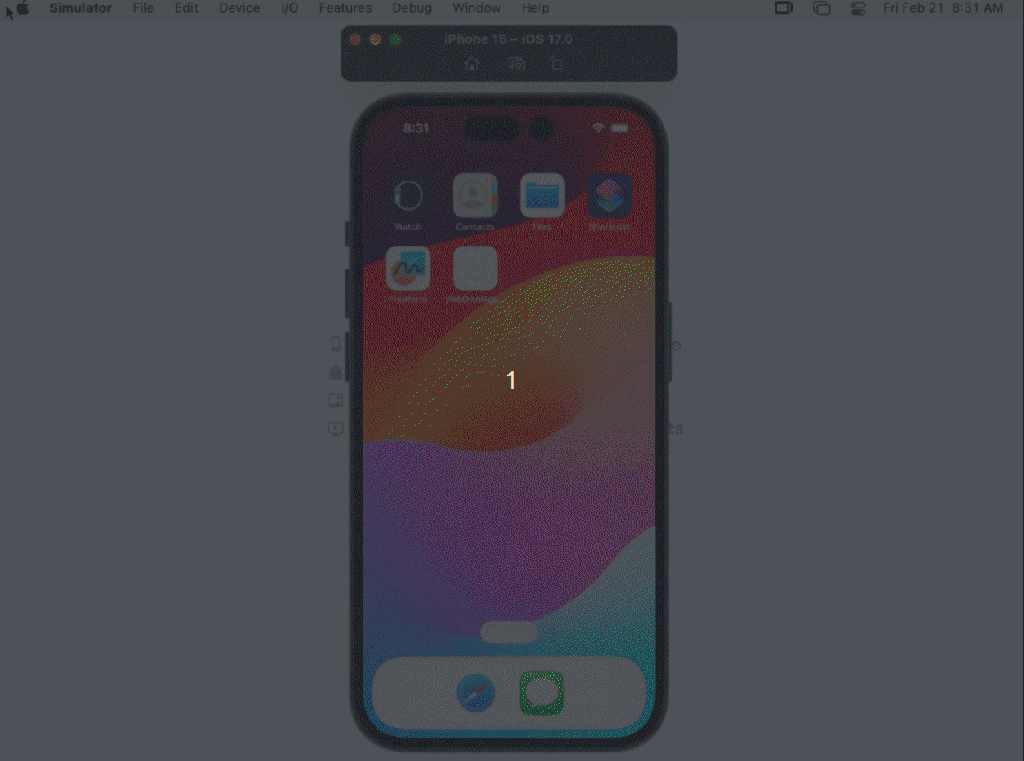
When a user or tester executes a test from an IDE like IntelliJ, they can view live logs in the terminal. Additionally, they can monitor the real-time execution of the test on the Sauce Labs dashboard for better visibility and debugging.
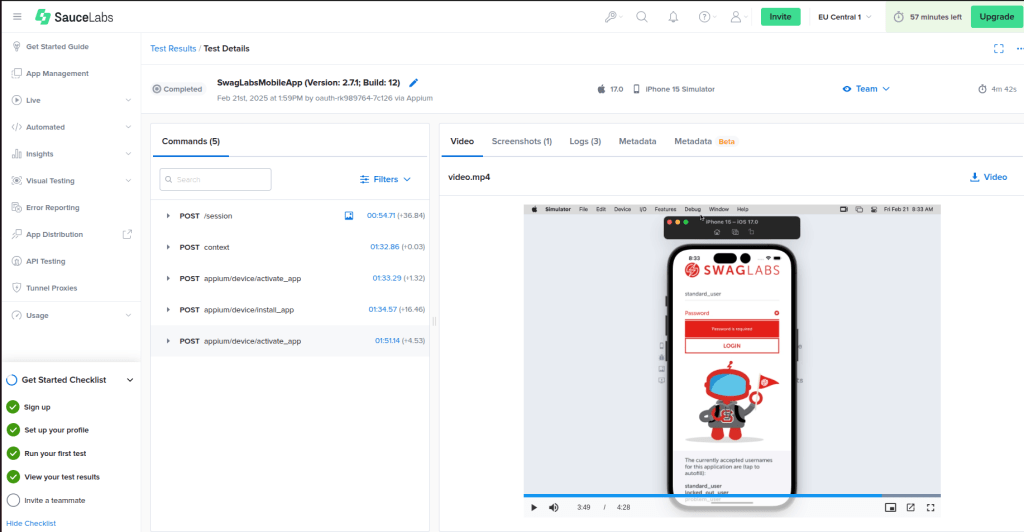
Even though you can view the entire test execution recording in the Sauce Labs Test Results section after test completion, testers can debug issues by analyzing what happened during execution, identifying the reasons for test failures, and gaining insights into other potential problems.
Conclusion
This is just the beginning of iOS test automation on Sauce Labs! In upcoming posts, I’ll cover advanced techniques, troubleshooting tips, and test optimization strategies. Plus, I’m launching a Tech Hub with a complete Appium iOS framework to streamline mobile test automation. Stay tuned for more insights, hands-on examples, and expert guidance to take your iOS automation skills to the next level! 🚀
Till then, Happy learning, and happy sharing!