


Welcome back to this Keycloak series, where we’ve been understanding Keycloak step by step.
Before moving ahead, let’s quickly recap what we’ve covered so far:
- Keycloak Basics: Concepts, Protocols, and Configuration introduced core concepts, protocols, realms, clients, users, and roles.
- Keycloak Tokens and Authentication Flow covered token issuance, contents, authentication, and validation.
With an Identity Provider and tokens in place, we’ll now secure backend APIs. This post integrates Keycloak with Spring Boot for JWT authentication and role-based access control, completing the end-to-end flow.
End-to-End Flow
- User authenticates → Keycloak login
- Keycloak issues JWT access token
- Client calls API:
Authorization: Bearer <access_token> - Spring Boot validates token signature/expiry (no Keycloak calls needed)
- Spring Security extracts roles → Makes authorization decision
- API responds (200 OK or 403 Forbidden)
1. Prerequisites and Setup
Before securing APIs, ensure the following (already done in previous blogs):
- Keycloak is configured
- Realm, client, users, and roles are set up
- Access tokens are issued correctly
Spring Boot application:
- Two basic APIs
- You can refer to this repository: keycloak-demo
Environment:
- Spring Boot 3.x
- Java 17+
- Maven or Gradle
2. Add Dependency
<dependency>
    <groupId>org.springframework.boot</groupId>
    <artifactId>spring-boot-starter-oauth2-resource-server</artifactId>
</dependency>
The spring-boot-starter-oauth2-resource-server dependency already brings in Spring Security, enables JWT validation, and configures the application as a resource server. Therefore, adding spring-boot-starter-security separately is unnecessary in this setup.
Spring Boot acts as an OAuth 2.0 Resource Server:
- It does not handle login or manage users.
- Instead, it trusts Keycloak as the Identity Provider.
- It checks the JWT in the
Authorization: Bearer <token>header by validating the signature, expiry, and issuer. - If the token is missing or invalid, it returns 401 Unauthorized.
- So, this is pure API security — there are no login pages, sessions, or form authentication.
3. Configure Keycloak Issuer
As, Spring Boot only needs to know:
- Where Keycloak is
- Which realm to trust
Add this to application.properties (Replace demo-realm if you used a different realm) :
spring.security.oauth2.resourceserver.jwt.issuer-uri=http://localhost:8080/realms/demo-realm4. Enable JWT Security
With the dependency added, we configure security using a SecurityFilterChain.
Here, we define which endpoints require authentication and which roles can access them. We also configure the application as an OAuth2 Resource Server using JWT. By using Customizer.withDefaults(), we rely on Spring Security’s default setup to validate JWTs.
Since this is a stateless API, CSRF is disabled and no HTTP sessions are created.
@Configuration
@EnableWebSecurity
public class SecurityConfig {

    @Bean
    public SecurityFilterChain filterChain(HttpSecurity http) throws Exception {
        http
                .cors(cors -> {})
                .csrf(AbstractHttpConfigurer::disable)
                .authorizeHttpRequests(
                        auth -> auth
                                .requestMatchers("/info/**").authenticated()
                                .requestMatchers("/admin/**").hasRole("admin")
                                .requestMatchers("/user/**").hasAnyRole("user")
                                .anyRequest().authenticated()
                )
                .oauth2ResourceServer(oauth2 -> oauth2.jwt(Customizer.withDefaults()))
                .sessionManagement(t -> t.sessionCreationPolicy(SessionCreationPolicy.STATELESS));

        return http.build();
    }
}
5. Testing the Authentication
Let’s now use the same user we created in the previous blogs:
User: john.doe
Credentials: (as previously configured)
Role: user
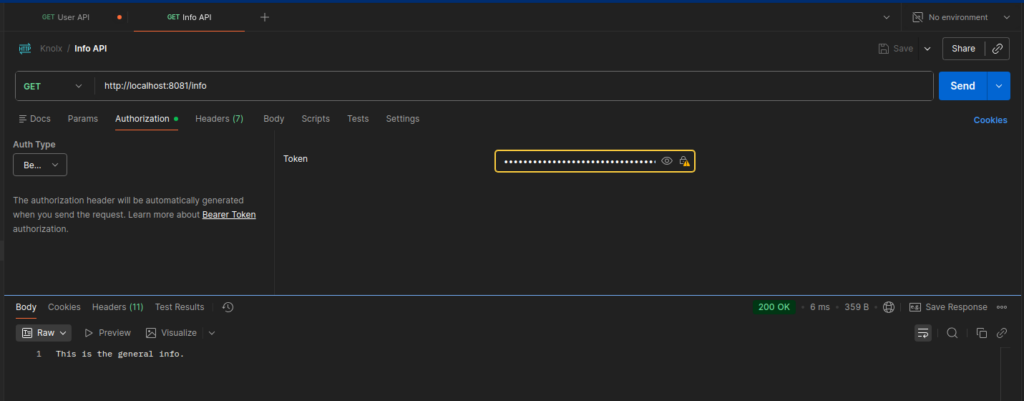
- Login via Keycloak and obtain the access token.
- Call the APIs using:
Authorization: Bearer <access_token>
Expected Behavior
- Accessing
/info→ ✅ Works, since this endpoint requires only authentication and does not enforce any role-based check.
- Accessing
/user/**→ ❌403 Forbidden, because the role check fails even though the token is valid.

Why Role-Based Checks Fail
Keycloak stores roles in the token like this:
“realm_access”: {
“roles”: [“admin”, “user”]
}
Spring Security expects roles in the format ROLE_<role-name>, such as ROLE_admin or ROLE_user.
Keycloak does not add the ROLE_ prefix to its roles.
Because of this, when Spring Security checks hasRole("user"), it does not find a matching role.
So, even if the token is valid, the request is denied with 403 Forbidden.
6. Making Role Checks Work
There are two approaches to fix the mismatch between Keycloak roles and Spring Security checks:
Approach 1. Quick Fix: Update role checks to include ROLE_
.authorizeHttpRequests(auth -> auth
    .requestMatchers("/info/**").authenticated()
    .requestMatchers("/admin/**").hasRole("ROLE_admin")
    .requestMatchers("/user/**").hasAnyRole("ROLE_user")
    .anyRequest().authenticated()
)
Approach 2. Recommended: Map Keycloak roles using a JwtAuthenticationConverter
This configuration extracts roles from realm_access.roles in the JWT and adds the ROLE_ prefix.
It converts them into GrantedAuthority objects so Spring Security can correctly authorize requests using hasRole().
    @Bean
    public JwtAuthenticationConverter jwtAuthenticationConverter() {
        JwtAuthenticationConverter converter = new JwtAuthenticationConverter();

        converter.setJwtGrantedAuthoritiesConverter(jwt -> {
            List<GrantedAuthority> authorities = new ArrayList<>();

            Map<String, Object> realmAccess = jwt.getClaim("realm_access");
            if (realmAccess != null) {
                List<String> roles = (List<String>) realmAccess.get("roles");
                if (roles != null) {
                    roles.forEach(r ->
                            authorities.add(new SimpleGrantedAuthority("ROLE_" + r))
                    );
                }
            }
            return authorities;
        });
        return converter;
    }
Update JWT part in the security configuration class to plug the converter into your resource server configuration:
Remove:
.oauth2ResourceServer(oauth2 -> oauth2.jwt(Customizer.withDefaults()))
Add:
      .oauth2ResourceServer(
                        oauth2 -> oauth2.jwt(
                                jwt -> jwt.jwtAuthenticationConverter(jwtAuthenticationConverter())
                        )
                )
7. Testing the Authorization
Expected Behavior
- Accessing
/info→ ✅ Works - Accessing
/user/**→ ✅ Works

- Accessing
/admin/**→ ❌403 Forbidden
For /admin/** to work, assign John Doe both roles (admin and user) in Keycloak, generate a new token, and access will succeed for all three endpoints.
Conclusion
This completes the Keycloak series.
We started with Keycloak fundamentals: realms, clients, users, and roles.
Then we explored tokens and the full authentication flow.
Finally, we integrated Keycloak with a Spring Boot application, validated JWTs, mapped roles, and enforced role-based API security.
From setup → token understanding → secured APIs, the flow is now complete.
You now have a fully working, stateless Spring Boot API secured by Keycloak and driven entirely by roles inside the access token.