


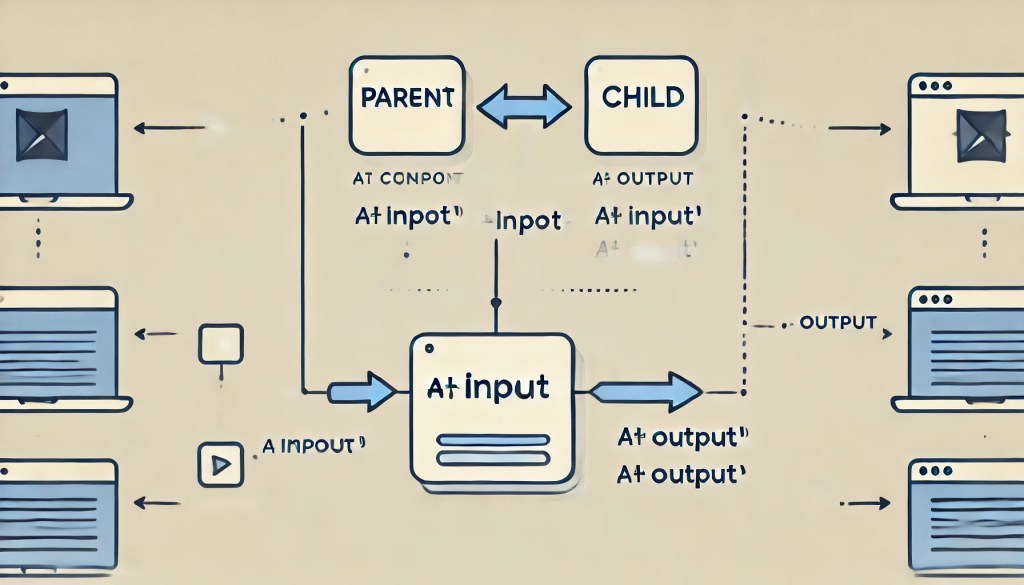
In today’s time, Angular is a big name for building single-page applications (SPAs). SPAs dynamically update the content of a single web page without requiring a full reload from the server. Instead of navigating to different pages, the SPA loads content dynamically. This provides a seamless and fast user experience. Angular (modern Angular) is the successor to AngularJS, offering a faster, component-based architecture built with TypeScript. Components are the main building blocks for Angular applications. A component controls a patch of screen called a view. It consists of a TypeScript class, an HTML template, and a CSS style sheet. Components relate as parent-child and child-parent, and we can share data between related components in angular through two ways:
One Way Binding
One-Way Binding refers to the flow of data in only one direction. That is either from parent to child or from child to parent. In this case, the data does not update automatically in the reverse direction. Making the flow of information more controlled and predictable.
Parent to child
When a component is used in another component, the parent component contains the child component. For example, if we have another component, app-note inside the html file of the component, app-root. Then app-root becomes the parent and app-note becomes the child.
Now if we wish to share some data from the app-root to app-note. We can use property binding by binding a property of app-root to an @Input() property of app-note. To achieve this, declare a property in the app-note component and annotate it with the @Input() decorator. Example:
Command to generate the note component :
ng generate component Components/noteapp.component.ts : Declare and define a property named noteInParent with type string and import the NoteComponent.
import { Component} from '@angular/core';
import { CommonModule } from '@angular/common';
import { NoteComponent } from "./Components/note/note.component";

@Component({
  selector: 'app-root',
  imports: [CommonModule, NoteComponent],
  templateUrl: './app.component.html',
  styleUrl: './app.component.css'
})
export class AppComponent {
  title = 'nashtech-notes';
  noteInParent: string = "Hello";
}
note.component.ts : Declare a string variable noteInChild and annotate it with @Input decorator.
import { Component, Input } from '@angular/core';

@Component({
  selector: 'app-note',
  imports: [],
  templateUrl: './note.component.html',
  styleUrl: './note.component.css'
})
export class NoteComponent {
  @Input()
  noteInChild!: string;
}
app.component.html : Embed the app-note (child component) within the app-root (parent component). Pass the input property of child in square brackets and the app-root property in inverted commas.
<div><app-note [noteInChild] = "noteInParent"></app-note></div>note.component.html : Display the child’s input property.
<p>{{noteInChild}}</p>Child to parent
To send data from app-note(child) to app-root(parent), we can use event binding. In event binding, the app-note component emits an event, which the app-root component binds to a method. To achieve this, declare an EventEmitter property with the type of data to send and then annotate it with @Output() decorator. And in the parent component, listen to the event and perform some method on its notification. Example:
note.component.ts : Declare an EventEmitter property of type string, noteEmitter and annotate it with @Output decorator. Declare a method sendNote which will emit the event data (note) using the noteEmitter.
import { Component, EventEmitter,Output } from '@angular/core';

@Component({
  selector: 'app-note',
  imports: [],
  templateUrl: './note.component.html',
  styleUrl: './note.component.css'
})
export class NoteComponent {
  @Output() noteEmitter = new EventEmitter<string>();
  sendNote() {
    this.noteEmitter.emit('Hello from child!');
  }
}
note.component.html : Add a button and call the sendNote() function on notification of a click event on the button.
<button (click) = "sendNote()">Click here to send hello to parent</button>app.component.ts : declare a method recieveNoteFromChild() which expects a note argument.
import { Component} from '@angular/core';
import { CommonModule } from '@angular/common';
import { NoteComponent } from "./Components/note/note.component";

@Component({
  selector: 'app-root',
  imports: [CommonModule, NoteComponent],
  templateUrl: './app.component.html',
  styleUrl: './app.component.css'
})
export class AppComponent {
  title = 'nashtech-notes';
  recieveNoteFromChild(noteFromChild: string) {
    console.log(noteFromChild);
  }
}
app.component.html : Listen to the event emitted by the child, noteEmitter and perform the method recieveNoteFromChild. Receive the data emitted from the child as an argument to the method.
<div><app-note (noteEmitter)="recieveNoteFromChild($event)"></app-note></div>Two Way Binding
In two-way binding, data flows in both directions between the components. In this case, data flows both from the parent to the child and from the child to the parent. This means that any changes made in the parent component will automatically reflect in the child component, and vice versa.
Two-way binding achieves by combining property binding and event binding together. Declare the string and EventEmitter property and annotate them with @Input() and @Output() respectively in the child component. Then pass the note property and perform the action in the parent on listening to the event from the child. To simplify, this can be replaced with a cleaner syntax: the banana-in-a-box syntax, [()
note.component.ts : Declare a string variable noteInChild and annotate it with @Input decorator. Declare an EventEmitter property of type string, noteEmitter and annotate it with @Output decorator. Declare a method sendNote which will emit the event data (note) using the noteEmitter.
import { Component, EventEmitter,Input,Output } from '@angular/core';

@Component({
  selector: 'app-note',
  imports: [],
  templateUrl: './note.component.html',
  styleUrl: './note.component.css'
})
export class NoteComponent {
  @Input()
  noteInChild!: string;
  @Output() noteInChildChange = new EventEmitter<string>();
  sendNote() {
    this.noteInChildChange.emit('Hello from child!');
  }
}
note.component.html : Display the note from child, which will be same as the noteInParent property in the parent component. Add a button and call the sendNote() function and emit the note event from the child. Simultaneously, the changes can be seen in both the child and parent component’s properties.
<hr>
Note from child: {{noteInChild}}
<hr>
<button (click) = "sendNote()">Click here to emit note event</button>
app.component.ts : Declare and define a property named noteInParent with type string and import the NoteComponent.
import { Component} from '@angular/core';
import { CommonModule } from '@angular/common';
import { NoteComponent } from "./Components/note/note.component";

@Component({
  selector: 'app-root',
  imports: [CommonModule, NoteComponent],
  templateUrl: './app.component.html',
  styleUrl: './app.component.css'
})
export class AppComponent {
  title = 'nashtech-notes';
  noteInParent: string = "Hello from parent!";
}
app.component.html : embed the app-note (child component) within the app-root (parent component) and pass the input property of child in banana-in-a-box syntax, [()] and the app-root property in inverted commas.
<div>Note from parent : {{noteInParent}}<app-note [(noteInChild)] = "noteInParent"></app-note></div>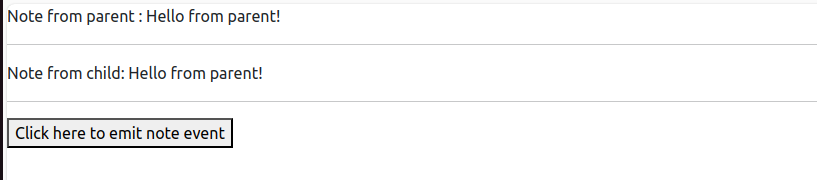
Conclusion
In summary, Angular offers flexible component communication through one-way binding for data flow between parent and child components. And two-way binding for synchronized data exchange. For more complex interactions, you can use shared services to manage data across components. These features make Angular a powerful framework for building dynamic and maintainable applications. If you’re interested in learning more, check out these blog links: