


Introduction
Databricks, the unified analytics platform, opens the door to a world of possibilities for data professionals. One of its core features is the powerful and collaborative environment provided by Databricks Notebooks. In this walkthrough, let’s get the understanding of Databricks Notebooks and the process of creating your first notebook in the Databricks portal-a canvas where data exploration, coding, and collaboration converge.
Features that Elevate Databricks Notebooks:
- Databricks Notebooks support multiple programming languages, including Scala, Python, R, and SQL.
- It supports for real-time collaboration where Teams can work on the same notebook simultaneously, view each other’s changes in real-time, and engage in collaborative coding and analysis.
- Databricks Notebooks offer built-in version control, allowing users to track changes, revert to previous versions, and maintain a clear history of edits—a crucial feature for maintaining code integrity.
- Notebooks seamlessly integrate with Apache Spark. Users can write Spark code directly in the notebook, leveraging the power of distributed computing for scalable data processing and analytics.
- Notebooks can be exported in various formats, including HTML, PDF, and IPython.
Creating a Databricks Notebook:
Prerequisites:
- Databricks Account If you don’t have one, you may need to signup https://www.databricks.com/try-databricks for free trail.
- Now that you have the prerequisites in place, follow the steps to create a Databricks notebook and run the code. In example we have used Python code.
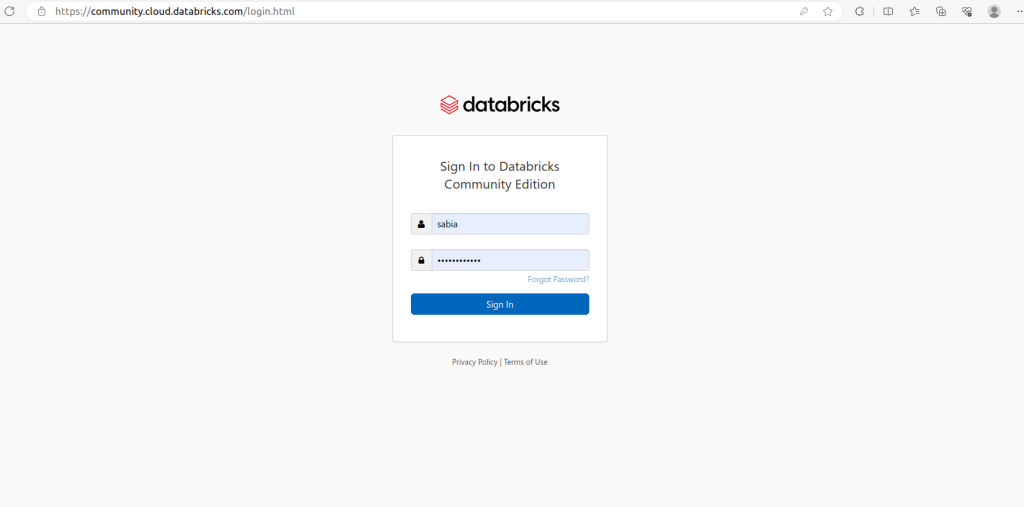
1: Accessing Databricks Workspace
- Open your web browser and navigate to the Databricks workspace https://community.cloud.databricks.com/login.html.
- Log in with your Databricks credentials.
2: Creating a New Notebook
- In the left sidebar, click on the “Workspace” tab.
- Navigate to the folder where you want to create the notebook. If needed, create a new folder by clicking “New” and selecting “Folder.”
- With the desired folder selected, click the “Create” button and choose “Notebook.”
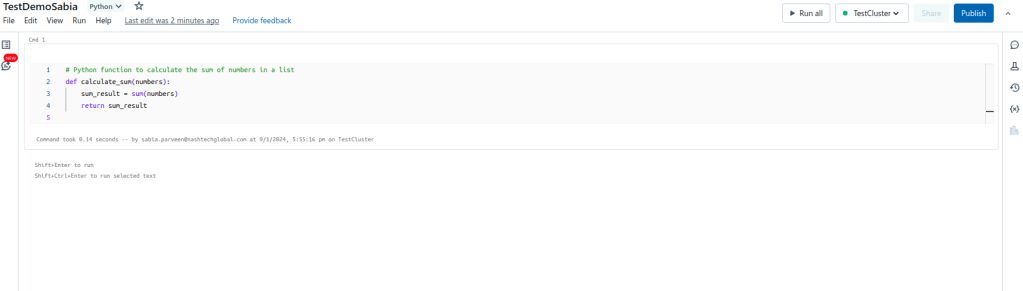
- In the “Create Notebook” dialog, provide a name for your notebook (e.g., “TestDemoSabia”) and choose the default language as “Python.” Optionally, associate the notebook with an existing cluster or create a new cluster.
- Click the “Create” button to create your new Python notebook.

3: Writing Python Code
- Once your notebook is created, you’ll see an empty canvas. This is where you can write your Python code.
- In the first cell, enter the following Python code to define the
calculate_sumfunction:
4: Running the Code
- Click the “Run” button in the toolbar above the notebook or use the keyboard shortcut (Shift + Enter). This will execute the code cell, and you’ll see the function defined.
- In the next cell, enter the following Python code to create a list of numbers and call the
calculate_sumfunction: - Run the code cell again. This will execute the code, and you’ll see the output below the cell.

5: Reflecting on the Output
- Take a moment to reflect on the output displayed in the notebook. You should see the result of the sum operation.
6: Saving the Notebook
- Click the “File” menu and select “Save” to save your notebook.
7: Exporting the Notebook (Optional)
- If you want to share your notebook, you can export it in various formats. Click the “File” menu, hover over “Export,” and choose the desired format (e.g., HTML, PDF).
Conclusion
You’ve successfully created a Databricks notebook, written Python code, and executed it to calculate the sum of numbers. As you navigate the Databricks portal, remember that each notebook is a story waiting to be told—a story that unfolds through code, visualizations, and collaborative discovery. Stay connected to more such blogs https://blog.nashtechglobal.com/creating-an-azure-databricks-workspace/